
An Interest In:
Web News this Week
- April 24, 2024
- April 23, 2024
- April 22, 2024
- April 21, 2024
- April 20, 2024
- April 19, 2024
- April 18, 2024
Some of Our Sources
- Six Revisions
- TutsPlus - Design
- Web Designer Depot
- FanExtra - PSD
- Web Design Ledger
- Wal You
- Design Modo
- Web Resource Source
- Codrops
- Daily Now
Help Webnuz
Referal links:
Setting up a CI/CD with Jenkins
** What you need ? **
- Dockerhub and Github Account
- Server with linux setup. For this case ubuntu
- Your application is already need to be configured on your test instances*This tutorial assumes you have set up a Jenkins file in your project. View reference make necessary changes
1. Installing Jenkins on your Server
*sudo apt update
search of all available packages & pick one from the options
sudo apt search openjdk*
For this case I will be using version 11, so sudo apt install openjdk-11-jdk
Confirm installation with running version checkjava -version
Now we are ready to install Jenkins. We start off by appending the Debian package repository address to the server's sources.list
wget -q -O - https://pkg.jenkins.io/debian-stable/jenkins.io.key | sudo apt-key add - sudo sh -c 'echo deb https://pkg.jenkins.io/debian-stable binary/ > \
    /etc/apt/sources.list.d/jenkins.list'
We'll run update so that apt will use the new reposudo apt-get update
Installing Jenkinssudo apt-get install jenkins=2.289.3
That's all
2. Setting up your Github and retrieving an API key
Login into your Github, and head over to your developer settings : Profile -> Settings -> Developer settings -> Personal access tokens
Note: I wouldn't consider this optional but it's good practice to set an expiration duration for your token.
Select admin:repo_hook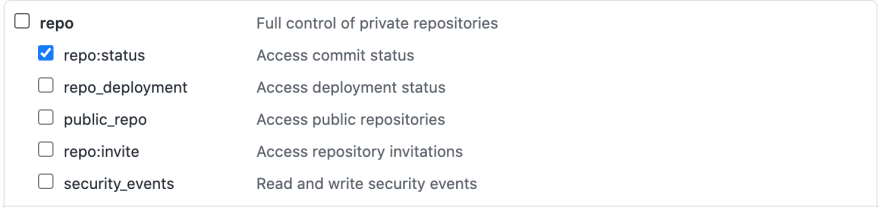
Lastly set repo: repo_status. Jenkins likes to access the repo commit status
Click "Generate token" and save your token somewhere.
3. Setting up Jenkins
3.1 Setting up an Administrator
1.SSH in your Jenkins instance
2.To retrieve your temporary passwordsudo "cat /var/lib/jenkins/secrets/initialAdminPassword"
3.Visit your-instance-ip:8080
4.Paste retrieved password into Jenkins start up page.
5.Go ahead and set up a permanent admin user on Jenkins
3.2 Setting up your Jenkin Projects
1.Log into Jenkins
2.Set up credentials in Jenkins will use to login into servers
Credentials -> click global -> click "add credentials" : username: deploy, password :+++++, id: webserver_login
3.Set up docker hub credentials:
username: username, password :access-token, id: docker_hub_login
4.Set up global properties in Jenkins for staging server
Click "Manage Jenkins" - "Configure System" - "Global properties and select Environment Variables" -> Add
input "name: staging_ip" and "value:staging-ip-address"
5.Set up Jenkins project
Give name -> select Multibranch pipeline for project type
Under branch sources: click add source -> GitHub
Enter the details and use your GitHub access token as password and Github username as the username, set id : "github_key"
Select github_key for credentials
Input your GitHub name into owner field
Set repository as intended repo
Go a head and Click save
Jenkins will scan your repo and run an initial build
In Jenkins, In the project- click master -> click. Build now
Next up
Powering up and down developer AWS instances using Slack and Jenkins
Original Link: https://dev.to/kennethatria/setting-up-a-ci-cd-with-jenkins-4hln
Dev To
More About this Source Visit Dev To