
An Interest In:
Web News this Week
- April 1, 2024
- March 31, 2024
- March 30, 2024
- March 29, 2024
- March 28, 2024
- March 27, 2024
- March 26, 2024
Some of Our Sources
- Slashdot
- Engadget
- Web Designer Wall
- The Logo Smith
- Vandelay Design
- Inspiredology
- CSS Globe
- Wal You
- Specky Boy
- Codrops
Help Webnuz
Referal links:
Create Working YouTube Clone with search box. YouTube API.
Hello, welcome. Today we'll see, how we can easily create a youtube clone using HTML, CSS and JS only. No other library. We'll also use youtube API to fetch real data from youtube.
Our clone has a lot of features. like, It's look like youtube. All the video data is coming from youtube directly. We have working search bar also which redirects user to official youtube search page. And whenever user click on video card, he/she will be redirect to youtube's official video page.
To see demo or you want full coding tutorial video. You can watch the tutorial below.
Video Tutorial
So, without wasting more time let's see how to code this.
Code
Download Project Images, Download Source Code
First, for this project we have 3 files index.html, style.css and app.js. Well is uses very basic CSS so i'll not be explaing you each CSS property. But, if you have any doubt feel free to ask me in comments. We'll understand each line of JavaScript.
First let's create Navbar. Our Navbar HTML structure.
<nav class="navbar"> <div class="toggle-btn"> <span></span> <span></span> <span></span> </div> <img src="img/logo.PNG" class="logo" alt=""> <div class="search-box"> <input type="text" class="search-bar" placeholder="search"> <button class="search-btn"><img src="img/search.PNG" alt=""></button> </div> <div class="user-options"> <img src="img/video.PNG" class="icon" alt=""> <img src="img/grid.PNG" class="icon" alt=""> <img src="img/bell.PNG" class="icon" alt=""> <div class="user-dp"> <img src="img/profile-pic.png" alt=""> </div> </div></nav>Output
Now give some CSS to it.
*{ margin: 0; padding: 0; box-sizing: border-box;}*:focus{ outline: none;}body{ position: relative; background: #f0f0f0; font-family: 'roboto', sans-serif;}.navbar{ position: fixed; top: 0; left: 0; width: 100%; height: 60px; background: #fff; display: flex; align-items: center; padding: 0 2.5vw;}.toggle-btn{ width: 20px; height: 10px; position: relative; cursor: pointer;}.toggle-btn span{ position: absolute; width: 100%; height: 2px; top: 50%; transform: translateY(-50%); background: #979797;}.toggle-btn span:nth-child(1){ top: 0;}.toggle-btn span:nth-child(3){ top: 100%;}.logo{ height: 30px; margin: -10px 30px 0;}.search-box{ position: relative; max-width: 500px; width: 50%; height: 35px; display: flex;}.search-bar{ width: 85%; height: 100%; border: 2px solid #dbdbdb; padding: 0 20px; font-size: 16px; text-transform: capitalize;}.search-btn{ width: 15%; height: 100%; background: #f0f0f0; border: 2px solid #dbdbdb; padding: 5px 0; border-left: none;}.search-btn img{ height: 100%;}.user-options{ height: 35px; display: flex; margin-left: auto; align-items: center;}.user-options .icon{ height: 80%; margin-right: 20px; cursor: pointer;}.user-dp{ cursor: pointer; height: 30px; width: 30px; border-radius: 50%; overflow: hidden;}.user-dp img{ width: 100%; height: 100%; object-fit: cover;}Output
Now create Side navbar.
<div class="side-bar"> <a href="#" class="links active"><img src="img/home.PNG" alt="">home</a> <a href="#" class="links"><img src="img/explore.PNG" alt="">explore</a> <a href="#" class="links"><img src="img/subscription.PNG" alt="">subscription</a> <hr class="seperator"> <a href="#" class="links"><img src="img/library.PNG" alt="">library</a> <a href="#" class="links"><img src="img/history.PNG" alt="">history</a> <a href="#" class="links"><img src="img/your-video.PNG" alt="">your video</a> <a href="#" class="links"><img src="img/watch-later.PNG" alt="">watch leater</a> <a href="#" class="links"><img src="img/liked video.PNG" alt="">like video</a> <a href="#" class="links"><img src="img/show more.PNG" alt="">show more</a></div>CSS
.side-bar{ position: fixed; top: 60px; left: 0; min-width: 250px; width: 250px; height: calc(100vh - 60px); background: #fff; padding-right: 10px;}.links{ display: block; width: 100%; padding: 10px 20px; display: flex; align-items: center; text-transform: capitalize; color: #242424; font-size: 14px; font-weight: 500; text-decoration: none;}.links img{ height: 25px; margin-right: 20px;}.links:hover,.links.active{ background: rgba(0, 0, 0, 0.1);}.seperator{ border: none; border-bottom: 1px solid rgba(0, 0, 0, 0.1); margin: 20px 0;}Output
Now, Filters options
<div class="filters"> <button class="filter-options active">all</button> <button class="filter-options">CSS</button> <button class="filter-options">web development</button> <button class="filter-options">python</button> <button class="filter-options">entertainment</button> <button class="filter-options">marvel</button> <button class="filter-options">javascript</button> <button class="filter-options">artificial intelligence</button> <button class="filter-options">machine learning</button> <button class="filter-options">trending</button></div>CSS
.filters{ position: fixed; left: 250px; top: 60px; width: calc(100% - 250px); height: 60px; background: #fff; border-top: 1px solid #dbdbdb; border-bottom: 1px solid #dbdbdb; padding: 0 20px; display: flex; align-items: center; overflow-x: auto; overflow-y: hidden;}.filters::-webkit-scrollbar{ display: none;}.filter-options{ flex: 0 0 auto; padding: 10px 20px; border-radius: 50px; background: #f0f0f0; border: 1px solid #dbdbdb; text-transform: capitalize; margin-right: 10px; color: #242424; font-size: 15px; cursor: pointer;}.filter-options.active{ color: #fff; background: #242424;}Output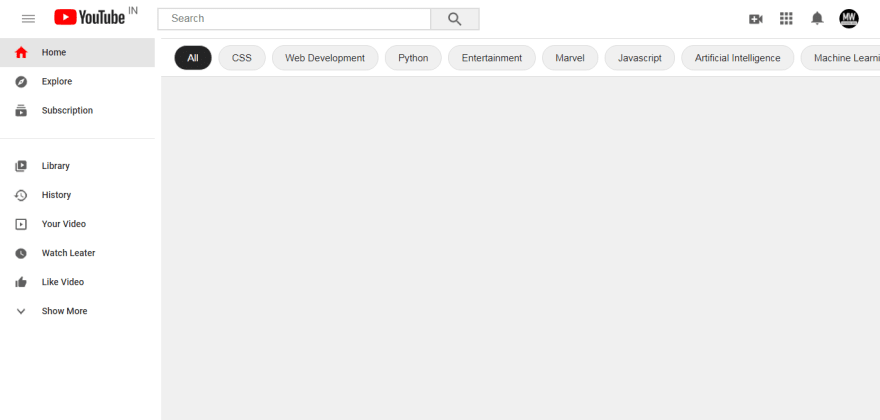
Now the last and the main thing. Make video cards. We'll create card from JS dynamically. So for just styling purpose we are creating a single card in HTML. And make sure to create a container for all video cards.
<div class="video-container"> <div class="video"> <img src="img/profile-pic.png" class="thumbnail" alt=""> <div class="content"> <img src="img/profile-pic.png" class="channel-icon" alt=""> <div class="info"> <h4 class="title">youtube clone 2021 | create working youtube clone</h4> <p class="channel-name">modern web</p> </div> </div> </div></div>CSS
.video-container{ width: calc(100% - 250px); margin-top: 120px; margin-left: 250px; padding: 20px; display: grid; grid-template-columns: repeat(4, 25%); grid-gap: 20px 5px; overflow-x: hidden;}.video{ min-height: 250px; height: auto;}.thumbnail{ width: 100%; height: 150px; object-fit: cover;}.content{ width: 100%; height: 100px; padding: 10px; display: flex; justify-content: space-between;}.channel-icon{ width: 40px; height: 40px; border-radius: 50%; object-fit: cover; margin-right: 10px;}.title{ width: 100%; height: 40px; overflow: hidden;}.channel-name{ font-size: 14px; margin: 2px 0; color: #979797;}Output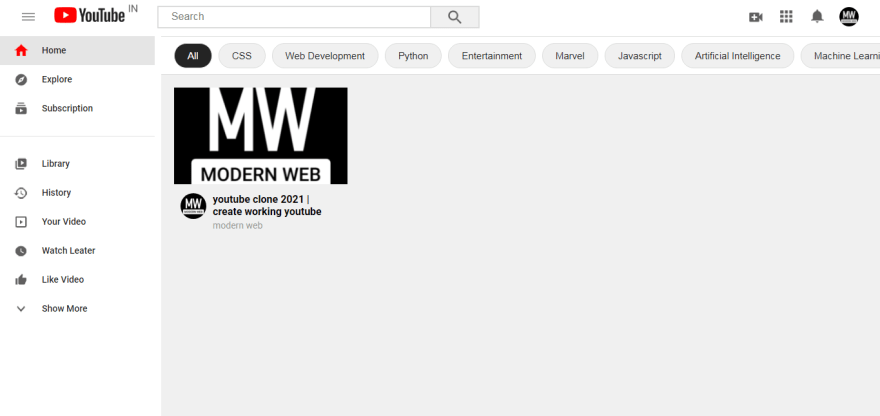
Now once we made our styling. We don't need our HTML card structure. So, comment it.
<div class="video-container"> <!-- <div class="video"> <img src="img/profile-pic.png" class="thumbnail" alt=""> <div class="content"> <img src="img/profile-pic.png" class="channel-icon" alt=""> <div class="info"> <h4 class="title">youtube clone 2021 | create working youtube clone</h4> <p class="channel-name">modern web</p> </div> </div> </div> --></div>Now go and create youtube API key. Watch this to know how create youtube API key.API Key.
Once you got your API key. Store that in a variable in your app.js file.
let api_key = "your api key";Now for fetching Videos. We need youtube api route. You can fine that in youtube documentation.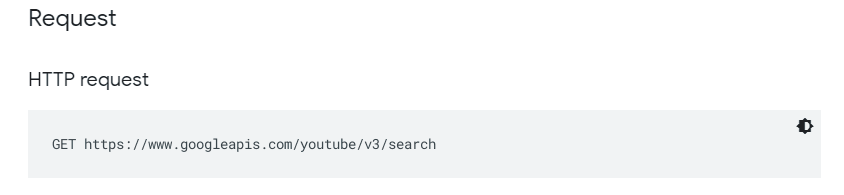
And add this link to the JS file.
let api_key = "your api key";let video_http = "https://www.googleapis.com/youtube/v3/videos?";Note: add "?" at the last of the link because we need to add some parameters to this link.
Now use fetch method fetch() to fetch data from youtube.
fetch(video_http + new URLSearchParams({ key: api_key, part: 'snippet', chart: 'mostPopular', maxResults: 50, regionCode: 'IN'})).then(res => res.json()).then(data => { data.items.forEach(item => { getChannelIcon(item); })}).catch(err => console.log(err));Explanation
You can see we are fetching data from the "video_http" that we got from youtube documentaion. And to add parameters to the URL we are using new URLSearchParama(object). Pass the parameters that are mentioned in the code. They all are self explanatory. part param define what art of data we want in this case we want all video related data. So, pass snippet.
After fetching the data we are converting it to JSON by res.json(). You can see youtube data structure.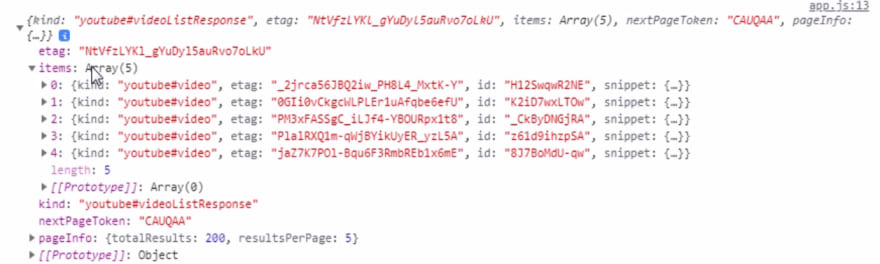
All the data we want is in item's array. So after getting JSON data from res.json() loop through the data.items using forEach() method and pass that item into a function called getChannelIcon(item).
What this function is for. Well, if you see youtube video's data. It contain everything but not channel icon. And we want channel icon too. So we have to fetch icons separately. Using "channel_http"
Go and find http for channel data in youtube's documentation. 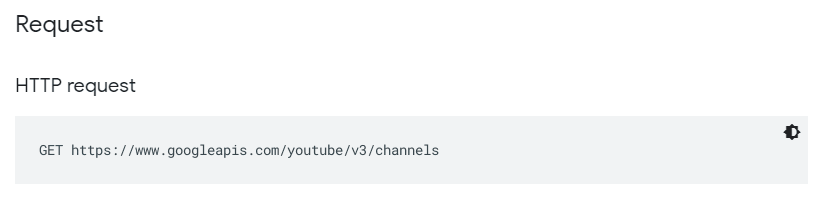
And store this HTTP in our app.js file. Below our video_http variable.
let video_http = "https://www.googleapis.com/youtube/v3/videos?";let channel_http = "https://www.googleapis.com/youtube/v3/channels?";And again add "?" at last of the link.
And, Now make that getChannelIcon function.
const getChannelIcon = (video_data) => { fetch(channel_http + new URLSearchParams({ key: api_key, part: 'snippet', id: video_data.snippet.channelId })) .then(res => res.json()) .then(data => { video_data.channelThumbnail = data.items[0].snippet.thumbnails.default.url; makeVideoCard(video_data); })}Explanation
Inside this function, we are getting individual video's data because we called this is a loop, remember? And after getting individual video's data we are making request to youtube api for channel information. Again use URLSearchParam to add parameters. Pass video_data.snippet.channelId inside id param. After getting response convert it into JSON by calling res.json() and after converting data into JSON. Set video_data.channelThumbnail to data.items[0].snippet.thumbnails.default.url.
By this we have successfully added channel icon URL to our actual video's data.
After this we are calling another function makeVideoCard(data). This function is to create card.
Now, create Video card. But before creating this function select our Video Container element from HTML.
const videoCardContainer = document.querySelector('.video-container');const makeVideoCard = (data) => { videoCardContainer.innerHTML += ` <div class="video" onclick="location.href = 'https://youtube.com/watch?v=${data.id}'"> <img src="${data.snippet.thumbnails.high.url}" class="thumbnail" alt=""> <div class="content"> <img src="${data.channelThumbnail}" class="channel-icon" alt=""> <div class="info"> <h4 class="title">${data.snippet.title}</h4> <p class="channel-name">${data.snippet.channelTitle}</p> </div> </div> </div> `;}Explanation
Inside this functions, as we have to attach card inside video container element use innerHTML method to add HTML code inside videoContainer element. Rememeber to use += instead of = because we want to add HTML not rewrite the HTML.
And what we add, well we already have our HTML card structure. Copy that code and paste it here. But use template string here. So, it will be easy to add variables with text.
And after pasting HTML structure, remove the actual image sources and titles, channel name instead use ${variable} this to add variable.
And the last thing inside video element use onclick="location.href = 'https://youtube.com/watch?v=${data.id}'" to add click event.
Our video card are done.
Output
L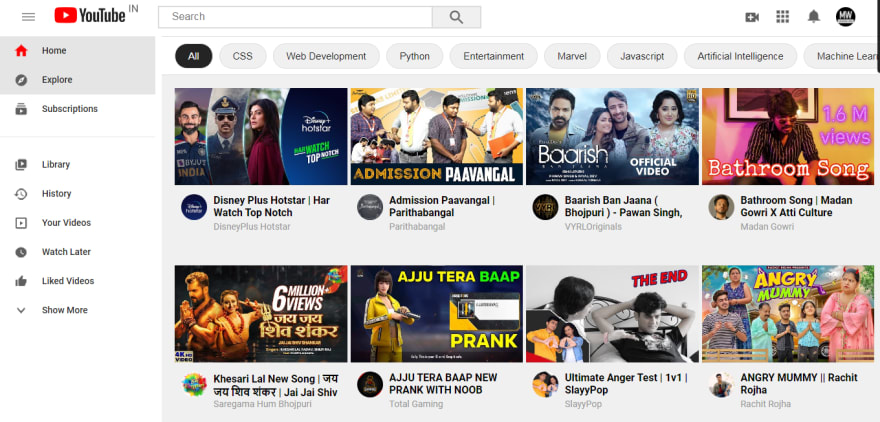
Last thing - Search Box
To make search box functional first select search box, and search button.
const searchInput = document.querySelector('.search-bar');const searchBtn = document.querySelector('.search-btn');And also create a variable to store search route.
let searchLink = "https://www.youtube.com/results?search_query=";Well from where I got this link. You can see in the image below.
You can see this is an actual link which youtube use to search videos. We can use this url, we only need to change the value of search_query param.
Now once we got our link. add click event to button and validate search box. Like this.
searchBtn.addEventListener('click', () => { if(searchInput.value.length){ location.href = searchLink + searchInput.value; }})And inside that condition use location.href to redirect user.
We are done.
So, that's it. I hope you understood each and everything. If you have doubt or I missed some thing let me know in the comments.
Articles you may found Useful
If you like, you can subscribe my youtube channel. I create awesome web contents. Subscribe
Thanks For reading.
Original Link: https://dev.to/kunaal438/create-working-youtube-clone-with-search-box-youtube-api-2a6e
Dev To
More About this Source Visit Dev To