
An Interest In:
Web News this Week
- April 18, 2024
- April 17, 2024
- April 16, 2024
- April 15, 2024
- April 14, 2024
- April 13, 2024
- April 12, 2024
Some of Our Sources
- Techcrunch
- Pearsonified
- The Logo Smith
- Vandelay Design
- You The Designer
- Naldz Graphics
- FanExtra - PSD
- 24 Ways
- Freelance Switch
- Web Resource Source
Help Webnuz
Referal links:
CSS z-index illustrated
My followers know that I no longer work as a frontend developer, however, I worked as one for nearly 15 years and I was self-taught. I was lucky to have a background in architecture, CAD and graphic and 3d design, so grasping the more mathematical (or in this case geometrical) aspects of putting together a layout, was not difficult for me. However, I see that for self-taught developers coming from completely unrelated backgrounds, the z-index is a tough one to grasp.
This is my attempt at explaining it in an illustrated way.
Most people will be familiar with the concept of cartesian coordinates. They are used to define the location of a point in either a line (2d) or in space (3d). If you drive and use Google Maps, you are probably familiar with geospatial coordinates, or longitude and latitude; the points we use for locations on maps or Earth.
2d or two dimensional
In 2d, we have the y-axis, and the x-axis. From their convergence, the point (0,0), we can then specify where another point is located. Typically the y-axis defines the vertical location, and the x-axis the horizontal location of a point.
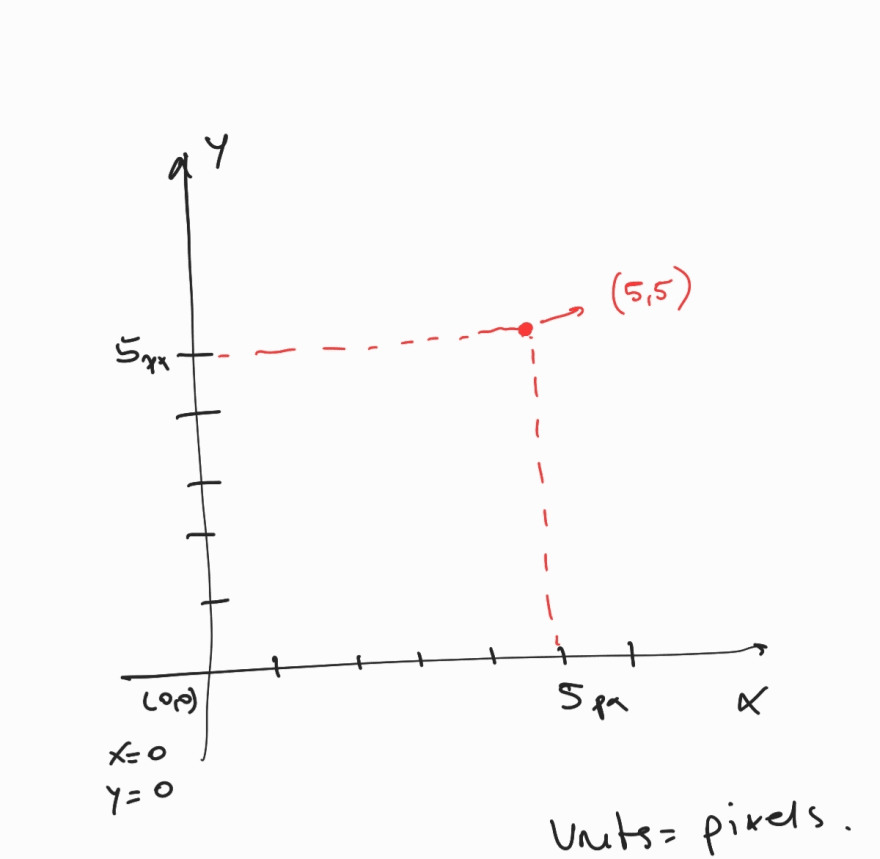
If we have several points that define a shape, like a box, then we can define its dimensions AND its location, using coordinates.
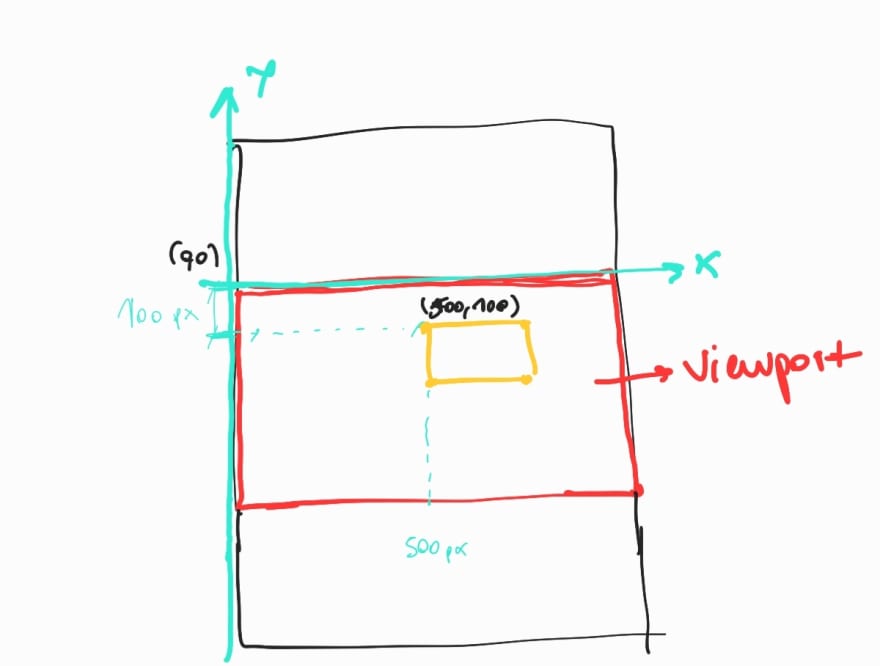
This is basically how we do layout with css, defining the dimensions and location of elements with respect to those two imaginary lines that come defined by the edge of the viewport.
We understand y=0 as the top of the browser viewport, and x=0 as the left edge (when left to right), so (0,0) would be the most top-left point as we load the page (considering it is not programmatically scrolling to another x,y location).
Layout and the box model
When we are adding new elements to the markup of a page, by default they're added to the default context (I will explain context later in the article). They will follow the document flow and be stacked on top of each other, in the same order they are added to the document.
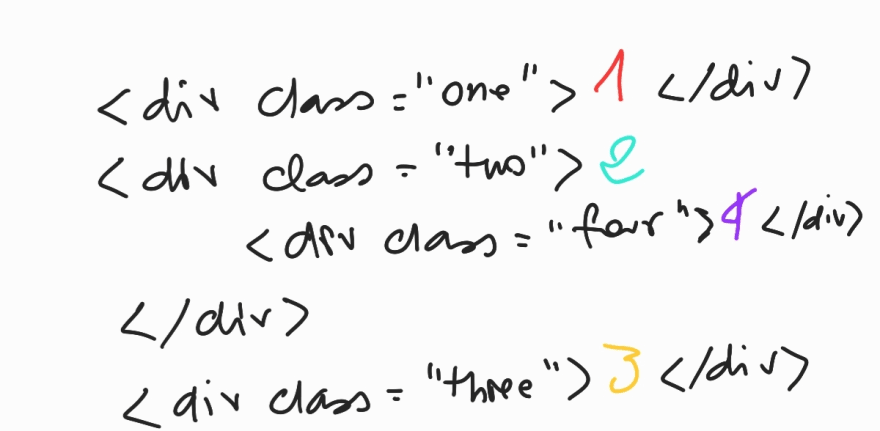
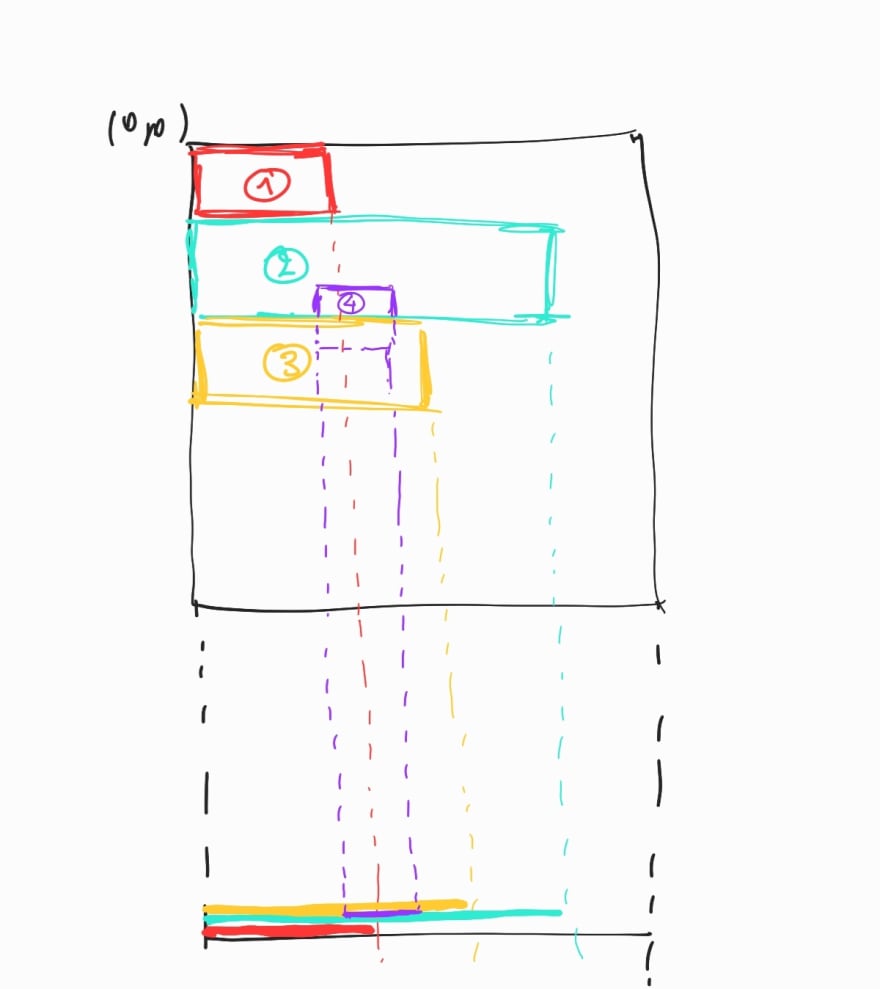
So if we had 3 block elements like divs for example, added to a document like you see in the figure below, if we could see them from the side in terms of an imaginary vertical stack, they would be stacked in this way:
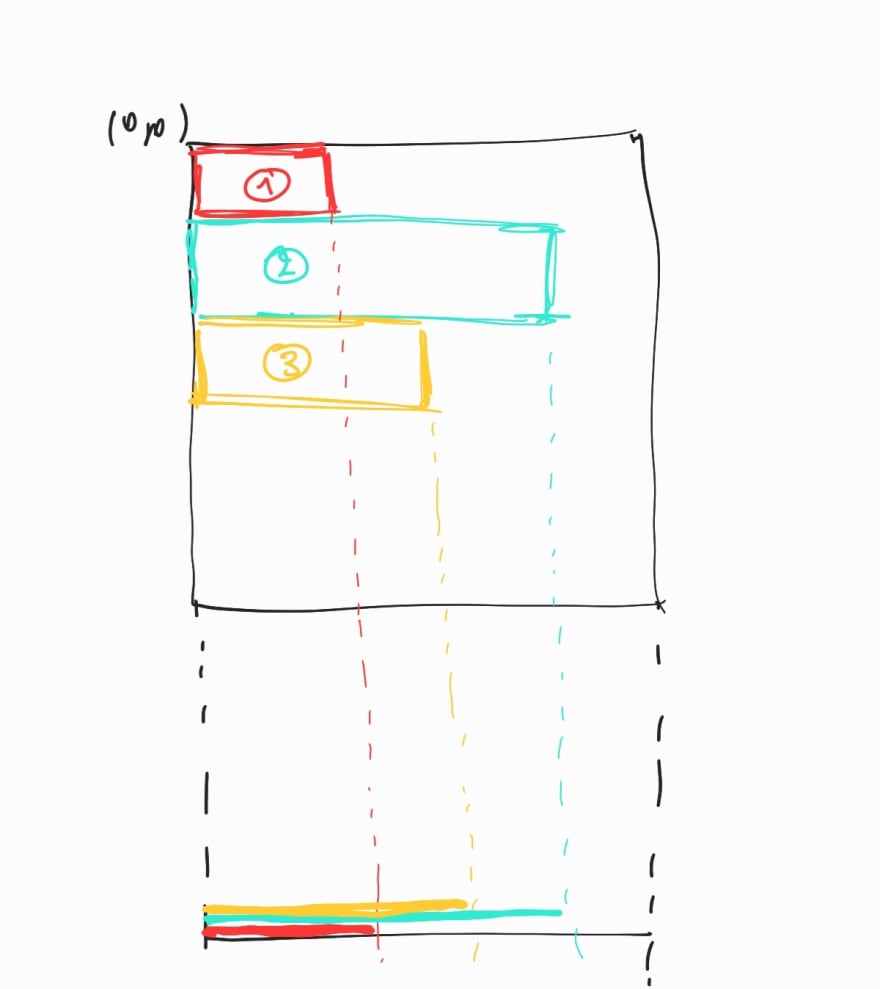
But what would happen if you added a child to div number 2, and give it a top margin to move it on top of div 3 in the y-axis? That "overlapping" bit would be hidden by div 3, and that's expected, since in terms of markup div 3 is coming after div 4 in the document flow.
z-index: 99999999999 !important will help...NOT
Many developers new to frontend will try to fix this using the z-index property, with a very high positive value (or maybe negative, supposign they wanted to completely hide the div 4). But that on its own, won't work.
EDIT: Thanks to Temani Afif Originally I had written -> "If you don't create a new stacking context, z-index won't work, no matter how many 9's and !importants you add." But he clarifies below giving a div a position, which I always understood creates a new stacking context as well. He points at the painting order which I mention in my article as the order in which elements are placed in the document flow. Please read his comment below.
Understanding stacking contexts
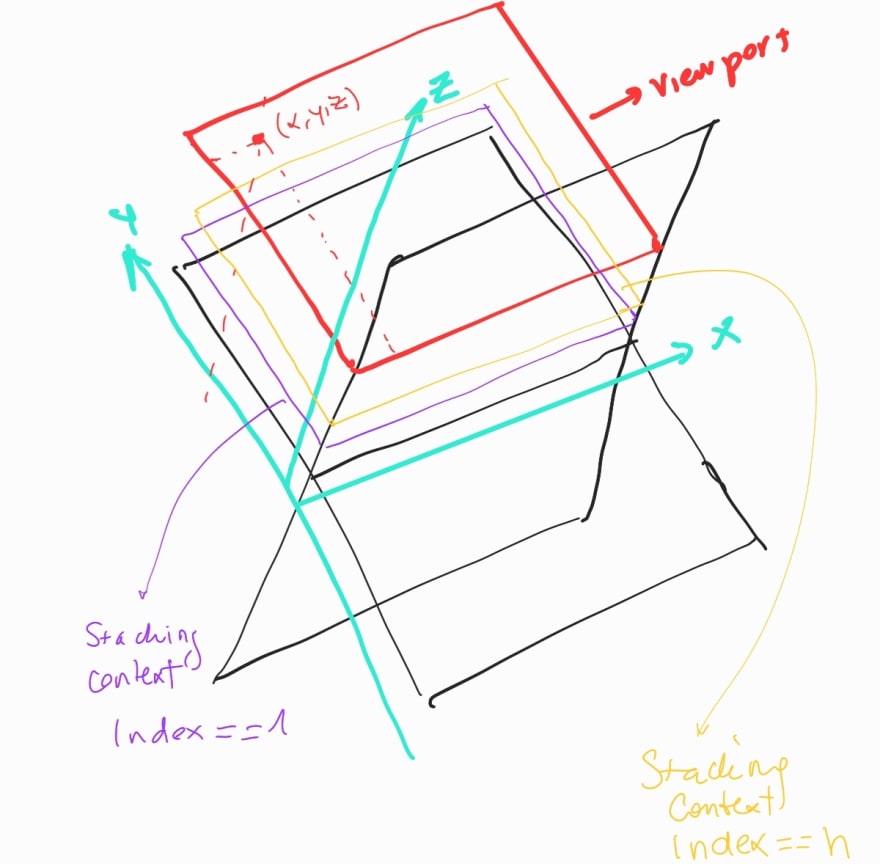
Let's port that two-dimensional representation of cartesian coordinates, to a three-dimensional or spatial one. As you probably guessed, now we have 3 points that specify the location of a point: (x, y, z)
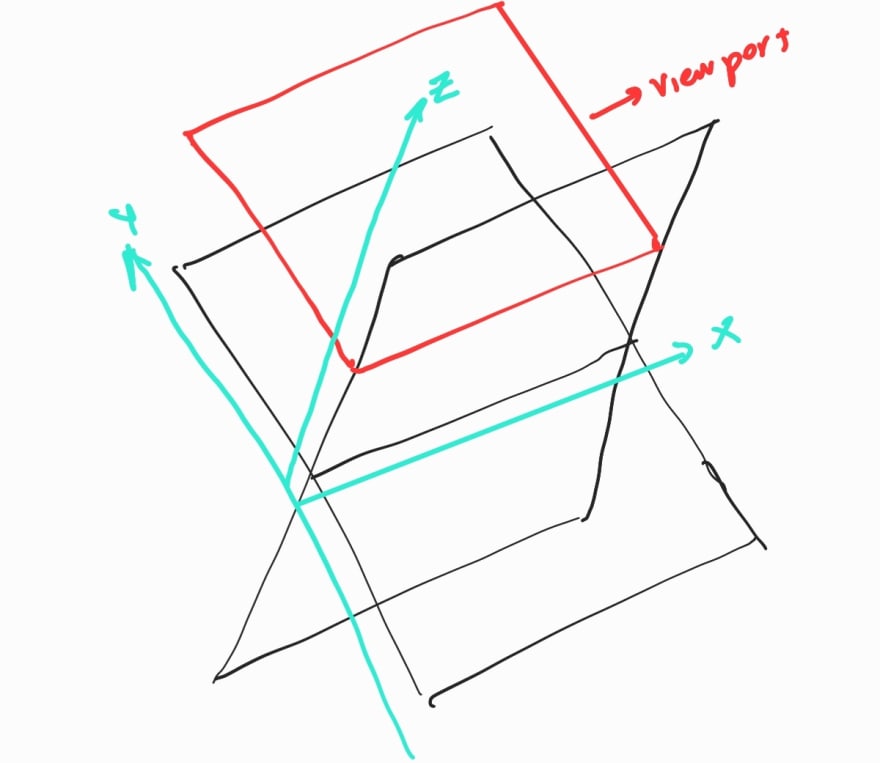
A stacking context is each new layer added to that z-axis, that you can now reorder, to bring elements on top or place them below the default context or other contexts.
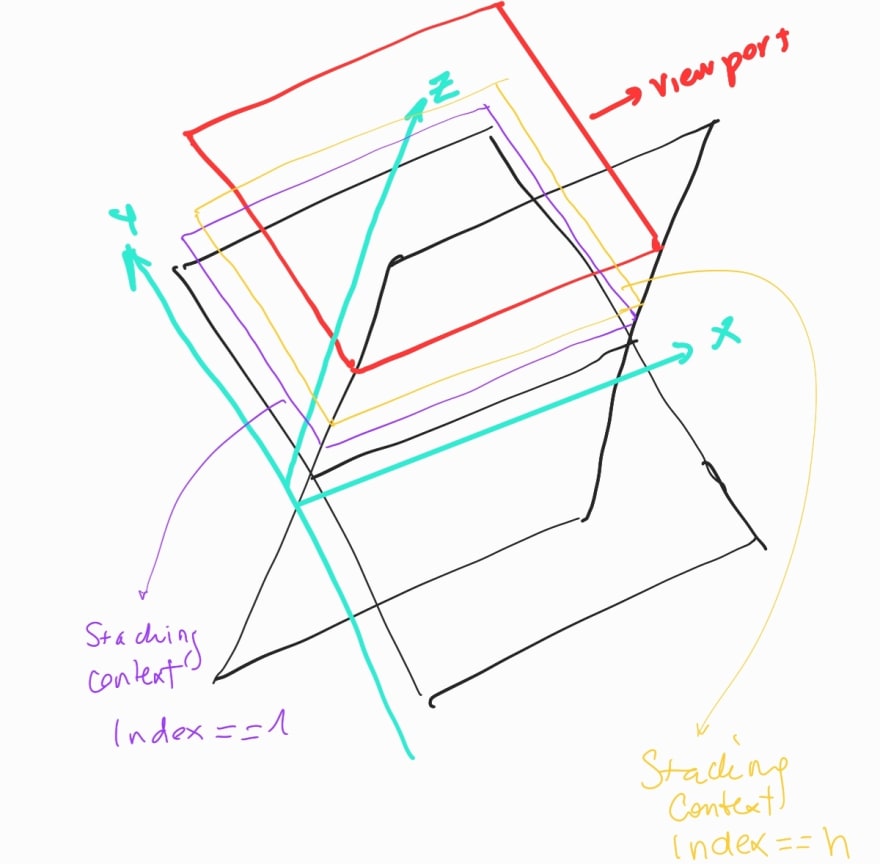
The order comes defined by the index, that can be 0, a positive integer or a negative integer or auto.
I advise you now head to the official documentation on MDN, and read all you can about stacking contexts. But in a nutshell, you create a new stacking context by giving a container div the following properties and values:
- you give it an
opacitydifferent than 0 - you give it a
positionother thanstatic, and az-indexother thanauto - you give it
displayeitherflexorgrid, and az-indexother thanauto - you use
transform,perspective,filter,clip-pathormask - or you use some of the brand new properties, such as
isolate(with a value ofisolate),will-change, orcontain.
That's all folks! I hope you find it useful and don't have to struggle with z-index issues anymore! Also if this article has an error or you want to suggest an improvement, do it in the comments!
Original Link: https://dev.to/this-is-learning/css-z-index-illustrated-51f7
Dev To
More About this Source Visit Dev To