
An Interest In:
Web News this Week
- April 1, 2024
- March 31, 2024
- March 30, 2024
- March 29, 2024
- March 28, 2024
- March 27, 2024
- March 26, 2024
Some of Our Sources
- Engadget
- Just Creative
- Creative Curio
- Crazy Leaf Design
- Reencoded
- CSS Globe
- Spyre Studios
- Web Resource Source
- Hashedout
- The Verge
Help Webnuz
Referal links:
Secure Open API (Swagger) calls with Azure Active Directory
We have talked about secure web apps and APIs many times here. In this blog post we'll examine how to secure Swashbuckle (.NET's version of Open API/Swagger) with Azure Active Directory in order to make authenticated calls to secure APIs.
Configure the Azure AD App Registrations
To enable end-to-end authentication ,we need to create 2 App Registrations in Azure AD. One for the API and one for the OpenAPI client. You can use the attached .NET Interactive Notebook app-registrations.ipynb to automatically configure both the API and the Swagger App Registrations in Azure AD.
Open API/Swagger with .NET
When you create a new API in .NET Core, the default template adds the Open API configuration by default. This means that everything works out of the box. However, if you add authentication to the API then Open Api stops working and needs additional configuration to acquire the necessary access token from Azure AD to make authenticated calls to the API.
Below we have the starting configuration of Open API in .NET
public void ConfigureServices(IServiceCollection services){ services.AddMicrosoftIdentityWebApiAuthentication(Configuration); services.AddControllers(); services.AddSwaggerGen(c => { c.SwaggerDoc("v1", new OpenApiInfo { Title = "VolcanoAPI", Version = "v1" }); }); }public void Configure(IApplicationBuilder app, IWebHostEnvironment env){ if (env.IsDevelopment()) { app.UseDeveloperExceptionPage(); app.UseSwagger(); app.UseSwaggerUI(c => c.SwaggerEndpoint("/swagger/v1/swagger.json", "YouAPI v1")); } app.UseHttpsRedirection(); app.UseRouting(); app.UseAuthentication(); app.UseAuthorization(); app.UseEndpoints(endpoints => { endpoints.MapControllers(); });}Let's implement authentication for our Open API middleware and UI. First, update the Startup.cs with the necessary code. In the ConfigureServices() method, add the following code:
services.AddSwaggerGen(c =>{ c.SwaggerDoc("v1", new OpenApiInfo { Title = "swaggerAADdemo", Version = "v1" }); c.AddSecurityDefinition("oauth2", new OpenApiSecurityScheme { Description = "OAuth2.0 Auth Code with PKCE", Name = "oauth2", Type = SecuritySchemeType.OAuth2, Flows = new OpenApiOAuthFlows { AuthorizationCode = new OpenApiOAuthFlow { AuthorizationUrl = new Uri(Configuration["AuthorizationUrl"]), TokenUrl = new Uri(Configuration["TokenUrl"]), Scopes = new Dictionary<string, string> { { Configuration["ApiScope"], "read the api" } } } } }); c.AddSecurityRequirement(new OpenApiSecurityRequirement { { new OpenApiSecurityScheme { Reference = new OpenApiReference { Type = ReferenceType.SecurityScheme, Id = "oauth2" } }, new[] { Configuration["ApiScope"] } } });});Next step, update the Configure() method to wire up the UI with the appropriate authentication settings. This bit will enable users to login in the UI before making API calls in the OpenAPI page.
if (env.IsDevelopment()){ app.UseDeveloperExceptionPage(); app.UseSwagger(); app.UseSwaggerUI(c => { c.SwaggerEndpoint("/swagger/v1/swagger.json", "swaggerAADdemo v1"); c.OAuthClientId(Configuration["OpenIdClientId"]); c.OAuthUsePkce(); c.OAuthScopeSeparator(" "); });}As you may have noticed, both bits of code require some configuration settings. Open the appsettings.json file and add the following json at the end:
"AuthorizationUrl":"https://login.microsoftonline.com/<your tenant Id>/oauth2/v2.0/authorize",TokenUrl":"https://login.microsoftonline.com/<your tenant Id>/oauth2/v2.0/token","ApiScope": <your api scope(s)>,"OpenIdClientId": "<your swagger app reg client id>"The APIScope property should have a value similar to this "api://cd28264c-2a31-49df-b416-bf6f332c716d/". This is the scope expected in the Access token by your API.
Finally, the OpenIdClientId should contain the Client ID from the Azure AD App Registration -> We did this as part of step 1 when we created the Azure AD App Registrations.
See it in action below:
Step 1 - Authenticate in Swagger UI
Step 2 - Make an authenticated call to the API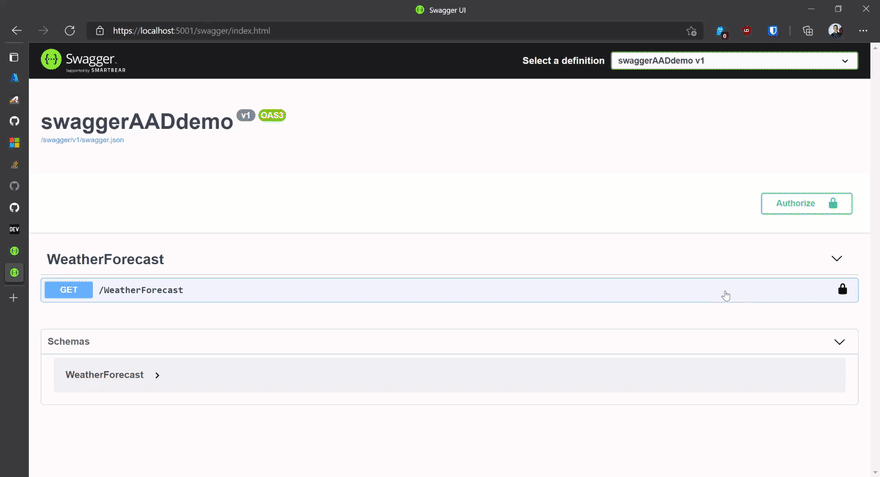
Source Code
As always, if you want to clone the source code, you can find a working repo on GitHub
Conclusion
I hope you found this useful but feel free to reach out to us on Twitter @christosmatskas, @AzureAndChill or join us on Discord to let us know if you have any issues with authentication, Azure AD or B2C!
Original Link: https://dev.to/425show/secure-open-api-swagger-calls-with-azure-active-directory-jj7
Dev To
More About this Source Visit Dev To