
An Interest In:
Web News this Week
- April 1, 2024
- March 31, 2024
- March 30, 2024
- March 29, 2024
- March 28, 2024
- March 27, 2024
- March 26, 2024
Some of Our Sources
- Techcrunch
- Technology Review
- Team Treehouse
- Smashing Magazine
- Web Designer Depot
- Fudge Graphics
- Line 25
- 24 Ways
- Specky Boy
- Spyre Studios
Help Webnuz
Referal links:
How I Deployed my First Machine Learning Model Using Streamlit (Part 1)
I believe most of you must have done some form of data science project at some point in your lives, be it a machine learning project, a deep learning project, or even visualizations of your data. And the best part of these projects is to showcase them to others.
But the question is how will you showcase your work to others? Well, this is where Model Deployment will help you.
In this article I will be showing you how I was able to deploy my first machine learning model using Streamlit.
Streamlit is a popular open-source framework used for model deployment by machine learning and data science teams. And the best part is its free of cost and purely in python.

Preparing Data and Training Model
We will first build a loan prediction model and then deploy it using Streamlit.
The project that I have picked for this particular article is automating the loan eligibility process.
The task is to predict whether the loan will be approved or not based on the details provided by customers.
Based on the details provided by customers, we have to create a model that can decide whether or not their loan should be approved and point out the factors that will help us to predict whether the loan for a customer should be approved or not.
As a starting point, here are a couple of factors that I think will be helpful for us with respect to this project:
- Amount of loan: The total amount of loan applied by the customer. My hypothesis here is that the higher the amount of loan, the lesser the chances of loan approval and vice versa.
- Income of applicant: The income of the applicant (customer) can also be a deciding factor. A higher income will lead to higher probability of loan approval.
- Education of applicant: Educational qualification of the applicant can also be a vital factor to predict the loan status of a customer. My hypothesis is if the educational qualification of the applicant is higher, the chances of their loan approval will be higher.
Next, we need to collect the data. And the dataset related to the customers and loan will be provided at the end of this article.
We will first import the required libraries and then read the CSV file:
import pandas as pd train = pd.read_csv('train_ctrUa4K.csv') train.head()
Above are the first five rows from the dataset.
We know that machine learning models take only numbers as inputs and can not process strings. So, we have to deal with the categorical features present in the dataset and convert them into numbers.
:
train['Gender']= train['Gender'].map({'Male':0, 'Female':1}) train['Married']= train['Married'].map({'No':0, 'Yes':1}) train['Loan_Status']= train['Loan_Status'].map({'N':0, 'Y':1})Above, we have converted the categories present in the Gender, Married and the Loan Status variable into numbers, simply using the map function of pandas DataFrame object. Next, lets check if there are any missing values in the dataset:
train.isnull().sum()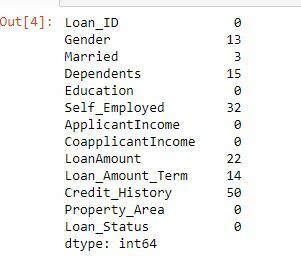
So, there are missing values inside many features including the Gender, Married, LoanAmount variable. Next, we will remove all the rows which contain any missing values in them:
train = train.dropna()train.isnull().sum()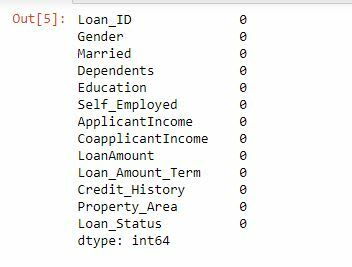
Now there are no missing values in the dataset. Next, we will separate the dependent (Loan_Status) and the independent variables:
X = train[['Gender', 'Married', 'ApplicantIncome', 'LoanAmount', 'Credit_History']] y = train.Loan_Status X.shape, y.shape
We will first split our dataset into a training and validation set, so that we can train the model on the training set and evaluate its performance on the validation set.
:
from sklearn.model_selection import train_test_split x_train, x_cv, y_train, y_cv = train_test_split(X,y, test_size = 0.2, random_state = 10)We have split the data using the train_test_split function from the sklearn library keeping the test_size as 0.2 which means 20 percent of the total dataset will be kept aside for the validation set. Next, we will train using the random forest classifier:
from sklearn.ensemble import RandomForestClassifier model = RandomForestClassifier(max_depth=4, random_state = 10) model.fit(x_train, y_train)Now, our model is trained, lets check its performance on both the training and validation set:
from sklearn.metrics import accuracy_score pred_cv = model.predict(x_cv) accuracy_score(y_cv,pred_cv)
The model is 80% accurate on the validation set. Lets check the performance on the training set too:
pred_train = model.predict(x_train) accuracy_score(y_train,pred_train)
Performance on the training set is almost similar to that on the validation set. So, the model has generalized well. Finally, we will save this trained model so that it can be used in the future to make predictions on new observations:
# saving the model import pickle pickle_out = open("classifier.pkl", mode = "wb") pickle.dump(model, pickle_out) pickle_out.close()We are saving the model in pickle format and storing it as classifier.pkl. This will store the trained model and we will use this while deploying the model.
We will be deploying this loan prediction model using Streamlit which is a recent and the simplest way of building web apps and deploying machine learning and deep learning models.
Model Deployment of the Loan Prediction Model using Streamlit
Creating the app, we will start with the basic installations:
!pip install -q streamlitStreamlit will be used to make our web app.
We have to create the python script for our app. Let me show the code first and then I will explain it to you in detail:
import pickle import streamlit as st # loading the trained model pickle_in = open('classifier.pkl', 'rb') classifier = pickle.load(pickle_in) @st.cache() # defining the function which will make the prediction using the data which the user inputs def prediction(Gender, Married, ApplicantIncome, LoanAmount, Credit_History): # Pre-processing user input if Gender == "Male": Gender = 0 else: Gender = 1 if Married == "Unmarried": Married = 0 else: Married = 1 if Credit_History == "Unclear Debts": Credit_History = 0 else: Credit_History = 1 LoanAmount = LoanAmount / 1000 # Making predictions prediction = classifier.predict( [[Gender, Married, ApplicantIncome, LoanAmount, Credit_History]]) if prediction == 0: pred = 'Rejected' else: pred = 'Approved' return pred #this is the main function in which we define our webpage def main(): #front end elements of the web page html_temp = """ <div style ="background-color:yellow;padding:13px"> <h1 style ="color:black;text-align:center;">Streamlit Loan Prediction ML App</h1> </div> """ #display the front end aspect st.markdown(html_temp, unsafe_allow_html = True) #following lines create boxes in which user can enter data required to make prediction Gender = st.selectbox('Gender',("Male","Female")) Married = st.selectbox('Marital Status', ("Unmarried","Married")) ApplicantIncome = st.number_input("Applicants monthly income") LoanAmount = st.number_input("Total loan amount") Credit_History = st.selectbox('Credit_History',("Unclear Debts","No Unclear Debts")) result ="" #when 'Predict' is clicked, make the prediction and store it if st.button("Predict"): result = prediction(Gender, Married, ApplicantIncome, LoanAmount, Credit_History) st.success('Your loan is {}'.format(result)) print(LoanAmount) if __name__=='__main__': main()This is the entire python script which will create the app for us. Let me break it down and explain in detail:
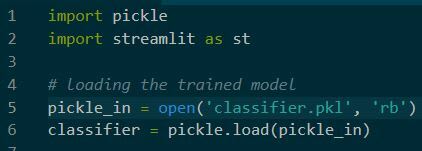
In this part, we are saving the script as app.py, and then we are loading the required libraries which are pickle to load the trained model and streamlit to build the app. Then we are loading the trained model and saving it in a variable named classifier.

Next, we have defined the prediction function. This function will take the data provided by users as input and make the prediction using the model that we have loaded earlier. It will take the customer details like the gender, marital status, income, loan amount, and credit history as input, and then pre-process that input so that it can be feed to the model and finally, make the prediction using the model loaded as a classifier. In the end, it will return whether the loan is approved or not based on the output of the model.

And here is the main app. First of all, we are defining the header of the app. It will display Streamlit Loan Prediction ML App. To do that, we are using the markdown function from streamlit. Next, we are creating five boxes in the app to take input from the users. These 5 boxes will represent the five features on which our model is trained.
The first box is for the gender of the user. The user will have two options, Male and Female, and they will have to pick one from them. We are creating a dropdown using the selectbox function of streamlit. Similarly, for Married, we are providing two options, Married and Unmarried and again, the user will pick one from it. Next, we are defining the boxes for Applicant Income and Loan Amount.
Since both of these variables will be numeric in nature, we are using the number_input function from streamlit. And finally, for the credit history, we are creating a dropdown which will have two categories, Unclear Debts, and No Unclear Debts.
At the end of the app, there will be a predict button and after filling in the details, users have to click that button. Once that button is clicked, the prediction function will be called and the result of the Loan Status will be displayed in the app. This completes the web app creating part. And you must have noticed that everything we did is in python. Isnt it awesome?
This part is for running the app on your local machine, not the acual deployment.
I will be explaining the actual deployment in my next article.
First run the .py file in the same directory on your cmd:
streamlit run loan_prediction.pyThis will generate a link, something like this:
Local URL: http://localhost:8501
Network URL: http://192.168.43.47:8501
Note that the link will vary at your end. You can click on the link which will take you to the web app:
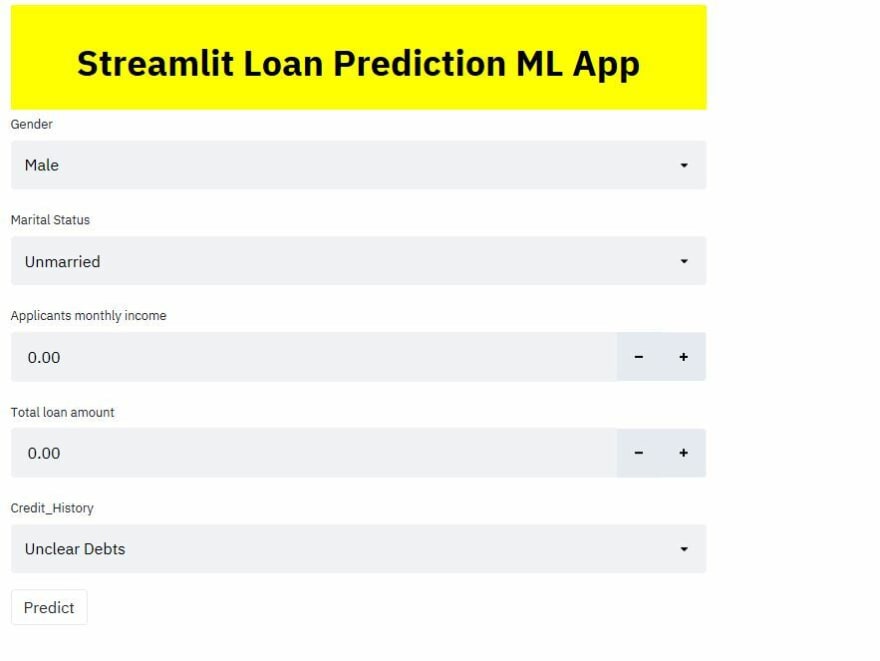
You can see, we first have the name displayed at the top. Then we have 5 different boxes that will take input from the user and finally, we have the predict button. Once the user fills in the details and clicks on the Predict button, they will get the status of their loan whether it is approved or rejected.

And it is as simple as this to build and deploy your machine learning models using Streamlit.
Note, this part is for running the app on your local machine, not the acual deployment.
I will be explaining the actual deployment in my next article.
Link to part 2 of the article:https://dev.to/codinghappinessweb/how-i-deployed-my-first-machine-learning-model-using-streamlit-part-2-103a
You can view the app via Streamlit
You can access the datasetGithub
And my jupyter notebookGithub
Original Link: https://dev.to/codinghappinessweb/how-i-deployed-my-first-machine-learning-model-using-streamlit-part-1-31h9
Dev To
More About this Source Visit Dev To