
An Interest In:
Web News this Week
- April 1, 2024
- March 31, 2024
- March 30, 2024
- March 29, 2024
- March 28, 2024
- March 27, 2024
- March 26, 2024
Some of Our Sources
- Simplebits
- Smashing Apps
- Abduzeedo
- Web Designer Depot
- Crazy Leaf Design
- Web Design Ledger
- Reencoded
- Line 25
- Codrops
- Hashedout
Help Webnuz
Referal links:
Automatic Image Slider Using Html Css & Javascript
In this article I will show you how to create an automatic image slider using HTML CSS and JavaScript code. Earlier I designed many more types of image sliders. If you want, you can create only with the help of HTML and CSS. But in this case I have used JavaScript.
A slider is a common web element that is used on a variety of websites. This type of slider is basically used to store many types of images together in a website. This slider can automatically change the image. There are also two buttons that can be used to change the image manually.
You can watch the live demo to learn more about how this image slider works. First of all I made a box in a web page. Then I added the image in that box. I have added two buttons to change the images.
I used JavaScript code to change the image. If you want to know how to make this design then follow the tutorial below. First of all you create an html and css file.
Related design:
Step 1: create the background of the slider
I created a box first of all using the HTML and CSS code below. In this case I have used the height of the box 265 px and the width 500 px. If you want to increase the size of this image slider, you can make the size.
I have used shadow around this box to create which I have used box-shadow.
<div id="slider"> </div> body { margin: 10%;}#slider { position: relative; width: 500px; height: 265px; overflow: hidden; box-shadow: 0 0 30px rgba(0, 0, 0, 0.3);}
Step 2: Add image to slider
Now we will add the image in that box. In this case I have used five images. You can use many images if you want.
<ul id="slideWrap"> <li><img src="img1.jpg" alt=""></li> <li><img src="img2.jpg" alt=""></li> <li><img src="img3.jpg" alt=""></li> <li><img src="img4.jpg" alt=""></li> <li><img src="img5.jpg" alt=""></li> </ul>#slider ul { position: relative; list-style: none; height: 100%; width: 10000%; padding: 0; margin: 0; transition: all 750ms ease; left: 0;}#slider ul li { position: relative; height: 100%; float: left;}
Step 3: Determine the size of the image
As you can see in the picture above, the images are not in the right place in the slider. Because the size of the image is larger than the frame of the slider.
For this we will determine the size of this image according to the size of the frame of the slider. Remember that if you change the size of the frame, you will change the same here.
#slider ul li img{ width: 500px; height: 265px;}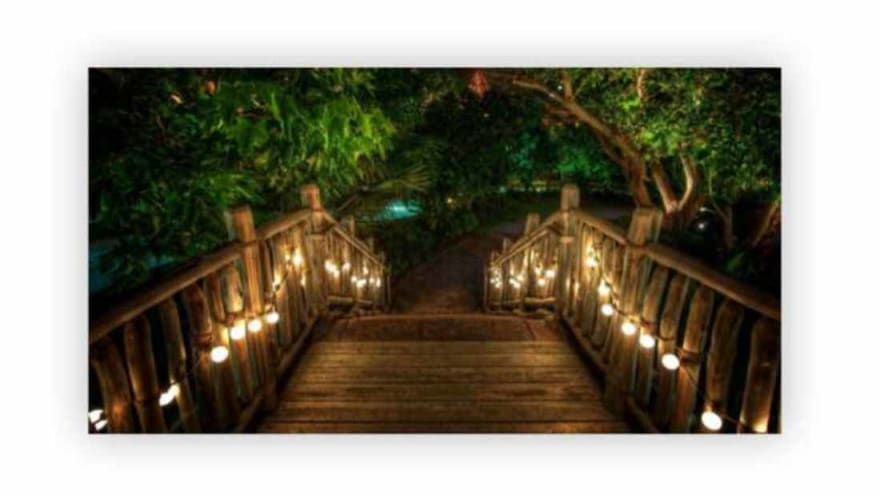
Step 4: Add Next and prev buttons
I used two buttons in the slide. One button will help move the image forward while the other will help push the image back. I have used the following codes to design those two buttons.
<a id="prev" href="#">≪</a> <a id="next" href="#">≫</a>#slider #prev, #slider #next { width: 50px; line-height: 50px; text-align: center; color: white; text-decoration: none; position: absolute; top: 50%; border-radius: 50%; font-size: 2rem; text-shadow: 0 0 20px rgba(0, 0, 0, 0.6); transform: translateY(-50%); transition: all 150ms ease;}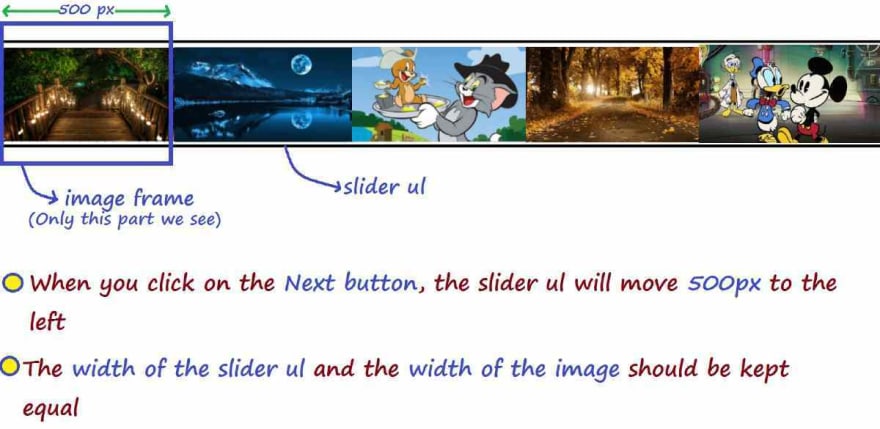
You must see that there are two button sliders, one on the left and the other on the right. For this I have used the css codes below.
#slider #prev { left: 10px;}#slider #next { right: 10px;}#slider #prev:hover, #slider #next:hover { background-color: rgba(0, 0, 0, 0.5); text-shadow: 0;}
Step 5: Activate the image slider using JavaScript
So far I have only designed this image slider. Now we will implement the image change with the help of JavaScript programming code.
First of all I have determined a Variable of each element here.
var slider = document.getElementById("slider");var sliderWidth = slider.offsetWidth;var slideList = document.getElementById("slideWrap");var count = 1;var items = slideList.querySelectorAll("li").length;var prev = document.getElementById("prev");var next = document.getElementById("next");window.addEventListener('resize', function() { sliderWidth = slider.offsetWidth;});I will store in 'prevSlide' what kind of changes will be made by clicking on the previous button.
var prevSlide = function() { if(count > 1) { count = count - 2; slideList.style.left = "-" + count * sliderWidth + "px"; count++; } else if(count = 1) { count = items - 1; slideList.style.left = "-" + count * sliderWidth + "px"; count++; }};I will store in 'nextSlide' what kind of changes will be made by clicking on the Next button.
var nextSlide = function() { if(count < items) { slideList.style.left = "-" + count * sliderWidth + "px"; count++; } else if(count = items) { slideList.style.left = "0px"; count = 1; }};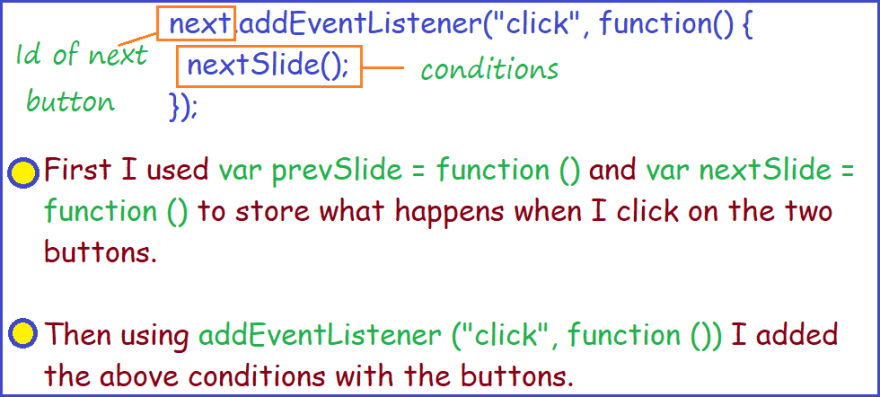
We have determined above what will change if we click on the two buttons. Again, we will add the buttons with that constant, that is, we will activate the buttons.
next.addEventListener("click", function() { nextSlide();});prev.addEventListener("click", function() { prevSlide();});The following code will help to change the image automaticallyat a certain time interval.
setInterval(function() { nextSlide()}, 5000); I have instructed that the condition of nextSlide should be effective every 5 seconds. That means the images will change every 5 seconds.
I set 5000 here for five seconds to change the pictures. If you want the image to change as quickly as 2 seconds, use 2000 instead of 5000.
window.onload = function() {responsiveSlider(); }
Final JavaScript code
var responsiveSlider = function() {var slider = document.getElementById("slider");var sliderWidth = slider.offsetWidth;var slideList = document.getElementById("slideWrap");var count = 1;var items = slideList.querySelectorAll("li").length;var prev = document.getElementById("prev");var next = document.getElementById("next");window.addEventListener('resize', function() { sliderWidth = slider.offsetWidth;});var prevSlide = function() { if(count > 1) { count = count - 2; slideList.style.left = "-" + count * sliderWidth + "px"; count++; } else if(count = 1) { count = items - 1; slideList.style.left = "-" + count * sliderWidth + "px"; count++; }};var nextSlide = function() { if(count < items) { slideList.style.left = "-" + count * sliderWidth + "px"; count++; } else if(count = items) { slideList.style.left = "0px"; count = 1; }};next.addEventListener("click", function() { nextSlide();});prev.addEventListener("click", function() { prevSlide();});setInterval(function() { nextSlide()}, 8000);};window.onload = function() {responsiveSlider(); }Hopefully in the above tutorial I have explained how I made this image slider with the help of HTML CSS and JavaScript. If you have any questions, please let me know in the comments.
Original Link: https://dev.to/code_mystery/automatic-image-slider-using-html-css-javascript-nf8
Dev To
More About this Source Visit Dev To