
An Interest In:
Web News this Week
- April 1, 2024
- March 31, 2024
- March 30, 2024
- March 29, 2024
- March 28, 2024
- March 27, 2024
- March 26, 2024
Some of Our Sources
- Slashdot
- Spoon Graphics
- Inspiredology
- FanExtra - PSD
- Noupe
- Fudge Graphics
- Web Design Ledger
- Codrops
- Hashedout
- TechPowerUp
Help Webnuz
Referal links:
Creating a multi architecture CI/CD deployment for Amazon ECS and ECS Anywhere
Organisations are moving their workloads to the cloud as quickly as they can. While most applications can be easily migrated to the cloud, some applications need to remain on-premises due to low-latency or data sovereignty requirements.
Regardless of where workloads may reside, organisations want to be able to develop once and be able to deploy workloads to the cloud or on-premises in an agile and consistent fashion using a common set of APIs to manage and operate.
Furthermore, enterprises need to be able to leverage investments in skills, technology, and processes across their environments. This leads many enterprises to seek hybrid cloud architectures to integrate their on-premises and cloud operations to support a broad spectrum of use cases,
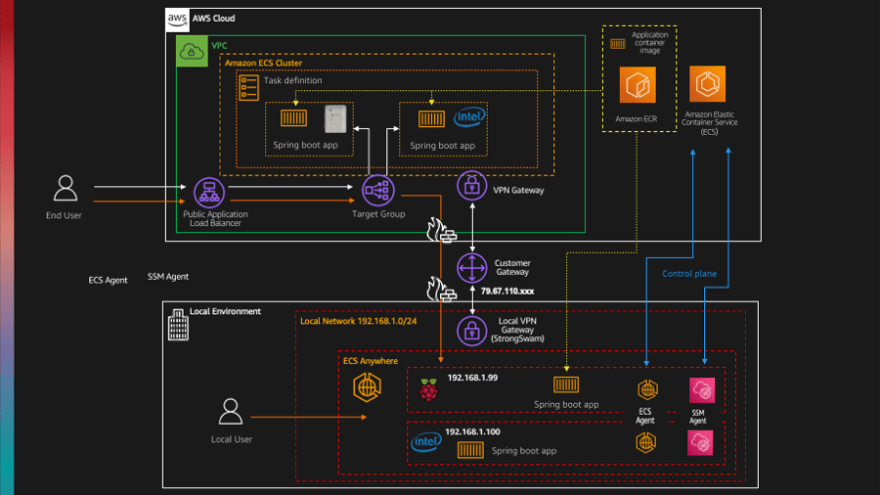
In this post I am going to explore how you can deploy your application to both your own environment and the AWS Cloud. We will take a simple application, a Dockerised Spring Boot application, and then automate the build and deployment of that application so that we can run it anywhere we want and on multiple processor architectures. For this I am going to setup Amazon ECS and ECS Anywhere, which allows you to run your ECS applications anywhere you want.
We will cover setting up a simple hybrid environment, with my home network being a proxy for your own on premises environment, and set up the site to site VPN and software components that enable us to seamlessly deploy our containerised applications on both our Cloud and our on premises servers.
This is what it will look like:
The kinds of use case and problems this will help you with include:
- building my applications so they will work across different architecture types, providing me with more choice and options
- simplifying and centralising my application builds so I can build once and deploy anywhere on any architecture
- manage my containerised applications running either in AWS or within my own environments (via ECS Anywhere)
- provide additional deployment applications for applications that might have requirements to run locally
This post will be in two parts.
The first part will look at setting up the multi-architecture build pipeline, that will take our sample Spring Boot application, and then build it and deploy it to some target clusters running mixed x86 and AWS Graviton2/arm based instance types.
The second part will look at extending this model, setting up the hybrid environment using ECS Anywhere and then using that to deploy the same application seamlessly.
What you will need
You can follow on with this post as I have published all the scripts and code so you can replicated this for yourself. Find the GitHub repo here.
You will also need a developer environment that has the following:
- An AWS Account with the right level of access (Admin) as well as the CodeCommit configured
- AWS cli
- Docker running on your local environment
- A Docker Hub account (we will need to use this to pull down containers during the build process)
- AWS CDK setup and running (cdk --version should be at least version 1.110.1)
Cost
I have been running this demo for about a week, and it has cost me so about $22 per day but I suspect if you get it up and running and then explore and remove everything it will cost a lot less. These exclude any costs you might have for your local environment.
I will cover how to remove everything at the end as part of the clean up activities.
Part zero: The application
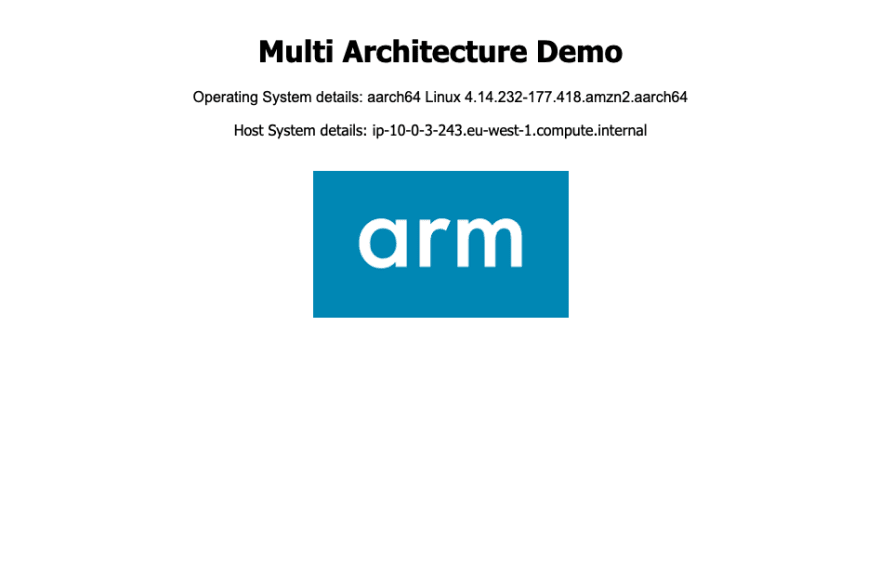
The app we will be using is a simple Spring Boot application that will display a different logo based on what the underlying architecture is.
The application has been containerised, and here is the Dockerfile
FROM amazoncorretto:11 as builderCOPY . /srvWORKDIR /srvRUN ./mvnw package spring-boot:repackageFROM amazoncorretto:11COPY --from=builder /srv/target/spring-boot-demo-1.0.0.jar /srv/EXPOSE 8080ENTRYPOINT ["java","-jar", "/srv/spring-boot-demo-1.0.0.jar"]When you access the application via a web browser, it will display information about the underlying system that it is running on, changing image based on the process architecture.
We can run this application on our local developer environment which we will see in a moment so you can see it running as you might typically do as part of your development workflow.
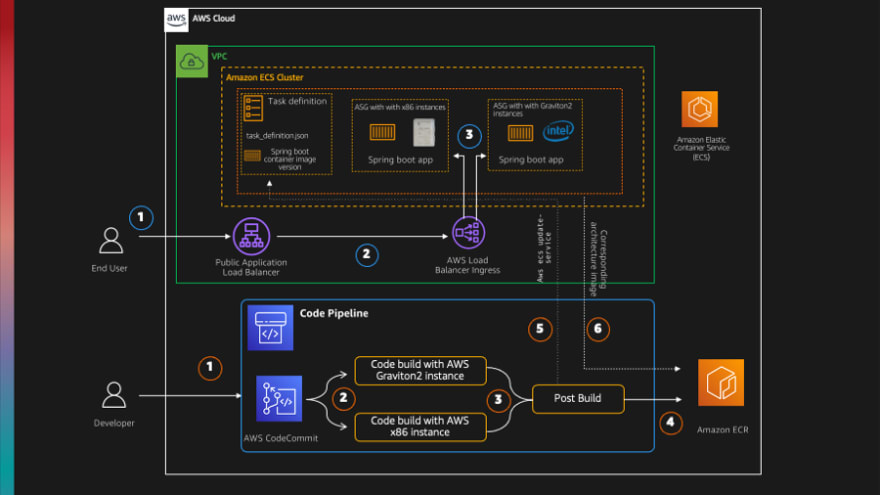
Part One: Setting up the Multi architecture CI/CD pipeline
Overview
We are going to set up the environment using Infrastructure as Code (IaC) and in this particular walkthrough, I am going to use AWS CDK. This will do the following:
- setup the initial source code and container repositories via a setup script
- set up the networking infrastructure, including the site to site VPN which we will use later
- set up the Amazon ECS cluster, deploying our application
- deploy a CI/CD pipeline that will automate the rebuilding and repacking of our application when changes are detected, and deploy the latest version to our Amazon ECS Cluster
This is what it will look like
Docker Hub
We need to create and store securely the Docker Hub username and password which will be used by the automation scripts. We do not want to store these in the configuration files, as we do not want to leak those to our source control systems. We will store this using AWS Parameter Store, and then reference these in our code we will run later.
We will create two parameters, one for the Docker Hub username, the other for the password. In our code we reference these as "/springboot-multiarch/dockerhub/username" and "/springboot-multiarch/dockerhub/password" so if you change these, remember to update the code where they are referenced.
To create your username/password, go to your Docker Hub account settings and create a new token

I have created one called "multi-arch-spring" and it will generate a token. You need to record this and keep it safe as we will use it in the next step.
From the command line, lets store these using the following commands, replacing the region where you want to deploy this solution and the password token:
aws ssm put-parameter --name "/springboot-multiarch/dockerhub/username" --value "multi-arch-spring" --type "SecureString" --region={your region where you will deploy this app}aws ssm put-parameter --name "/springboot-multiarch/dockerhub/password" --value "{your token}" --type "SecureString" --region={your region where you will deploy this app}From the AWS console, if you go to the AWS Systems Manager, Parameter Store you should now see these@

We are now ready to proceed.
Running the setup script
[1] Check out the repository on your developer machine.
In the example below, I am checking the repository out after swtiching to a separate folder off my home folder in a directory called blog-demo [cd ~/blog-demo]
cd ~mkdir blog-democd ~/blog-demogit clone https://github.com/094459/blog-multi-arch-springboot.gitcd blog-multi-arch-springboot/demo-multiarch-springboot-multiarch[2] Review the setup.sh script, changing the parameters at the top of the script so that they work for your own environment. You MUST change the AWS DEFAULT REGION and AWS ACCOUNT, the others you can leave if you want but are customisable. Any changes will need to be updated in the CDK application which we will use later.
For the rest of this walk through, I will use these values.
AWS_DEFAULT_REGION={your AWS region}AWS_ACCOUNT={your AWS account number}AWS_ECR_REPO=demo-multiarch-springboot-ecsanywhereAWS_CC_REPO=demo-multiarch-springboot-ecsanywhereCOMMIT_HASH="abcdef"[3] Run the setup.sh script, which will 1/Create a Code Commit repository, 2/Create an ECR repository and 3/Build and publish the sample Spring Boot application in the ECR repository.
We are containerising this application as we will be using this container when we create the Amazon ECS cluster.
Running this script may take 10-15 minutes (or more depending on your internet speeds) but you should see something like this (your specific details will be different to the following)
......The push refers to repository [704533066374.dkr.ecr.eu-west-1.amazonaws.com/demo-multiarch-springboot-ecsanywhere-test]05aeb36b29bc: Pushed# create AWS ECR Repo91a6dcd86b53: Pushedec1372e9de86: Pushedabcdef-arm64: digest: sha256:f51d9da34442fb53f67439752754fd36e02406d061db0a574429e6ecf94d9689 size: 954Created manifest list 704533066374.dkr.ecr.eu-west-1.amazonaws.com/demo-multiarch-springboot-ecsanywhere-test:abcdef{ "schemaVersion": 2, "mediaType": "application/vnd.docker.distribution.manifest.list.v2+json", "manifests": [ { "mediaType": "application/vnd.docker.distribution.manifest.v2+json", "size": 954, "digest": "sha256:28ad0b732b826e8a27575715b3d922c4ce0065749be31af7325ab5f96c5fba9b", "platform": { "architecture": "amd64", "os": "linux" } }, { "mediaType": "application/vnd.docker.distribution.manifest.v2+json", "size": 954, "digest": "sha256:f51d9da34442fb53f67439752754fd36e02406d061db0a574429e6ecf94d9689", "platform": { "architecture": "arm64", "os": "linux" } } ]}We now have our containerised application stored in Amazon ECR, which we will use when we build our Amazon ECS cluster.
[4] We are now going to populate the CodeCommit repository that was created. We will create a new working directory to do this
cd ~/blog-demogit clone https://git-codecommit.eu-west-1.amazonaws.com/v1/repos/demo-multiarch-springboot-ecsanywhere-test demo-appcd demo-appcp -r ~/blog-demo/blog-multi-arch-springboot/demo-multiarch-springboot-multiarch/* .You should now have a directory structure that looks like this
cdk-app ecs-anywhere app.py ecs_anywhere ecs_anywhere_cicd.py ecs_anywhere_ecs.py ecs_anywhere_pipe.py ecs_anywhere_repo.py ecs_anywhere_vpc.py requirements.txt pipeline ecs-pipeline eks-pipeline setup.sh springbootdemo Dockerfile mvnw pom.xml src main java hello Application.java HelloController.java resources static css style.css images arm.png aws.png intel.png tf-any.json tf.json tf.json.template[5] Commit this and then publish to the CodeCommit repository
git add .git commit -m "Initial upload"git pushNote! If you get prompted for username/password, then you may not have the CodeCommit Git helper configured. Check out the documented linked above. In your .gitconfig file I have the following setup
[credential] helper = helper = !aws codecommit credential-helper $@ UseHttpPath = true[user] email = [email protected] name = xxxx
[6] We will now change the default branch to Main. This is much easier to do via the console, where you go to the repository (demo-multiarch-springboot-ecsanywhere-test) create a branch (main) and then go to settings and make this the default branch.
Once you have done this, switch to the main branch.
git pullgit checkout mainWe now have the application we can make updates too that will trigger our CI/CD pipeline later on. Now we can set that up.
Deploy the AWS resources via AWS CDK
[7] We are now ready to deploy the AWS resources using AWS CDK. We go back to the first folder we checked out, and go to the folder where the CDK app has been created. We need to adjust the app.py file, which contains parameters to customise the demo for your environment
cd ~/blog-demo/blog-multi-arch-springboot/demo-multiarch-springboot-multiarch/cdk-app/ecs-anywhereWhen you look at the app.py file, you will need to change the env_EU and the props.
from aws_cdk import corefrom ecs_anywhere.ecs_anywhere_cicd import EcsAnywhereCICDStackfrom ecs_anywhere.ecs_anywhere_vpc import EcsAnywhereVPCStackfrom ecs_anywhere.ecs_anywhere_ecs import EcsAnywhereECSStackfrom ecs_anywhere.ecs_anywhere_pipe import EcsAnywherePipeStackfrom ecs_anywhere.ecs_anywhere_repo import EcsAnywhereLBStackenv_EU=core.Environment(region="eu-west-1", account="704533066374")props = { 'mydcexternalip': '79.67.110.xx', 'mydcinternalcidr' : '192.168.1.0/24', 'awsvpccidr':'10.0.0.0/16', 'ecsclustername':'mydc-ecs', 'ecr-repo': 'demo-multiarch-springboot-ecsanywhere', 'code-repo' : 'demo-multiarch-springboot-multiarch', 'image-tag' : 'abcdef', 'home-pi' : '192.168.1.99' }app = core.App()mydc_vpc = EcsAnywhereVPCStack( scope=app, id="ecs-anywhere-vpc", env=env_EU, props=props)mydc_lb = EcsAnywhereLBStack( scope=app, id="ecs-anywhere-lb", env=env_EU, vpc=mydc_vpc.vpc, props=props)mydc_ecs_cicd = EcsAnywhereCICDStack( scope=app, id="ecs-anywhere-cicd", env=env_EU, vpc=mydc_vpc.vpc, props=props )mydc_ecs_pipe = EcsAnywherePipeStack( scope=app, id="ecs-anywhere-pipe", env=env_EU, vpc=mydc_vpc.vpc, props=props )mydc_ecs = EcsAnywhereECSStack( scope=app, id="ecs-anywhere-cfn", env=env_EU, vpc=mydc_vpc.vpc, props=props)app.synth()The app.py shows you the different stacks that you will need to deploy to build this demo. The first thing we need to do is set the correct values.
env_EU=core.Environment(region="{your aws region}", account="{your aws account}")props = { 'mydcexternalip': '{your external router IP - you can find this via tools like what is my IP}', 'mydcinternalcidr' : '{your home network CIDR e.g.192.168.1.0/24}', 'awsvpccidr':'{your VPC CIDR range e.g 10.0.0.0/16}', 'ecsclustername':'{name for your ecs cluster e.g. mydc-ecs}', 'ecr-repo': '{name of the ECR repo - must match what you set in the setup.sh e.g. demo-multiarch-springboot-ecsanywhere}', 'code-repo' : '{name of the CodeCommit repo - must match what you setup above, e.g. demo-multiarch-springboot-multiarch}', 'image-tag' : '{initial hash for ECR repo - must match what you have setup above, e.g. abcdef}' } 'home-pi' : '{the IP address of the Raspberry Pi you will be running your workloads on your local network}Once you have amended this file and saved it, we are ready to deploy the first stack. To make sure it is all working as expect, type the following:
cdk lsand you should see the following output, which means we are ready to go.
ecs-anywhere-cfnecs-anywhere-pipeecs-anywhere-vpcecs-anywhere-cicdecs-anywhere-lbDeploy the VPC stack
[8] The first stack we will deploy is the VPC which will deploy and configure all the networking components. Much of this will be used in Part Two. To deploy,
cdk deploy ecs-anywhere-vpcyou should see something like this if successful. You will need this info for Part Two, so make sure you keep a record although you can view this information in the CloudFormation console.
ecs-anywhere-vpcOutputs:ecs-anywhere-vpc.ExportsOutputRefmydcvpnvpcC99028A5E0C4BB86 = vpc-0e77901855dd34b64ecs-anywhere-vpc.ExportsOutputRefmydcvpnvpcprivateSubnet1Subnet907447937118DADD = subnet-00d3e62f014db2eb2ecs-anywhere-vpc.ExportsOutputRefmydcvpnvpcprivateSubnet2Subnet2F863D5508703380 = subnet-084ab056d6ab1ae1aecs-anywhere-vpc.ExportsOutputRefmydcvpnvpcpublicSubnet1Subnet93B9609B6FB2CB58 = subnet-0eb59347bf659e8d0ecs-anywhere-vpc.ExportsOutputRefmydcvpnvpcpublicSubnet2Subnet252458EC3B8C529C = subnet-038234a8a8bffb90aecs-anywhere-vpc.VPCId = vpc-0e77901855dd34b64ecs-anywhere-vpc.VPGId = vgw-0bc980838a7a37edaStack ARN:arn:aws:cloudformation:eu-central-1:704533066374:stack/ecs-anywhere-vpc/a5f78e70-e28e-11eb-90fc-026316002c84Deploy the Amazon ECS Cluster
[9] The next stage we will deploy the application into an Amazon ECS cluster. This will create two EC2 instances, one using x86 and the other, using AWS Graviton2 instance types. It will set up the application load balancer and create a service. Once this has completed, we will be able to access the application via the DNS name that is displayed in the output.
cdk deploy ecs-anywhere-cicdYou will see a review screen that shows the security changes this stack will deploy. Answer Y to deploy. After a while, if you are successful you will see the following:
ecs-anywhere-cicdOutputs:ecs-anywhere-cicd.LoadBalancerEndpoint = ecs-a-LB8A1-UQ0ZD3461WUB-1638849351.eu-central-1.elb.amazonaws.comStack ARN:arn:aws:cloudformation:eu-central-1:704533066374:stack/ecs-anywhere-cicd/7004c1a0-e290-11eb-9334-0288a08f1e2c[10] You will now be able to access the application via the browser, using the endpoint that is output. In my example, when I enter "http://ecs-a-LB8A1-UQ0ZD3461WUB-1638849351.eu-central-1.elb.amazonaws.com" into my browser and refresh a few times, I see the following:
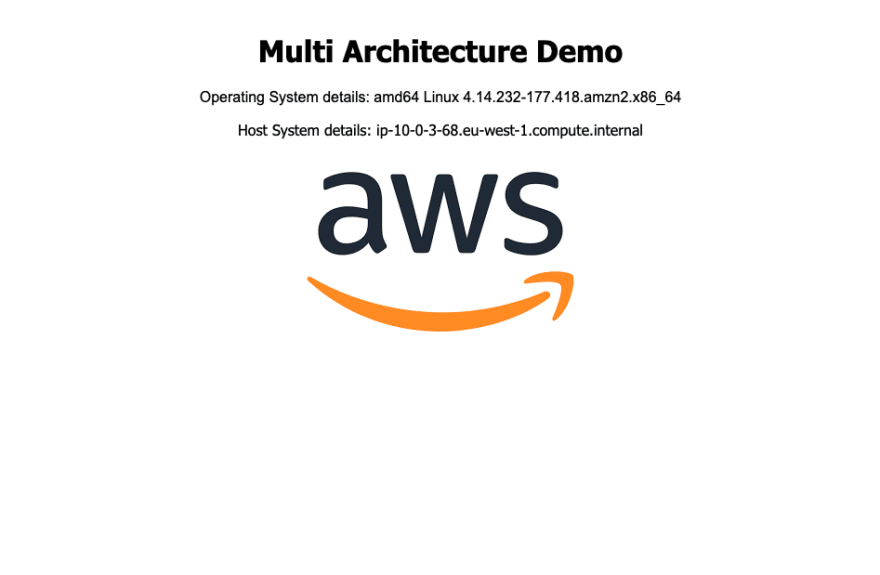
If I refresh the page a few times, you should see it change as your request is served up by a different container instance running on a different processor architecture
We have now deployed the application, next step is to setup and deploy a CI/CD so we can make changes and automate the process of 1/building updates container images of our application, and 2/deploy this to this cluster.
Deploying the CI/CD System
[11] From the command line, we can deploy the CI/CD setup with the following command:
cdk deploy ecs-anywhere-pipelineYou will see a review screen that shows the security changes this stack will deploy. Answer Y to deploy. After a while, if you are successful you will see the following:
ecs-anywhere-pipeOutputs:ecs-anywhere-pipe.CodeCommitOutput = https://git-codecommit.eu-central-1.amazonaws.com/v1/repos/demo-springboot-repoStack ARN:arn:aws:cloudformation:eu-central-1:704533066374:stack/ecs-anywhere-pipe/30f90840-e29a-11eb-b20f-0ae3cbe3a3b6That is it, you now have a CI/CD setup that is going to build both x86 and arm container images of your application every time you change your code.
The CDK application builds the CodePipeline and CodeBuild steps, ensures that the right permissions are defined and that it is integrated with the right source code repository to trigger the pipeline. It does not configure what these steps will do however, and for that we have some additional yml files where we configure the actual build steps.
In the source code repository you will find a directory called "pipelines/ecs-pipeline" which has three files; armbuild.yml, amdbuild.yml and post_build.yml. These are the files that are used to create the specific actions that will be done by the automation. They use environment variables, including some we have set in the code to store values such as the ECS Cluster and Service name, the Docker Hub username and password and the tag id used for the container repository.
Here is the post_build.yml file that takes the x86 and arm built containers, creates the container manifest files, tags them, uploads them to the Amazon ECR repository and then finally kicks of the deployment to our ECS cluster.
version: 0.2phases: pre_build: commands: - echo Logging in to Amazon ECR... - aws --version - $(aws ecr get-login --region $AWS_DEFAULT_REGION --no-include-email) - COMMIT_HASH=$(echo $CODEBUILD_RESOLVED_SOURCE_VERSION | cut -c 1-7) - IMAGE_TAG=${COMMIT_HASH:=latest} - ARM_TAG=${IMAGE_TAG}-arm64 - AMD_TAG=${IMAGE_TAG}-amd64 - echo $REPOSITORY_URI - echo $IMAGE_TAG - echo $AMD_TAG - echo $ARM_TAG - export DOCKER_CLI_EXPERIMENTAL=enabled build: commands: - echo Build started on `date` - echo Building the Docker manifest... - docker manifest create $REPOSITORY_URI:$IMAGE_TAG $REPOSITORY_URI:$ARM_TAG $REPOSITORY_URI:$AMD_TAG - docker manifest annotate --arch arm64 $REPOSITORY_URI:$IMAGE_TAG $REPOSITORY_URI:$ARM_TAG - docker manifest annotate --arch amd64 $REPOSITORY_URI:$IMAGE_TAG $REPOSITORY_URI:$AMD_TAG - docker manifest inspect $REPOSITORY_URI:$IMAGE_TAG - docker manifest push $REPOSITORY_URI:$IMAGE_TAG post_build: commands: - cd springbootdemo - sed -i "s|{ecr_image}|${REPOSITORY_URI}:${IMAGE_TAG}|g" tf.json - sed -i "s|{region}|$AWS_DEFAULT_REGION|g" tf.json - sed -i "s|{log_group}|$ECS_SN|g" tf.json - aws ecs register-task-definition --cli-input-json file://tf.json - TASK_DEFINITON="springboot-cicd" - TASK_REVISION=`aws ecs describe-task-definition --task-definition $TASK_DEFINITON | egrep "revision" | tr "/" " " | awk '{print $2}' | sed 's/,$//'` - aws ecs update-service --cluster $ECS_CLUSTER --service $ECS_SERVICE --task-definition $TASK_DEFINITON:${TASK_REVISION} - aws ssm put-parameter --name "/demo/ecsanywhere/latestimage" --value ${IMAGE_TAG} --type "String" --overwriteLet's review what we have done so far.
Reviewing what we just did
We have used AWS CDK as well as some scripts to automate the deployment and configuration of our sample application into an Amazon ECS cluster, and setup a simple CI/CD pipeline.
If you go to the AWS Console and review the Pipelines under CodePipeline, you should see that you now have a pipeline called "ECSAnyWhere" (or if you modified the code, what ever you renamed it to) with a status of successful.
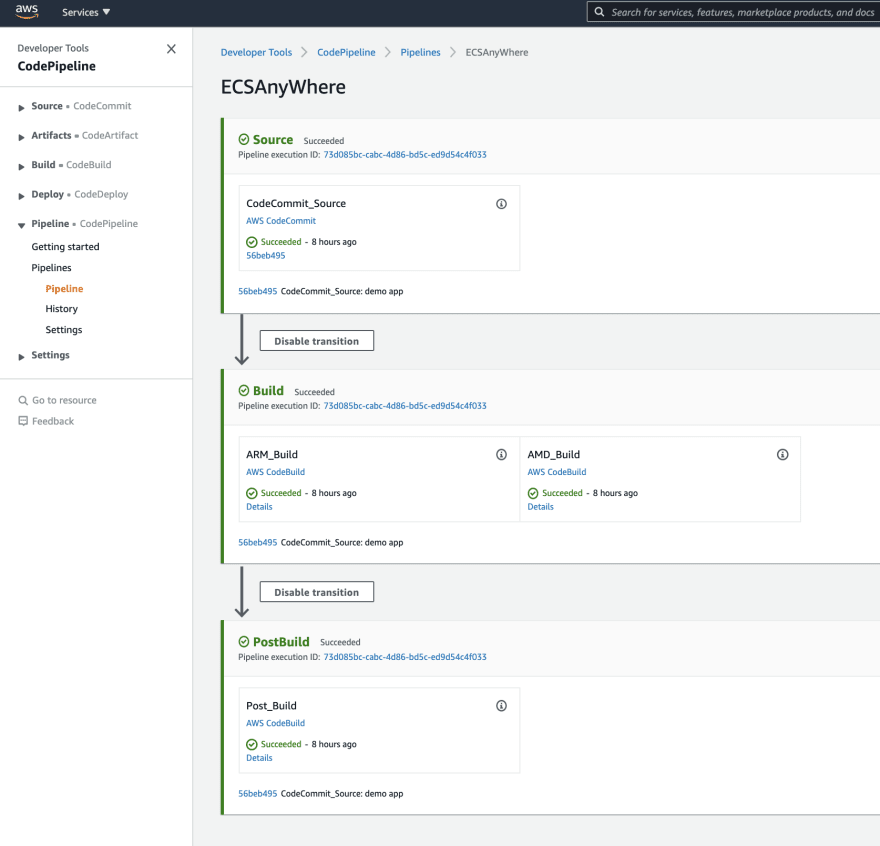
You can explore the build logs to see the output for each stage to see in more detail what is happening.
When we make changes to our application, it kicks off the CI/CD system which builds the application on both x86 and arm platforms, and then deploys these on both x86 and Graviton2 instance types. Check out the application repo locally and make some changes. The code you can change is the HelloController.java (it will be n the springboot/src/main/java/hello directory) and I suggest perhaps changing the version number or the text that is displayed.
Once you have committed the code, when you go back to the CodePipeline screen, you should see that the pipeline is kicking off. It will take around 5-10 minutes for the code to update and deploy to the ECS Cluster. Once it has, check both the application via the browser to see if your changes have been successful, or the logs (see below)
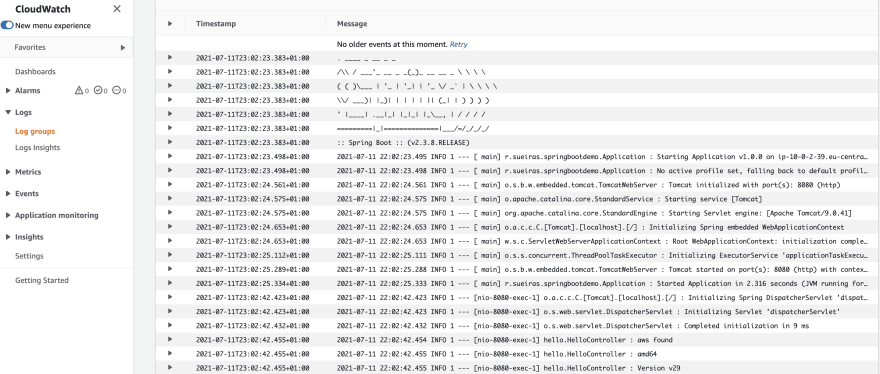
You can review the output of this via the CloudFormation console. There will be a new CloudWatch log group, which should have a log stream for each ECS instance (so if you follow all the defaults, there will be two). When you open these log streams, you should see the output as follows:
For the next part we are going to integrate with our "on premises" environment, which in my case, is my home network.
Part Two: Setting up and integrating with your local environment
Now that we have our application, the next stage is to integrate this with our own environment. I am going to be doing the following:
- Setup the local environment - configuring the site to site VPN and all the additional software components needed
- Deploying the AWS resources - we will set up an Amazon ECS cluster that will use the application we have just automated
- Integrate the on premises and AWS cloud environments
- Run our workloads, testing them both in the Cloud and on premises.
There are a number of great blog posts I read whilst preparing this post, which you should check out. The first is from Romain Jourdan Secure Connection between AWS VPC and a Raspberry Pi, but there are a few others that are worth mentioning. This blog post from Nathan Peck, Building an Amazon ECS Anywhere home lab with Amazon VPC network connectivity and this post Look ma, I can run containers on Amazon ECS Anywhere On-premises or on the Cloud !!. Finally, this great post, Setup Raspberry PI 3 as AWS VPN Customer Gateway helped get me unstuck when I had VPN issues.
Make sure you check them out if you get stuck or want to dive a little deeper into this setup.
Architecture
I am going to be using a Raspberry Pi as VPN Gateway, setup on my local network. I will use a different Raspberry Pi to run the application workloads.
If you have a different VPN Gateway (for example, if you are using a Unify type solution, then check out this Romain Jourdan blog post above).
The only thing I have done on my home router is to create a Firewall DMZ, which opens up the world to the Internet, to a single host (in my case, a Raspberry Pi which I will host my VPN Gateway). It is outside the scope of this post on how that is configured, but it is a hardened/secure configuration given it is "exposed".
Updating the local Raspberry Pi's
The first thing I had to do was to update the firmware and kernel to latest version on the Raspberry Pi. This is outside the scope of this post, but if you get errors during the VPN setup with missing libraries, it is likely they are the cause of the problem so make sure you update everything before proceeding. You should do this at the start before you begin.
I was using two different kinds of Raspberry Pi's - for the VPN Gateway I used an older Raspberry Pi Model 3 Rev B (running Raspbian), but for the Workloads I had a later Raspberry pi Model 4 (I was running Ubuntu 20.04.02 LTS).
This is the output once I had updated the Pi running the VPN Gateway
uname-a outputLinux dmcpi01 5.10.44-v7+ #1428 SMP Thu Jun 24 17:22:49 BST 2021 armv7l GNU/LinuxThis is the output once I had updated the Pi running the workloads
uname -aLinux ubuntu 5.4.0-1038-raspi #41-Ubuntu SMP PREEMPT Thu Jun 17 14:14:11 UTC 2021 aarch64 aarch64 aarch64 GNU/LinuxOn the Pi running the workloads I needed to make a modifications to /boot/firmware/cmdline.txt to append the following cgroup_enable=memory
This is what mine looked like
net.ifnames=0 dwc_otg.lpm_enable=0 console=serial0,115200 console=tty1 root=LABEL=writable rootfstype=ext4 elevator=deadline rootwait fixrtc cgroup_enable=memoryOnce that change was done, a reboot is required.
Setting up the local Raspberry Pi that will run the local VPN Gateway
[1] I needed to install some additional packages and dependencies. On the Raspberry Pi that is going to be my VPN Gateway, I run these commands
sudo apt-get updatesudo apt-get install strongswan raspberrypi-kernel-headers lsofWe can check to see if this has been successful by running this command
sudo ipsec statusWhich should not return any errors. This is now ready for connecting to our AWS VPN, which we will now create so for the time being we will leave this and come back later.
Setting up the Site to Site VPN
[2] When we ran the "cdk deploy ecs-anywhere-vpc" it deployed and configured everything on the AWS side for the Site to Site VPN. We now just need to configure the local VPN gateway (Strongswan) to set up the ipsec tunnels.
From the AWS console, you can see this if you go to the VPC, Site to Site Connections which should look something like this.

This information was provided in the parameter section of the app.py file, and the important details here now are the CIDR address ranges (that need to match your local network - for mine this is 192.168.1.0/24) and the external IP address which is what the VPN tunnel from the AWS side is going to look to connect to. If you are unsure what this is, you can find it by googling "my IP address" - make sure you are not connected to a VPN though, otherwise you will get a different.
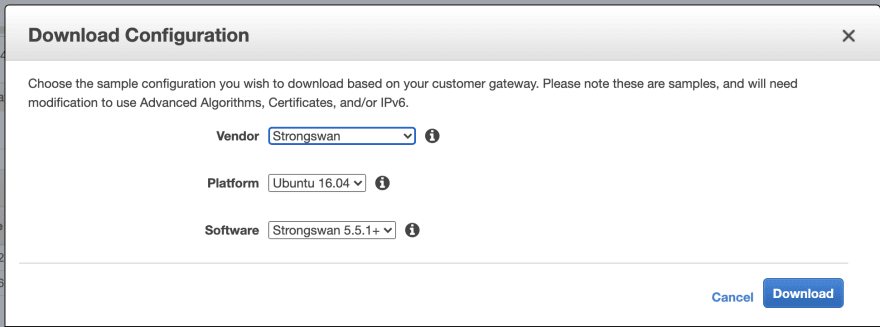
You will need to click on the DOWNLOAD CONFIGURATION (highlighted above/arrow) and then select STRONGSWAN from the pull down menu. There are only single options for PLATFORM/SOFTWARE so click on the DOWNLOAD button, which will download a text file.
[3] You will now need to follow the instructions provided in that text file on your Raspberry Pi local gateway.
It should be pretty straight forward, but might take you around 10-15 minutes to complete. For reference, these are the steps I took:
- Changed /etc/sysctl.conf as per the various options documented (and then reload this via sudo sysctl -p)
- Created the ipsec.conf and added details for the two ipsec tunnels
- Created the ipsec.secrets and added the shared secrets
- Created the tunnel interfaces, running these commands:
sudo ip link add Tunnel1 type vti local 192.168.1.6 remote 35.156.20.208 key 100sudo ip addr add 169.254.100.230/30 remote 169.254.100.229/30 dev Tunnel1sudo ip link set Tunnel1 up mtu 1419sudo ip route add 10.0.0.0/16 dev Tunnel1 metric 100sudo iptables -t mangle -A FORWARD -o Tunnel1 -p tcp --tcp-flags SYN,RST SYN -j TCPMSS --clamp-mss-to-pmtusudo iptables -t mangle -A INPUT -p esp -s 35.156.20.208 -d 79.67.110.164 -j MARK --set-xmark 100sudo ip link add Tunnel2 type vti local 192.168.1.6 remote 52.58.162.102 key 200sudo ip addr add 169.254.254.234/30 remote 169.254.254.233/30 dev Tunnel2sudo ip link set Tunnel2 up mtu 1419sudo ip route add 10.0.0.0/16 dev Tunnel2 metric 200sudo iptables -t mangle -A FORWARD -o Tunnel2 -p tcp --tcp-flags SYN,RST SYN -j TCPMSS --clamp-mss-to-pmtusudo iptables -t mangle -A INPUT -p esp -s 52.58.162.102 -d 79.67.110.164 -j MARK --set-xmark 200If you have run this successfully, when you run the ifconfig-a command, you should now see two new interfaces:
Tunnel1 Link encap:IPIP Tunnel HWaddr inet addr:169.254.100.230 P-t-P:169.254.100.229 Mask:255.255.255.252 inet6 addr: fe80::5efe:c0a8:106/64 Scope:Link UP POINTOPOINT RUNNING NOARP MTU:1419 Metric:1 RX packets:0 errors:0 dropped:0 overruns:0 frame:0 TX packets:0 errors:8 dropped:0 overruns:0 carrier:8 collisions:0 txqueuelen:1000 RX bytes:0 (0.0 B) TX bytes:0 (0.0 B)Tunnel2 Link encap:IPIP Tunnel HWaddr inet addr:169.254.254.234 P-t-P:169.254.254.233 Mask:255.255.255.252 inet6 addr: fe80::5efe:c0a8:106/64 Scope:Link UP POINTOPOINT RUNNING NOARP MTU:1419 Metric:1 RX packets:0 errors:0 dropped:0 overruns:0 frame:0 TX packets:0 errors:3 dropped:0 overruns:0 carrier:3 collisions:0 txqueuelen:1000 RX bytes:0 (0.0 B) TX bytes:0 (0.0 B)And if we check the routing tables, we should see we now have a path to our VPC on AWS via those interfaces.
netstat -rnKernel IP routing tableDestination Gateway Genmask Flags MSS Window irtt Iface0.0.0.0 192.168.1.1 0.0.0.0 UG 0 0 0 wlan010.0.0.0 0.0.0.0 255.255.0.0 U 0 0 0 Tunnel110.0.0.0 0.0.0.0 255.255.0.0 U 0 0 0 Tunnel2169.254.100.228 0.0.0.0 255.255.255.252 U 0 0 0 Tunnel1169.254.254.232 0.0.0.0 255.255.255.252 U 0 0 0 Tunnel2192.168.1.0 0.0.0.0 255.255.255.0 U 0 0 0 wlan0Note! This information is not persistent. If you restart your Pi, you will need to repeat these steps. Read the text file for details of how you can persist the configuration
[4] We can now start the local Strongswan VPN by running the following command:
sudo ipsec startWhich we can check by running
sudo ipsec statusWe should now see that the VPN is starting and establishing the connection with the AWS VPN Gateway.
Security Associations (2 up, 0 connecting): Tunnel2[2]: ESTABLISHED 3 seconds ago, 192.168.1.6[80.42.49.11]...18.184.143.185[18.184.143.185] Tunnel2{2}: INSTALLED, TUNNEL, ESP in UDP SPIs: c6777c18_i c9f1bf73_o Tunnel2{2}: 0.0.0.0/0 === 0.0.0.0/0 Tunnel1[1]: ESTABLISHED 3 seconds ago, 192.168.1.6[80.42.49.11]...3.65.61.44[3.65.61.44] Tunnel1{1}: INSTALLED, TUNNEL, ESP in UDP SPIs: c57f2982_i cbfd1699_o Tunnel1{1}: 0.0.0.0/0 === 0.0.0.0/0Note! If you see the following, then it is likely that you have entered the ipsec.conf/ipsec.security details incorrectly, so review that information.
Security Associations (2 up, 0 connecting): Tunnel2[2]: CONNECTING, 192.168.1.6[%any]...52.58.162.102[%any] Tunnel1[1]: CONNECTING, 192.168.1.6[%any]...35.156.20.208[%any]
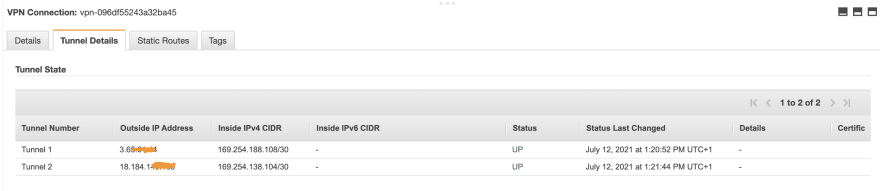
We can verify that everything is working by going to the AWS Console, and checking the status of the tunnel again. You should see that the VPN tunnel is now up.
Route to AWS
There is one final thing we need to do. On the Raspberry Pi that will be running our sample application, it does not yet know how to route traffic to AWS via the VPN. We need to add a static route:
sudo ip route add 10.0.0.0/16 via 192.168.1.6This will route all traffic for AWS via the Raspberry Pi VPN gateway (192.168.1.6) we just created.
Note! This is quite an important step. If the workload machine does not have a route back, during the later sections of this blog post, when you come to create a load balancer to this instance, you will get errors because the Pi does not know how to route traffic via the VPN.
We have now finished the networking part, and can move onto setting up our local workloads.
Note! Whilst I was putting this together, my broadband went down. When it came back, my external IP had changed. I had to update the IP in the app.py and then redeploy the ecs-anywhere-vpc stack to update everything.
Configuring and deploying AWS resources
We now have a secure connection between our AWS environment and our local environment. We will come back to this in a moment. Now we are going to setup our local Raspberry Pi workload machine so that it can become a host that can run our containerised applications and integrate with the Amazon ECS control plane.
This will involve creating a new ECS cluster in which we can register these "EXTERNAL" resources, and then setting up the software on those local resources (in my case, the Raspberry Pi workload machine) so that it can be managed by Amazon ECS.
Note! Connectivity between AWS and our local environment is needed as the local instance is in essence being managed by the Amazon ECS control plane. Whilst it can tolerate some down time, after a few hours you will experience issues with your local environment. Therefore this is not (currently at least) intended for disconnected/infrequently connected environments.
[4] We now need to go back to our developer machine where we ran t[]he CDK applications as part of Part One, and run the following to deploy a new Amazon ECS cluster which we will use to register the EXTERNAL, or hybrid ECS Anywhere instance.
cdk deploy ecs-anywhere-cfnYou will be prompted to review security settings, repond Y and if successful you should see output like the following:
ecs-anywhere-cfnOutputs:ecs-anywhere-cfn.ECSAnyWhereIamRole = ecs-anywhere-cfn-mydcecsroleE385F8F3-AI911P55T3JPecs-anywhere-cfn.ECSClusterName = mydc-ecs-extclusterStack ARN:arn:aws:cloudformation:eu-central-1:704533066374:stack/ecs-anywhere-cfn/24fb74e0-e2fb-11eb-ae06-06c47aa6fac8We are going to use the values of ecs-anywhere-cfn.ECSAnyWhereIamRole in a moment. In my example here, it is ecs-anywhere-cfn-mydcecsroleE385F8F3-AI911P55T3JP
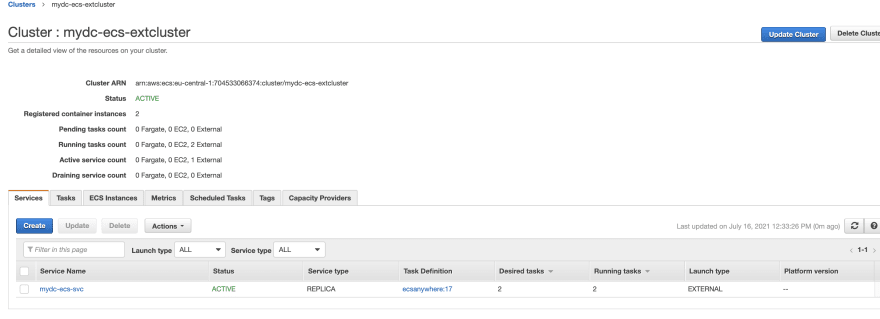
If you go to the AWS console you will now see a new ECS cluster appear (which should match the name in the output of ecs-anywhere-cfn.ECSClusterName (so in the above example, this is mydc-ecs-extcluster)
Setting up the local Raspberry Pi that will run our ECS Anywhere workloads
[5] Log back into your local Raspberry Pi where you plan to run your workloads. You will need to install the AWS cli and then configure with a set of AWS credentials. I created a new IAM user for this purpose, but this is up to you.
sudo apt-get install awscliaws configure[6] We now need to install the agent software onto this Raspberry Pi (workload). Before we do that though, we need to get an activation code, which we will use the IAM role we created above (the output from the CDK app - ecs-anywhere-ec2.ECSAnyWhereIamRole, which in my example was ecs-anywhere-cfn-mydcecsroleE385F8F3-AI911P55T3JP)
aws ssm create-activation --iam-role ecs-anywhere-cfn-mydcecsroleE385F8F3-AI911P55T3JP --region={region} | tee ssm-activation.jsonWhich generated the following output.
{ "ActivationId": "0c8840d6-cd71-482c-9ea5-3c8380cc325a", "ActivationCode": "v4PEBr7nyIQ6u55OaWs!"}Note! Do not share these or store these electronically. I have changed these values and they will not work.
Will need these values in a minute, so lets create environment variables
export id="0c8840d6-cd71-482c-9ea5-3c8380cc325a"export code="v4PEBr7nyIQ6u55OaWs!"Once you have these values, the clock is ticking. You will have a short amount of time in which to run the script (which will depend on how you have configured your AWS environment account timeouts). To know if this is the cause of any issues, you will see the following error in your logs like
level=error time=2021-06-30T16:22:12Z msg="Unable to register as a container instance with ECS: ExpiredTokenException: The security token included in the request is expired
status code: 400, request id: f21461d9-ba49-4097-a66c-a902747428c4" module=client.golevel=error time=2021-06-30T16:22:12Z msg="Error registering: ExpiredTokenException: The security token included in the request is expired
status code: 400, request id: f21461d9-ba49-4097-a66c-a902747428c4" module=agent.go
[7] Run the following command which will download the ECS Anywhere installation script which does three things: it installs the ECS Agent, the SSM Agent and the Docker engine
curl --proto "https" -o ~/ecs-anywhere-install.sh "https://amazon-ecs-agent.s3.amazonaws.com/ecs-anywhere-install-latest.sh"When we ran the CDK script to provision the ECS cluster, it output the name of the ECS Cluster, so lets assign that to an environment variable as will need to use that in the next step.
export ecscluster="mydc-ecs-extcluster"[8] We can now run the installation script to install and configure the required software components.
sudo bash ~/ecs-anywhere-install.sh --region {your AWS region} --cluster $ecscluster --activation-id $id --activation-code $codeThis is going to take a few minutes whilst it downloads, installs and configures the SSM and ECS agents on the Raspberry Pi.
If you see the following error, make sure you have set your AWS region information correctly:
Error occurred fetching the seelog config file path: open /etc/amazon/ssm/seelog.xml: no such file or directory
Initializing new seelog logger
New Seelog Logger Creation Complete
2021-07-12 12:46:23 WARN Could not read InstanceFingerprint file: InstanceFingerprint does not exist.
2021-07-12 12:46:23 INFO No initial fingerprint detected, generating fingerprint file...
2021-07-12 12:46:25 ERROR Registration failed due to error registering the instance with AWS SSM. InvalidActivation:
You should get output similar to the following
......Ping ECS Agent registered successfully! Container instance arn: "arn:aws:ecs:eu-west-1:704533066374:container-instance/ecs-anywhere-ec2-mydcecsclusterBB109425-r7l2mKClssuV/8dfb8700d9a1460dad403a321db6b5b9"You can check your ECS cluster here https://console.aws.amazon.com/ecs/home?region=eu-west-1#/clusters/ecs-anywhere-ec2-mydcecsclusterBB109425-r7l2mKClssuV# ok####################################################This script installed three open source packages that all use Apache License 2.0.You can view their license information here: - ECS Agent https://github.com/aws/amazon-ecs-agent/blob/master/LICENSE - SSM Agent https://github.com/aws/amazon-ssm-agent/blob/master/LICENSE - Docker engine https://github.com/moby/moby/blob/master/LICENSE##########################What just happened?
Well, on your local (in my case, Raspberry Pi) the script (ecs-anywhere-install.sh) installs and configures the AWS SSM Agent as well as the ECS Anywhere agent. The script will also install additional software for running your container applications, for example Docker.
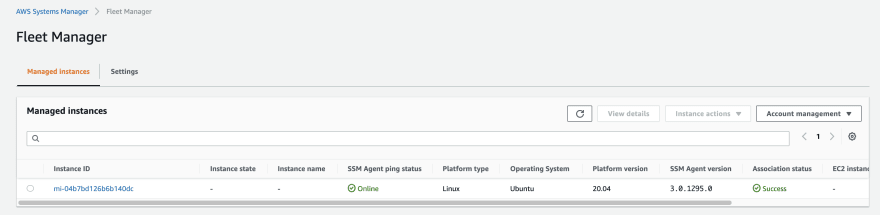
If we go to AWS System Manager > Fleet Management we should now see our Raspberry Pi show up.
The ECS Agent has also been added as a resource to the ECS Cluster we created. If we go to the AWS Console and look at the ECS Clusters, we will see this new resource listed.
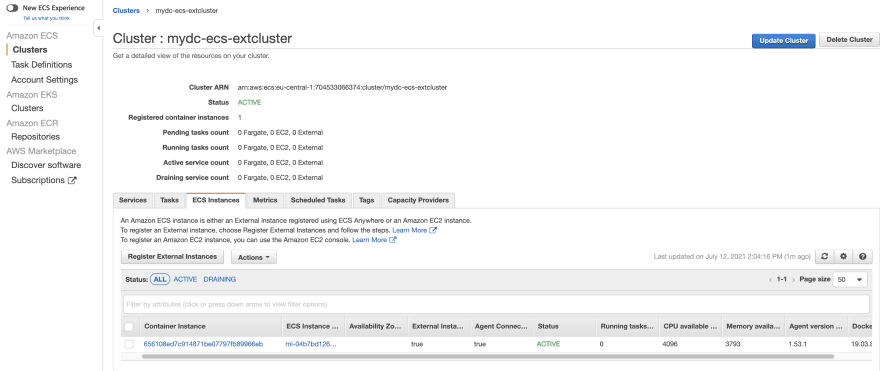
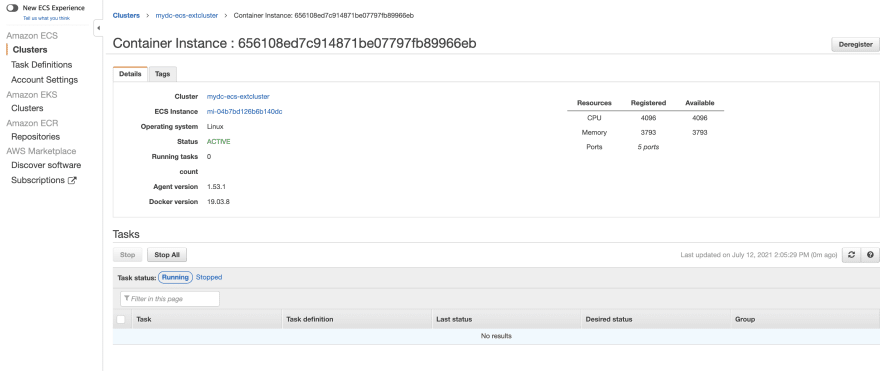
We can click on it to see more details about the available resources (memory / cpu / processor / etc) that this instance provides
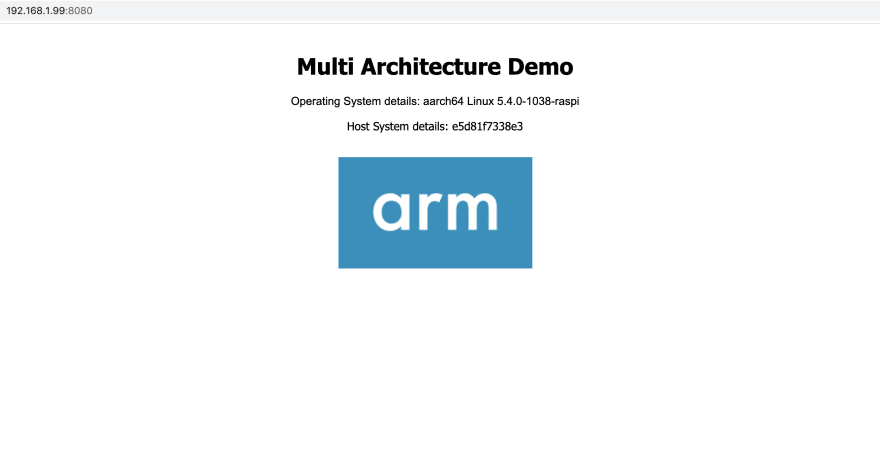
We can now deploy our application to this ECS cluster, and it will get deployed onto our local Raspberry Pi and then be accessible via the local network (in my case, this is http://192.168.1.99)
Deploying the application to your local ECS Anywhere cluster
[9] We will do this via the cli before we amend the CI/CD system so that this is automatically done every time there is an update.
Note! The first time that you launch the task, the Raspberry Pi will need to download the container images so it will take longer to start the application (and will vary depending on your internet connection). If you notice your Task is in "PENDING" then this could be the reason.
The first thing we need to do is prep the task_definion.json file which we will use to create a new version of the task definition that was created during the AWS CDK ecs-anywhere-cfn deployment. We create a file called tf-any.json as follows
{ "requiresCompatibilities": [ "EXTERNAL" ], "containerDefinitions": [{ "name": "springboot-remote", "image": "{ecr_image}", "memory": 256, "cpu": 256, "essential": true, "portMappings": [{ "containerPort": 8080, "hostPort": 8080, "protocol": "tcp" }] }], "networkMode": "bridge", "family": "ecsanywhere"}We know what the latest container image is by looking in the ECR Repository. (When we come to automate this via CI/CD, these are passed as environment variables, so we only need to do this now as we bootstrap the application for the first time)
export APP="704533066374.dkr.ecr.eu-central-1.amazonaws.com/demo-springboot-ecsanywhere:56beb49"sed -i "s|{ecr_image}|$APP|g" tf-any.jsonNote! If you are using a Mac, you will need to use "sed -i '.bak' "s|{ecr_image}|$APP|g" tf-any.json"
This will update the file with the container reference and has. We can now register a new task definition. I will use what we already have in the post_build.yml script.
LOCAL_ECS_CLUSTER="mydc-ecs-extcluster"LOCAL_ECS_SERVICE="mydc-ecs-svc"LOCAL_TASK_DEFINITON="ecsanywhere"aws ecs register-task-definition --cli-input-json file://tf-any.json --region={the region where the ECS cluster is running}This will generate output similar to the following:
{ "taskDefinition": { "taskDefinitionArn": "arn:aws:ecs:eu-central-1:704533066374:task-definition/ecsanywhere:5", "containerDefinitions": [ { "name": "springboot-remote", "image": "704533066374.dkr.ecr.eu-central-1.amazonaws.com/demo-springboot-ecsanywhere:56beb49", "cpu": 256, "memory": 256, "portMappings": [ { "containerPort": 8080, "hostPort": 8080, "protocol": "tcp" } ], "essential": true, "environment": [], "mountPoints": [], "volumesFrom": [] } ], "family": "ecsanywhere", "networkMode": "bridge", "revision": 5, "volumes": [], "status": "ACTIVE", "requiresAttributes": [ { "name": "com.amazonaws.ecs.capability.ecr-auth" } ], "placementConstraints": [], "compatibilities": [ "EXTERNAL", "EC2" ], "requiresCompatibilities": [ "EXTERNAL" ] }}Now I need to grab the latest version from that output, and then use that to update the running service.
LOCAL_TASK_REVISION=`aws ecs describe-task-definition --task-definition $LOCAL_TASK_DEFINITON --region={the region where the ECS cluster is running} | egrep "revision" | tr "/" " " | awk '{print $2}' | sed 's/,$//'`If we use "echo $LOCAL_TASK_REVISION" you will see the new version number which we will use when we update the running service. Now we have everything we need to update the service, which we can do using the following command:
aws ecs update-service --cluster $LOCAL_ECS_CLUSTER --service $LOCAL_ECS_SERVICE --task-definition $LOCAL_TASK_DEFINITON:${LOCAL_TASK_REVISION} --region={the region where the ECS cluster is running}Which will give you something like:
{ "service": { "serviceArn": "arn:aws:ecs:eu-central-1:704533066374:service/mydc-ecs-extcluster/mydc-ecs-svc", "serviceName": "mydc-ecs-svc", "clusterArn": "arn:aws:ecs:eu-central-1:704533066374:cluster/mydc-ecs-extcluster", "loadBalancers": [], "serviceRegistries": [], "status": "ACTIVE", "desiredCount": 1, "runningCount": 1, "pendingCount": 0, "launchType": "EXTERNAL", "taskDefinition": "arn:aws:ecs:eu-central-1:704533066374:task-definition/ecsanywhere:5", "deploymentConfiguration": { "deploymentCircuitBreaker": { "enable": false, "rollback": false }, "maximumPercent": 200, "minimumHealthyPercent": 100 }, "deployments": [ { "id": "ecs-svc/2775386206525924918", "status": "PRIMARY", "taskDefinition": "arn:aws:ecs:eu-central-1:704533066374:task-definition/ecsanywhere:5", "desiredCount": 1, "pendingCount": 0, "runningCount": 0, "failedTasks": 0, "createdAt": 1626102200.686, "updatedAt": 1626102200.686, "launchType": "EXTERNAL", "rolloutState": "IN_PROGRESS", "rolloutStateReason": "ECS deployment ecs-svc/2775386206525924918 in progress." }, { "id": "ecs-svc/7501839119011433935", "status": "ACTIVE", "taskDefinition": "arn:aws:ecs:eu-central-1:704533066374:task-definition/ecsanywhere:4", "desiredCount": 1, "pendingCount": 0, "runningCount": 0, "failedTasks": 2, "createdAt": 1626101923.328, "updatedAt": 1626101923.328, "launchType": "EXTERNAL", "rolloutState": "IN_PROGRESS", "rolloutStateReason": "ECS deployment ecs-svc/7501839119011433935 in progress." }, { "id": "ecs-svc/5388566575203796106", "status": "ACTIVE", "taskDefinition": "arn:aws:ecs:eu-central-1:704533066374:task-definition/ecsanywhere:3", "desiredCount": 1, "pendingCount": 0, "runningCount": 1, "failedTasks": 0, "createdAt": 1626101139.148, "updatedAt": 1626101938.625, "launchType": "EXTERNAL", "rolloutState": "COMPLETED", "rolloutStateReason": "ECS deployment ecs-svc/5388566575203796106 completed." } ],......Accessing the application locally
[10] On your local network, you can now access the application via your web browser on port 8080. When I access this on my network, this is what I get.
Now that we know it works, we can automate those steps and incorporate it within the CI/CD system.
Updating the CI/CD to deploy locally
To do this all we need to do is update the post_build step in the CI/CD workflow. The containers have already been built/packaged, so all we need is to add the following steps:
# - sed -i "s|{ecr_image}|${REPOSITORY_URI}:${IMAGE_TAG}|g" tf-any.json# - LOCAL_ECS_CLUSTER="mydc-ecs-extcluster"# - LOCAL_ECS_SERVICE="mydc-ecs-svc"# - aws ecs register-task-definition --cli-input-json file://tf-any.json# - LOCAL_TASK_DEFINITON="ecsanywhere"# - LOCAL_TASK_REVISION=`aws ecs describe-task-definition --task-definition $LOCAL_TASK_DEFINITON | egrep "revision" | tr "/" " " | awk '{print $2}' | sed 's/,$//'`# - aws ecs update-service --cluster $LOCAL_ECS_CLUSTER --service $LOCAL_ECS_SERVICE --task-definition $LOCAL_TASK_DEFINITON:${LOCAL_TASK_REVISION} These are already in the sample files, but commented out. This is because the post_build script would have failed prior to us setting up the remote cluster. We can now enable these (and if you have changed any of the names, make sure you update the values above).
To do this, we check out the repository, make the changes and then commit the changes. Once committed, this will trigger the build process. The changes we will make are:
- upload the new tf-any.json file to the springboot folder - this is going to be updated every time a new container image is built, and then used to register a new task
- update the post_build.yml to include the steps above, updating the tf-any.json file and then triggering the deployment
Change the following line in the code, increasing the number so you can see that a new version has been deployed
str = str.concat("<p style='text-align:center;font-family:Arial'>Version : 25 </p><br>
");
Once committed, you should see the Pipeline trigger the build process. Make sure you check out the logs in CodePipeline, looking at the Post Build logs. You will the new lines we added to the build script running the update and deploy to the local Raspberry Pi managed via ECS Anywhere.
After about 5-10 minutes, refresh the browsers for the local and the AWS load balanced version and they should both be at the same revision. But wait, they are not. The ECS cluster on AWS has updated, but not the local one. What is going on?
Local Cluster vs AWS Clusters
The reason why the local ECS cluster has not updated is because there are no other instances to deploy the application onto. We have two instances on AWS, and these are rolled out one at a time, validated and then the old one removed. With our local instance, we only have the single Raspberry Pi.
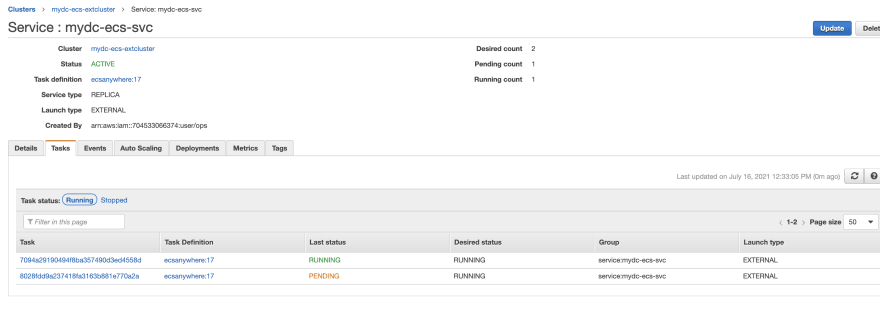
We will need to stop the running task. The ECS Anywhere agent will then detect that it is not running and then start a new instance, choosing the latest version that we just created. To do this, from the AWS Console, go to the Amazon ECS Cluster view, select the local cluster (mine is called mydc-ecs-extcluster) and then click on the TASKS tab. Select the check box next to the running task and select STOP, ignoring the warning.
If you try and access the application via a browser, you will now get an error. We have no running containers to service our requests. After about 1-2 minutes, the ECS Service will realise there are no tasks running and kick off a new one. Once this is up and running, when we refresh, you should now see that this is running the same version.
Adding more local capacity
We can easily address this issue by adding more local instances to the local ECS Cluster that is managed by ECS Anywhere.
Repeating the steps above, I added another local machine - this time, my main Ubuntu desktop which is running on an old x86 machine. I can see this has been successful as it now appears as a new ECS instance under the ECS instances tab.

When you now kick off a new build, it will provision the task on the free instance, check that it is up and running before draining session from the old application
If we wanted too, we could increase the number of instances we want this cluster to support (when we set it up via the CDK application, we defined we wanted the "desired count" to be one. If we go back to that code, update the number to two, and redeploy.
service = ecs.CfnService( self, f"{props['ecsclustername']}-svc", service_name=f"{props['ecsclustername']}-svc", cluster=f"{props['ecsclustername']}-extcluster", launch_type="EXTERNAL", desired_count=2, task_definition="ecsanywhere" #task.to_string() )We can now see we have this cluster with running running tasks, spread across the two different (local) ECS instances managed by ECS Anywhere.

And now we have them both running

We are nearly finished, just one last thing.
Accessing the application via an AWS Load Balancer
It would be great if we could now access the application via a load balancer in the cloud. Why would we do that? Perhaps we want to leverage a Cloud based application load balancer rather than deploying and managing our own one. This would allow us to deploy more local machines, and then ECS Anywhere would be able to deploy those applications across those instances. No more manually stopping tasks.
We can automate that with some more CDK code, and adding a new item in the props file so we do not need to hard code the entry.
local_lb_security_group = ec2.SecurityGroup( self, "Load Balance internal Springboot http access", vpc=vpc ) local_lb_security_group.add_ingress_rule( ec2.Peer.any_ipv4(), ec2.Port.tcp(80) ) local_lb_security_group.add_egress_rule( ec2.Peer.ipv4(f"{props['mydcinternalcidr']}"), ec2.Port.tcp(8080) ) lb = elbv2.ApplicationLoadBalancer( self, "LB", vpc=vpc, internet_facing=True, security_group=local_lb_security_group ) listener = lb.add_listener( "Listener", port=80, open=True ) remotepi = elbv2.IpTarget( f"{props['home-pi']}", port=8080, availability_zone="all") listener.add_targets( "Target", port=8080, targets=[remotepi] )To kick this off we just run
cdk deploy ecs-anywhere-lbAnd after a few minutes, you should see the following output.
ecs-anywhere-lbecs-anywhere-lb: deploying...ecs-anywhere-lb: creating CloudFormation changeset... ecs-anywhere-lbOutputs:ecs-anywhere-lb.PiRemoteLB = ecs-a-LB8A1-UMQHFMJZEX80-435054691.eu-central-1.elb.amazonaws.comStack ARN:arn:aws:cloudformation:eu-central-1:704533066374:stack/ecs-anywhere-lb/017fbe20-e3ca-11eb-b32e-06f34beb5820You will see that it outputs the DNS name of the Load Balancer created, which we can put into our browser. When we put "ecs-a-LB8A1-UMQHFMJZEX80-435054691.eu-central-1.elb.amazonaws.com" into our browser, we see our glorious application again.
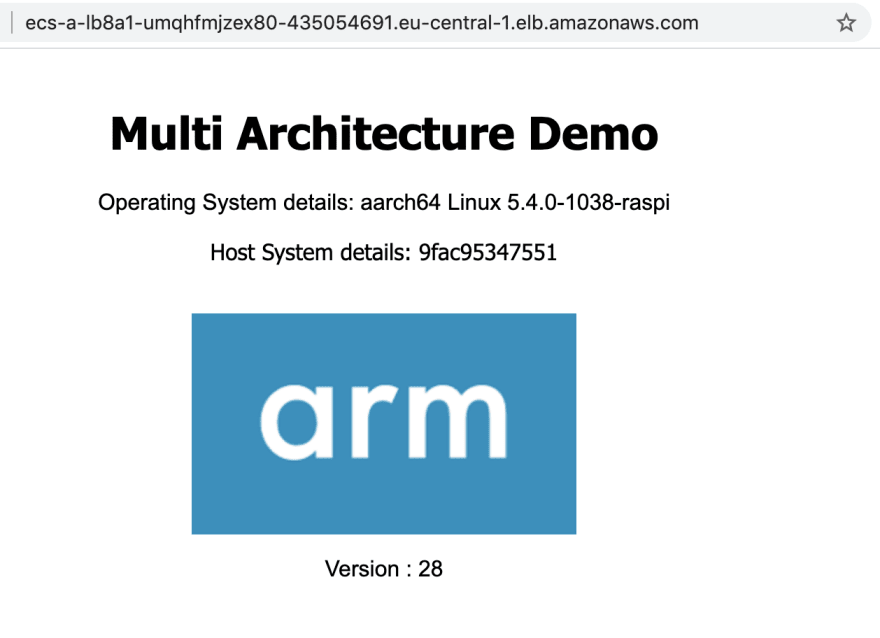
Note! We only added one of the local nodes but we can add both which we will see in the next section.
Improvements
Congratulations, you have come to the end of this post and walk through. As always, this is just the start and I hope that you take the time to explore the code and build upon it and improve it for your own use cases.
One thing that I did manage to do via the console, but have not figured out yet how to do via my CDK application is to incorporate the local Raspberry Pi into the first ECS cluster. Do do this I first uninstalled the previous step:
cdk destroy ecs-anywhere-lbOnce this finished, I then went to the AWS console, found the Target Group that had the existing EC2 instances registered (one running on x86 instance types, the other AWS Graviton2) and then registered manually my local Raspberry Pi (using the settings of the VPC created as part of this application, the IP address of the local Raspberry Pi 192.168.1.99, and the other local machine 192.168.1.110, the port they are listening to - 8080. I then added this to the cluster.
When that completed, it came back as unhealthy. Why?
This is to be expected, and shows the security groups working. The original ECS Cluster has a security group setup that controls access from the Application Load Balancer to the EC2 instances, on the target port (8080). That was for the subnet that those instances were on, not my local network (which is on a 192.168.1.0/24 CIDR).
I needed to add a new rule that would allow the Application Load Balancer to health check and route traffic, so I added a new rule (in my instance, updating sg-027005ab1cded3bce to enable TCP port 8080 access to the CIDR 192.168.1.0/24 range.
Once that was completed, I now had three healthy targets.

And now when refreshing the original link, we can see we have all four different hosts servicing requests.

Managing your local ECS Anywhere cluster
I thought it would be useful to share some of the things I found useful when administering the local ECS Anywhere instance.
Managing the agent
To shutdown, restart and get a status you can use the following commands
sudo systemctl stop ecssudo systemctl status ecssudo systemctl start ecsExample output
ecs.service - Amazon Elastic Container Service - container agent Loaded: loaded (/lib/systemd/system/ecs.service; enabled; vendor preset: enabled) Active: active (running) since Mon 2021-06-28 12:37:53 UTC; 2 days ago Docs: https://aws.amazon.com/documentation/ecs/ Main PID: 2214 (amazon-ecs-init) Tasks: 8 (limit: 4435) Memory: 12.0M CGroup: /system.slice/ecs.service 2214 /usr/libexec/amazon-ecs-init startLog files
If you want to find the log files, then these are located in /var/log/ecs
- ecs-agent.log
- ecs-init.log
You can view the ECS agent initialisation logs as well as the operational logs.
Other key files
The name of the ECS Cluster can be found in /etc/ecs/ecs.config. You may need to update/remove this as you experiment.
If you are trying this and run into the following error:
level=critical time=2021-06-30T15:52:29Z msg="Data mismatch; saved cluster 'dc_pi_ecs_cluster' does not match configured cluster 'ecs-anywhere-ec2-mydcecsclusterBB109425-3HBnIv5IpvQm'. Perhaps you want to delete the configured checkpoint file?" module=agent.goWhen the agent starts (perhaps because this is a subsequent installation or you have changed values) then you may need shutdown your ECS agent, move/rename the following file /var/lib/ecs/data/agent.db and then restart to recover.
You may also need to move/rename the /var/lib/amazon/ssm if you get issues around the agent failing to install on subsequent attempts. If you are seeing errors like this in your hibernate.log
2021-06-30 18:30:37 ERROR Health ping failed with error - error occurred in RequestManagedInstanceRoleToken: AccessDeniedException: Authentication failed status code: 400, request id: afbe8882-27ed-49fa-92a9-1c3582b12f11The shut down your agent/uninstall/move or rename that directory and re-run the script.
Cleaning up
Removing the AWS resources
We can clean up what we have created by running the following commands:
cdk destroy ecs-anywhere-lbcdk destroy ecs-anywhere-cfncdk destroy ecs-anywhere-pipecdk destroy ecs-anywhere-cicdcdk destroy ecs-anywhere-vpcOnce this has completed, you will then manually need to delete the following AWS resources:
- AWS CodeCommit and ECR repositories as these will not be deleted
- AWS System Manager Parameter Store values for the Docker Hub user name and password and the ECS Cluster details
Cleaning up your local environment
sudo systemctl stop amazon-ssm-agentsudo systemctl stop ecsRemove the ECS Anywhere and SSM agents
sudo apt remove amazon-ecs-initsudo apt remove amazon-ssm-agentRemove the Strongswan software from the Pi VPN Gateway
sudo apt remove strongswanYou should can also remove the /etc/ecs.config file which may not be removed when the package is installed, as well as cleaning up the /var/lib/ecs folder too.
And your environment should now be disconnected from AWS Systems Manager and Amazon ECS
Conclusion
In this post I have shown you one way in which you can automate the creation of multiple architecture and deployment options for your containerised applications, integrating with ECS Anywhere to provide you with more choices as to where you deploy those workloads.
There are many ways the scripts could be improved, but I hope that these will save you some time as you look to automate your deployment processes. I will hope to build on this post with future posts which add/update the existing CDK applications to cover:
- adding security to the application, automating the provisioning of SSL certificates and a friendly DNS name
- integrating other applications or services we might need to use as part of our application
- what would you like to see?
Lastly, I would be grateful if you could provide me with some short feedback on this walkthrough. Please complete this very short survey here.
Please let me know if you find this post useful and how you might use this kind of setup. Are you exploring moving your workloads to arm processing architectures? Are you looking to explore hybrid scenarios where you deploy a single application across different environments?
Made with
Original Link: https://dev.to/aws/creating-a-multi-architecture-ci-cd-deployment-for-amazon-ecs-and-ecs-anywhere-15o3
Dev To
More About this Source Visit Dev To