
An Interest In:
Web News this Week
- April 1, 2024
- March 31, 2024
- March 30, 2024
- March 29, 2024
- March 28, 2024
- March 27, 2024
- March 26, 2024
Some of Our Sources
- Technology Review
- Just Creative
- Six Revisions
- You The Designer
- FanExtra - PSD
- Crazy Leaf Design
- Specky Boy
- Design Modo
- Android Dissected
- Willems Lab
Help Webnuz
Referal links:
How to send a SMS using Twilio
Whether that be notification, security OTPs or alerts, SMS is one of the best methods of reaching your user base. Adding SMS services requires a backend setup for Twilio or other SMS services. Our goal is to create an endpoint that we can trigger to send our SMS on the Twilio without writing any backend code.
Creating project on low-code tool
We head over to Canonic and sign in using our social accounts. Next, we click on Create New to create a project for our application. Click on next, then click on create to complete the process.

A popup asking your first table name will appear. If not, you can click on the + icon in the header to create a new table. Let's name our first & only table for this project as Messages.

We create a text field named "Message" as we'll need it in the API & also to store the messages we send out.

We hit deploy on the top right, and we'll be provided with a hosted backend. a database & basic CRUD endpoints per table to help us create an API for our Twilio integration.
Click on the API tab on the left to start adding the twilio webhook. We select the createMessage block in mutations. Click on the + button. It'll open up a new webhook settings on the right hand side.

Select Message type Choose Twilio from the list of providers & you'll be provided with fields for settings.
SID This is your Twilio account number, generated along with access tokens..
Auth Token To generate auth token, you should follow Twilio's guide - https://www.twilio.com/docs/iam/access-tokens#creating-tokens
Sender's phone number Phone number to be used to send (should be verified by twilio)
Receiver's phone number Phone number of the receiver of the sms (should be verified by twilio)
Message Body Message to send to the user.

For Message body We want to send the text found in the message field of the API to Twilio. So we can make use of Handlebars templates & simply write
{{message}}
in that field. This will extract the message field from the API payload and forward it to Twilio.
The above concludes the setup for the API that was required. Now let's start using this API to start sending SMS to our user base.
Integrating our existing app with this API:
This will require a combination of things that we need for securely connecting our application with this API.
- Access token for our API
- Documentation for the API
Access Tokens
Click on Settings using left side menu. Go to Access tokens tab.

Click on Create a new token, and provide it a suitable name and permissions. Click on Create.
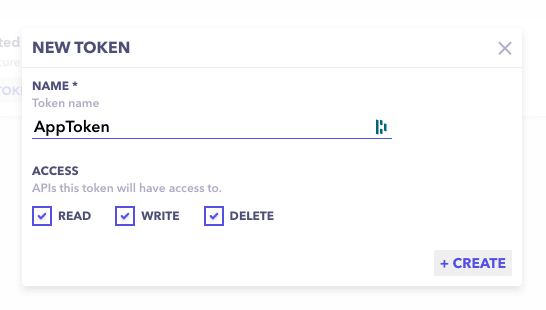
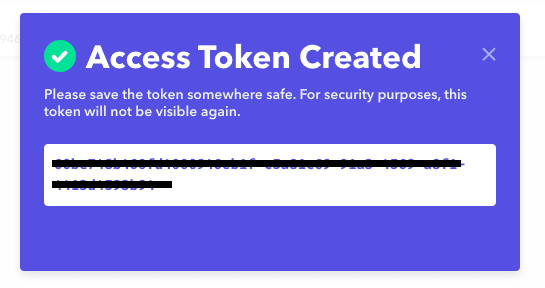
You've successfully generated an access token for your API. Copy it & save it some place safe as you won't be able to see it again.
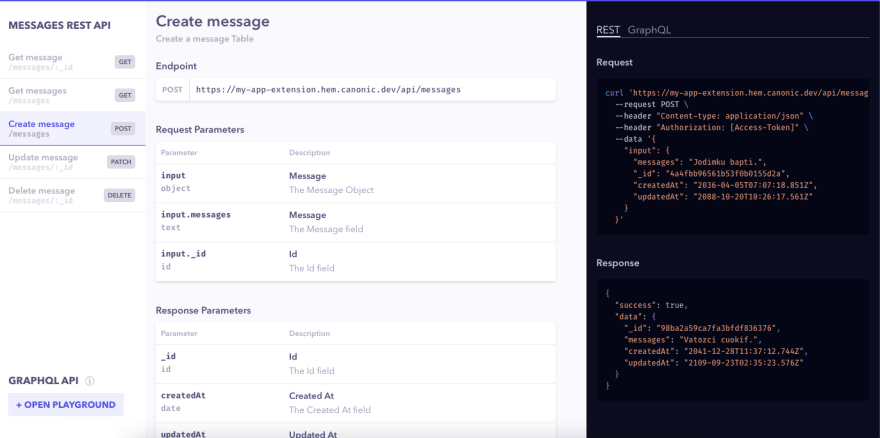
Documentation
Head over to the docs tab using the left-hand side, and you'll find documentation for createMessage API (the API block where we added our twilio webhook).
Testing
After completing all the necessary steps, we're finally ready to deliver our first SMS using our Twilio-connected API.
- Let's copy the CURL command that was mentioned in the documentation. Fill in your access token and paste it into the terminal.
Our curl command will look something like this.
~ curl 'https://xxxx.hem.canonic.dev/api/messages' \ --request POST \ --header "Content-type: application/json" \ --header "Authorization: xxxxxx-xxxxx-xxxx" \ --data '{ "input": { "message": "Hello! how are you?", } }'A successful response will look like this:
{"data":{"messages":"Hello! how are you?","_id":"60bf30ee2529700009fd2a4a","createdAt":"2021-06-08T08:57:18.316Z","updatedAt":"2021-06-08T08:57:18.316Z","__v":0,"id":"60bf30ee2529700009fd2a4a"},"error":null,"success":true}%
And you'll hear a bell ring in the receiver's phone , and our SMS has been successfully delivered.
Dynamic Receiver phone number
So far we've added a fixed receiver's phone number, but what if you want to dynamically change who you send the SMS to. For achieving this, we can add another field in our graph of type Number & Deploy it.
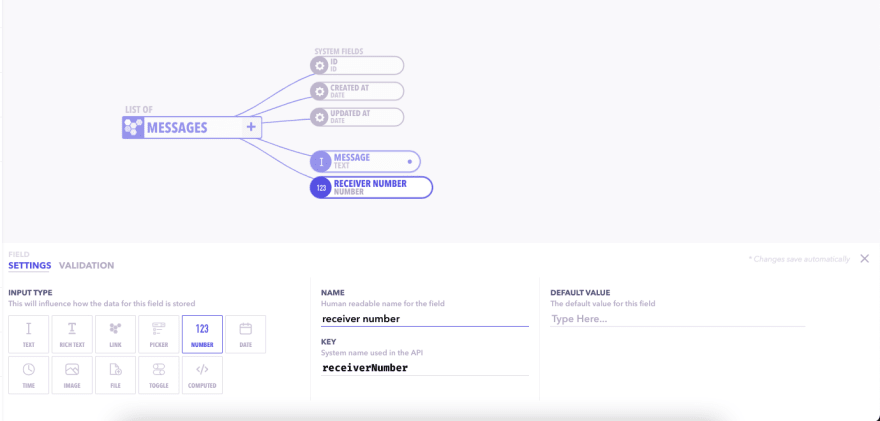
In the Twilio webhook settings, you can modify the receiver phone number option to
{{ receiverNumber }}
and it'll extract the receiver's phone number from the API to send SMS to.
Find detailed documentation for this feature here - https://docs.canonic.dev/concepts/webhook-providers/twilio
Hope this guide was helpful and we are excited to see you built your roadmap using Canonic. If you want you can also duplicate this project from Canonic's sample app and easily get started by customising it as per your experience. If you want to experience how our roadmap turned out. Check it out app.canonic.dev.
Join us on Discord to discuss or share with our community. Write to us for any support requests at [email protected]. Checkout our website to know more about Canonic
Original Link: https://dev.to/canonic/how-to-send-a-sms-using-twilio-2lp3
Dev To
More About this Source Visit Dev To