
An Interest In:
Web News this Week
- April 16, 2024
- April 15, 2024
- April 14, 2024
- April 13, 2024
- April 12, 2024
- April 11, 2024
- April 10, 2024
Some of Our Sources
- Slashdot
- Technology Review
- Joshua Blankenship
- Six Revisions
- You The Designer
- Creative Curio
- Fuel Your Creativity
- Reencoded
- Specky Boy
- TechPowerUp
Help Webnuz
Referal links:
Creating Grocery Bud Using Supabase & JavaScript
INTRODUCTION
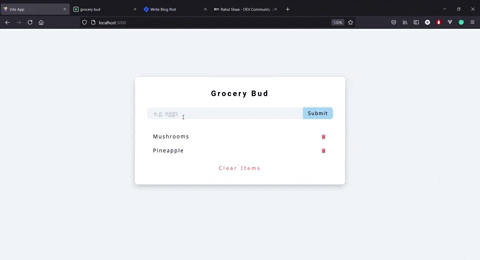
Recently I wrote a post about Supabase and I thought maybe it would be better to create a project using Supabase and JavaScript. If you haven't read about it yet then read here. So, today we will be looking at how you can create a grocery bud app using Supabase & JavaScript. THE DESIGN OF THE APP IS FROM JOHN SMILGA'S JAVASCRIPT COURSE. YOU CAN ALSO CHECK IT OUT IF YOU WANT. You can take a look at what we are going to be building.

Project Set Up
We are going to use Vite so if you don't know about Vite I will highly recommend you to read my blog about Vite.
Copy the below command and paste it into your terminal for creating a Vite app.
npm init @vitejs/appGive the name of your project and choose vanilla js as it is a mini project. And then change your directory to that folder and install all the modules.
cd *your project name*npm installnpm run devInstall Supabase package to easily use Supabase data in the frontend.
npm install @supabase/supabase-jsNow, get your ANON KEY & API URL from the Supabase dashboard & then create the .env file and paste your keys as I have done below.
VITE_SUPABASE_URL=YOUR SUPABASE URLVITE_SUPABASE_ANON_KEY=YOUR SUPABASE ANON KEYThen, create a supabase.js file in your project's directory and add the following configurations.
import { createClient } from "@supabase/supabase-js";const supabaseUrl = import.meta.env.VITE_SUPABASE_URL;const supabaseAnonKey = import.meta.env.VITE_SUPABASE_ANON_KEY;export const supabase = createClient(supabaseUrl, supabaseAnonKey);Now, we are ready to create our project.
Styling & Markup
Copy the following CSS code and paste it into your styles.css file. The code is from John's Smilga JavaScript Course.
@import url("https://fonts.googleapis.com/css?family=Open+Sans|Roboto:400,700&display=swap");:root { --clr-primary-8: hsl(205, 86%, 81%); --clr-grey-5: hsl(210, 22%, 49%); --clr-grey-10: hsl(210, 36%, 96%); --clr-white: #fff; --clr-red-dark: hsl(360, 67%, 44%); --clr-red-light: hsl(360, 71%, 66%); --ff-primary: "Roboto", sans-serif; --ff-secondary: "Open Sans", sans-serif; --transition: all 0.3s linear; --spacing: 0.25rem; --radius: 0.5rem; --light-shadow: 0 5px 15px rgba(0, 0, 0, 0.1); --dark-shadow: 0 5px 15px rgba(0, 0, 0, 0.2);}*,::after,::before { margin: 0; padding: 0; box-sizing: border-box;}body { font-family: var(--ff-secondary); background: var(--clr-grey-10); color: var(--clr-grey-1); line-height: 1.5; font-size: 0.875rem;}h3 { letter-spacing: var(--spacing); text-transform: capitalize; line-height: 1.25; margin-bottom: 0.75rem; font-family: var(--ff-primary);}h3 { font-size: 1.25rem;}.section-center { width: 90vw; margin: 0 auto; max-width: 35rem; margin-top: 8rem;}@media screen and (min-width: 992px) { .section-center { width: 95vw; }}.section-center { background: var(--clr-white); border-radius: var(--radius); box-shadow: var(--light-shadow); transition: var(--transition); padding: 2rem;}.section-center:hover { box-shadow: var(--dark-shadow);}.grocery-form h3 { color: var(--clr-primary-1); margin-bottom: 1.5rem; text-align: center;}.form-control { display: flex; justify-content: center;}#grocery { padding: 0.25rem; padding-left: 1rem; background: var(--clr-grey-10); border-top-left-radius: var(--radius); border-bottom-left-radius: var(--radius); border-color: transparent; font-size: 1rem; flex: 1 0 auto; color: var(--clr-grey-5);}#grocery::placeholder { font-family: var(--ff-secondary); color: var(--clr-grey-5);}.submit-btn { background: var(--clr-primary-8); border-color: transparent; flex: 0 0 5rem; display: grid; align-items: center; padding: 0.25rem; text-transform: capitalize; letter-spacing: 2px; border-top-right-radius: var(--radius); border-bottom-right-radius: var(--radius); cursor: pointer; content: var(--clr-primary-5); transition: var(--transition); font-size: 0.85rem;}.submit-btn:hover { background: var(--clr-primary-5); color: var(--clr-white);}.grocery-container { margin-top: 2rem; transition: var(--transition);}.grocery-item { display: flex; align-items: center; justify-content: space-between; margin-bottom: 0.5rem; transition: var(--transition); padding: 0.25rem 1rem; border-radius: var(--radius); text-transform: capitalize;}.grocery-item:hover { color: var(--clr-grey-5); background: var(--clr-grey-10);}.grocery-item:hover .title { color: var(--clr-grey-5);}.title { margin-bottom: 0; color: var(--clr-grey-1); letter-spacing: 2px; transition: var(--transition);}.delete-btn { background: transparent; border-color: transparent; cursor: pointer; font-size: 0.7rem; margin: 0 0.15rem; transition: var(--transition);}.delete-btn { color: var(--clr-red-light);}.delete-btn:hover { color: var(--clr-red-dark);}.clear-btn { text-transform: capitalize; width: 10rem; height: 1.5rem; display: grid; align-items: center; background: transparent; border-color: transparent; color: var(--clr-red-light); margin: 0 auto; font-size: 0.85rem; letter-spacing: var(--spacing); cursor: pointer; transition: var(--transition); margin-top: 1.25rem;}.clear-btn:hover { color: var(--clr-red-dark);}Now, copy the following HTML code and paste it into your index.html file.
<!DOCTYPE html><html lang="en"> <head> <meta charset="UTF-8" /> <link rel="icon" type="image/svg+xml" href="favicon.svg" /> <meta name="viewport" content="width=device-width, initial-scale=1.0" /> <link rel="stylesheet" href="https://use.fontawesome.com/releases/v5.15.3/css/all.css" integrity="sha384-SZXxX4whJ79/gErwcOYf+zWLeJdY/qpuqC4cAa9rOGUstPomtqpuNWT9wdPEn2fk" crossorigin="anonymous" /> <title>Vite App</title> </head> <body> <section class="section-center"> <!-- form --> <form class="grocery-form" id="groceryForm"> <h3>grocery bud</h3> <div class="form-control"> <input type="text" id="grocery" autocomplete="off" placeholder="e.g. eggs" /> <button type="submit" class="submit-btn">submit</button> </div> </form> <!-- list --> <div class="grocery-container"> <div class="grocery-list" id="groceryList"></div> <button class="clear-btn" id="clearBtn">clear items</button> </div> </section> <!-- JavaScript --> <script type="module" src="./main.js"></script> </body></html>So, all our styling and markups have been done. Now, let's just focus on things that we have all came for.
Using Supabase
To create a grocery bud app, we need to go to our Supabase dashboard and create some data. Create a new project, give it any name you want, and wait for some time for Supabase to build APIs. Then, create a new table and give it the following details.

Add a new column and give it a name of name. It will hold all our grocery names.

If you want to, you can also add some sample data for testing as I have done below.

In the below code, I have created a function called get groceries() which will get all the groceries data from Supabase and add it to the frontend whenever the DOMContent is loaded (The first time).
import "./style.css";import { supabase } from "./supabase";const groceryList = document.getElementById("groceryList");const getGroceries = async () => { const { data, error } = await supabase.from("groceries").select(); // getting datas let html = ""; data.forEach((grocery) => { html += ` <article class="grocery-item" data-id="${grocery.id}"> <p class="title">${grocery.name}</p> <div class="btn-container"> <button type="button" class="delete-btn" id="deleteBtn"> <i class="fas fa-trash"></i> </button> </div> </article> `; }); groceryList.innerHTML = html;};// Event Listenerswindow.addEventListener("DOMContentLoaded", getGroceries);Your site will look something like this.

Now, let's make our form working and start adding data.
In the below code, I have imported form and input variables and created a function called addGroceries() which will execute as soon as our form is submitted. You can also see in the last line of the function that I have executed getGroceries() function because if new data is added in Supabase then the function will refresh our data. We could have also used Supabase real-time database but I didn't know how to use it. If you know, please comment below.
const groceryForm = document.getElementById("groceryForm");const grocery = document.getElementById("grocery");const addGroceries = async (e) => { e.preventDefault(); // preventing browser from refreshing const { data, error } = await supabase .from("groceries") .insert([{ name: grocery.value }]); // inserting data in supabase groceryForm.reset(); // resetting form values getGroceries();};groceryForm.addEventListener("submit", addGroceries);You can see that our form is working perfectly and the grocery is getting added to our lists.
Our form is working perfectly & all our data are getting added to our lists but if you click on the delete button it will not delete that particular grocery. So now let's work on it.
In the below code, in our getGroceries() function I am getting the delete button reference and then iterating all buttons and adding event listeners to it. The event listener calls thedeleteGroceries() function and first it takes the id of the blog and then deleting it from our Supabase dashboard. And again, we are calling getGroceries() function to refresh the data.
const getGroceries = async () => { const { data, error } = await supabase.from("groceries").select(); let html = ""; data.forEach((grocery) => { html += ` <article class="grocery-item" data-id="${grocery.id}"> <p class="title">${grocery.name}</p> <div class="btn-container"> <button type="button" class="delete-btn" id="deleteBtn"> <i class="fas fa-trash"></i> </button> </div> </article> `; }); groceryList.innerHTML = html; const deleteBtn = document.querySelectorAll("#deleteBtn"); deleteBtn.forEach((btn) => { btn.addEventListener("click", deleteGroceries); });};const deleteGroceries = async (e) => { const id = e.currentTarget.parentElement.parentElement.getAttribute("data-id"); // getting id const { data, error } = await supabase .from("groceries") .delete() .match({ id: id }); getGroceries();};So, you can see that now our delete button is working perfectly. Now, let's move on to the clear button.

In the below code, we are getting the clear button reference and then adding an event listener to it which calls clearGroceries() function which will simply delete all the data from Supabase.
const clearBtn = document.getElementById("clearBtn");const clearGroceries = async () => { const { data, error } = await supabase.from("groceries").delete(); getGroceries();};clearBtn.addEventListener("click", clearGroceries);You can see the clear button is working perfectly as we wanted.

So our project is completed if you want, you can also add some more features. You can add authentication such that only authenticated person can add groceries. You can add storage and ask for images of the groceries.
CONCLUSION
So that's it for today guys. If you want to make some changes I will highly recommend you to do it and also read Supabase's docs cuz that's where you learn more than any blog or youtube video. And also if you know how to use Supabase real-time database then please comment. I will update my post and also give a shoutout to you. Comment on what topic you want to read about. If I have made any mistakes or written something wrong, feel free to comment.
Original Link: https://dev.to/rahulshawdev/creating-grocery-bud-using-supabase-javascript-4c31
Dev To
More About this Source Visit Dev To