
An Interest In:
Web News this Week
- April 19, 2024
- April 18, 2024
- April 17, 2024
- April 16, 2024
- April 15, 2024
- April 14, 2024
- April 13, 2024
Some of Our Sources
- Joshua Blankenship
- The Logo Smith
- Spoon Graphics
- Naldz Graphics
- My Ink Blog
- Line 25
- Stylized Web
- Codrops
- Android Headlines
- Willems Lab
Help Webnuz
Referal links:
Django full CI-CD flow to AWS with GitHub Actions and S3
This guide covers all steps needed for setting up your CI-CD workflow for Django project with Amazon Beanstalk and GitHub Actions under the hood.
Link to sample project: https://github.com/vlntsolo/django-cicd
TOC
- AWS Beanstalk environment
- S3 configuration
- IAM user access
- GitHub workflow settings
- Preparing Django settings
- First run
- Composing postdeploy commands (hooks)
Before we start, what is CI-CD flow in the first place?
Despite the fact that Django code doesn't require any build step compared to compiled apps, you might find it quite frustrating to repeat a manual re-upload each time you need to deploy a new feature or a bug fix. Because of this, CI-CD (Continuous integration and Continuous delivery) workflows were invented.
CI-CD workflows or pipelines allow us to safely build, test and deploy web applications in a relatively short period of time (usually, in a matter of minutes). So what about Django? If you have a python application codebase hosted on a GitHub, it would be enormously convenient to push it to the hosting environment right after you update the repository. And that is exactly what we're going to do using GitHub Actions, which is publicly available for free since late 2019.
Let's dive in!
1. AWS Beanstalk environment
Before we start configuring everything, we need to be sure we have our environment warm and ready.
If you already have an AWS account, go to the Console and search for Beanstalk. If not, create one here. You will be asked to add billing information in order to proceed.
In the Beanstalk dashboard, make sure you have selected the most suitable region (where services to be deployed) in the right top corner. Check [Environments] and choose [Create a new environment]. Then, on the dialogue page, choose [Web server environment].

Fill in the details and focus on Platform section. Here we need to select Python platform (last version) and last Amazon Linux 2 available.
Leave Sample application and hit [Create environment]. In a few moments, you should be able to open your environment URL address and see a sample page.

Copy the name of the application and the environment displayed in the top left corner if you open the environment page.

The last thing to do here is to set up the database for Django.
Go to [Configuration] [Database] and select preferred options:
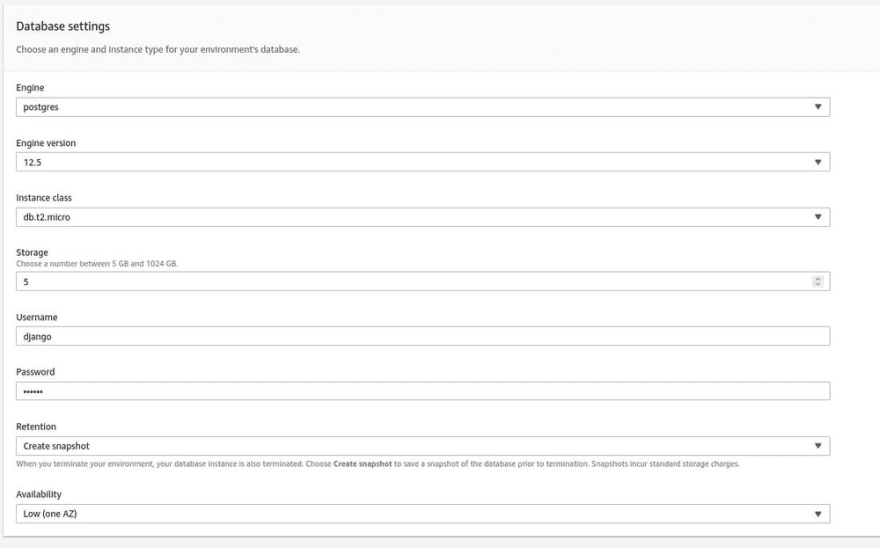
It this example I picked a PostgreSQL since this my usual choice, but you can stick with MySQL or even Oracle if you want.
! Alert: Database server created this way is suited for testing purposes only. It will be strictly attached to the environment. The database will be deleted if you remove or recreate the Beanstalk environment. In production, you should use RDS or Aurora, standalone servers inside your VPC.
Now that we've got a managed python environment and the database, we need to prepare a file storage for our future application builds.
2. S3 configuration
We need to set up a custom S3 bucket as a temporary storage for our builds before they will be pushed to the Beanstalk.
Search for S3 in AWS console or switch to it from the menu. Then select [Create bucket]. Type in some unique name and select your region.
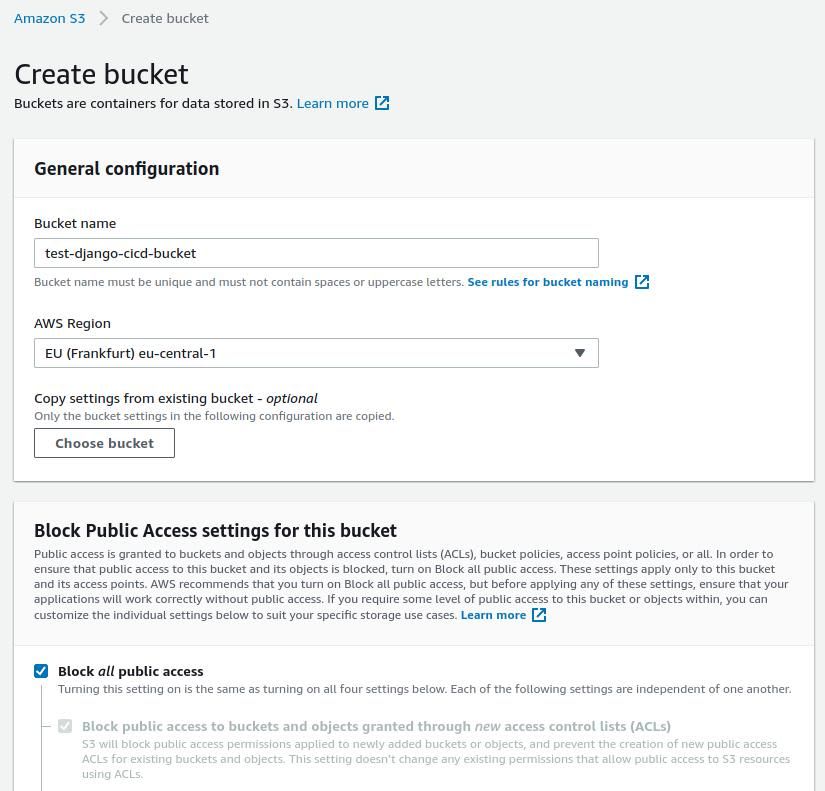
Leave the checkbox on "Block all public access" and proceed with [Apply].
The next thing we need to do is to generate programmatic access credentials which will be used by GitHub Action to deploy our Django app.
3. IAM user access
Search for IAM users in the AWS console and select [Add user].

On the permissions page, select [Attach existing policies directly]. Search for S3FullAccess* and select the checkbox. Repeat the same steps for AdministratorAccess-AWSElasticBeanstalk* and hit [Add user].
Finally, copy Access key ID and Secret from the last step. Make sure to save this info somewhere safe, since user secret will be shown only once.

Looks like we're done with AWS and ready to proceed with GitHub!
4. GitHub workflow settings
Go back to your Django project and create a folder called .github. And one more folder inside it called workflows. GitHub Actions config should be placed inside and formatted with YAML syntax. See my example below:
#Location: .github/workflows/custom_config.ymlname: CI-CD pipeline to AWSenv: EB_S3_BUCKET_NAME: "YOUR BUCKET NAME FROM Step 2" EB_APPLICATION_NAME: "YOUR APP NAME FROM Step 1" EB_ENVIRONMENT_NAME: "YOUR ENVIRONMENT NAME FROM Step 1" DEPLOY_PACKAGE_NAME: "django-app-${{ github.sha }}.zip" AWS_REGION_NAME: "YOUR AWS REGION ("us-east-1"/"eu-central-1" etc.)"on: push: branches: - master #Use your own branch here (Might be staging or testing)jobs: build: runs-on: ubuntu-latest steps: - name: Git clone on our repo uses: actions/checkout@v2 - name: Create zip deployment package run: zip -r ${{ env.DEPLOY_PACKAGE_NAME }} ./ -x *.git* - name: Configure AWS credentials uses: aws-actions/configure-aws-credentials@v1 with: aws-access-key-id: ${{ secrets.aws_access_key_id }} aws-secret-access-key: ${{ secrets.aws_secret_access_key }} aws-region: ${{ env.AWS_REGION_NAME }} - name: Copying file to S3 run: aws s3 cp ${{ env.DEPLOY_PACKAGE_NAME }} s3://${{ env.EB_S3_BUCKET_NAME }}/ - name: Print nice message on success finish run: echo "CI part finished successfuly" deploy: runs-on: ubuntu-latest needs: [build] steps: - name: Configure AWS credentials uses: aws-actions/configure-aws-credentials@v1 with: aws-access-key-id: ${{ secrets.aws_access_key_id }} aws-secret-access-key: ${{ secrets.aws_secret_access_key }} aws-region: ${{ env.AWS_REGION_NAME }} - name: Create new EBL app ver run: | aws elasticbeanstalk create-application-version \ --application-name ${{ env.EB_APPLICATION_NAME }} \ --source-bundle S3Bucket="${{ env.EB_S3_BUCKET_NAME }}",S3Key="${{ env.DEPLOY_PACKAGE_NAME }}" \ --version-label "${{ github.sha }}" - name: Deploy new app run: aws elasticbeanstalk update-environment --environment-name ${{ env.EB_ENVIRONMENT_NAME }} --version-label "${{ github.sha }}" - name: Print nice message on success finish run: echo "CD part finished successfuly"Let's go through the surface of the config blocks and check their purpose. More details can be found here.
1) [env] block serves as a list of shortcuts for variables inside the config. We define our non-sensitive data here.
2) [jobs] block defines what actually will be done.
3) [build] block is just a job name and includes a list of "steps" to perform in our building process. For a pure Django app, this means only zipping the working directory and pushing it to the S3 bucket.
4) [steps] block lists names and actual commands to execute on the virtual machine.
You might easily add another job name called testing and run ./manage.py test step within it.
5) [needs] block is a prerequisite for further execution. In our case, we're making sure that our file transfer was completed successfully before we send commands to the Beanstalk.
6) [on] block specifies the trigger event, like our "push", as well as the target branch.
If you come up with several Beanstalk environments (QA, testing, staging, production etc.), you'd need to place new config.yml files for them and change env vars and branch accordingly.
You might also notice that we didn't define secrets.aws_access_key_id or secrets.aws_secret_access_key yet. Let's fix that!
Open your GitHub repo or create one for your project and go to [Settings] [Secrets] [New repository secret]. Paste your IAM user key and secret there like this:

Repeat the same step for aws_secret_access_key and it's value. That's it!
5. Preparing Django settings
Remember, we've connected a Relational database to our Beanstalk environment at Step 1? But where are the connection parameters and db user credentials?
With integrated database, Beanstalk exposes env variables, which can be used right away:
# main_django_app settings.pyimport osALLOWED_HOSTS = ['YOUR_ENVIRONMENT_HOST']DATABASES = {'default': { 'ENGINE': 'django.db.backends.postgresql_psycopg2', 'NAME': os.environ['RDS_DB_NAME'], 'USER': os.environ['RDS_USERNAME'], 'PASSWORD': os.environ['RDS_PASSWORD'], 'HOST': os.environ['RDS_HOSTNAME'], 'PORT': os.environ['RDS_PORT'], }}# rest of the settingsDon't forget to add your environment URL and main domain to allowed hosts list.
At this point, we need to make sure that Beanstalk python platform will be ready to establish a connection with PostgreSQL. Let's tell it to install some extras for us.
Create a folder in your project root called .ebextensions and place there a file 01_packages.config:
packages: yum: amazon-linux-extras: []commands: 01_postgres_activate: command: sudo amazon-linux-extras enable postgresql10 02_postgres_install: command: sudo yum install -y postgresql-develNow we need to add Django config to inform Beanstalk's WSGI server about our main app and settings. Create another file inside .ebextensions folder called django.config:
option_settings: aws:elasticbeanstalk:container:python: WSGIPath: main_django_app.wsgi:application aws:elasticbeanstalk:application:environment: DJANGO_SETTINGS_MODULE: main_django_app.settings "PYTHONPATH": "/var/app/current:$PYTHONPATH" aws:elasticbeanstalk:environment:proxy:staticfiles: /static: staticChange main_django_app to your Django application name.
Last row aws:elasticbeanstalk:environment:proxy:staticfiles0: tells which folder to serve through the reverse proxy and which relative URL to use.
Finally, freeze your local python environment with pip freeze > requirements.txt (it will be the primary source for Beanstalk to configure EC2 environment).
6. First run
Push any changes to your specified branch and visit Actions tab. If your actions completed successfully, you will see the green mark. If something went wrong, open the logs and resolve the errors inside.
Got errors after successful GitHub Actions run? Visit Elastic Beanstalk environment and check the Logs.
Hopefully, you'll see something like this:

7. Composing postdeploy commands (hooks)
There's still few commands that should be executed after deploy.
1) We need to migrate our changes to the Beanstalk database (migration files created by makemigrations command should be a part of your codebase).
2) We need to collect static files (no need to keep your static files in a codebase).
This problem could be solved with Beanstalk postdeploy hooks. File names could be totally custom, but file extension is important. All .sh files will be executed in alphanumerical order.
In your project root, create a folder .platform with the following structure:
.platform/hooks/ postdeploy/ -01_django.sh#!/bin/bashsource /var/app/venv/*/bin/activate && {# collecting static filespython manage.py collectstatic --noinput;# log which migrations have already been appliedpython manage.py showmigrations;# migrate the restpython manage.py migrate --noinput;# another command to create a superuser (write your own)}You've got the idea! Now, you can figure out how to create the superuser account.
Important notes:
Review IAM user access policy. For the tutorial purpose, I've granted full access to S3 and Beanstalk. Make sure that you grant only required permissions for GitHub Actions client in order to prevent unpleasant consequences in case of secret key leakage.
Add lifecycle rules to S3 bucket and Application versions storage. By default, S3 doesn't delete application versions or any other files from the buckets. Use lifecycle rules in both S3 and Beanstalk to keep only needed app versions.
AWS Beanstalk health checking system might not work properly ( severe health status) because of Django ALLOWED_HOSTS restriction in headers. I don't know the right way of handling this issue (you can either ignore status warnings or set ALLOWED_HOSTS = ['*'] at your own risk).
If you're going to use PostgreSQL, don't forget to install the package with pip install psycopg2-binary and freeze the requirements.txt.
Useful links:
How to split Django settings for different environments
How to configure Django Q with Supervisor on AL2 Beanstalk
Deploying a Django application to Elastic Beanstalk
Workflow syntax for GitHub Actions
Hope, you've enjoyed following this guide. Stay tuned and next time I might cover how to set up a full-stack Django-based project with truly seamless dev experience.
This article was originally published in my blog post.
Original Link: https://dev.to/vlntsolo/django-full-ci-cd-flow-to-aws-with-github-actions-and-s3-2enp
Dev To
More About this Source Visit Dev To