
An Interest In:
Web News this Week
- April 20, 2024
- April 19, 2024
- April 18, 2024
- April 17, 2024
- April 16, 2024
- April 15, 2024
- April 14, 2024
Some of Our Sources
- Slashdot
- Mashable
- Techcrunch
- Simplebits
- Web Designer Wall
- Vandelay Design
- Creative Curio
- Noupe
- Crazy Leaf Design
- Hashedout
Help Webnuz
Referal links:
How to build a Ruby on Rails app on AWS for beginners - Part 1.
This is part one of a series of posts, this post covers the initial provisioning of a Ruby on Rails app on AWS using LightSail which is the simplest way of getting started with compute and databases on AWS.
Let's get started by creating an AWS account and building a Linux host to run our Ruby on Rails app with AWS LightSail.
Provisioning a Linux instance to run a Ruby on Rails app on AWS LightSail.
This post will guide you through getting started with your first AWS LightSail compute instance. Before you follow the article though, you need to remember to choose Ubuntu as the OS as per below:
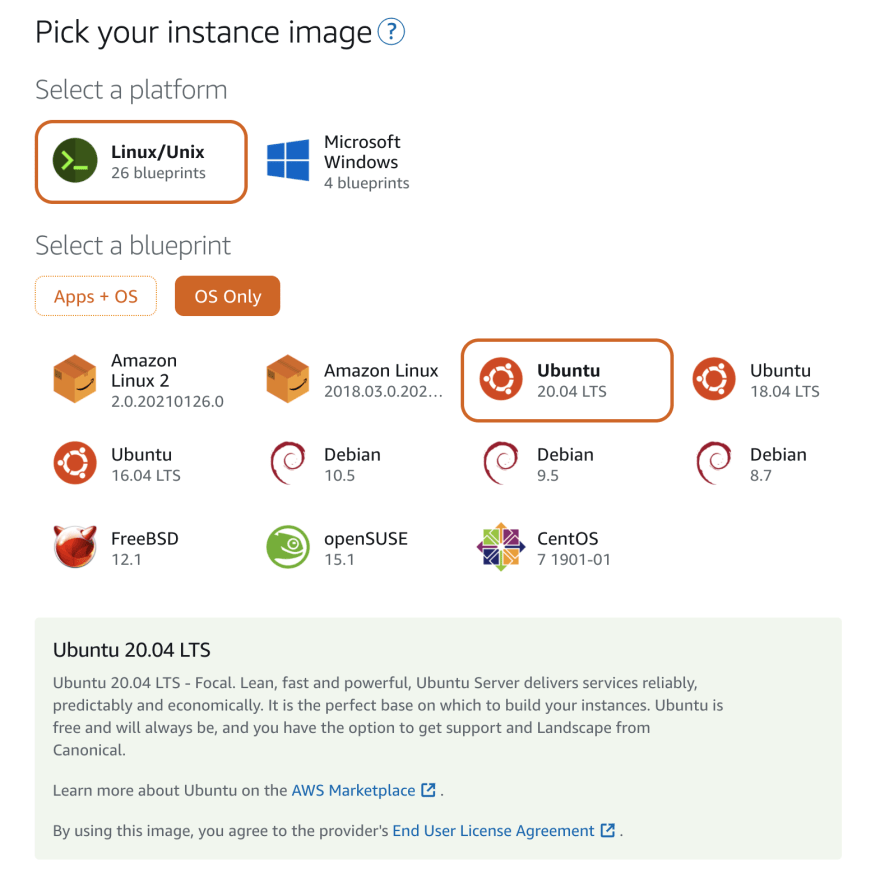
Then select your plan (I chose the $10 for now)

Okay, once that's done, click on the little command line icon next to you instance and you should get a new console tab, all logged in and ready to go.

Installing Node and Yarn to support Webpacker in Ruby on Rails.
sudo apt install curlcurl -sL https://deb.nodesource.com/setup_12.x | sudo -E bash - curl -sS https://dl.yarnpkg.com/debian/pubkey.gpg | sudo apt-key add -echo "deb https://dl.yarnpkg.com/debian/ stable main" | sudo tee /etc/apt/sources.list.d/yarn.listsudo apt-get updatesudo apt-get install git-core zlib1g-dev build-essential libssl-dev libreadline-dev libyaml-dev libsqlite3-dev sqlite3 libxml2-dev libxslt1-dev libcurl4-openssl-dev software-properties-common libffi-dev nodejs yarnInstalling rbenv and then Ruby
Great, let's install a Ruby. We are going to install it using rbenv which allows you to run multiple versions of Ruby side by side if needed.
cdgit clone https://github.com/rbenv/rbenv.git ~/.rbenvecho 'export PATH="$HOME/.rbenv/bin:$PATH"' >> ~/.bashrcecho 'eval "$(rbenv init -)"' >> ~/.bashrcexec $SHELLgit clone https://github.com/rbenv/ruby-build.git ~/.rbenv/plugins/ruby-buildecho 'export PATH="$HOME/.rbenv/plugins/ruby-build/bin:$PATH"' >> ~/.bashrcexec $SHELLrbenv install 3.0.0rbenv global 3.0.0ruby -vNow all we need to do is install bundler
gem install bundlerNext up, installing Rails
gem install rails -v 6.1.3.2To make the Rails executable available:
rbenv rehashCheck you have everything installed (this should return the installed version):
rails -vJob done next up this series is installing PostgreSQL for the DB.
Original Link: https://dev.to/leewynne/how-to-build-a-ruby-on-rails-app-on-aws-for-beginners-part-1-p5n
Dev To
More About this Source Visit Dev To