
An Interest In:
Web News this Week
- April 1, 2024
- March 31, 2024
- March 30, 2024
- March 29, 2024
- March 28, 2024
- March 27, 2024
- March 26, 2024
Some of Our Sources
- Pearsonified
- Spoon Graphics
- You The Designer
- Fuel Your Creativity
- Naldz Graphics
- Noupe
- Line 25
- 24 Ways
- Web Resource Source
- TechPowerUp
Help Webnuz
Referal links:
Understanding Docker, Docker Compose & Swarm
The intention behind this article is to provide high level understanding of what they are, how to use them and explain the commonly used syntax & semantics. the article might be a bit long but the reason I preferred not make it into series is because there is no deep dive into each and every aspect of container solution.
Points of discussion in this article
If particular section is not area of your interest feel free to jump between sections. having said that lets get to it.
1. Docker
Docker at its core is a platform used to run and deploy applications in container, in addition to this docker also comprises a lot of features which you will come to see as we go further. The reason for running applications in a container is to facilitates the entire life cycle of software development and management(which includes development, testing, deployment, update & maintenance), which docker does in a very elegant way.
Docker CLI
The commands used in this article are from Windows machine & if you are using Mac/Linux the commands might be different(you might need to run the commands as sudo).Initially the docker CLI commands were structured as following
docker [OPTIONS] COMMANDAnd as the product become bigger and bigger they also introduced Management commands to make the CLI more organized. The command structure for Management commands is as following
docker [MANAGEMENT COMMAND] [SUB COMMAND] [SUB COMMAND OPTIONS]For every command there is --help option which provides all the necessary information's about the command and its corresponding options.
Example-1
docker container --helpwill have the following output.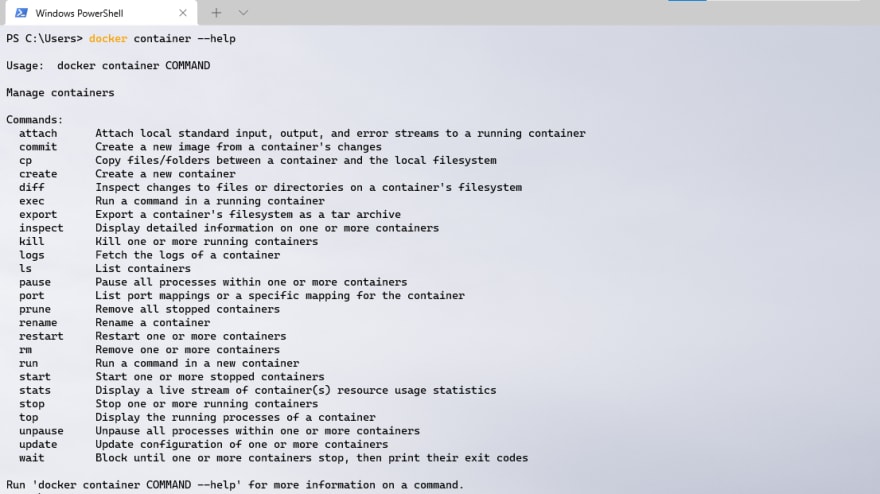
The --help command is quite useful because with the extensive feature sets of docker it can be difficult to memorize all the commands.
Container
Are running instances of docker image & it is possible to run multiple container from the same docker image. Images are explained in the Image section for now lets take a look at a simple container command.
Example-2
docker container run --name nginx-server --publish 80:80 nginxor alternatively
docker container run --name nginx-server --publish 80:80 --detach nginxAfter running this command if there is an existing image of nginx docker will run a container from that image however if there is no image of nginx docker will pull the image first and then start the container. lets take a look at the command
- container :
Management commandused to execute all container related commands. - --name : sets the name of the container.
It is not possible for multiple containers to have the same name because the container name will be used for DNS resolution(which is explained in detail in the Network section ).
- --publish : Maps the containers running port into host port. in this case we check this by visiting
http://localhost:80from browser. The port mapping pattern is as following
... --publish [HOST PORT]:[CONTAINER PORT] ...It is not possible to use the same host port to run multiple containers.
- --detach : starts the container in background and prints only the container id
- nginx : name of an image from which we want to run our container
Another example
Example-3
docker container run --name db-server --env MYSQL_ROOT_PASSWORD=my-sample-password --detach mysqlSome images require environment variable to run(such as database server) and the --env option is used to pass environment variable from CLI.
Other common container commands
docker container ls: lists all running containersdocker container ls -a: lists all containers that are running and that are not
docker container stop nginx-server: stops the container namednginx-server
docker container start nginx-server: starts the container namednginx-serverdocker container logs nginx-server: prints the logs from running container namednginx-serverdocker container rm nginx-server: removes container namednginx-server
As you can see above the commands are self explanatory and strait forward. The intention of showing those basic commands is to demonstrate & be familiar with the commands and usages. There is no need to memorize any of this as you can get those and many more sub-commands of the container command which are not listed above by simply using the --help command.
Interacting with containers
There are two commands we can use to interact with containers.
1. Using run command
When starting a container using the run command it is possible to add -it option and have the container start in interactive mode.
Example-4
docker container run -it --name nginx-server-it --publish 8080:80 nginx bashWill give us the bash console inside the nginx-server-it container to interact with. The output is shown below 
With this method once we exit from the interactive window (in this case bash terminal) the container will be stopped automatically.
2. Using exec command
exec command is used to interact with running container.
Example-5
docker container exec -it nginx-server-it bashThis command will have the same result to the previous(... run -it) command. the difference is once we exit from the interactive window the container will keep running.
Image
Are simply the binaries, libraries and source code that make up the application. and images are used as a template to construct a container. images are constructed in a layered fashion and Union file system is used under the hood to achieve this. Union file system is not covered in this article but for those of you who wants to know more about it Deep Dive into Docker Internals Union Filesystem is good article. the reason for creating images in layered fashion is mainly to:
- Speedup the startup time
- Avoid storing duplicate files
Creating an Image
Images can be created either from an existing image or from Dockerfile. lets take a look at each method.
- Creating image from existing imageThe
tagcommand can be used to create from another image as shown below
Example-6
docker image tag nginx sample/my-nginxThe output will look like 
Though there is newly created image the Id attribute for both images is the same. That's because the layers used to construct both images are identical therefor the layers are shared between the two images(This has to do with the Union file system).
- Creating image from Dockerfile
Dockerfile comprises all the commands that user can use from the CLI. here are quick overview of the commands and description
FROM: sets the base image for subsequent instructionWORKDIR: Defines the working directory of the imageENV: Environment variables expected to start a container similar to themysqlexample above.RUN: To run commands inside the containerCOPY: Copies files from source to target directoryEXPOSE: Exposed container port. This port can then be mapped to the host port using the--publishcommand as shown in the example above.CMD: Final command that runs when starting container.
These are the most commonly used commands, for extensive list of all available commands official documentation is a great place.
It is recommended to put the commands for frequently changing items(such as source code) at the bottom and commands for items that doesn't change as often at the top.as the order of command entries define the way the image is constructed.
In every
Dockerfilethere must beFROM&CMDcommands. and to clarify if there is noCMDcommand in aDockerfilethat meansCMDis defined in the base image & it is inherited via theFROMcommand.
Example-7
create file named Dockerfile with the following content
FROM nginxWORKDIR /usr/share/nginx/htmlCOPY . .create index.html file with the following content
<!DOCTYPE html><html lang="en"><head> <meta charset="UTF-8"> <meta http-equiv="X-UA-Compatible" content="IE=edge"> <meta name="viewport" content="width=device-width, initial-scale=1.0"> <title>Document</title></head><body> <h1>Docker is awsome!</h1></body></html>from the root directory run the following command
docker image build --tag sample/my-nginx-2 .Great! you created your own image which you can check by running the ls command. to make things more interesting lets run the image created and see the the changes made.
docker container run --rm -p 80:80 sample/my-nginx-2When visiting localhost from browser you should get something like this 
Persistent data
Containers by design are short lived and immutable(redeploy not change). this design puts the need for persistent data as separate concern, and there are two solution provided by Docker for persistent data namely Bind Mount and Volumes.
Bind Mount
Is a way of mounting host machines file system in to a container. while this is not often used in production it is better way for local testing and development. lets take a look at example by running the following command inside root directory of Example-7
docker container run --rm --publish 8080:80 --volume ${pwd}:/usr/share/nginx/html/ nginxWhile the container is running if the index.html file is updated in the host machine those changes will be reflected from the running container as well. for demonstration update the index.html as shown below
<!DOCTYPE html><html lang="en"><head> <meta charset="UTF-8"> <meta http-equiv="X-UA-Compatible" content="IE=edge"> <meta name="viewport" content="width=device-width, initial-scale=1.0"> <title>Document</title></head><body> <h1>[Content Updated] Docker is awsome!</h1></body></html>after these update you can see the changes from browser as shown below
TIP for referencing current directory when
Bind Mappingfrom CLI
${pwd} - PowerShell
$(pwd) - Mac/Linux
%cd% - Command Prompt
Volumes
Similar to Bind Mount volumes are another means of persisting data. The distinction from that of bind mount is that volumes are managed by Docker Bind Mount on the other hand are reliant on specifying the destination path on the host machine.
The first place to specify volume is in the Dockerfile by using the VOLUME command. the Dockerfile of databases (such as postgres, mysql) are setup to include volume.
Example-8
docker container run --rm --env POSTGRES_PASSWORD=test-password postgresWill start postgres container, then we can check for the volumes using the following command
docker volume lsTo make things even more interesting we can inspect the volume as well
docker volume inspect [VOLUME_NAME]The output will look like this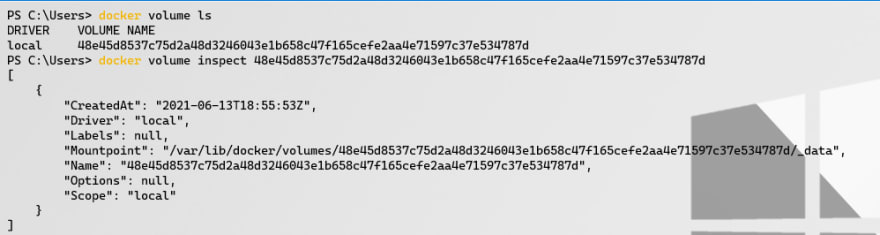
As you might have noticed the problem with this is the name of the volume is not readable. this can be fixed by naming the volume using the following command
Example-9
docker container run --rm --env POSTGRES_PASSWORD=test-password --volume my-db-volume:/var/lib/postgresql/data postgresif we now inspect the volume it will look as follows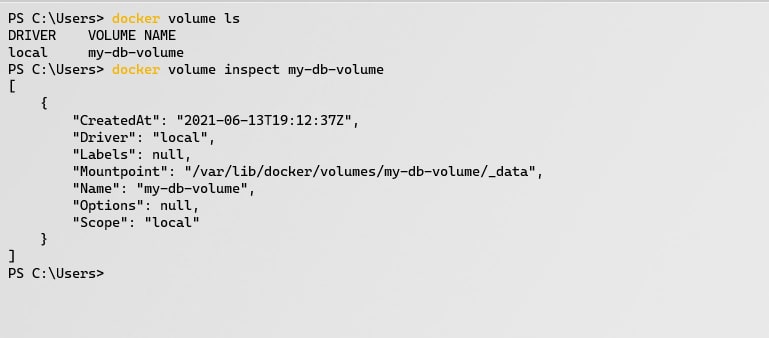
Which is more readable.
NOTE the syntax difference between
Bind Mount&Named VolumeIs that the host path ofBind Mountis preceded by/(on Mac/Linux) or by//(on windows).
Network
Docker network is basically a way of making the running containers accessible from the outside world(it could be the internet or local network) and enables containers communicate to each other. of-course there is a lot more to it but I will not go deep in this article.
Creating virtual network is as easy as running create command as shown below
Example-10
docker network create my-networkWe can run multiple containers in side this container by running the following command
docker container run --rm --network my-network --name nginx1 nginxdocker container run --rm --network my-network --name nginx2 nginxNOTE Running containers in the same virtual network can communicate to each other by using the container name as a domain name.
Since both containers (nginx1, nginx2) are on the same virtual network it is possible to use the container name as domain name and to communicate between containers. from Example-5 we can use the exec command to open bash & run Curl and see if we can reach the other container
docker container exec -it nginx1 bashcurl nginx2The result is shown below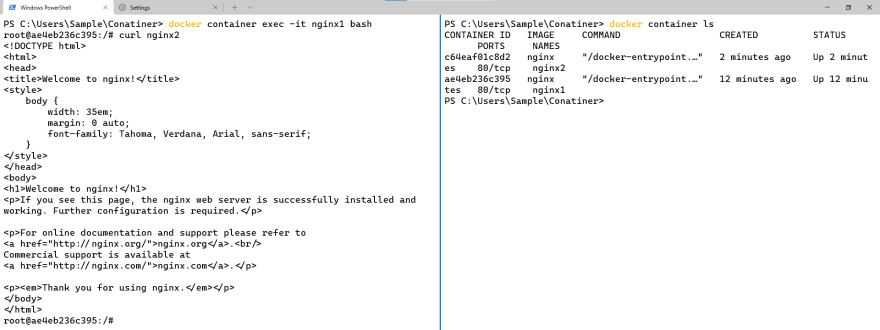
NOTE Bridge(or Docker0) is the default docker virtual network & it doesn't support the usage of container name as a domain name even if the container are running in the same virtual network.
The next section is about Docker compose, but before that cheers on reading this far, most of the important fundamentals are covered. as you will come to see docker compose is only a more organized way of doing the previously mentioned points. lets get to it...
Docker Compose
Is a simplified way of managing multiple containers at the same time. docker-compose works fine both in production and local development. docker-compose comprises yml configuration file and CLI tool to manage containers using the configuration file.
configuration file syntax overview
version:[] services: service_name1: . . service_name2: . . service_nameN:volumes: named_volume1: named_volume2: . . named_volumeN:networks: network1: netwprk2: . . networkN: For better understanding of the general syntax defined above lets take a look at an example. for this example create file called docker-compose.yml in the same directory as Example-7
Example-11
version: "3.4" # Specifies the docker compose file formatservices: nginx-simple: # Service name image: nginx # Image name & docker checks if image is available locally if not image will be pulled first ports: # Expose ports to make services accssible from outside. the port mapping is read as map host's port 80 to container port 80 - 80:80 # host_port:container_port nginx-bindmount: image: nginx volumes: # defines the volume for the container - .:/usr/share/nginx/html # BindMapping of the files in the current directory(in host) into containers path (which is /usr/share/nginx/html). the "." indicates current host directory ports: - 5005:80 depends_on: # defines the priority of the services. in this case nginx-bindmount is dependent on nginx-simple therefor nginx-simple has to start first - nginx-simple # list of services that nginx-bindmount is dependent up on nginx-custom-image: build: # Tells docker we want to build the image from local Dockerfile context: . # Defines the directory of the Dockerfile in the host machine. "." indicates current host dircetory dockerfile: Dockerfile # name of the Dockerfile ports: - 5006:80 nginx-named-volume: image: mysql volumes: - db-volume:/var/lib/mysql # defines named volume called db-volume for nginx-named-volume service to store persistent data environment: # passes list of environment variables into nginx-named-volume service - MYSQL_ROOT_PASSWORD=my-password # enviroment variable variable_key=value, in this case MYSQL_ROOT_PASSWORD is variable key & my-password is the corresponding value volumes: # defines list the named volumes db-volume: # entrie of named volumeI hope the comments on the compose file are explanatory enough for each entries. now by running
docker compose upWill start all containers & setup all volumes, networks. yeah! it is that simple. & to clean up everything(container, volume & networks) use the following command
docker compose downdocker compose also contains start & stop commands to start and stop services with out cleaning up everything.
NOTE:
docker composedoesn't attach the services with docker's default virtual network(calledbridge) rather it creates it own network and runs the services in that network. that way the services in the samedocker-composeconfiguration file can communicate with each other by using theService nameas domain name.
Swarm
From the previous section we have seen how to setup and manage image as well as containers and finally using docker compose to manage multiple containers and images. while that all good it doesn't address a couple of problem that surface when using docker, such as
- Easily scaling up and down
- Restarting container if it fails
- Deployment with zero down time
- Secure communication between containers
- Manage which container runs where
- Storing sensitive information & making it accessible only to specific container
That's where Swarm mode comes to the picture and address the problems stated above. Swarm is docker built in clustering solution.
Manager Nodes: are nodes with proper authorization and configuration to manage swarm.
Workers Nodes: are nodes with responsibility to carry out a task and no authority to administer the swarm.
Raft Database: Is a database the resides on every manager nodes, It comprises manager node's configuration that guarantee's their authority.
By default Swarm mode is not enabled. to enable swarm mode run the following command.
docker swarm initThere is multiple ways to setup the swarm, but for demonstrating some of the basics I will use Play with Docker.
Example-12
Create multiple instances in the docker lab and to initialize the swarm run the following command
docker swarm init --advertise-addr 192.168.0.8The IP Address has to be public IP so other instances can join to that swarm(in my case it happens to be 192.168.0.8).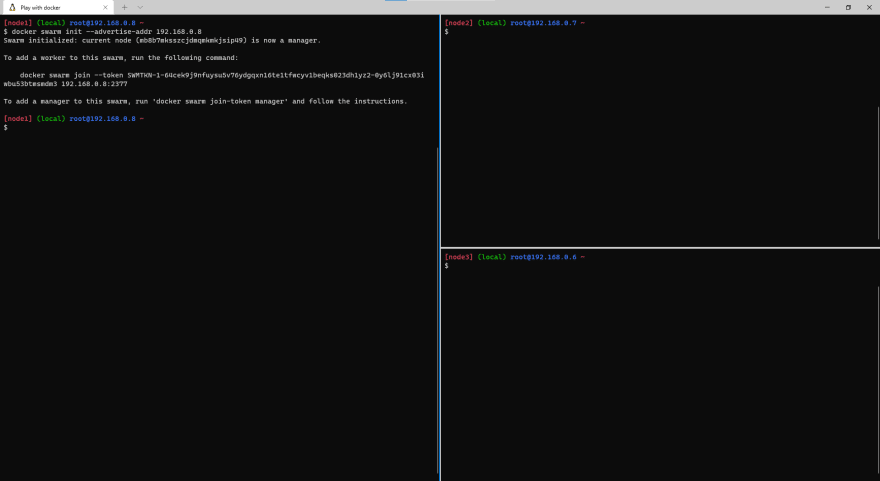
Once swarm is created other instances can join using the command generated after creating the swarm
docker swarm join --token [TOKEN] [IP_ADDRESS]docker swarm join --token SWMTKN-1-64cek9j9nfuysu5v76ydgqxn16te1tfwcyv1beqks023dh1yz2-0y6lj91cx03iwbu53btmsmdm3 192.168.0.8:2377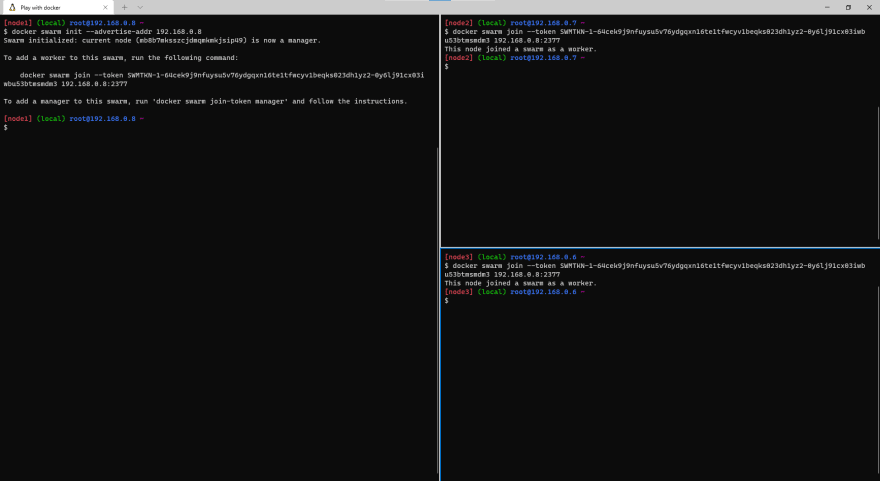
After joining the two instances into the swarm we can see the nodes in the swarm
docker node ls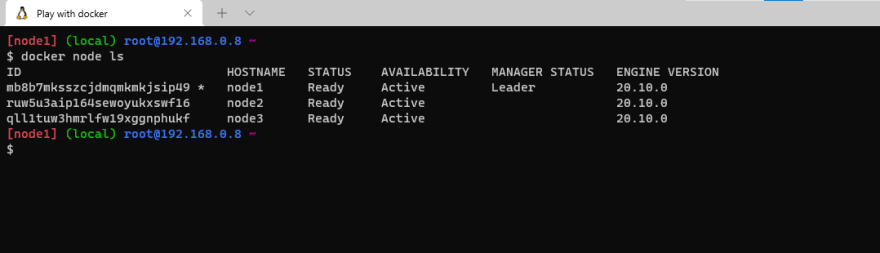
With in the swarm we can now create multiple services with out worrying about the container distribution because that will be handled by the swarm.
docker service create --publish 80:80 --replicas 3 nginxThis will create three containers of nginx and distribute the containers into the instances with in the swarm. to see active services list
docker service lsTo see more information's of particular service run
docker service ps [SERVICE_NAME | SERVICE_ID]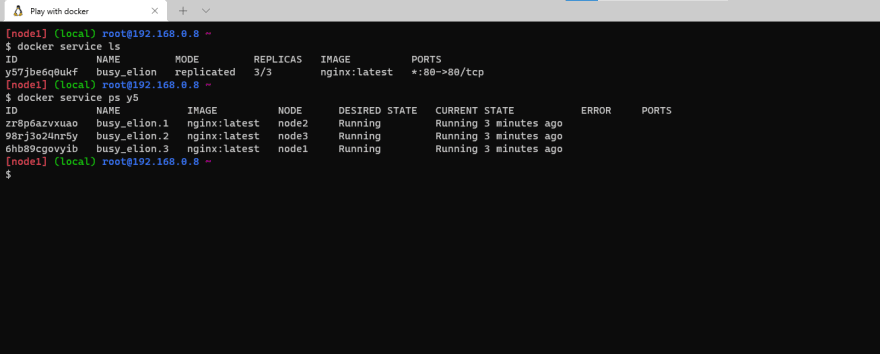
As shown above there is 3 replicas of nginx and they are running on different instances. by updating the number of replicas we can easily scale up and scale down. even more intersting if a container fails in the swarm for some reason it will then be recreated automatically. 
And if we see the list of containers again
This is only the tip of the iceberg, there is a lot more you can do with swarm(such as using secrets using docker-compose with swarm) which could not be explained in one article. but I hope this is enough to give you an idea of what Swarm is & its importance.
Thanks for reading. Cheers!
Original Link: https://dev.to/bazenteklehaymanot/understanding-docker-docker-compose-swarm-i31
Dev To
More About this Source Visit Dev To