
An Interest In:
Web News this Week
- April 1, 2024
- March 31, 2024
- March 30, 2024
- March 29, 2024
- March 28, 2024
- March 27, 2024
- March 26, 2024
Some of Our Sources
- Techcrunch
- TutsPlus - Design
- Web Designer Depot
- Crazy Leaf Design
- Reencoded
- Line 25
- Specky Boy
- Design Modo
- Android Dissected
- Willems Lab
Help Webnuz
Referal links:
Django Authentication System - Tutorial for Beginners
Hello Coders,
This tutorial aims to help beginners accommodate with Django Framework, especially with the authentication system provided "out-of-the-box" by this amazing framework. For newcomers, Django is an open-source web framework designed and actively supported by experienced developers with help from many open-source enthusiasts.
Thanks for reading! - Content provided by App Generator.
Topics covered in this tutorial
- User - the core entity used to manage auth information
- How to create a new user using the Django CLI
- How to create a superuser
- Create a user using UI (forms, controller, view)
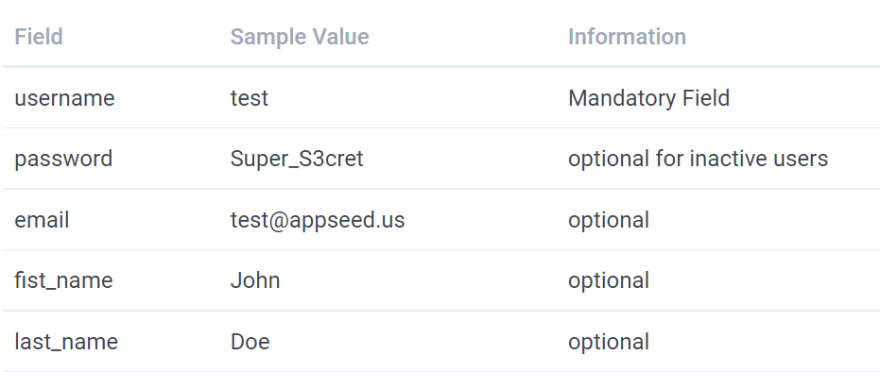
User Model
As mentioned in the official Django documentation, the User model represents the core entity used to save and manage authentication. The fields managed by the User model can be found below:
Probably the most simple way to create a new user in Django is to use the CLI (Django shell). In case you don't have already a Django project, feel free to clone an open-source sample provided by the AppSeed Team to explain many Django concepts:
$ git clone https://github.com/app-generator/django-learn-by-coding.git$ cd django-learn-by-codingCreate a virtual environment - Linux-based systems
$ virtualenv env$ source env/bin/activate For Windows system, the syntax is different:
$ virtualenv env$ .\env\Scripts\activate Install Django
$ pip install djangoCreate Users - Django CLI
The user creation process using the terminal is usually related to the superuser that allows us to access the admin section. For newcomers, the admin section manages the registered users, groups defined in our project.
$ # We are in the ROOT of the project$ python manage.py createsuperusersername (leave blank to use 'test'): adminEmail address: test@appseed.usPassword: ********Password (again): ********Superuser created successfully. Once the superuser admin is created we can access the admin section and interact with all models registered by our project. Let's explore the users using the Django CLI:
>>> from django.contrib.auth.models import User >>> User.objects.all() <QuerySet [<User: admin>]>Using the CLI we can explore all properties and of course update fields.
Create a new (common) user
>>> from django.contrib.auth.models import User>>> user = User.objects.create_user('test', '[email protected]', 'Super_S3cret111')We can see the new users can be created with ease using the create-user helper provided by User model - Let's check again all registered users in the terminal:
>>> >>> User.objects.all() <QuerySet [<User: admin>, <User: test>]>Create Users via UI
Using the console to create and manage users might be fun but might be also useful in our projects to allow users to register themselves using a public web page. To do this, we need a simple page where the form is exposed and a backend to handle the information sent to the user.
Create the SignUp Form
class SignUpForm(UserCreationForm): username = forms.CharField( widget=forms.TextInput( attrs={ "placeholder" : "Username" } )) email = forms.EmailField( widget=forms.EmailInput( attrs={ "placeholder" : "Email" } )) password1 = forms.CharField( widget=forms.PasswordInput( attrs={ "placeholder" : "Password" } )) password2 = forms.CharField( widget=forms.PasswordInput( attrs={ "placeholder" : "Password check" } ))Create the controller
def register_user(request): # A user-friendly message msg = None # User submits the credentials if request.method == "POST": # Initialize the from POST data form = SignUpForm(request.POST) # Check all constraints (one line) if form.is_valid(): # Create the user form.save() msg = 'User created successfully.' else: msg = 'Form is not valid' # Show the SignUp Page else: form = SignUpForm() return render(request, "accounts/register.html", {"form": form, "msg" : msg })The page that shows the form and invite the user to register
<form role="form" method="post" action=""> {% csrf_token %} <div> {{ form.username }} </div> <span class="text-error">{{ form.username.errors }}</span> <div> {{ form.email }} </div> <span class="text-error">{{ form.email.errors }}</span> <div> {{ form.password1 }} </div> <span class="text-error">{{ form.password1.errors }}</span> <div> {{ form.password2 }} </div> <span class="text-error">{{ form.password2.errors }}</span> <button type="submit" name="register">Register</button></form>The user registration mechanism
- The User sees the registration page
- The User inputs all fields
- The form is submitted and the controller receives all information (username, password)
- If the form is valid, the form is saved and the user is created
- A confirmation message is returned to the user
The above sample uses a form to create the user but we can update the code to use the create-user method as well:
def register_user(request): # A user-friendly message msg = None # User submits the credentials if request.method == "POST": # Initialize the from POST data form = SignUpForm(request.POST) # Check all constraints (one line) if form.is_valid(): username = form.cleaned_data.get("username") # <-- UPDATED email = form.cleaned_data.get("email") # <-- UPDATED raw_password = form.cleaned_data.get("password1") # <-- UPDATED # Create user: UPDATED new_user = User.objects.create_user(username, email, raw_password) msg = 'User created successfully.' else: msg = 'Form is not valid' # Show the SignUp Page else: form = SignUpForm() return render(request, "accounts/register.html", {"form": form, "msg" : msg })Thanks for reading! Feel free to AMA in the comments section. For more resources, please access:
- Read more about Django (official docs)
- Start fast a new project using development-ready Django Starters
Original Link: https://dev.to/sm0ke/django-authentication-system-4ha9
Dev To
More About this Source Visit Dev To