
An Interest In:
Web News this Week
- April 12, 2024
- April 11, 2024
- April 10, 2024
- April 9, 2024
- April 8, 2024
- April 7, 2024
- April 6, 2024
Some of Our Sources
- BoingBoing
- Mashable
- Spoon Graphics
- TutsPlus - Design
- Web Designer Depot
- My Ink Blog
- CSS Tricks
- Willems Lab
- Dev To
- Hashedout
Help Webnuz
Referal links:
Terminal
Getting a terminal for windows (cmder)
Before we proceed with this blog article, I would want to inform you that there is a video about this article on Codetopias YouTube channel. You can watch it or read this post or preferably do both.
What is a terminal?
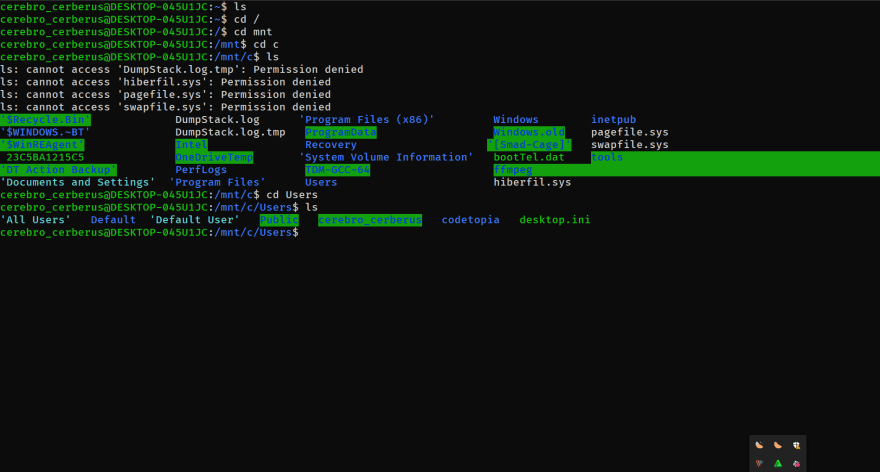
From experience, I can tell that about 90% of learners who begin their way into the development world or into computing often know nothing about the terminal and often get confused when anything about it is mentioned. What is the terminal? one may ask. The terminal is actually an interface where instructions known as commands could be given to the computer to carry out. Unlike the normal GUI (Graphical User Interface) where the mouse is used to click buttons and other graphical elements in order to issue commands, we have another interface called the CLI (short for Command-Line Interface) of which the terminal happens to fall under, and it is through the terminal that commands are written to give out a task. Let us take for instance, a shutdown operation. Using the normal way, a user would click a few buttons in order to achieve that. That same task (shutdown) could be carried out with the terminal but within a short amount of time. Since this tutorial is actually not dedicated to the deep stuffs about the terminal, well not go deep into it. But below is just a glance of what a linux terminal looks like.
For the unix and linux users, a terminal is no news because most of the operations on these operating systems require the use of terminals. But for some windows users, its a big pool of confusion and fear. Windows terminals have proven to be insufficient as it is very inefficient and slow in accomplishing some computational and development task. But in recent times, developers have contributed to developing terminal tools to aid windows users and developers complete their computational and development task with ease. So lets get straight into it. Well not be using windows default terminal (command prompt) but a terminal tool called cmder (commander). But first Well need to install it. Cmder is a software package created out of pure frustration over the absence of nice and efficient console emulators on Windows. It is based on amazing software, and spiced up with the Monokai color scheme and a custom prompt layout, looking sexy from the start. Follow the instructions below to install Cmder.
Go to this link -> https://cmder.net/ and scroll down till you see something like the picture below
cmder download page
N.B: There are two options to download from namely the Mini and Full. If you choose the Mini, you would have limited features and would have to install git with cmder manually (dont worry, will show you how very soon). But if you choose the full setup with git, then you dont need to install git again. In this case it is recommended to go in for the full version.
After hitting the download button, Wait for it to finish downloadingAfter downloading, you have to extract the zipped file into the Program Files directory in your local C drive.
If you dont have an extraction tool or software for the extraction, I recommend winrar.
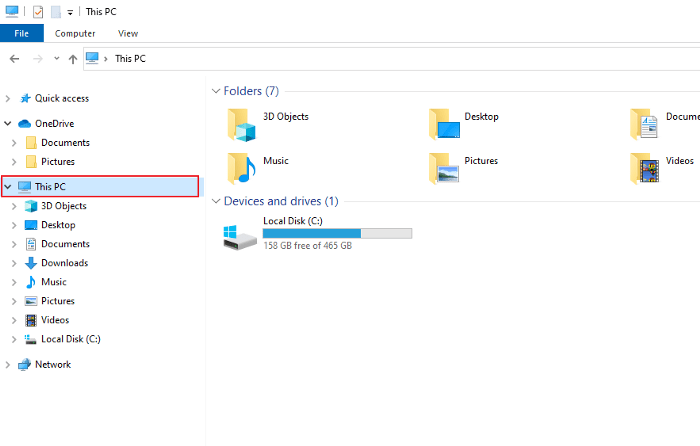
Before you extract the files into your Program Files, you first have to create a new folder in the Program Files directory. Lets do that together.First open a new file explorer

click on This PC located on the left pane of your file explorer

Double click on Local Disk (C:) to open

locate Program Files and launch it (its just Program Files not Program Files (x86))
After opening the Program Files directory, create a new folderyou can create a new folder by simply using the shortcut Ctrl+Shift+n or using the GUI way which is right clicking on an empty space in the directory (folder), selecting new and then folder. Grant administrative permissions if you are being asked by your computer by clicking yes, continue or ok.
Now rename that folder to any name you want. But due to pratical reasons, I recommend you name is commander
To rename a folder, you have to right click on that folder and choose rename from the pop-up menu. After selecting rename, type the name you want to give to your folder and press enter Now that we are done creating our folder in the Program Files directory, Its time to extract the cmder zipped files to our commander folder,
Locate the cmder downloaded zipped file. (Which should be in your downloads directory or folder.).
After locating it, right click on it and select Open with WinRAR (if only you have winrar installed)
After opening with winrar, you should see something like this
After opening cmder with winrar, go back to your program files directory and open the commander folder we created.
Now open the cmder zipped folder and the commander folder side by side on your windows
Now highlight all the files and folders in the cmder winrar directory
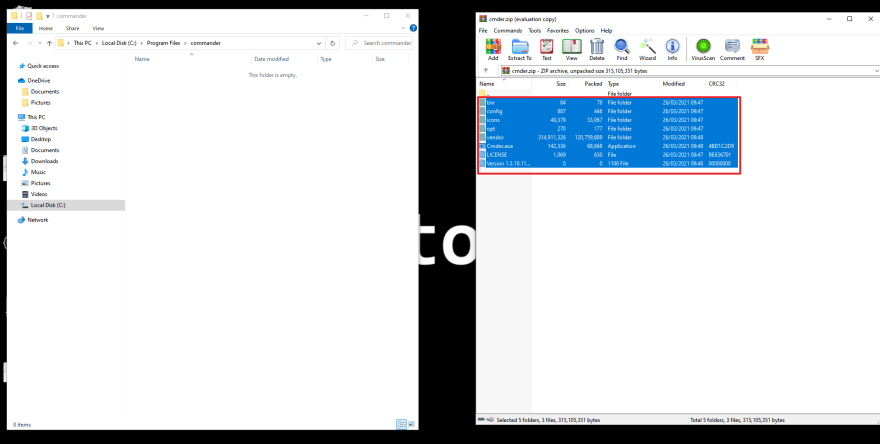
To highlight on your windows, press and hold the left button of your mouse and drag the mouse over the object you want to hightlightAfter highlighting all the files and folders in the cmder winrar directory, drag all the files and folders and drop it into the commander folder (which is opened by the side of the cmder winrar directory). After droping the files and folder into the commander folder, your should see something like this

since we are extracting to the commander directory which is located in the Program Files directory in our Local Disk (C:), we may need to grant administrative rights. To do this, click on Do this for all current items, click on continue and wait for it to complete the extraction
After the extraction you should see these bunch of files and folders in your commander directory
Now double click on the cmder icon in the commander directory to begin the installation

After launching cmder, cmder will begin to run some script for the installation

We finally now have a very powerful and cool terminal on our windows that we can use to perform command line tasks.
You might want to do this
Some of you might realize that after you install cmder and try to find it by searching it name in your windows search box, its nowhere to be found on your windows.
It is on your windows alright but you just have to do a couple of configurations to make it searchable. Like editing your environment variables or pinning it to your start menu. The formal is quite complicated for beginners so we will focus on the latter. To make cmder searchable on your windows, just follow these simple steps to get it done
- Navigate to the commander folder which contains the extracted cmder files and launch it (which is located in your Program Files directory which is also located in your C local disk)
- After launching it, locate and right click on the cmder icon

- click on Pin to Start from the pop-up menu
- Now go to your start menu and you will now find cmder in there

Good job! Cmder is now searchable on your windows. You can confirm that by doing a quick search in your windows search box

BOUNUS ROUND
The cmder terminal also has some cool settings that you can play around with. You can alter changes to the font, the color scheme, font family, font style etc. To access these settings, you have to right click on either the top-most or bottom section of your terminal and click on settings.
In the pop-up dialog box, you can make a couple of changes and select save settings after you are done.
Since we are not focusing on altering changes to cmder in this blog post, we wont dive further. But you can make your own changes to suit your taste and preference.
:-) Good luck on your new journey with your cool windows terminal
Original Link: https://dev.to/codetopiacommunity/terminal-3fnm
Dev To
More About this Source Visit Dev To