
An Interest In:
Web News this Week
- April 1, 2024
- March 31, 2024
- March 30, 2024
- March 29, 2024
- March 28, 2024
- March 27, 2024
- March 26, 2024
Some of Our Sources
- Engadget
- Team Treehouse
- Joshua Blankenship
- Pearsonified
- Crazy Leaf Design
- Stylized Web
- Android Dissected
- Daily Now
- The Verge
- TechPowerUp
Help Webnuz
Referal links:
Build an Email Application using Node JS Express JS with Gmail and Nodemailer - (All in one Article)
Hello , my gorgeous friend on the internet , how are you doing today?.
Sometimes we want to send out a welcome email to our new registered users or send them a link to reset their forgotten password.
This is an extracted feature from my HarperDB Hackerthon open source project, I found it difficult to implement, because of resources, so I am saving you from the stress I passed through.
Below you will learn how to send out emails directly from your Node JS Application using your registered Gmail account and Nodemailer, with an interface built with HTML and CSS that is powered by Express JS.
Don't worry about the complexity of what is listed above, I am going to explain all of them in this article (in a bit).
You can check out the final project sample of what you will be building along with me in this article Here.
If you would prefer a series of this article (broken into multiple parts), you can check it out HERE
Note: Some of the block code on dev.to doesn't work well, you can check the canonical url, if you didn't get to copy the code from this article.
PREREQUISITES
Before following along in this tutorial, I assume you already have a basic understanding of JavaScript and that you already have the following setup:
Gmail account
Node installed on your PC
If you do not have a Gmail account setup, click Here to register your account and you can also download the Node application by clicking Here.
Before we proceed, kindly note that this is a very long article, because I ensure to explain every concept that is been used in building the application, and this will help you grasp useful concepts in Node JS.
At the end of this article, you will learn the following concepts and technologies:
- How to kick-start a Node JS application
- Writing your first route (beginners)
- Rendering HTML with Node JS
package.jsonand explanation of what is inside - Implementation of Nodemailer
- How to add Multer to your Node JS project
- How to retrieve form data from the HTML form to our Node js Server
What is Node JS?
Node JS is a JavaScript framework that allows us to use JavaScript outside of the browser and on the server-side.
The Server-side is the system that runs on the server (Node JS runs here), and the client-side is the software that runs on a user's web browser (Vanilla JavaScript or React JS runs here).
To learn more about Node JS check out the official documentation Here
Let us verify that Node JS is successfully installed on your system, run the command below on your terminal.
node --versionIf there is no error, the command will return the current version of the installed Node on your system.

What is Express JS?
Express JS is a popular framework of Node JS that makes it easier to manage web applications, Express JS is the E in both M*ERN and ME*AN stack.
To learn more about Express JS check out the official documentation Here
What is Gmail?
Gmail is a free mail service provided by Google, they enable us to send and receive information (electronic-mail) on their platform.
To learn more about Gmail and its services you can check it out Here
What is Nodemailer?
Nodemailer is a Node JS module (function) that allows us to send emails from our Node JS (Server) Application.
To learn more about Nodemailer check out the official documentation Here
Setting up our Node JS Application
1. To begin our project create a new folder and name it projectMailSender
2. Right-click on the projectMailSender and select the Git bash here option

Your current directory should be displayed on the bash terminal like this

If you are not using Gitbash, ensure to navigate inside the projectMailSender folder on your cmd.
3. Let's proceed to generate our project package.json file by running the code below
yarn init -yThe yarn init command is used to create or update a package.json file interactively. This command will walk you through a question and answer process to create a package.
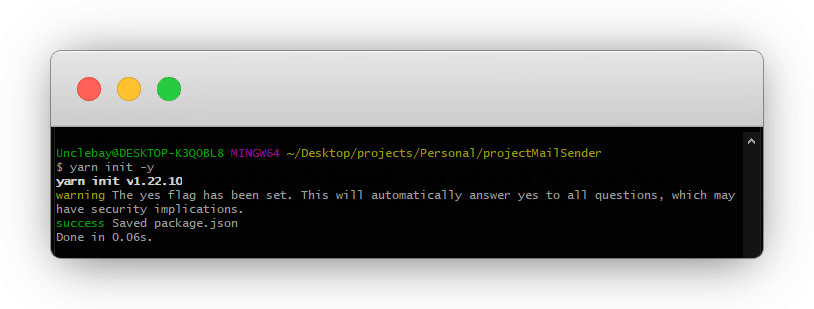
We skipped some questions about the new package.json that we are creating with the -y flag, you can check out the questions in your next Node project by running yarn init without the -y.
Note that
-yis a shorthand for-yes
To learn more about the yarn init command check out the official documentation Here
What's inside package.json?
If the yarn init command is successful a new file named package.json will be created in ourprojectMailSender` folder.

Let's take a look at what is inside our package.json file below
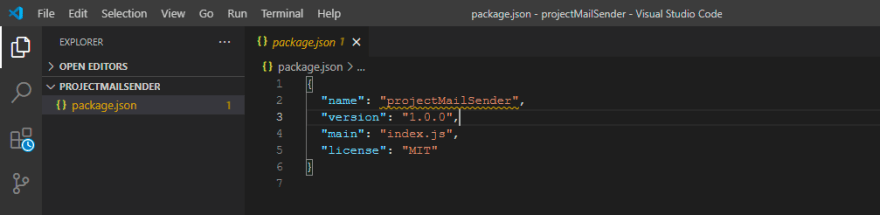
1. name: the name of our project folder.
2. version: you can set and update your project version here
1 stands for a major update (version 1), second 0 stands for a minor update for the major update (version 1, with zero updates (the number of updates on version 1)), and finally the last 0 means patch, a very minor update that is not a big deal.
3. main: every project must have an index.js which serves as an entry point for your project (you can change this).
4. License: your project license goes here.
More information about your project will be stored in the package.json file if you do not skip the yarn init command with the -y flag.
We will be using a file name index.js as our project entry point, so let's proceed to create it in our project root .
You can either run the command below to create the file from your terminal or create it manually.
touch index.js
Your project folder should look like this

Installing Express JS
Now that we have our project setup, let us proceed to install the Express JS into our project.
Use the command below to install Express JS
`
yarn add express
`
Note: if you initialized your
package.jsonfile withnpm, kindly stick to it to avoid conflict, let me know in the comment section if you made this mistake.
The Express JS package should be successfully installed by now let's take a look at our project folder structure again below

You should also notice from your end that a folder named node_modules and a file named yarn.lock has been created automatically in our project folder.
Explanation
- ###
node_modules
This is where yarn or npm will keep the folders of our installed packages for us to make use of them later.
To learn more about node_modules you can check out the official documentation Here
- ###
yarn.lock
Because we are using yarn as our package manager, yarn auto-generate this file to keep track of our project dependencies(packages).
To learn more about yarn.lock you can check out the official documentation Here
Warning:
Do not alter thenode_modulesfolder and theyarn.lockfile manually.
Creating our Project Server with Express JS
Copy and paste the code below into your project entry file (index.js in this tutorial)
`
// Import express into our project
const express = require("express");
// Creating an instance of express function
const app = express();
// The port we want our project to run on
const PORT = 3000;
// Express allows us to listen to the PORT and trigger a console.log() when you visit the port
app.listen(PORT, () => {
console.log(Server is on port ${PORT});
});
`
This is the minimum way of setting up a server with the Express Node JS framework, I have included comments that are straightforward in the code snippet , so it will be present in your own project for reference.
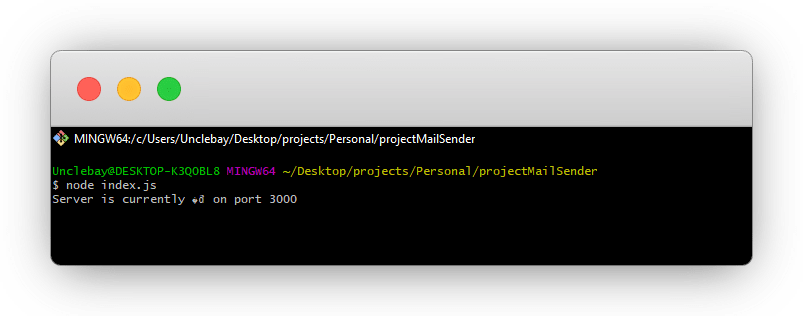
Let's proceed to test our server by running the code below in our terminal.
node index.js
Output

Setting up Nodemon
Now that our server is running on our terminal, let's try to change something in our console.log(), let's say we update the console message below
`
app.listen(PORT, () => {
console.log(Server is currently on port ${PORT});
});
`
Save your file and check your terminal, you should notice that the previous message is still displayed, this implies that the server will not restart whenever there is a change in our project directory, we need to do this manually each time we make a change in the project by stopping the server with ctrl + c and starting it again with node index.js.
If you restart your server, you should get a new message like below
To do this automatically, we can install a package called nodemon, nodemon will help us listen to changes in our project files and automatically restart the server within seconds.
Run the following command to install nodemon to your project
yarn add --dev nodemon
We are installing the nodemon package as a development dependency because it is not needed when we finally host our Node JS project to production.
To learn more about dependencies and devDependencies in package.json you can check it out Here
Now that we've installed nodemon package in our project, let us set it up to do its job.
Open your package.json file
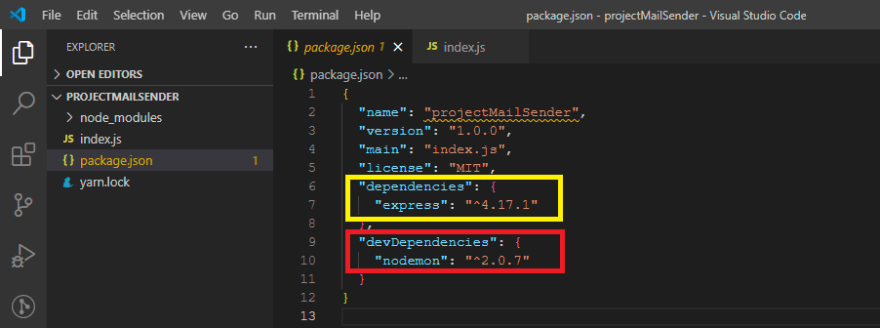
Your project express package should be inside the dependencies object while the nodemon should be inside the devDependencies, this is because we need the express package in our production but we only need the nodemon for our project development.
if your
package.jsonis not structured like the above, kindly check back how we installed the two packages previously.
Add the following code to your package.json file
`
// Before the dependencies
"scripts": {
"start": "nodemon index.js"
},
`
Your package.json file should look something like below

we are basically adding a command to our project which can be accessed through yarn or npm, in this case, we are saying when we run the yarn start command, yarn should start our project with nodemon index.js, so that nodemon will start listening to our file changes.
Start the server again with the code below
`
yarn start
`
You should get a response, that nodemon is ready for any file change and will restart the server immediately.

You can proceed to change your console.log() message and see if the server will restart automatically.
Kindly note that
nodemonwill only listen to changes to files with.js,.mjs, and.jsonextensions, we will have to handle the refresh of the HTML and CSS files on our browser.
If you wish to handle this automatically you can click HERE to install a live server on your VScode to listen for the HTML and CSS file changes.
Click the go-live to turn on the server for your HTML file (ensure you are currently on your HTML file)

Now that we have our server up and running with
nodemon listening to our file changes, let design our application interface.Create a new folder and name it
publicInside the
publicfolder create the following files
Copy the code below into the stated files respectively
index.html
`
<!DOCTYPE html>
<!-- Css styles -->
<!-- Fontawesome icon library -->
rel="stylesheet"
href="https://cdnjs.cloudflare.com/ajax/libs/font-awesome/4.7.0/css/font-awesome.min.css"
/>
e-Mail Sender Application
e-Mail Sender Application
<input class="input-field" type="text" placeholder="To: i.e [email protected]" name="email" autocomplete="off" required /> </div> <div class="input-wrapper"> <i class="fa fa-envelope icon"></i> <input class="input-field" type="text" placeholder="Subject" name="subject" required /> </div> <div class="input-wrapper"> <textarea id="message" name="message" placeholder="Message body.." style="height: 200px; width: 100%" required ></textarea> </div> <div class="attachment-wrapper"> <label for="attachment">Attachment</label> <input id="attachment" name="attachment" type="file" required/> </div> <button type="submit" class="send-btn">Send Mail</button></form>`
- ###
index.css
`
- {box-sizing: border-box;font-family: "Poppins";}
h2 {
font-size: 2rem;
}
.input-wrapper {
display: -ms-flexbox; /* IE10 */
display: flex;
width: 100%;
margin-bottom: 15px;
font-family: "Poppins";
}
.icon {
padding: 10px;
background: #333333;
color: white;
min-width: 50px;
text-align: center;
font-family: "Poppins";
}
.input-field {
width: 100%;
padding: 10px;
outline: none;
font-family: "Poppins";
border: 2px solid #333333;
}
.input-field:focus {
box-shadow: 0 0 10px #333333;
border: 2px solid #333333;
}
.input-wrapper textarea {
padding: 1rem;
border: 2px solid #333333;
}
.input-wrapper textarea:focus {
outline: none;
box-shadow: 0 0 10px #333333;
border: 2px solid #333333;
}
.attachment-wrapper {
margin: 15px 0;
}
.attachment-wrapper label {
font-weight: 600;
}
.send-btn {
background-color: #333333;
color: white;
padding: 15px 20px;
border: none;
cursor: pointer;
width: 100%;
opacity: 0.9;
font-size: 16px;
}
.send-btn:hover {
opacity: 1;
}
`
- ###
success.html
`
<!DOCTYPE html>
<link rel="stylesheet" href="./success.css" /><!-- Fontawesome icon library --><link rel="stylesheet" href="https://cdnjs.cloudflare.com/ajax/libs/font-awesome/4.7.0/css/font-awesome.min.css"/><title>Mail Sent</title><h1>Message Delivered!!!</h1><a href="./index.html">New message</a>`
success.css
`
body {
font-family: "Poppins";
display: flex;
flex-direction: column;
justify-content: center;
align-items: center;
height: 70vh;
color: #333333;
}
a {
color: blue;
}
a:hover {
opacity: 0.8;
}
body .icon {
font-size: 3rem;
}
`
Rendering Static Files to the Browser with Express JS
Yes, we cannot just access our HTML file directly from our browser, express must handle that for us and to this point, we can only access our application port 3000 on our terminal, let's see how we can display our HTML files on our browser using Express JS.
Update the index.js with the following code
`
....
// After PORT = 3000;
// Express should add our path
app.use(express.static("public"));
// Render the index.html when the user visit our project port
app.get("/", (req, res) => {
res.sendFile("/index.html");
});
...
`
Explanation
1. app.use(express.static("public"));
- We are using the express js method called
useto chain a middleware calledstatic, which allows us to serve static files likehtml,css,js,image, and more.
The
publicfolder is defined inside thestaticmiddleware as our project root directory.
2. app.get
app.get()is a function that tells the server what to do when a get request at the given route is called.
3. ("/", (req, res)
The forward slash signifies the root directory of our route, just like
www.hashnode.comThe
reqargument stands for request from that particular route, while theresrepresents response, which is a means to send back a response to the route caller.
4. res.sendFile("/index.html");
- Remember the
resabove us used to send back a response? thereshas a method to send back a file to the route been called, and that is what we are doing here, we are returning theindex.htmlfile when the root route of the project is been hit.
Project UI Routing on a Browser with Express JS
Routing refers to how our application's endpoints (URLs) respond to the client (browser) request through the req parameter, this is unique for a particular endpoint (URL).
www.hashnode.com will respond with the landing page while a request to www.hashnode.com/onboard will respond with a login page .
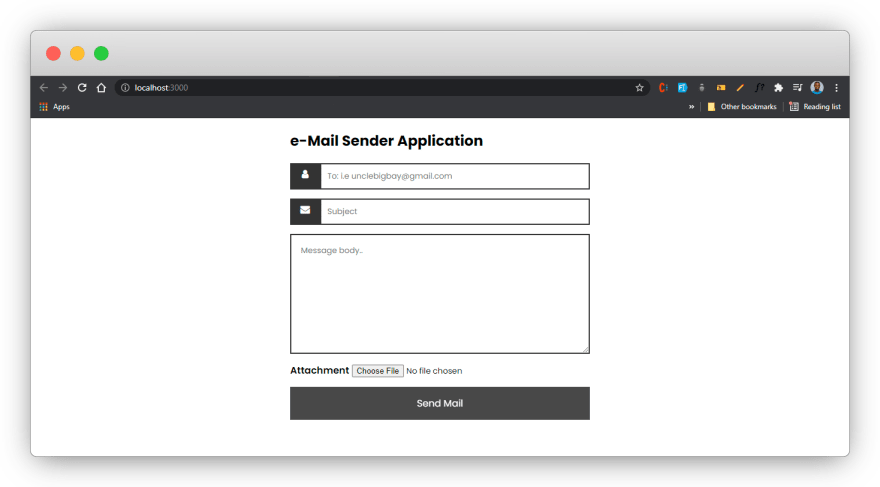
Since we have our route and static files setup, it's time to visit our project port in our browser
You can either copy-paste this route localhost:3000 to your browser address bar and hit enter or click this link localhost:3000.
If all goes well, you should have this displayed on your browser.
You can as well visit the success page using this link localhost:3000/success.html
Our success page should look something like below .


Let's drink up

**
Welcome Back **Handling Data from our HTML forms
Now that we have our project UI setup, let's look into handling the data submitted by the sender.
Note that, our HTML form has the following form input types
- email - text
- subject - text
- message - text
- attachment - file
Generally, to have access to a request body through the req parameter in the get() function, we need a middleware package called bodyparser, but this is also provided by the express JS function, so we do not need to install any package for this.
Update the index.js with the code below
`
// After the express static middleware
...
// Body parser
app.use(express.json());
app.use(express.urlencoded({ extended: false }));
...
`
Now that we have our body-parser setup, let's see it in action by creating a POST route in our application, which we will use to post the entries of the sender to our server.
Add the following code below the get route function
`
// Post route to handle retrieving data from HTML form to server
app.post("/send_email", (req, res) => {
console.log(req.body);
});
`
We also need to update our HTML form to have a POST method and also set the path to post the data to like below.
    <form
      action="/send_email"
      method="POST"
      style="max-width: 500px; margin: auto"
    >
Explanation
1. action="/send_email"
- The action attribute is used to specify where we want to send the form data when the form is submitted, we are sending the data to the /send_email route in our application.
2. method="POST"
- The post method is good when sending sensitive information from the client (browser) to the server (backend), it hides the form values from the browser address bar unlike the
GETmethod which displays it, the post method also appends form data inside the body of the HTTP request, this body is what express js is parsing and is also been retrieved using through thereqparameter in our route functions.
3. req.body
- Here we are accessing the form body object from the
reqparameter which contains all the data from our HTML inputs (example ahead).
Now that we have all this setup, let us proceed to send a sample mail that will be displayed in our terminal.
Fill in the form inputs and also select an attachment then click the send mail button.

If you have all your project set up correctly you, should have the form values displayed below in your terminal.

That is the example of the
req.body, this picks up the attribute name of the HTML input tags
The POST Method

Did you noticed that your browser address bar didn't change , now set your form method to
GETand try sending a mail again, what did you notice?
The GET Method

The submitted data are been displayed on the address bar, imagine you are submitting your password .
Which method will you use for credit cards ?.
Handling Files over a Node JS server
In this section, we will look into handling files coming from the client-side to our project Node JS backend application.
In other to handle files coming from the frontend, we need to install a package called multer
Multer is a node.js middleware for handling multipart/form-data, which is primarily used for uploading files.
Multer also has a rule, which is that multer will not process any form which is not multipart (multipart/form-data).
In other to make multer work in our project we need to add an encryption attribute to our form tag like below.
`
action="/send_email"<br> method="POST"<br> enctype="multipart/form-data"<br> style="max-width: 500px; margin: auto"<br>>`
Ensure to update your form tag with the new attribute, after that, we need to create a new folder called attachments in our project root directory
Your project structure and index.js should look like this

Configuring Multer
To configure our project to use multer, we need to first install it using the command below
`
yarn add multer
`
Once it is installed, we need to configure it in our index.js file.
Setting up multer diskStorage
Multer allows us to specify where we want to store the attachments coming from the frontend and also define their unique names through its method called diskStorage.
require multer below where we required the express js
`
// Import express into our project
const express = require("express");
// Import multer
const multer = require("multer");
...
`
Copy-paste the following code, below the body-parser.
// Multer file storage
const Storage = multer.diskStorage({
  destination: function (req, file, callback) {
    callback(null, "./attachments");
  },
  filename: function (req, file, callback) {
    callback(null,
},
});
`
Explanation
multer.diskStorage
1. destination
This multer method allows us to set the destination of our attachment through a callback function, and as you can see we passed our attachment folder as the second argument of the callback function, this is where the attachment of a mail will be store (example coming up).
2. filename
The second property we can set using the diskStorage is the file name of the incoming attachment, we do this so that every attachment will have a unique file name, we concatenate the field name (from, input name=" attachment") with underscore _ and current date that the file is been attached in milliseconds with another underscore _ and finally the attachment original name.
That is super unique
Let's proceed to write middleware to actually get the attachment from the request body.
`
// Middleware to get a single attachment
const attachmentUpload = multer({
storage: Storage,
}).single("attachment");
`
What we are doing here is that we are passing the attachment storage logic we created into the multer object and also telling multer that we are only targeting a single attachment with the .single("attachment").
Applying Multer Middleware to our Post Route
Now that we have set up a middleware with multer, which will help us retrieve attachments from the frontend form, let's proceed to apply it within our Post route.
Update the application post route with the following code
`
// Post route to handle retrieving data from HTML form to server
app.post("/send_email", (req, res) => {
if (error) {
console.log(err);
return res.send("Error uploading file");
} else {
const recipient = req.body.email;
const subject = req.body.subject;
const message = req.body.message;
const attachmentPath = req.file.path;
console.log("recipient:", recipient);
console.log("subject:", subject);
console.log("message:", message);
console.log("attachmentPath:", attachmentPath);
}
});
`
Explanation
1. We invoked (call/execute) the attachmentUpload middleware function and extend (pass) the req and res parameter from the post route function to it. This will allow the middleware to have access to any file in the request body.
2. The attachmentUpload also takes in a callback function which will check for any error while attachmentUpload processes the files from the request body.
3. In the callback function, we are checking whether there is an error in the process, if any error occurs, we want to display the error in the terminal and send back a message which says Error uploading file as a response (res).
A call-back function is any function that is been passed as an argument to another function, which will be executed (call-back) later in time (any point in time).
4. Finally, we included an alternative statement with the else block which is executed if the previous statement is not satisfied. This implies that the else statement block will only run if there is no error when the middleware is trying to upload any attachments from the HTML form to the "attachment" folder.
Storing Files from HTML Form to our Storage Folder
Let's proceed to test our implementation so far.
Save your script and refresh your browser (if you're not using a live server) to get updated with our node script.
Fill the form inputs and attach any file of your choice as shown below and hit the send button.
Output 1
If all goes well, your terminal should have the following output

You should also notice that the attachment name has changed to the naming convention logic we created earlier .

Output 2
The fun part is, if you expand the attachment folder, you will see your attached file there , thanks to multer, you can also check the folder directory in the file explorer.

Check your File Explorer

You can check the complete code to this point from my GitHub gist Here
Setting up Nodemailer Package
Now that we can get data submitted from our HTML form to our Node JS server, let us proceed to set up the logic that will actually send out the mail to our recipient.
In other to achieve this, we need to install and setup the awaited Nodemailer package, just as the name implies, this package allows us to send mail from our Node js application without stress, to begin with, let us install the Nodemailer package using the code below.
`
yarn add nodemailer
`
Nodemailer Requirements
Now that the nodemailer package has been successfully installed, let us break down the requirements for using the nodemailer package.
1. Nodemailer requires a *transporter * object
This is where we configure the means of sending out the mail, we are going to be using the Gmail service in this article.
Below is the format of a nodemailer transport.
`
let transporter = nodemailer.createTransport({
service: 'gmail',
auth: {
type: 'OAuth2',
user: "your gmail address",
pass: "your gmail password",
clientId: "your gmail client id",
clientSecret: "your gmail client secret token",
refreshToken: "gmail refresh token",
}
});
`
2. Nodemailer requires a mailOption
This is an object where we specify the following
a. The sender's email address (required)
b. The recipient's email address (required)
c. The mail subject (optional)
d. The email text body (optional) and
e. The attachments (optional)
Below is the format for a mailOption
let mailOptions = {
  from: "your gmail address",
  to: "your recipient email address",
  subject: "e-mail subject",
  text: "e-mail body",
};
3. Node mailer requires a sendMail method
Nodemailer sendMail method is actually the one responsible for the sending of email to the recipient, this method takes in the mailOption we've discussed above and also a callback function to handle the status of the mail transportation.
Below is the format for sendMail method
`
transporter.sendMail(mailOptions, function(err, data) {
if (err) {
console.log("Error: " + err);
} else {
console.log("Email sent successfully");
}
});
`
The complete code of the nodemailer should be like this
`
// After the last console.log(attachmentPath) in the else statement
// Connecting to gmail service
let transporter = nodemailer.createTransport({
service: "gmail",
auth: {
type: "OAuth2",
user: "your gmail address",
pass: "your gmail password",
clientId: "your gmail client id",
clientSecret: "your gmail client secret token",
refreshToken: "gmail refresh token",
},
});
// e-mail option
let mailOptions = {
from: "your gmail address",
to: "your recipient email address",
subject: "e-mail subject",
text: "e-mail body",
};
// Method to send e-mail out
transporter.sendMail(mailOptions, function (err, data) {
if (err) {
console.log("Error: " + err);
} else {
console.log("Email sent successfully");
}
});
`
The above code will serve as our nodemailer ** template, which we need to find the credentials to, but before we do that, we need to set up a secure way to protect the transporter credentials such as the **user, pass, clientId, clientSecret and the refresh token that we be provided by google, so that everyone will not be able to see our application secret details from Github repository when we finally push to production.
Setting up dotenv
dotenv allows us to keep secret credentials or tokens in our project environment (.env file), which will not be visible to either the browser, git version control, or people viewing our project on Github, these are called the Environment Variables.
Ensure to add the .env file to your .gitignore file
Run the code below to install the dotenv to your project
`
yarn add dotenv
`
After the dotenv installation, proceed to create a .env file in your project root directory like this
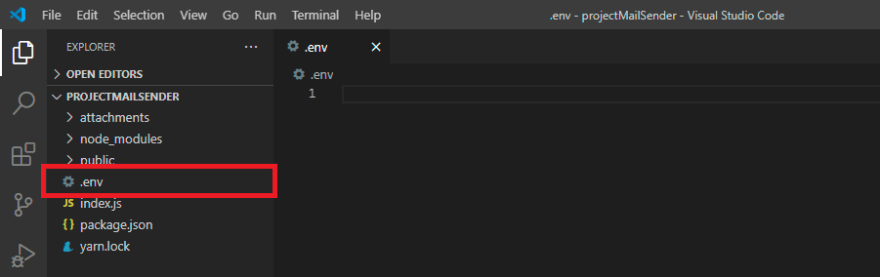
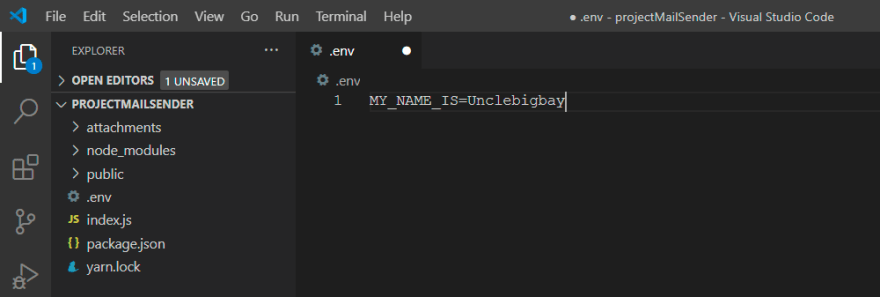
This is where we are going to store our Environment-Specific variables in a NAME=value format like below
To access this *enviroment-variable * from our JavaScript application we need to require (import) the dotenv package in our index.js and configure it like below

Or like this

You can use this method of import when you need to use other dotenv function like parse, but in this article, we are going to make use of the first method because we only need the config() function.
To learn more about the dotenv package, you can visit the official documentation Here
Accessing our environment-variables from dotenv file
Now that we know how to use the dotenv package to store our enviroment-variable in our JavaScript application let us see how we can then access this variables in our scripts.
Add this line of code below the dotenv configuration

Output

And that is totally how to set up and use environment-variables with dotenv package in a JavaScript project (Not only in Node JS) .
If you made it this far, you deserve this

FINAL LAP
Gmail OAuth2 Configuration
Now that we have everything setup in our Node JS application, let's proceed to get the following credentials from Google.
-
clientId: "your gmail client id", clientSecret: "your gmail client secret token",refreshToken: "gmail refresh token",
Follow the guide below to setup you Gmail OAuth 2 Configurations
1. Google Cloud Platform Account Setup
Firstly we need to register our Gmail address on the ** Google Cloud Platform **, if you have not done that before you can register HERE.
If your gmail account is logged in on your browser you should have a screen display like this

Accept the Terms and Condition by checking the box, the Email Updates is optional, and then click on Accept and Continue
2. Setting up a New Project
Next, we need to create a new project, to do this click on the CREATE PROJECT link.

- Setup Project Name
Fill in a name for your project, I am using projectmailSender in this tutorial, note that this project name will be used to generate an id for your project and this cannot be changed later.
- After you have decided on a project name, click on the Createbutton.

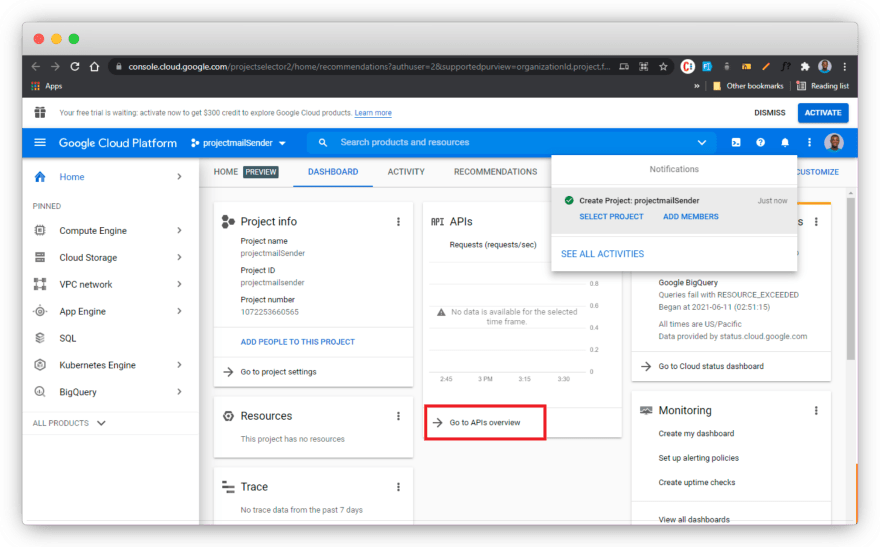
- After a few seconds delay your dashboard should look like this

- After loading click on Go to APIs review
- On the APIs review page, click on the OAuth consent screen option on the sidebar
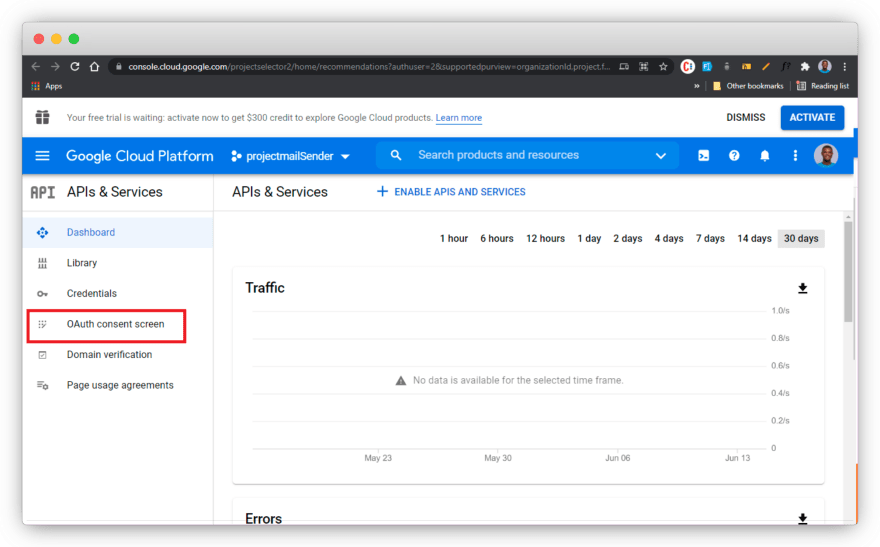
On the OAuth consent Screen
- Select external and click on the create button

- The next step is to provide basic information about our app (nodemailSender)
Only three inputs are compulsory, your app name and 2 emails, one for support and the other for contacting the developer.
Click save and continue when you are done.

- The scope section is optional, but if you want to fill it, you can.
I am going to skip it in this tutorial by clicking the Save and continue .

- Add your email address as the test user and save

- And finally in the Summary section, review your application data and click on Back to dashboard when you are satisfied.
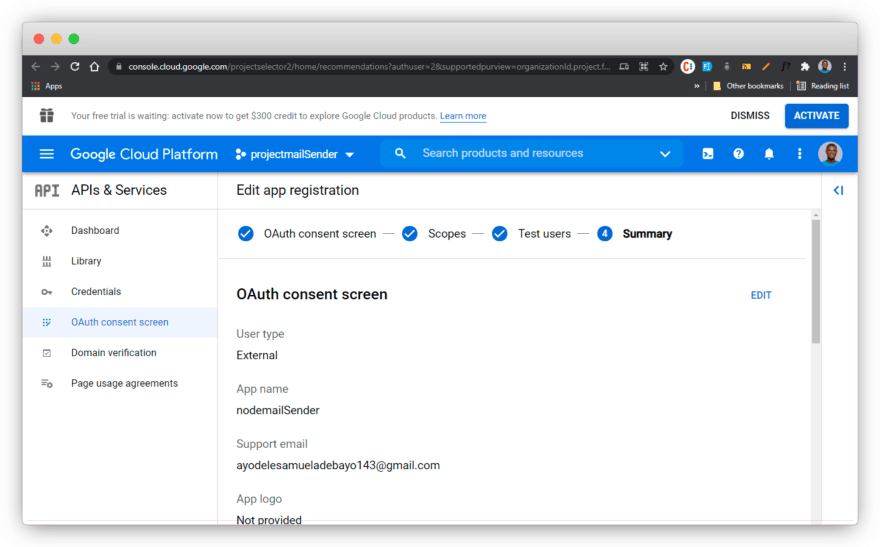
Now that we have setup our new application, let us proceed to generate the credentials we are going to use in our Nodemailer.
- From the page we stopped earlier , click on the Credentials option at the sidebar
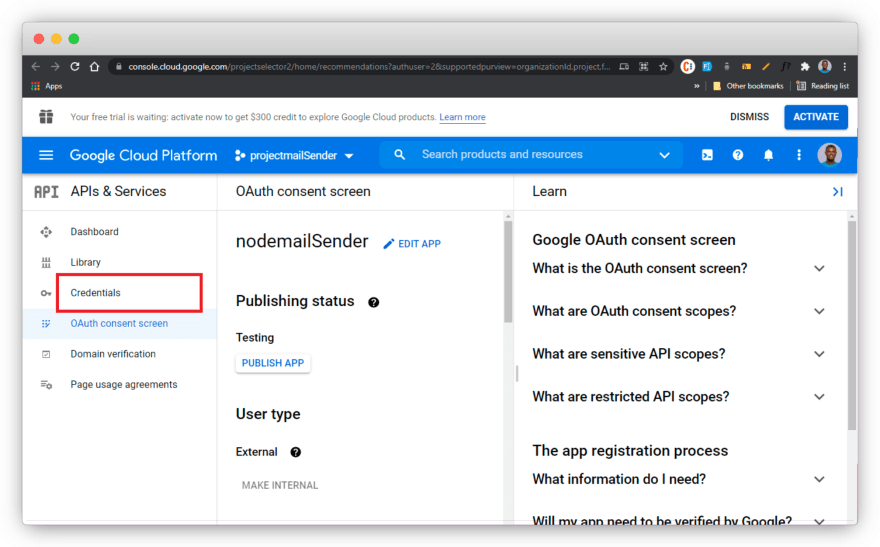
-
On the new page, click on Create Credentials and select the OAuth Client ID option from the dropdown

- On the next page, select Web application option from the dropdown, since we are building our application for the web .

- Choose a client name
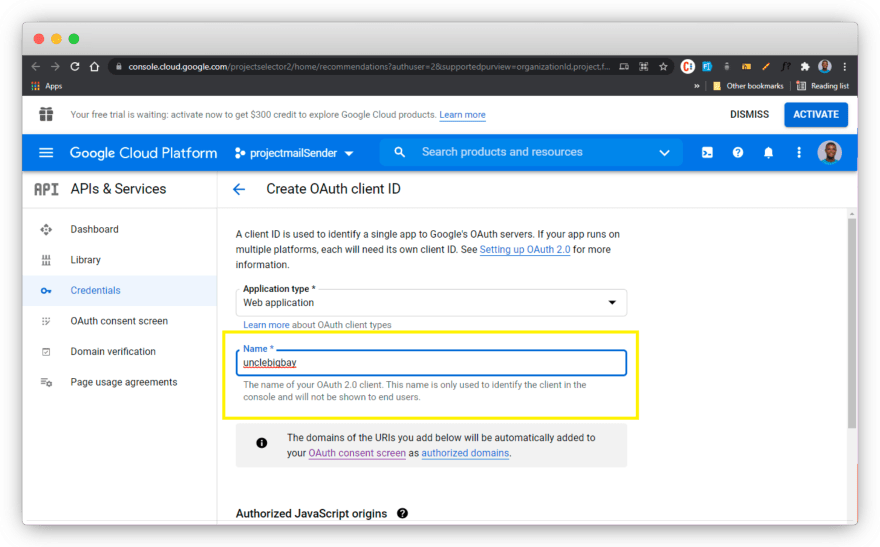
- Scroll to the bottom of the page and add https://developers.google.com/oauthplayground to the Authorized redirect urls section
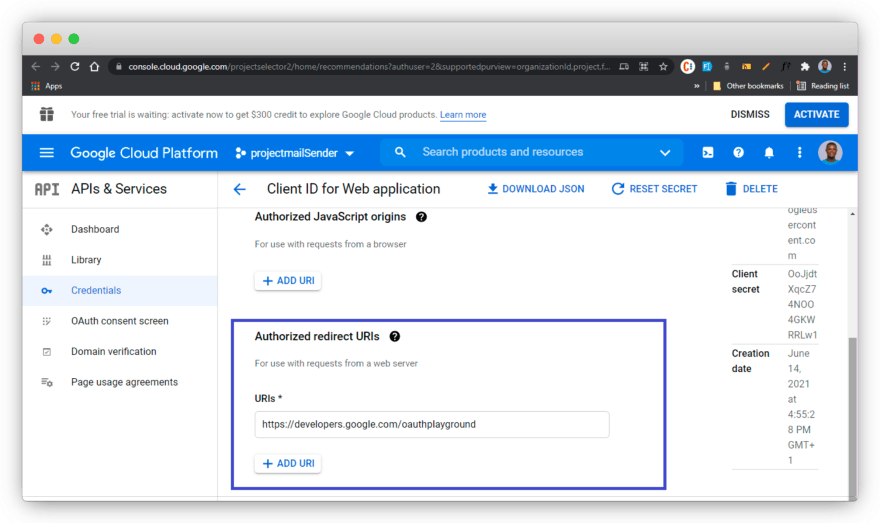
After adding the URL, click on the Create button and if everything goes well, you should receive an alert that your OAuth credentials have been created, followed by this popup.
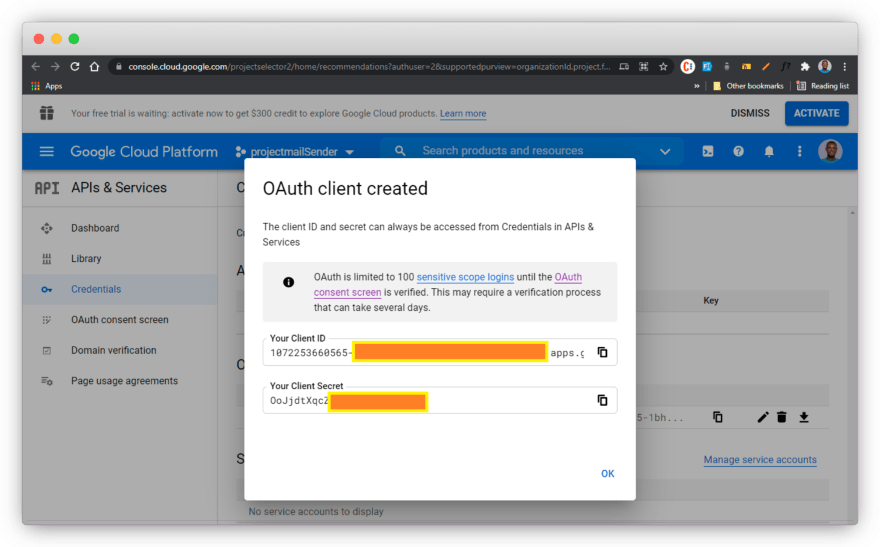
Copy your Client ID and your Client Secret key and keep them safe, because we will use it very soon.
At this point we have gotten 2 out of 3 credentials that we need to configure out nodemailer, the last credential we are looking for is the refreshToken, let's go it em .
Generating OAuth Refresh Token
We will be using the Client ID and the Client Secret to generate our refresh token.
(I hope you saved it earlier?)
If you, you can retrieve it from the credential tab

- ### OAuth Playground
Remember that we set the Authorized redirect urls to https://developers.google.com/oauthplayground ?
Now let's head to the playground to grab our refresh token
click here https://developers.google.com/oauthplayground
On the OAuth Playground
- Click on the settings (gear icon)
- Select the Use your own OAuth credentials
- Fill in your Client ID and Client Secret keys appropriately
- Find and click Gmail API v1 then select https://mail.googl.com/ from the dropdown

Click on the Authorize APIs button.
- You should be redirected to the page below, ensure to select the email address you added as a Test user

If you are denied access, then you should check your test user in the Google Cloud Platform
- Click on continue
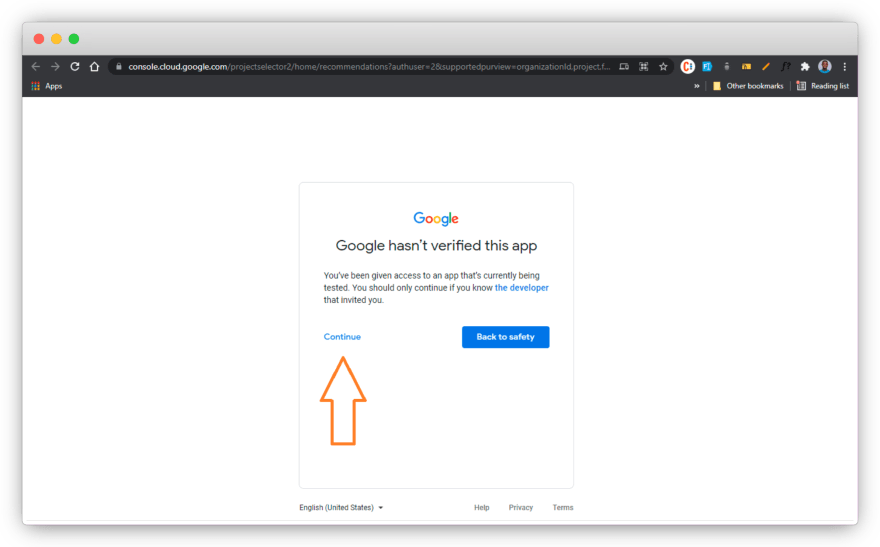
- Grand the application access to your Gmail account

And

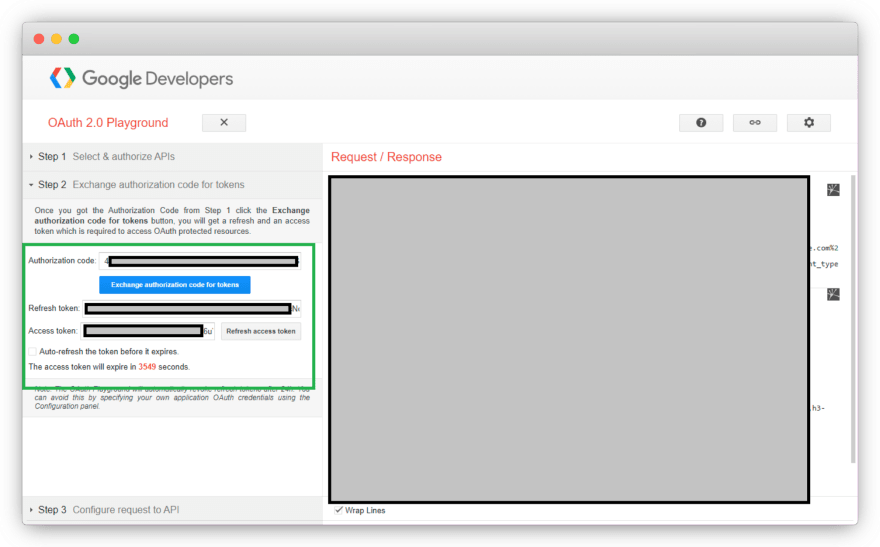
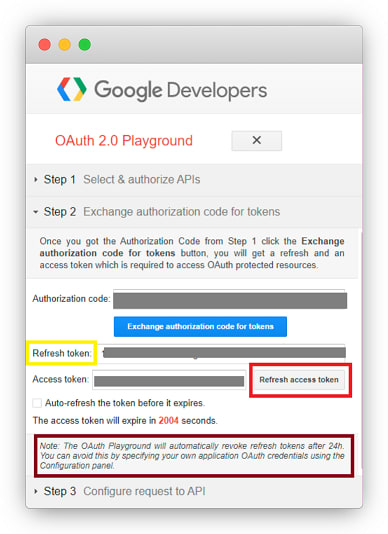
- You will be redirected back to the OAuth Playground, click on Exchange authorization code for tokens

- Copy the refresh token and keep it safe
Setting up Google Transporter
Now that we have gotten our required credentials, let's update our nodemailer logic with the googleapis package.
install the google API using the code below
`
yarn add googleapis
`
What we want to achieve below is to connect to our Google Playground and create a new token each time we need to send a mail and to achieve this, we need to dedicate a function named createTransport to connect to the playground and always create a new access token when we try to send a new email, with this we will never encounter expired token error.
The createTransport function
`
// Googleapis
const { google } = require("googleapis");
// Pull out OAuth2 from googleapis
const OAuth2 = google.auth.OAuth2;
const createTransporter = async () => {
// 1
const oauth2Client = new OAuth2(
process.env.OAUTH_CLIENT_ID,
process.env.OAUTH_CLIENT_SECRET,
"https://developers.google.com/oauthplayground"
);
// 2
oauth2Client.setCredentials({
refresh_token: process.env.OAUTH_REFRESH_TOKEN,
});
const accessToken = await new Promise((resolve, reject) => {
oauth2Client.getAccessToken((err, token) => {
if (err) {
reject("Failed to create access token :( " + err);
}
resolve(token);
});
});
// 3
const transporter = nodemailer.createTransport({
service: "gmail",
auth: {
type: "OAuth2",
user: process.env.SENDER_EMAIL,
accessToken,
clientId: process.env.OAUTH_CLIENT_ID,
clientSecret: process.env.OAUTH_CLIENT_SECRET,
refreshToken: process.env.OAUTH_REFRESH_TOKEN,
},
});
// 4
return transporter;
};
`
Explanation
After importing the googleapis and pulling out OAuth2, let's see what we have in the createTransporter function.
1. Remember this ?

We can't always go to connect our application to the Google playground manually, this method here is automatically doing that for us.

2. Remember the refresh access token also?
The method below will automatically do that for us in other to keep the access token active, it requires the refresh token to generate a new access token, that is why we are passing the token from our environment-variable along with it.

3. We are authenticating ourselves as the owner of the Gmail account we want to use as the transport.
4. we are returning the response from the transport authentication (approved or declined)
Now that we have an understanding of what is going on, let us update our mailOptions and our sendMail method
`
// Route to handle sending mails
app.post("/send_email", (req, res) => {
attachmentUpload(req, res, async function (error) {
if (error) {
return res.send("Error uploading file");
} else {
// Pulling out the form data from the request body
const recipient = req.body.email;
const mailSubject = req.body.subject;
const mailBody = req.body.message;
const attachmentPath = req.file?.path;
// Mail options let mailOptions = { from: process.env.SENDER_EMAIL, to: recipient, subject: mailSubject, text: mailBody, attachments: [ { path: attachmentPath, }, ], }; try { // Get response from the createTransport let emailTransporter = await createTransporter(); // Send email emailTransporter.sendMail(mailOptions, function (error, info) { if (error) { // failed block console.log(error); } else { // Success block console.log("Email sent: " + info.response); return res.redirect("/success.html"); } }); } catch (error) { return console.log(error); }}});
});
`
What we are doing above is to create an asynchronous function without our post route, because we are going to be waiting for a response from the createTransportorer function, we also created a new attachment key in our mailOpitons which will hold our attachment.
The try block is to catch any error that is going to occur during the process of connecting to the Google playground and sending out emails.
The if statement which serves as a conditional statement will check if there is an error and log it out, but if there is no error during the process, it will redirect to the success page.
Now let us test our code
Because this article is long already, I have created a Github Gist Here
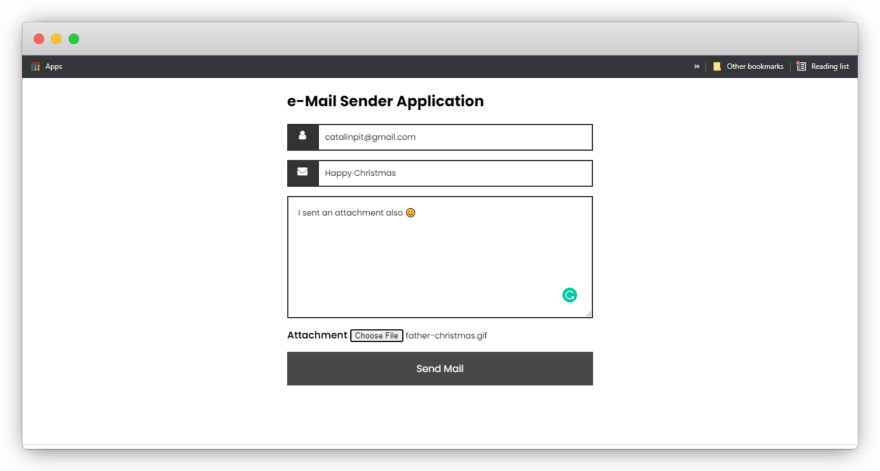
Update your index.js file with the code from the Git and fill the form in your browser with an attachment, like below

- Click on the send mail button, and if all goes well, you should be redirected to the Success Page .

- Proceed to check your recipient mailbox, your sent e-mail should be received .

- Full mail body with attachment displayed

Cleaning Up
Now that our project is complete, there is one important thing to do, which is deleting the attachments from our server document, everytime a mail has been sent, we don't want to keep the user's files, and these files can also take up huge space.
To achieve this, we need to install a package called fs
yarn add fs
The fs package allows us to perform actions with our computer files through Node JS more info HERE
Finally, let us update our sendMail method within the else success block with the code below
`
// Send email
emailTransporter.sendMail(mailOptions, function (error, info) {
if (error) {
// failed block
console.log(error);
} else {
// Success block
console.log("Email sent: " + info.response);
fs.unlink(attachmentPath, function (err) {
if (err) {
return res.end(err);
} else {
console.log(attachmentPath + " has been deleted");
return res.redirect("/success.html");
}
});
}
});
`
You can get the completed Github Gist for the index.js file Here
Now try to send another mail with an attachment to test if the sent files still remain in the folder, remember to manually remove the existing ones.
And that is how to implement a mailing application into your NODE JS project.

In this article, you just learned the basics of Node JS which includes Routing, rendering HTML files, integrating packages, working with Google APIs, and file handling to mention a few. This should get you started in using these technologies to build more stuff.
Useful Links
Final Project Link:
Hosted Version Link:

Wow, what a journey, I am glad you made it to the end of this article, if you enjoyed and learned from this article, I will like to connect with you, so you won't miss any of my upcoming articles.
Let's connect on
%%[reaction-id]
See you in the next article. Bye Bye

If you found this helpful and want to support my blog, you can also buy me a coffee.
Original Link: https://dev.to/unclebigbay/build-an-email-application-using-node-js-express-js-with-gmail-and-nodemailer-all-in-one-article-1c84
Dev To
More About this Source Visit Dev To