
An Interest In:
Web News this Week
- April 1, 2024
- March 31, 2024
- March 30, 2024
- March 29, 2024
- March 28, 2024
- March 27, 2024
- March 26, 2024
Some of Our Sources
- Simplebits
- TutsPlus - Code
- Web Designer Wall
- Fuel Your Creativity
- Web Designer Depot
- Crazy Leaf Design
- My Ink Blog
- Line 25
- Wal You
- Willems Lab
Help Webnuz
Referal links:
Create Model in Django - Tutorial for Beginners
Hello Coders,
This article aims to help beginners to understand how to Create a Model in Django Framework by coding a new app from scratch and use mostly the terminal. The sample source code can be downloaded from Github (MIT License) and extended for hobby and commercial products. For newcomers, Django is a high-level Python Web framework built by experienced developers that encourages rapid development and clean, pragmatic design.
Thanks for reading! - Content provided by App Generator.
- Create Model in Django - source code (Github/MIT License)
- More Django Samples provided with authentication, basic modules
Let's Code Django
Check Python Version - recommended version is Python3
$ python --versionPython 3.8.4 <-- All good, we have a 3.x versionCreate/activate a virtual environment - Unix-based system
$ virtualenv env$ source env/bin/activate For Windows, the syntax is slightly different
$ virtualenv env$ .\env\Scripts\activateInstall Django
$ pip install djangoCreate a new Django Project
$ mkdir django-create-model$ cd django-create-modelInside the new directory, we will invoke startproject subcommand:
$ django-admin startproject config .Note: Take into account that . at the end of the command.
Setup the database
$ python manage.py makemigrations$ python manage.py migrateStart the app
$ python manage.py runserver $$ # Access the web app in browser: http://127.0.0.1:8000/At this point we should see the default Django page in the browser:

Create a new Django application
$ python manage.py startapp sampleVisualize the default SQL settings - config/settings.py
# File: config/settings.py (partial content)...DATABASES = { 'default': { 'ENGINE': 'django.db.backends.sqlite3', 'NAME': BASE_DIR / 'db.sqlite3', }}...Define a new model Books in sample application. The below changes should be added to sample/models.py:
# File: sample/models.pyfrom django.db import models class Book(models.Model): # <- NEW title = models.CharField(max_length=100) # <- NEW author = models.CharField(max_length=100) # <- NEW publication_date = models.DateField() # <- NEW Update Project Configuration to use the new model - The sample application must be added in the project configuration to INSTALLED_APPS section.
# File: config/settings.py (partial content)...INSTALLED_APPS = [ 'django.contrib.admin', 'django.contrib.auth', 'django.contrib.contenttypes', 'django.contrib.sessions', 'django.contrib.messages', 'django.contrib.staticfiles', 'sample' # <- NEW ]...Tip - for a quick check over latest changes we can run check subcommand.
$ python manage.py checkSystem check identified no issues (0 silenced). Generate the SQL code
$ python manage.py makemigrations # generate the SQL codeMigrations for 'sample': sample\migrations\0001_initial.py - Create model BookApply changes on database
$ python manage.py migrateOperations to perform: Apply all migrations: admin, auth, contenttypes, sample, sessionsRunning migrations: Applying sample.0001_initial... OKUse the model via CLI
Once the model is created we can use it via the Django shell
$ python manage.py shell>>> >>> from sample.models import Book # import the Book model in our context>>> from django.utils import timezone # used to provide the value for publication_date>>>>>> book1 = Book(title='The Adventures of Tom Sawyer', author='Mark Twain', publication_date=timezone.now() )>>> book1.save() # save the new bookList all books (using the CLI)
$ python manage.py shell>>> >>> from sample.models import Book>>> Book.objects.all()<QuerySet [<Book: Book object (1)>]>We can see our new book retuned by the query. Let's improve the information that describe the object.
Django Model - add text representation of an object
To achieve this goal, we should define the __str__() method for the Book model
# File: sample/models.pyfrom django.db import models class Book(models.Model): title = models.CharField(max_length=100) author = models.CharField(max_length=100) publication_date = models.DateField() def __str__(self): # <- NEW return self.title # <- NEWLet's restart the Django console and check the results:
$ python manage.py shell>>> >>> from sample.models import Book>>> Book.objects.all()<QuerySet [<Book: The Adventures of Tom Sawyer>]>Use the model via Admin Section
Django comes with an admin section our-of-the box that allows us to manage with ease all models defined in project.
To manage the Book model in the administration console we need to create a superuser (aka the admin) and after register the Book model to be visible in the admin section.
Create the superuser
$ python manage.py createsuperusersername (leave blank to use 'sm0ke'): adminEmail address: [email protected]: Password (again):Superuser created successfully.Register
Bookmodel to be visible in theadminsection - Editsample/admin.pyas below:
# File: sample/admin.pyfrom django.contrib import adminfrom .models import Book # <- NEWadmin.site.register(Book) # <- NEWAuthenticate as admin -
http://localhost:8000/admin/
At this point we should see the Books model in the UI and able to execute CRUD operations.
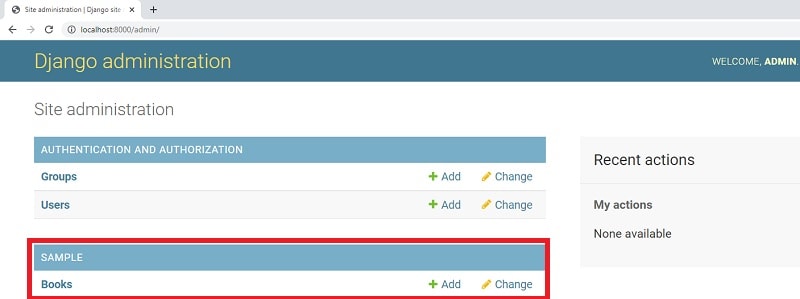
Create Django Model - List Model Items

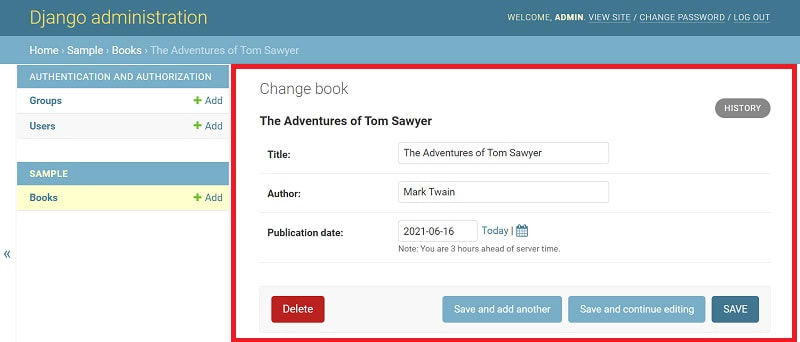
Django Create Model - Edit Records
Thanks for reading! Feel free to AMA in the comments section.
More Django Resources
- Read more about Django (official docs)
- Start fast a new project using development-ready Django Starters
Original Link: https://dev.to/sm0ke/create-model-django-1536
Dev To
More About this Source Visit Dev To