
An Interest In:
Web News this Week
- April 25, 2024
- April 24, 2024
- April 23, 2024
- April 22, 2024
- April 21, 2024
- April 20, 2024
- April 19, 2024
Some of Our Sources
- Mashable
- Web Designer Wall
- Pearsonified
- Spoon Graphics
- Noupe
- Crazy Leaf Design
- Fudge Graphics
- Android Headlines
- Willems Lab
- The Verge
Help Webnuz
Referal links:
Daily Share Price Notifications using Python, SQL and Africas Talking - Part Two
Previously..
To recap abit, in Part One of this article:
- Created a folder to hold all of our code.
- Used pip to install the required packages including: africastalking,beautifulsoup4, scrapy, psycopg2-binary, sqlachemy, python-dotenv.
- Created our first project and spider using scrapy-cli.
- Scraped the afx website for stock prices.
- We followed that by cleaning the data; removing html tags and unnecessary styling.
- Finally we defined our data pipeline as required by scrapy and database parameters. This was enable data to be insterted and therefore persisted across different sessions.
- We ran our scraper to ensure everything is working as it should. We also saved the scraped data as a JSON file for quick preview.
For this article we will cover creating a SMS notification script once a certain stock reaches a specified price threshold. This will be enabled by Africas Talking SMS api through the python SDK. To wrap up, we'll deploy our project to a heroku server and it have run 24/7.
The full code for this tutorial is on github.
Notifications

In this section we'll create a script that queries the database, retrieves a specified stock price,checks against set constraints and if the specified condition is met a notification text is sent.
Our current file structure is as shown below:
python-projects $ tree nse_scrapernse_scraper LICENSE nse_scraper __init__.py items.py middlewares.py models.py pipelines.py settings.py spiders afx_scraper.py __init__.py test.json README.md requirements.txt scrapy.cfg test.json2 directories, 14 filesInside the nse_scraper/nse_scraper folder, lets create a stock_notification.py file. This will hold all of query and notification code. Inside add the following code:
# stock_notification.pyfrom typing import List, Anyfrom models import StockData, db_connectfrom sqlalchemy.orm import sessionmakerfrom sqlalchemy import descimport africastalking as atimport osThe above block code imports our required libraries, ranging from africastalking python sdk to the os package. We also import the required classes: Stockdata and db_connect from models.py file. We also import the List and Any objects fron the typing library.
For the next part ensure you have an Africas Talking account and a Heroku account.
# stock_notification.pyat_username = os.environ.get("at_username")at_api_key = os.environ.get("at_api_key")mobile_number = os.environ.get("mobile_number")# print(at_username, at_api_key)# Initialize the Africas sdk py passing the api key and username from the .env fileat.initialize(at_username, at_api_key)sms = at.SMSaccount = at.ApplicationThe above code retrieves the required credentials from enviroment variables. Usually I prefer to use .env files however since we are deploying to Heroku. We need to specify environment variables that we will define in Heroku. We the initialize the Africas Talking Sdk using our appropriate credentials. We further assign the SMS class to a variable. We also assign the Application class to a account variable.
The snippet below assigns engine variable to the db_connect function, following it up by binding sessionmaker to the engine variable. This implements a session when doing database operations. We finally define an empty ticker_data list to hold all of our stock data.
# stock_notification.pydef stock_query(): sq = session.query(StockData.id, StockData.stock_ticker, StockData.stock_name, StockData.stock_price).filter(StockData.stock_ticker == "SCOM") for id, ticker, name, price in sq.order_by(desc(StockData.id)).limit(1): # print(id, name, ticker, price) new_data = {'stock_id': id, 'stock_name': name, 'stock_ticker': ticker, 'stock_price': price} return new_dataWe define a stock_query() function to query our specific stock data. We then define a query for the database using our pre-defined StockData class, we are checking specifically checking for the latest Safaricom PLC stock data. This is however just for demonstration purposes, you are free to choose any other stock or counter. We then unpack the returned data into the new_data dictionary.
# stock_notification.py# Create a function to send a message containing the stock ticker and pricedef stock_notification(message: str, number: int): try: response = sms.send(stock_data, [number]) print(account.fetch_application_data()) print(response) except Exception as e: print(f" Houston we have a problem: {e}")In the snippet above we create a stock_notification function and pass stock_data argument specified as a list. We also pass a number argument of the integer type. As the name suggests, this function will effectively send a text message to the us once a stock reaches a certain criteria. We throw-in a try-catch block, this ensures incase the message fails to send we have a way to catch and debug the error. We also output our account balance inorder to ensure we get a balance check on each run.
# stock_notification.py message = f'{stock_query()["stock_name"]}, is now Kes {stock_query()["stock_price"]} per share'# check if Safaricom share price is more than Kes 39 and send a notification.if stock_query().get("stock_price") >= 39: # Call the function passing the message and mobile_number as a arguments print(message) stock_notification(message, mobile_number)In the final block of code above: we define a message variable to hold the data we'll send as a text message. We want to send the stock name and the current stock price. We then define the criteria inorder to send the message, in this case its when the price is above Kes 39. When the criteria is achieved, the stock_notification function is called.
To recap your project should now look as shown below:
nse_scraper LICENSE nse_scraper __init__.py items.py middlewares.py models.py pipelines.py settings.py spiders afx_scraper.py __init__.py stock_notification.py test.json README.md requirements.txt runtime.txt scrapy.cfg test.json2 directories, 16 filesDeployment

Lets now deploy our scraper to Heroku and have it run in one hour intervals.

- Heroku account registration
First and foremost, you would need to register an account with Heroku, its free!
- Installing Heroku CLI
After your account registration, lets use Heroku CLI to create and manage our project. You may check out the installation steps for other OS here.
# for arch-linuxsudo pacman -S heroku - Login
To log in using Herokus CLI, simply cd to your project folder and run heroku login.
$ cd nse_scraper $ heroku login heroku: Press any key to open up the browser to login or q to exit:Opening browser to https://cli-auth.heroku.com/auth/cli/browser/xxxx-xxxx-xxxx-xxxx-xxxx?requestor=xxxx.xxxx.xxxxLogging in... doneLogged in as &*^@gmail.com...- Git
At this stage, you should already have set up your project with git init and git commit etc. The next steps are to turn your project into a git repository and push it to Heroku.
# i. To create a Heroku application:$ heroku apps:create daily-nse-scrape# ii. Add a remote to your local repository:$ heroku git:remote -a daily-nse-scraper# iii. Deploy your code$ git push heroku mainOnce were done here, lets open up our Heroku dashboard page for your newly created Heroku application.
Setup free tier managed PostgreSQL service on Heroku
Take note that the free tier only has a limit of 10,000 rows at the time of writing this.
This step is fairly simple, simply go to the Resources tab on your Heroku dashboard and look for Heroku Postgres, select the free tier (or whichever you deem fit). 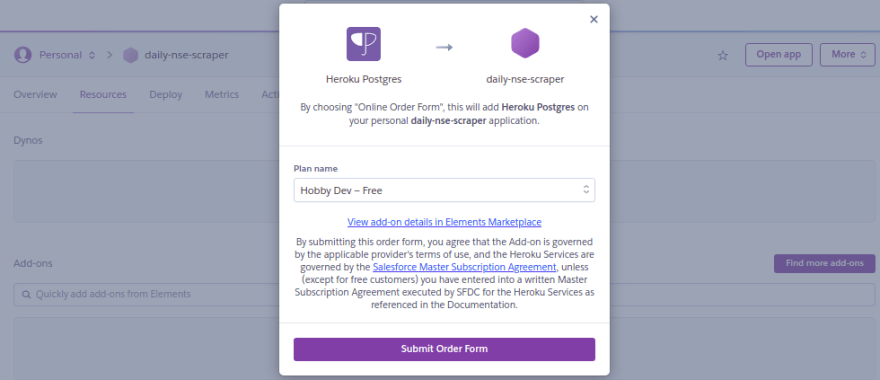
To look for your database credentials, simply click on your Heroku Postgres add-on select Settings View Credentials
Finally, adjust your Scrapy projects connection to your database accordingly.
# settings.py# POSTGRES SETTINGShost = os.environ.get("POSTGRES_HOST")port = os.environ.get("POSTGRES_PORT")username = os.environ.get("POSTGRES_USER")password = os.environ.get("POSTGRES_PASS")database = os.environ.get("POSTGRES_DB")drivername = "postgresql"DATABASE = f"{drivername}://{username}:{password}@{host}:{port}/{database}"# Or alternatively:DATABASE_CONNECTION_STRING = postgres://xxxx:xxxx@ec2-xx-xxx-xxx-xx.compute-1.amazonaws.com:5432/xxxxxxEnsure you add your configuration variables in Settings Reveal Config Vars. This will allow Heroku to get and set the required environment configuration for our web scraper to run. As shown below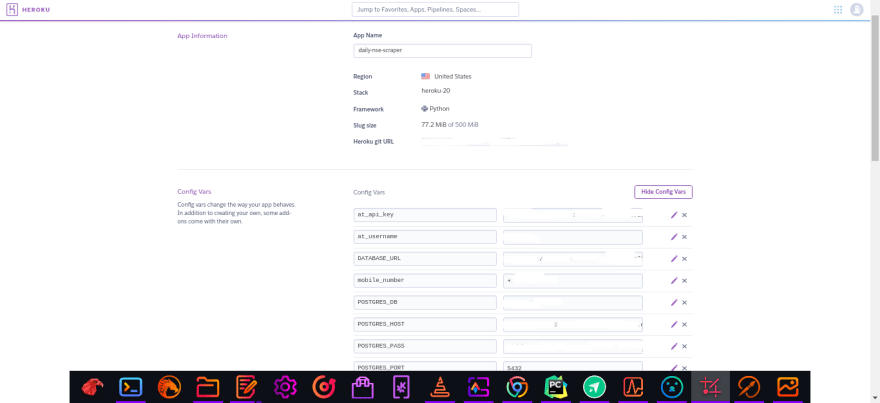
- End Results
By the end of this, if you were to visit your Heroku dashboard activity feed, you should see your application there where the latest activity says that your app has been deployed.
If you try to run heroku run scrapy crawl afx_scraper on your local terminal, you should see that it will attempt to run the crawler on your Heroku server.

If everything ran as expected. You should see output on your terminal. In the database addon we can run a simple query to check our database tables. 
Note: I also added a runtime.txt file at the root of our project, this tells Heroku what python version to use for our project. By default it uses the latest python version, this may introduce errors during execution thus its better to opt for a fixed version. In this case I specified python-3.9.2
Heroku Scheduler
This section of the article shows you how you can run your crawlers/spiders periodically.
Though Heroku offers several different schedulers that could run your application periodically, I personally prefer Heroku Scheduler as it has a free tier and it is super simple to use.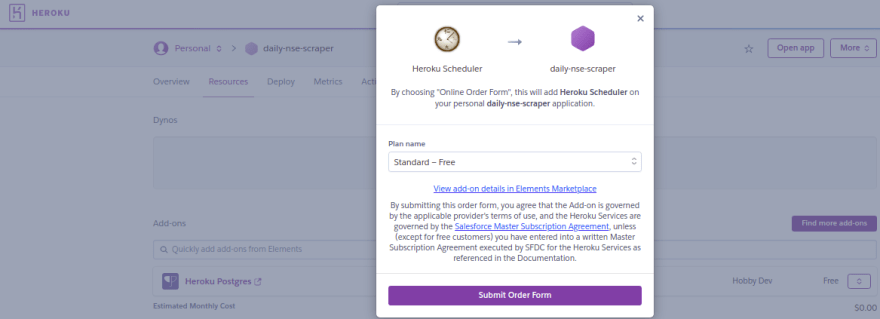
To use the free tier of this add-on, Heroku requires you to add a payment method to your account.
- ConfigurationInside your newly added Heroku Scheduler add-on, simply select Add Job on the top right corner and you should see the screen as shown in the picture beside.
To run thescrapy crawl afx_scraper command periodically, simply select a time interval and save job.
- How do I schedule a daily job? Simply configure our Heroku Scheduler to run our python script every day at a specified time. In our case its every hour at 10 minutes. Then it should run our command.
scrapy crawl afx_scraperScheduling Text Notifications
Now we need add a scheduler for Heroku to run our notifiction script which will inturn send us texts. Since we already have an instance of Heroku running in our app we need an alternative. Advanced scheduler is a good option as it offers a free trial and if need be a $5 per month for an upgrade.
Setup
Inside our daily-nse-scraper app, search for the advanced scheduler addon. Select the trail-free plan and submit order form.
Configuration
Click on the Advanced Scheduler addon. Inside the overview page. Click on Create trigger button. The free trial allows up-to 3 triggers.
We'll set a trigger for 11.00 am each day, specify the command python nse_scraper/stock_notification.py to run. Remember to select the correct timezone in my case its Africa/Nairobi and save the changes. 
- Testing
To ensure the scheduler will execute as expected. We can manually run the trigger: on the overview page, click on the more button and select execute trigger. 
You should now have received a notification text if everything went as expected.

Wrap Up

To wrap things up, I have found a lot of success in deploying and running my spiders periodically with this method. The only downside here is the free tier version of Heroku Postgres which only supports up to 10,000 database rows.
In this case, we can easily opt-in for the paid version of it and scale our database accordingly based on our demand. On a side note, we could also easily swap out our Scrapy projects database instance to use another cloud RDS solution such as Amazon RDS.
On top of these, you can also easily opt-in for other available Heroku add-ons for logging and monitoring purposes.
Another Free Alternative Method
While I am aware that we could use Scrapyd to host your spiders and actually send requests, alongside with ScrapydWeb, I personally prefer to keep my scraper deployment simple, quick, and free. If you are interested in this alternative instead, check out this post written by
Harry Wang.
If you have any question or comments. Let me know in the comments, or on Twitter.
Happy Coding.
Original Link: https://dev.to/ken_mwaura1/daily-share-price-notifications-using-python-sql-and-africas-talking-part-two-37db
Dev To
More About this Source Visit Dev To