
An Interest In:
Web News this Week
- March 21, 2024
- March 20, 2024
- March 19, 2024
- March 18, 2024
- March 17, 2024
- March 16, 2024
- March 15, 2024
Some of Our Sources
- Mashable
- Simplebits
- Pearsonified
- Fuel Your Creativity
- Noupe
- Web Design Ledger
- Specky Boy
- CSS Tricks
- Spyre Studios
- Design Modo
Help Webnuz
Referal links:
Building your own Ngrok in 130 lines
Running a local development server for your app is pretty common, but what if you wanted somebody else to access it? Maybe for a demo, or maybe to debug webhook integrations. If you've ever used Ngrok (or perhaps the original localtunnel), you know what I'm talking about.
Today we're going to make a system that emulates the core functionality of Ngrok, exposing a localhost HTTP server via a public URL.
Just to make sure we're clear on how this all works, let me explain the problem. Normally when you run a server on your computer it can only be accessed by other computers on the same local network. However, many development servers will bind to 127.0.0.1, or localhost, which means only a client or browser on your computer can access it. Either way, there are times when you might want another party to access it temporarily, but it's simply not addressable from the public Internet.
In the olden days, this could only be achieved if you had access to a server running SSH. You could configure SSH to have publicly addressable ports on that server be "forwarded" to a local port on your computer over an SSH connection. This is called remote port forwarding or sometimes SSH tunneling. Assuming SSH is configured properly, the command to set this up looks like this:
$ ssh -R 8080:localhost:3000 your-ssh-server.comThis would allow somebody to point their browser to your-ssh-server.com:8080 and get your localhost server running on port 3000 as long as this command was running. Around 2009, I noticed how useful this is (especially in the context of webhooks), but was annoyed you had to have an SSH server properly configured for it before you could even do it. Even then, I always found the SSH command difficult to remember how to use for forwarding. I envisioned a command as simple as:
$ localtunnel 3000So I set about making this happen. My first attempt at building a system with Twisted Python failed because I didn't quite grok multiplexing. So I ended up wrapping SSH. I wrote a localtunnel client in Ruby that behind the scenes would just run the above SSH command using a server I had set up. The only difference being that I didn't give you a port like 8080 to connect to, I wanted you to get a generated subdomain. Instead of localtunnel.com:8080, you'd get wxyz.localtunnel.com, which was unique to your tunnel as it was intended as a public service.
To achieve that, I just ran a Twisted web server with the SSH server that would figure out which port to use based on the subdomain and proxy to it. This would only work with HTTP because the idea of virtual hosts was actually invented for HTTP. Normally when you get a TCP connection you have no idea what hostname is used.
So I had something like this: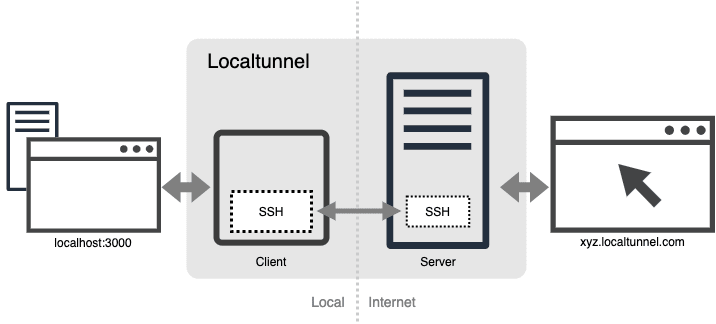
And it worked! It became rather popular. However, due to the slight complexity (Ruby+Python+OpenSSH) and the fact I was too busy to maintain the service, people started cloning it. One jackass even called his clone "localtunnel".
Another jackass, who was less of a jackass and more my friend and coworker, decided to clone it as a way to learn Go. He called it Ngrok and decided to commercialize it. This bothered me for a number of reasons I won't get into, but eventually decided it was fine since he really improved on the idea and would at least listen to me if I had anything to say about it.
Anyway, today we're exploring a toy recreation of this system that we'll call groktunnel. It removes SSH from the setup and using two libraries lets us build the whole thing in about 130 lines of Go. You'd still need a server to run this on, so it's not as convenient as a hosted service, but this is more for educational purposes. After all, groktunnel is actually a demo for qmux, one of the libraries I mentioned. Let me explain these libraries.
What qmux does is give us a subset of the SSH protocol to multiplex many connections over a single connection. It was the missing piece of my original Twisted prototype. You can read more about how there aren't a lot of these protocols (but perhaps with QUIC are also the future of the Internet) in my previous post.
The other library is actually by the author of Ngrok. Called go-vhost, it helps with the problem of virtual hosts. Ideally when a connection comes in to be forwarded down the tunnel we can hand it off wholesale. This way the other end can just start reading off the connection as if received directly. But in order to figure out the hostname used, we have to start reading off the connection up to the Host header. Then we have to hand it off prepended with what was read. What Alan wrote is an abstraction that gives you a virtual listener that lets you accept new connections for a particular virtual host and get the connection as if it hadn't been read yet. A lot of this is due to the interface based approach of the Go standard library.
This brings us to the main utility function we'll be writing for this system. A TCP connection established between two peers cannot (easily) be handed off between programs, let alone hosts. We don't literally "forward" the connection, we sit in the middle and relay the bytes. This is how every proxy, load balancer, gateway, or tunnel works. It sort of welds two sockets together. I call this socket joining. And if you can avoid doing any protocol level stuff, building a proxy just becomes opening a connection to the backend when a connection comes in and then joining them.
Since Go models connections using the interfaces of the io package, we can use io.Copy to simplify reading off bytes from one connection into another until an EOF. A two-way copy like this that closes when finished looks like this:
func join(a io.ReadWriteCloser, b io.ReadWriteCloser) { go io.Copy(b, a) io.Copy(a, b) a.Close() b.Close()}This minimal approach benefits from setting a deadline on the connections in case one end doesn't hang up. You can see we copy bytes from a to b in the background, then wait for copying bytes from b to a before making sure both sides are closed once b gets an EOF.
We'll also define a helper to generate random subdomains. In a production service this is a big deal. You'd want an incredibly large space of possible subdomains, but here we generate 10 random alphanumeric characters using crypto/rand:
func newSubdomain() string { b := make([]byte, 10) if _, err := rand.Read(b); err != nil { panic(err) } letters := []rune("abcdefghijklmnopqrstuvwxyz1234567890") r := make([]rune, 10) for i := range r { r[i] = letters[int(b[i])*len(letters)/256] } return string(r) + "."}Another quick utility to define that's common in simple Go programs is a fatal function. This helps simplify all the error checking.
func fatal(err error) { if err != nil { log.Fatal(err) }}Now we can get started in our main() which will contain both client and server modes. However, first we'll define some flags useful to both:
var port = flag.String("p", "9999", "server port to use")var host = flag.String("h", "vcap.me", "server hostname to use")var addr = flag.String("b", "127.0.0.1", "ip to bind [server only]")flag.Parse()The default hostname of vcap.me is a way to make the server easy to run locally. Since localhost doesn't allow subdomains, but any domain can resolve to 127.0.0.1, there are a few public domains that have wildcard subdomains all resolving to 127.0.0.1. If we ran this on a real server, we'd need a domain with wildcard subdomains resolving to the server IP, and we'd probably use port 80 instead of 9999.
Now we'll start with the client, which is quite simple. It's activated when there is an argument specifying the local port to expose publicly.
// client usage: groktunnel [-h=<server hostname>] <local port>if flag.Arg(0) != "" {    conn, err := net.Dial("tcp", net.JoinHostPort(*host, *port))    fatal(err)    client := httputil.NewClientConn(conn, bufio.NewReader(conn))    req, err := http.NewRequest("GET", "/", nil)    req.Host = net.JoinHostPort(*host, *port)    fatal(err)    client.Write(req)    resp, _ := client.Read(req)    fmt.Printf("port %s http available at:
", flag.Arg(0))    fmt.Printf("http://%s
", resp.Header.Get("X-Public-Host"))    c, _ := client.Hijack()    sess := session.New(c)    defer sess.Close()    for {        ch, err := sess.Accept()        fatal(err)        conn, err := net.Dial("tcp", "127.0.0.1:"+flag.Arg(0))        fatal(err)        go join(conn, ch)    }}
Here we set up the tunnel over HTTP since we'll be serving HTTP anyway, and we need a way to tell the client what the generated public host is to display a URL to the user. You can see we get the hostname from a response header.
We're manually creating an HTTP request with httputil.NewClientConn because it lets us hijack the connection. This simply means it stops processing as HTTP and treats it like a raw TCP connection. Alternatively we could upgrade to WebSocket for this, but this simply works just as well with fewer dependencies.
After hijacking we create a qmux session to start multiplexing virtual connections, or channels, over this connection. This is the tunnel. We don't open channels, we just sit in a loop waiting for incoming channels and assume they want to be joined with a connection to our localhost server. That's it.
Now the server. First we set everything up using our flags, including a TCP listener, which we wrap in a virtual host muxer. The meat of our server is in serve() but that runs asynchronously as we listen for vhost muxing errors until shutdown.
// server usage: groktunnel [-h=<hostname>] [-b=<bind ip>]l, err := net.Listen("tcp", net.JoinHostPort(*addr, *port))fatal(err)defer l.Close()vmux, err := vhost.NewHTTPMuxer(l, 1*time.Second)fatal(err)go serve(vmux, *host, *port)log.Printf("groktunnel server [%s] ready!
", *host)for {    conn, err := vmux.NextError()    fmt.Println(err)    if conn != nil {        conn.Close()    }}
Now the heart of this system in serve():
func serve(vmux *vhost.HTTPMuxer, host, port string) { ml, err := vmux.Listen(net.JoinHostPort(host, port)) fatal(err) srv := &http.Server{Handler: http.HandlerFunc(func(w http.ResponseWriter, r *http.Request) { publicHost := strings.TrimSuffix(net.JoinHostPort(newSubdomain()+host, port), ":80") pl, err := vmux.Listen(publicHost) fatal(err) w.Header().Add("X-Public-Host", publicHost) w.Header().Add("Connection", "close") w.WriteHeader(http.StatusOK) conn, _, _ := w.(http.Hijacker).Hijack() sess := session.New(conn) defer sess.Close() log.Printf("%s: start session", publicHost) go func() { for { conn, err := pl.Accept() if err != nil { log.Println(err) return } ch, err := sess.Open(context.Background()) if err != nil { log.Println(err) return } go join(ch, conn) } }() sess.Wait() log.Printf("%s: end session", publicHost) })} srv.Serve(ml)}Here we create a new listener using the vhost muxer passed in to listen for connections on the naked domain (vcap.me). Then we make an HTTP handler that sets up a new tunnel. First it generates a new hostname and tells our vhost muxer to start listening on it. We'll hold on to that listener.
Then we start writing headers. Remember this is how we tell the client what our generated hostname is. We also use Connection: close to tell the other end we're going to be done and normally hang up, but after we flush the headers with a 200 OK status, we hijack the connection like we know is going to happen on the other end. We make a new qmux session and start a new goroutine.
This goroutine handles connections coming in from our new vhost listener. All this does is sit in a loop accepting new connections, then using our qmux session opens a channel, then joins the new connection with that channel.
Back in our HTTP handler, we call Wait() on our session, which will just block until the connection breaks. This handler has been put into an HTTP server instance set to serve on our original vhost listener for the naked vcap.me domain.
Now we can try it out. You can follow the instructions in the groktunnel README to see it in action.
This little program gives us a client and server that recreates the original localtunnel system. It showcases the use case of tunneling for connection multiplexing, but also how easily you can wire things up in Go using mostly the standard library.
If you wanted to tunnel normal TCP connections, not HTTP connections, this program gets even simpler. However, that's an exercise for the reader. You can see the full groktunnel source in the demos directory of the qmux project. Hope you were inspired to build something cool!
For more posts like this sent directly to your inbox and to find out what all I'm up to, get on the list at progrium.com
Original Link: https://dev.to/progrium/building-your-own-ngrok-in-130-lines-2lif
Dev To
More About this Source Visit Dev To