
An Interest In:
Web News this Week
- April 1, 2024
- March 31, 2024
- March 30, 2024
- March 29, 2024
- March 28, 2024
- March 27, 2024
- March 26, 2024
Some of Our Sources
- Engadget
- Simplebits
- Pearsonified
- Spoon Graphics
- Six Revisions
- Noupe
- CSS Globe
- Design Modo
- Android Headlines
- Willems Lab
Help Webnuz
Referal links:
How to build a React CRUD todo app (edit todo)
In this series, we will build a todo application.
To begin, we will go over a very basic way to build this application and revise as we gain more knowledge.
I suggest following along and if you get stuck, you can fork the code from the Code Sandbox.
In the previous posts, added the ability to delete todos. Now lets add the edit functionality.
1. Add more state
We need to add a couple more state values we can use to help us get the editing functionality.
// boolean state to know if we are editing (this will let us display // different inputs based on a condition (conditional rendering) const [isEditing, setIsEditing] = useState(false); // object state to set so we know which todo item we are editing const [currentTodo, setCurrentTodo] = useState({});2. Setup onChange handler for edit input
Now lets setup an onChange handler for the new input we will create in the next step.
// function to get the value of the edit input and set the new state function handleEditInputChange(e) { // set the new state value to what's currently in the edit input box setCurrentTodo({ ...currentTodo, text: e.target.value }); console.log(currentTodo); }3. Re-format JSX
We are going to make quite a few changes in the JSX. I'll break this down:
- We need to check if we are in editing mode
- If we are editing, then display the editing form
- If we are not editing, then display the add todo form
- The editing form has a couple additional buttons so the user can control what they would like to do
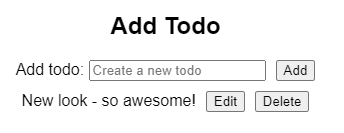
return ( <div className="App"> {/* We need to conditionally render different inputs based on if we are in editing mode */} {isEditing ? ( // if we are editing - display the edit todo input // make sure to add the handleEditFormSubmit function in the "onSubmit" prop <form onSubmit={handleEditFormSubmit}> {/* we've added an h2 element */} <h2>Edit Todo</h2> {/* also added a label for the input */} <label htmlFor="editTodo">Edit todo: </label> {/* notice that the value for the update input is set to the currentTodo state */} {/* also notice the handleEditInputChange is being used */} <input name="editTodo" type="text" placeholder="Edit todo" value={currentTodo.text} onChange={handleEditInputChange} /> {/* here we added an "update" button element - use the type="submit" on the button which will still submit the form when clicked using the handleEditFormSubmit function */} <button type="submit">Update</button> {/* here we added a "Cancel" button to set isEditing state back to false which will cancel editing mode */} <button onClick={() => setIsEditing(false)}>Cancel</button> </form> ) : ( // if we are not editing - display the add todo input // make sure to add the handleFormSubmit function in the "onSubmit" prop <form onSubmit={handleFormSubmit}> {/* we've added an h2 element */} <h2>Add Todo</h2> {/* also added a label for the input */} <label htmlFor="todo">Add todo: </label> {/* notice that the value is still set to the todo state */} {/* also notice the handleInputChange is still the same */} <input name="todo" type="text" placeholder="Create a new todo" value={todo} onChange={handleInputChange} /> {/* here we just added a "Add" button element - use the type="submit" on the button which will still submit the form when clicked using the handleFormSubmit function */} <button type="submit">Add</button> </form> )} <ul className="todo-list"> {todos.map((todo) => ( <li key={todo.id}> {todo.text} {/* we are passing the entire todo object to the handleEditClick function*/} <button onClick={() => handleEditClick(todo)}>Edit</button> <button onClick={() => handleDeleteClick(todo.id)}>Delete</button> </li> ))} </ul> </div> );After adding the JSX, you should see the interface has changed some. 
3. Handle when a user clicks "Edit" button
There are a few functions you see in the JSX above that we need to make in order to make this function.
Lets start with when a user clicks on the "Edit" button. We want the "Update" button and "Cancel" button, and change from the add todo input to the editing input.
// function to handle when the "Edit" button is clicked function handleEditClick(todo) { // set editing to true setIsEditing(true); // set the currentTodo to the todo item that was clicked setCurrentTodo({ ...todo }); } // for this to work, do not forget to use the handleEditClick function in the JSX - when its clicked we will pass the todo object as an argument <ul className="todo-list"> {todos.map((todo) => ( <li key={todo.id}> {todo.text} {/* we are passing the entire todo object to the handleEditClick function*/} <button onClick={() => handleEditClick(todo)}>Edit</button> <button onClick={() => handleDeleteClick(todo.id)}>Delete</button> </li> ))} </ul> Now we should see that the currentTodo is the todo we clicked on, which is getting us close. Notice how the todo text is now in the editing input. 
4. Adding the updated text to the todos state
Here we will create a function that we will call when the form is submitted.
// function to edit a todo item function handleUpdateTodo(id, updatedTodo) { // here we are mapping over the todos array - the idea is check if the todo.id matches the id we pass into the function // if the id's match, use the second parameter to pass in the updated todo object // otherwise just use old todo const updatedItem = todos.map((todo) => { return todo.id === id ? updatedTodo : todo; }); // set editing to false because this function will be used inside a onSubmit function - which means the data was submited and we are no longer editing setIsEditing(false); // update the todos state with the updated todo setTodos(updatedItem); }5. Call the handleUpdateTodo function
Last step is to actually update the todo item when the form is submitted.
function handleEditFormSubmit(e) { e.preventDefault(); // call the handleUpdateTodo function - passing the currentTodo.id and the currentTodo object as arguments handleUpdateTodo(currentTodo.id, currentTodo); }6. Putting it all together
After doing everything mentioned above, you should have something that looks like this:
import { useEffect, useState } from "react";import "./styles.css";export default function App() { const [todos, setTodos] = useState(() => { const savedTodos = localStorage.getItem("todos"); if (savedTodos) { return JSON.parse(savedTodos); } else { return []; } }); const [todo, setTodo] = useState(""); // boolean state to know if we are editing (this will let us display // different inputs based on a condition (conditional rendering) const [isEditing, setIsEditing] = useState(false); // object state to set so we know which todo item we are editing const [currentTodo, setCurrentTodo] = useState({}); useEffect(() => { localStorage.setItem("todos", JSON.stringify(todos)); }, [todos]); function handleInputChange(e) { setTodo(e.target.value); } // function to get the value of the edit input and set the new state function handleEditInputChange(e) { // set the new state value to what's currently in the edit input box setCurrentTodo({ ...currentTodo, text: e.target.value }); console.log(currentTodo); } function handleFormSubmit(e) { e.preventDefault(); if (todo !== "") { setTodos([ ...todos, { id: todos.length + 1, text: todo.trim() } ]); } setTodo(""); } function handleEditFormSubmit(e) { e.preventDefault(); handleUpdateTodo(currentTodo.id, currentTodo); } function handleDeleteClick(id) { const removeItem = todos.filter((todo) => { return todo.id !== id; }); setTodos(removeItem); } // function to edit a todo item function handleUpdateTodo(id, updatedTodo) { // here we are mapping over the todos array - the idea is check if the todo.id matches the id we pass into the function // if the id's match, use the second parameter to pass in the updated todo object // otherwise just use old todo const updatedItem = todos.map((todo) => { return todo.id === id ? updatedTodo : todo; }); // set editing to false because this function will be used inside a onSubmit function - which means the data was submited and we are no longer editing setIsEditing(false); // update the todos state with the updated todo setTodos(updatedItem); } // function to handle when the "Edit" button is clicked function handleEditClick(todo) { // set editing to true setIsEditing(true); // set the currentTodo to the todo item that was clicked setCurrentTodo({ ...todo }); } return ( <div className="App"> {/* We need to conditionally render different inputs based on if we are in editing mode */} {isEditing ? ( // if we are editing - display the edit todo input // make sure to add the handleEditFormSubmit function in the "onSubmit" prop <form onSubmit={handleEditFormSubmit}> {/* we've added an h2 element */} <h2>Edit Todo</h2> {/* also added a label for the input */} <label htmlFor="editTodo">Edit todo: </label> {/* notice that the value for the update input is set to the currentTodo state */} {/* also notice the handleEditInputChange is being used */} <input name="editTodo" type="text" placeholder="Edit todo" value={currentTodo.text} onChange={handleEditInputChange} /> {/* here we added an "update" button element - use the type="submit" on the button which will still submit the form when clicked using the handleEditFormSubmit function */} <button type="submit">Update</button> {/* here we added a "Cancel" button to set isEditing state back to false which will cancel editing mode */} <button onClick={() => setIsEditing(false)}>Cancel</button> </form> ) : ( // if we are not editing - display the add todo input // make sure to add the handleFormSubmit function in the "onSubmit" prop <form onSubmit={handleFormSubmit}> {/* we've added an h2 element */} <h2>Add Todo</h2> {/* also added a label for the input */} <label htmlFor="todo">Add todo: </label> {/* notice that the value is still set to the todo state */} {/* also notice the handleInputChange is still the same */} <input name="todo" type="text" placeholder="Create a new todo" value={todo} onChange={handleInputChange} /> {/* here we just added a "Add" button element - use the type="submit" on the button which will still submit the form when clicked using the handleFormSubmit function */} <button type="submit">Add</button> </form> )} <ul className="todo-list"> {todos.map((todo) => ( <li key={todo.id}> {todo.text} {/* we are passing the entire todo object to the handleEditClick function*/} <button onClick={() => handleEditClick(todo)}>Edit</button> <button onClick={() => handleDeleteClick(todo.id)}>Delete</button> </li> ))} </ul> </div> );}You should be able to change the todo item text now!
This is the fourth post in this series. Keep in mind that in this post, we added the ability to edit a todo item in the app. We now have full CRUD functionality. However, I think this could be structured better. We will look at re-factoring the code into separate components in the next post.
Thanks for reading!
Original Link: https://dev.to/joelynn94/how-to-build-a-react-crud-todo-app-edit-todo-46g6
Dev To
More About this Source Visit Dev To