
An Interest In:
Web News this Week
- March 21, 2024
- March 20, 2024
- March 19, 2024
- March 18, 2024
- March 17, 2024
- March 16, 2024
- March 15, 2024
Some of Our Sources
- Techcrunch
- Just Creative
- Joshua Blankenship
- The Logo Smith
- Naldz Graphics
- FanExtra - PSD
- CSS Globe
- Design Modo
- Android Dissected
- The Verge
Help Webnuz
Referal links:
Deploy a React Application to Firebase Hosting using GitHub Actions
Deploying applications can be a tedious task. This includes integrating, optimizing, merging, testing and deploying the codes to make sure it runs in production.
Using CI/CD tools can help us streamline the process. Though there are several CI/CD tools available in the market like Jenkins, CircleCI etc these can be a bit difficult to set up. So why not look at a tool that is easy to set up and free of cost to use(mostly) - Github Actions.
In this article, we will be looking at Github Actions to build and deploy React Application to Firebase Hosting.
Continuous Integration and Continuous Deployments
*Continuous Integration: * It refers to the process of adding a new piece of code to a shared repository (like GitHub) by one or more developers, which is followed by a series of automated tests and checks to make sure that the new code doesnt break the existing stable code.
Continuous Deployment or Continuous Delivery: It is a process of building and delivering the software with automated testing, building and deployment process. Each build can be triggered based on some event or can be scheduled based on time.
GitHub Actions
GitHub Actions is a CI/CD tool provided by GitHub that helps us to automate various processes like Testing, Integration or Deployment. Few advantages of using Github Actions is it is ready to use, no extra setup required and the Integration and Deployment scripts are part of the actual repository.
How GitHub Actions Works?
- To automate a set of tasks, we need to create workflows in a GitHub repository. GitHub looks for YAML files inside of the .github/workflows directory. Events like commits, the opening or closing of pull requests, or updates to the projects wiki, can trigger the start of a workflow.
- Workflows are composed of jobs, which run at the same time by default. Each job should represent a separate part of the workflow. Jobs can be configured to depend on the success of other jobs in the same workflow. For example, failing tests can prevent deploying to production.
- Jobs contain a list of steps, which GitHub executes in sequence. A step can be a set of shell commands or an action, which is a pre-built, reusable step implemented either in TypeScript or inside a container.
What is development mode and production mode?
When building a React App, you might want to use features like hot deploy to see the changes instantly, or to debug certain features in the browser. But you want to minimise the code and optimise it for better performance during production. We will be discussing how to build the production build and deploy it to Firebase Hosting in this article
Pro Tip - Use React Dev Tools to debug your application in development mode
Prerequisites
To follow along with this tutorial, you should have a basic knowledge of the following :
- JavaScript and React
- Firebase
- Git
- Terminal (Mac/Linux)/Command prompt (Windows)
Setting up a React project
Well use Create React App to get our React app up and running. Run the following commands in your terminal to set up a sample React app.
npx create-react-app react-cd-samplecd react-cd-samplenpm startThis will spin up the default React Application in your localhost
Setting up a Firebase project
To set up a firebase account, go to Firebase Console, click on Add Project and fill in the details.

After setting up the project, add a web app from the dashboard and fill in the details. Check on Also Setup Firebase Hosting for this app to enable Hosting services

Once youre done, launch your terminal and run the command below to install the firebase-CLI globally.
npm install -g firebase-toolsFirebase CLI is a tool for managing, viewing, and deploying Firebase projects.
The next step is to initialize Firebase in the React project you created. Navigate to the root of your project on your terminal and run the command to log in to Firebase.
firebase login:ciThe above command will launch your browser and open a Google authentication page. After successful authentication, a token will display on your terminal. Copy it and keep in a safe place because youll need it when it comes time to create a workflow.
After successful authentication, run the following.
firebase init
This initializes firebase and allows you to choose the products you want to integrate into your React project. As noted earlier, for this tutorial well focus on hosting.
After choosing hosting, youll be prompted to configure the hosting options.
- Input
buildas the public directory since thats the default directory React serves after building a project - Input
Noon the configure as a single-page app prompt to allow React to control that behavior

If it prompts you to overwrite any files, input no since you dont want it to rewrite files generated by React. After the process is complete, two files are generated: firebase.json and .firebaserc.
The firebase.json file contains information on the location of files, assets, and settings related to the project. The .firebaserc file stores project aliases, which can be used to set different hosting options for the same application one for staging and the other for production.
Setting Up GitHub Repository for GitHub Actions
- To get started, youll need a GitHub repository to house your project, so head over to GitHub and create one. Add the repository to the project, commit the changes, and push the project to GitHub.
- Next, go to your Settings Tab in the repository and click on Secrets, then New Repository Secret

- Input
FIREBASE_TOKENas the name and the token you copied earlier as the value. After doing that, click Add secret to save the environment variable

Setting up the Workflow
After you have added the secret variable in your repository and pushed the current code to GitHub it is time to set up the Workflow.
- Head over to the Actions Tab in your GitHub repo. Click on Set up a workflow yourself

- Change the name to filename to firebase.yml
- Replace the pre-provided code with the below code
name: Firebase CIon: push: branches: [ main ] pull_request: branches: [ main ]jobs: build: runs-on: ubuntu-latest strategy: matrix: node-version: [14.x] steps: - uses: actions/checkout@v2 - name: Use Node.js ${{ matrix.node-version }} uses: actions/setup-node@v1 with: node-version: ${{ matrix.node-version }} - name: npm install and build run: | npm install npm run build - name: Archive Build uses: actions/upload-artifact@v2 with: name: build path: build deploy: name: Deploy needs: build runs-on: ubuntu-latest steps: - uses: actions/checkout@v2 - name: Download Build uses: actions/download-artifact@v2 with: name: build path: build - name: Depoy to Firebase uses: w9jds/firebase-action@master with: args: deploy --only hosting env: FIREBASE_TOKEN: ${{ secrets.FIREBASE_TOKEN }}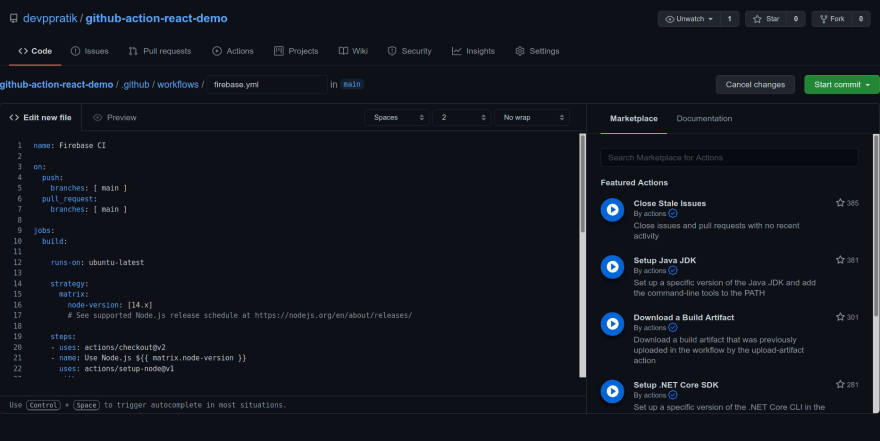
- Now save the file by committing the file to the repo.

Deploying to Firebase
Click on the Actions tab on the repository and watch the actions as it runs. Once it successfully executes, the project is deployed to Firebase. Visit your .firebaseapp.com to view your project.
The action runs every time there is a push to the main branch or a pull request is merged.
Let's Dig Deeper - An Explanation of the Workflow firebase.yml file
name: Firebase CIon: push: branches: [ main ] pull_request: branches: [ main ]This block specifies that the workflow Firebase CI will run when there is a push or a pull request on the main branch.
jobs: build: runs-on: ubuntu-latest strategy: matrix: node-version: [14.x]This block of code specifies the jobs that are required to be run on the workflow. The workflow will be executed on ubuntu and the version of Nodejs to be used is 14
steps: - uses: actions/checkout@v2 - name: Use Node.js ${{ matrix.node-version }} uses: actions/setup-node@v1 with: node-version: ${{ matrix.node-version }} - name: npm install, build and test run: | npm install npm run build - name: Archive Build uses: actions/upload-artifact@v2 with: name: build path: buildIt describes the steps that are run in order during the job build
-
actions/checkout@v2- This action checks out your repository under$GITHUB_WORKSPACE, so your workflow can access it. actions/setup-node@v1- This action sets by node environment for use- This command executes the npm scripts in the shell.
npm installinstalls all the dependency that are required to build the projectnpm run buildbuilds the production-readybuildfolder from the React project actions/upload-artifact@v2- This upload artifacts from your workflow allowing you to share data between jobs and store data once a workflow is complete.
deploy: name: Deploy needs: build runs-on: ubuntu-latest steps: - uses: actions/checkout@v2 - name: Download Build uses: actions/download-artifact@v2 with: name: build path: build - name: Depoy to Firebase uses: w9jds/firebase-action@master with: args: deploy --only hosting env: FIREBASE_TOKEN: ${{ secrets.FIREBASE_TOKEN }}- This part of the YAML configuration directs the workflow to deploy the application after the job has been completed. It uses
w9jds/firebase-actionaction from the GitHub marketplace that is a wrapper for the Firebase CLI - The token required is accessed from the repository secrets
Conclusion
Setting up continuous deployment doesnt have to be expensive or cumbersome. You can integrate the processes described in this tutorial into your projects with ease, and itll help ensure you deploy projects with fewer bugs to production more quickly than ever before.
This was my first article and I hope it was easy to follow along. Feedback is appreciated
Check out the demo repo here - github-action-react-demo
Original Link: https://dev.to/devppratik/deploy-a-react-application-to-firebase-hosting-using-github-actions-1ocp
Dev To
More About this Source Visit Dev To