
An Interest In:
Web News this Week
- April 20, 2024
- April 19, 2024
- April 18, 2024
- April 17, 2024
- April 16, 2024
- April 15, 2024
- April 14, 2024
Some of Our Sources
- Abduzeedo
- TutsPlus - Design
- Inspiredology
- Noupe
- My Ink Blog
- 24 Ways
- Wal You
- Spyre Studios
- Android Dissected
- Android Headlines
Help Webnuz
Referal links:
JWT Authentication in Node.js
Hola Amigos!
I was learning about JWT and its application in Node.js and now I'm pleased to share my learnings with ya'll. I hope you guys enjoy reading it. In this post, I'll talk about:
- What exactly is a JSON web token
- Why do we need JSON web token
- JWT authentication in Node.js with Express.js
01 What exactly is a JWT?
According to the official website of JWT:
JSON Web Token (JWT) is an open standard (RFC 7519) that defines a compact and self-contained way for securely transmitting information between parties as a JSON object. This information can be verified and trusted because it is digitally signed. JWTs can be signed using a secret (with theHMACalgorithm) or a public/private key pair usingRSAorECDSA.
 WHATTTT?
Okay! In simple words, JWT is a token that allows secure transmission of data between the same or different web servers.
But how is it different from the traditional session-based approach?
 Traditional session-based user authorization
In the traditional approach whenever the user sends a request to a server with user credentials, the user information is stored in the session on the server, and the server will now send a session ID as a cookie. This will authorize the client and this cookie can be attached to all the future requests to the server by the client. With every request, the server has to look up the session ID and validate the user before sending back a response.
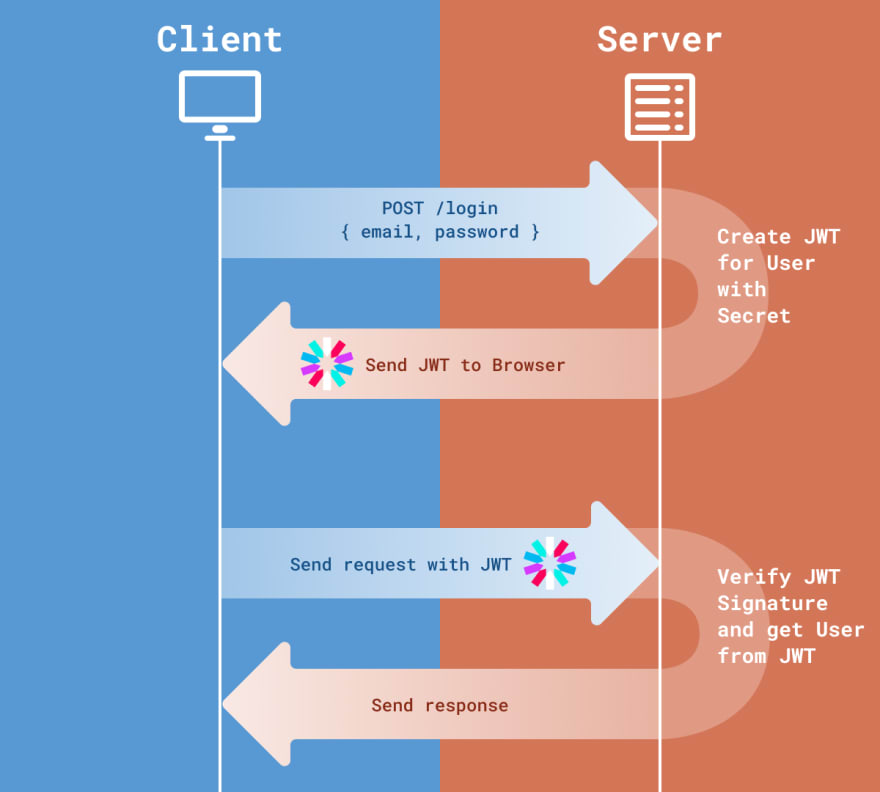 JSON Web Tokens (JWT)
In the JWT approach, after the client requests for access, a JWT corresponding to the user is generated which has encrypted user information in it. So basically the server doesn't have to store any user information, the user is stored on the client. This JWT is sent back to the client, and each subsequent request that the client makes will include this JWT. The browser will check the JWT signature to check which user does it corresponds to, and send a response back to the client.
The JWT Structure
In its compact form, JSON Web Tokens consist of three parts separated by dots (.), which are:
- Header
- Payload
- Signature
Therefore, a JWT typically looks like the following.
xxxxx.yyyyy.zzzzz
The following is a sample JWT,
eyJ0eXAiOiJKV1QiLCJhbGciOiJIUzI1NiJ9.eyJhdXRoX2lkIjoiMzIxNjA1MTA1NDEyQUM2QUVCQzQyOTBERUIxMUJENkEiLCJjbGllbnRfaWQiOiIiLCJjc3JmX3Rva2VuIjoiNHJWMGRuWmpJbEdNOFYrNHN3cFZJQkN0M054SjArYlVkVldTdkNDQUJoaz0iLCJpYXQiOjE2MjA4MzQwNjYsInVzZXJfaWQiOiIyYmJlN2QxMC1hYzYxLTQ2NDItODcyMC04OTI1NGEyYzFhYTgiLCJ1c2VyX3R5cGUiOiJndWVzdF9wYXJlbnQiLCJpc19ndWVzdCI6ZmFsc2V9.FNQFIm0_a7ZA5UeMAlQ1pdKS9r6dbe7ryKU42gT5nPcLet's go to jwt.io debugger, to play around with a sample JWT token, following is the screenshot of the debugger.

If you see, there are three parts to the key
TheHeader,has the information to the algorithm and the type of token.
ThePayload, which contains the claims. Claims are statements about an entity (typically, the user) and additional data.
For more about types of claims, you can follow the official doc:https://jwt.io/introduction
You may have noticed the
iatkey, which stands forissued at, as in when was this token issued. This is mostly used for expiring tokens after a certain amount of time.The VerifySignature, this part is basically used to verify the signature by the server. We need to add a secret key to this to make it secure.
Suppose the client tries to infringe the token and removes a character, then this token will instantly become invalid as the red and the pink part won't match the signature that is the blue part.
02 Why do we need JWT?
It is stored on client side

Let us assume that there is a Yahama Music Store server that the client needs to access but he can only access this server through Yamaha's main server. In this case, if we go with:
a) The traditional session-based approach, where the user info is stored at the server level, the Music Store server will not have this information and the user will have to log in and authenticate himself again to access Yamaha Music Store. The same goes for the Motor Store server (refer to the image).
b) JWT based approach, since the user is stored at the client-end, even after the redirection with the JWT, the user can request to the Music Store server or the Motor Store server through the main server without getting logged out in between. One thing to note: the servers should share the same secret key among them to be accessible to the clients while using JWT.
More compact
If we compare it with SAML, as JSON is less verbose than XML, when it is encoded its size is also smaller, making JWT more compact than SAML. This makes JWT a good choice to be passed in HTML and HTTP environments.
Ease of use
JSON parsers are common in most programming languages because they map directly to objects. This makes it easier to work with JWT
03 JWT authentication in Node.js
Now let's try to build a simple JWT authentication service in Node.js
1. Setup
To showcase the cross-server application of JWT, I'll be making two different servers, one for all the requests related to authentication and name itauthServer.jsand the second will be any other API requests to get some information from the server and we will simply name server.js
authServer.jswill listen to port5000andserver.jswill listen to port4000
To start, let's install few modules
npm install express jsonwebtoken
Note: We have installedexpressas a framework on top of node to handle all the server-related actions andjsonwebtokenfor signing ajwtagainst a user, or simply getting a jwt for a user.
After installing we'll just call these modules in both our files i.eauthServer.jsandserver.js
const express = require('express');const jwt = require('jsonwebtoken');const app = express();app.use(express.json());2. Generating JWT on login
Let's write the first API call which will be a POST request to log in a user in the authServer.js file.
app.post('/login', (req, res) => { // ... // Suppose the user authentication is already done const username = req.body.username; const user = {name: username}; const accessToken = generateAccessToken(user); res.json({accessToken: accessToken});});app.listen(5000);Let's define generateAccessToken function which will basically return the JWT
const generateAccessToken = (user) => { return jwt.sign(user, process.env.ACCESS_TOKEN_SECRET, {expiresIn: '30s'});}Here is the definition of jwt.sign,
jwt.sign(payload, secretOrPrivateKey, [options, callback])
The callback can be of two types:
- (Asynchronous) The callback is called with the
error the JWT. - (Synchronous) Returns the JWT as a string.
Note: To use the environment variable we need to configure it first, for which we need to install another module calleddotenv; We'll install it withnpm install dotenv
After running this command, we need to make a.envfile and place ourACCESS_TOKEN_SECRETsecret key there, the value should be something unguessable. for eg:
"0704d2bf835240faffab848079ce73ccf728ffd833e721afd4d7184845b5fc8f00e9f4e2baa87f9d77432f06f0f0384c736d585dacf3f736d8eda3b740c727dea7291542235fe02d75e6ba755307e2546408cffce0b210b4834ea5eff2587859d101bf94aac0f062036662f279ce6f12d84b890a0eaa357b70a01c6922621591"
This can be anything random, you can generate it by running the following script in the node terminal:
require('crypto').randomBytes(64).toString('hex');

After putting the key in the .env file, what we need to do is add the following line on top of both our server files, so that it can access process.env variables.
require('dotenv').config();3. Getting data from Server
Let's make a GET request to get some data from the server corresponding to the logged-in user, in the server.js file:
const articles = [ { id: 1, name: "Atul Kumar", title: 'First Article', }, { id: 2, name: "John Doe", title: 'Second Article', }, { id: 3, name: "Don Joe", title: 'Third Article', },];app.get('/articles', authenticateToken, (req, res) => { res.json(articles.filter(article => req.user === article.name));});As you can see we have used a custom middleware authenticateToken for our /article request.
Following is the definition of authenticateToken:
Note: I've used the ES6 fat arrow function so you need to write this function before you make a GET request.
const authenticateToken = (req, res, next) => { // getting the authorization information const authHeader = req.headers['authorization']; // In our case It's JWT authantication const token = authHeader && authHeader.split(' ')[1]; if (!token) return res.sendStatus(401); // No token found; // verify if there is a user corrosponding to the token found in the // authorization header. jwt.verify(token, process.env.ACCESS_TOKEN_SECRET, (err, user) => { if (err) return res.sendStatus(403); // The token is there but it's not valid; // if the token is valid, i.e the user is present, then in the request we are // attaching the user name, so that it can be used in other action controllers. req.user = user.name; // proceeding to the next action controller. next(); })}Why did we do authHeader.split(' ')[1];?
Since JWT is a bearer token, req.headers['authorization']; will give us a string having a value that would look like:
"Bearer eyJhbGciOiJIUzI1NiIsInR5cCI6IkpXVCJ9.eyJuYW1lIjoiQXR1bCBLdW1hciIsImlhdCI6MTYyMTAwOTEzMCwiZXhwIjoxNjIxMDA5MTYwfQ.fxDe0Q2S_G5M0qq1Lo91sz2Od9hBS12226Utq0LJ9jY"We just need the token part of the string.
We are basically checking whether the client that made the GET request for /articles has access to it or not. We do this by checking if there is a valid token attached to the request. While making the GET request we need to make sure that we include the JWT in the authorization header.
But what if we don't?
Well if we don't, then we'll get 'Unauthorized' in the response body because if you look at the code a 401 status code is sent when the token is not found.

Let's try to play with what we have made until now, on the Postman app.
Let's try to access the articles with the GET request
Without a bearer token :

As you can see, we are getting a 401 Unauthorized Status, like we discussed earlier, it's because we didn't give a token at all (you can see the Token field is empty).
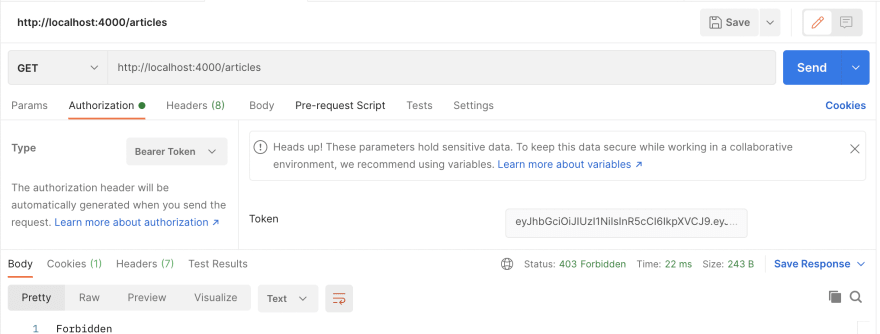
With an invalid bearer token :
We'll just give a random JWT token to check what happens in this case.

This time we are getting a 403 Forbidden status, i.e we have a token but this token seems to be invalid.But Atul how can my token be invalid?
Well, there could be two reasons -
a) The token has been tampered with, or you might have just put a random string for the token.
b) The token has expired.
If you look at the code,
jwt.verify()first checks if this token is a valid token or not. If it is valid, it returns the user object. If it is not, it gives us a 403 status.How can we access the articles of a particular user?
To be doing this, we need to first log in with a user so that a new JWT could be generated.
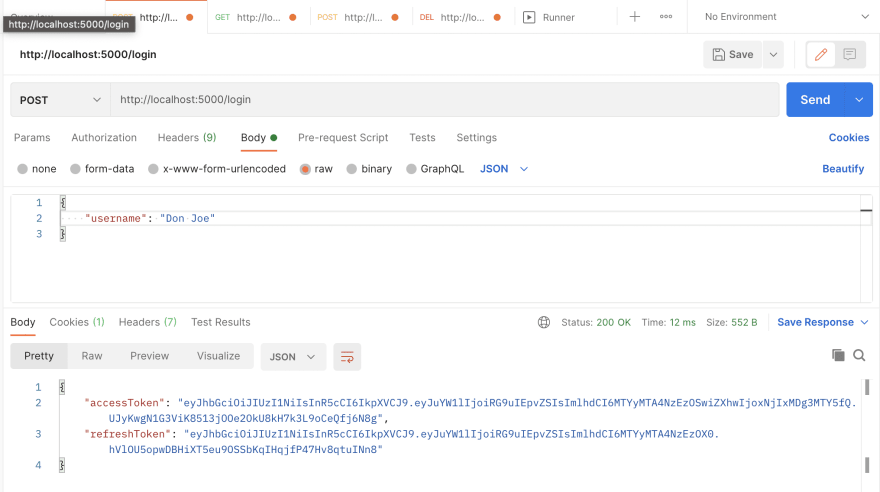
Now let's login with a given username
We'll request for
/loginwith the body being a JSON object having the keyusername.
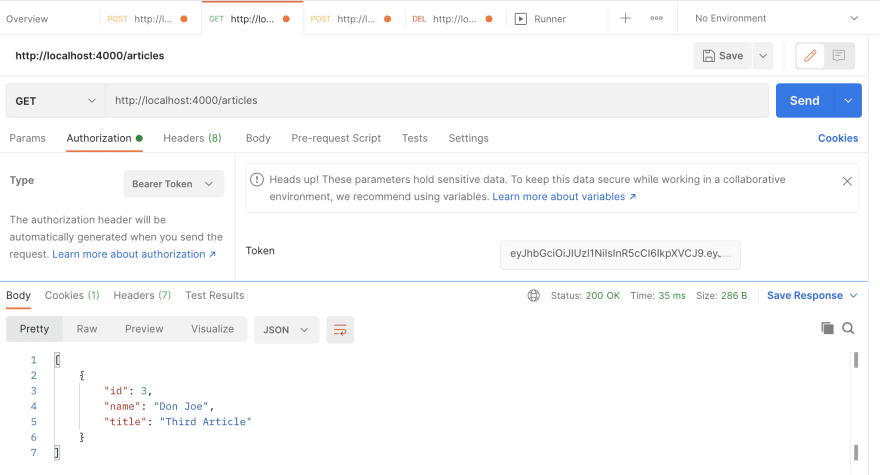
We have successfully logged in and have gotten our accessToken (JWT),
Now we can use this accessToken in our GET
/articlesrequest.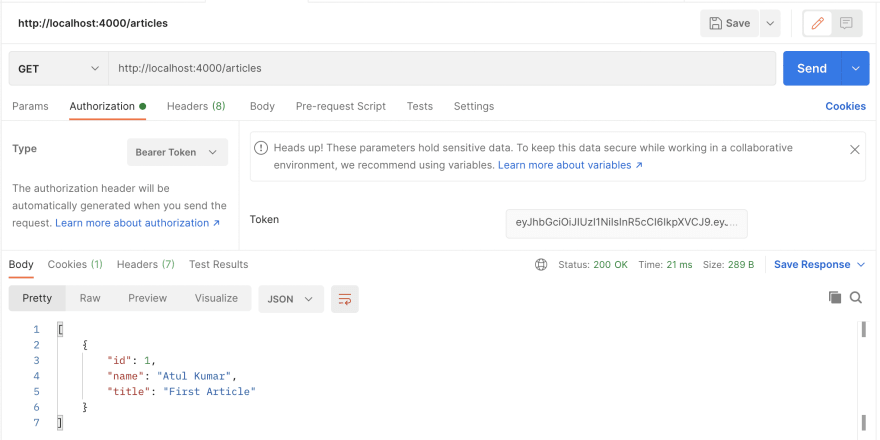
As you can see, we got the articles for this particular user as we used the JWT which has the payload information of this very user. If you log in with a different user, then you can access their articles too.
Note: We have used
{expiresIn: '30s'}as the option to thejwt.sign()method, so if you try to access with the same accessToken after 30 seconds, you'll get Forbidden in the response, since the token has been invalidated now. But, generally, we wouldn't limit expiration time to 30 seconds (this was only an example).

So should the user log in again after every 30 seconds to access her articles?
Of course not, we would need to add another kind of token to our application called a Refresh Token.
4. Refresh Token
The concept is simple: after every 30 seconds, we'll generate a new access token for the user with the help of the refresh token of the user.
Ideally, we'll need to store our refresh token in cache memory or some database so that we can validate which users need a new access token. But in our example here, let's not waste time in storing it in a database; we'll just focus on the concept.
Let's keep it in a variable then;
let refreshTokens = [];Note: Bad practice, should not be done on a production build, because every time the server will restart this will make refreshTokens empty. I'm using it so that we can focus on the concept.
In our .env file we'll add a new secret key REFRESH_TOKEN_SECRET and assign it some encrypted value, just like how we did for ACCESS_TOKEN_SECRET
Now, in our /login action controller we will basically push the refreshToken in the refreshTokens array that we created.
app.post('/login', (req, res) => { // ... // Suppose the user authentication is already done const username = req.body.username; const user = {name: username}; const accessToken = generateAccessToken(user); const refreshToken = jwt.sign(user, process.env.REFRESH_TOKEN_SECRET) // pushing the refreshToken generated for this particular user. refreshTokens.push(refreshToken); res.json({accessToken: accessToken, refreshToken: refreshToken});});Now we will need to create a new POST request to generate a new access token for a particular refresh token in our authServer.js file
// generates a new access token with the help of the refresh token;app.post('/token', (req, res) => { // getting the token value from the body const refreshToken = req.body.token; if (!refreshToken) return res.sendStatus(401); // if it doesn't belong to the array we created to store all the refreshTokens // then return Unauthorized. if (!refreshTokens.includes(refreshToken)) return res.sendStatus(403); jwt.verify(refreshToken, process.env.REFRESH_TOKEN_SECRET, (err, user) => { if (err) return res.sendStatus(403); // if the user is found generate a new access token const accessToken = generateAccessToken({ name: user.name}); res.json({ accessToken: accessToken }); })});Why are we not passing the user object directly to the generateAccessToken?
It is because there is some additional information that is stored in the user object that we get in return, the following is the user object we get,
{ name: 'Atul Kumar', iat: 1621086671 }the problem is if we use the whole user object, jwt.sign() will generate the same accessToken every time because we are passing the user object having the exact same iat
Now let's check if everything is working on Postman
We'll log in and look for the access token and the refresh token in the response
We'll get all the articles for this particular user

Now if we make a request after 30 seconds with the same accessToken we'll get Forbidden.
We'll now generate a new token for this user, we make a POST request to
/tokenpassing the refresh token we obtained in the first step.
We'll get a new accessToken.
Now we'll use this newly generated accessToken to access the articles again.
We are able to access articles again, we can do this every time the token expires.

So does this mean users having the refresh token will have the access to the app forever? Can they generate a new accessToken whenever they want?
Right now, yes, but we need to stop this from happening, by invalidating the refresh token. But when is the right time to invalidate a refresh token?
We'll invalidate a refresh token on the /logout URL. Let's make a delete request for this.
5. Invalidating a refresh token
app.delete('/logout', (req, res) => { refreshTokens = refreshTokens.filter(token => token !== req.body.token); res.sendStatus(204);})This will take the refresh token as the body param that we would want to free from the cache storage, or in our case, the array.
Whenever the user logs out, the refreshToken will basically expire (no more in the storage). The user will have to log in again to get a fresh pair of refreshToken and accessToken assigned to her.
Trying this out:

And now we can no longer generate any new access tokens by hitting /token API, with this refreshToken that we passed in the logout request.

That's it on JWT from me!
If you found this useful, have any suggestions or thoughts to share, do let me know in the comments below :)
Adios until the next article,
atulkumar:5000/logout
Original Link: https://dev.to/atulkr9/jwt-authentication-in-node-js-1dc6
Dev To
More About this Source Visit Dev To