
An Interest In:
Web News this Week
- April 1, 2024
- March 31, 2024
- March 30, 2024
- March 29, 2024
- March 28, 2024
- March 27, 2024
- March 26, 2024
Some of Our Sources
- Slashdot
- Techcrunch
- Web Designer Wall
- Just Creative
- The Logo Smith
- Spoon Graphics
- Smashing Apps
- CSS Globe
- Stylized Web
- TechPowerUp
Help Webnuz
Referal links:
Raspberry Pi media player with Plex, Transmission, Sonarr, Bazarr and Jackett
So you have a Raspberry Pi abandoned and always wanted to use it for something useful. Also you like to see series but there are too many providers and you don't know which one subscribes to it. Don't worry with this tutorial you will have both problems solved at once; You will use the Raspberry Pi for watching your favourite series with no limits!
Install Raspberry OS
First of all we need to install an Operating System in our Raspberry. So for that we have different options explained in the official documentation. I personally decided for the Raspberry Pi OS (32-bit) Lite as I don't want any desktop or any recommended software, so the lighter the better.
From the source we follow the instructions for the linux image.
AS you know, we need a microSD for running the OS in a Raspberry Pi, so we have to connect to our laptop and know the name of it. For that we can open a terminal and type:
lsblk -pIn my case it is /dev/sda.
Once we know the name of the SD, we need to write the image to the card with the command below making sure you replace the input file if= argument with the path to your .img file, and the /dev/sda in the output file of= argument with the correct device name.
This is very important, as you will lose all the data on the hard drive if you provide the wrong device name. Make sure the device name is the name of the whole SD card as described above, not just a partition. For example: sdd, not sdds1 or sddp1; mmcblk0, not mmcblk0p1.
sudo dd bs=4M if=2020-08-20-raspios-buster-armhf-lite.img of=/dev/sda conv=fsynWe can add the flags status=progress conv=fsync to see the progress:
dd bs=4M if=2020-08-20-raspios-buster-armhf.img of=/dev/sda status=progress conv=fsyncIf it's zipped we can concat the unzip and the dd commands with:
sudo unzip -p 2020-08-20-raspios-buster-armhf.zip | sudo dd of=/dev/sda bs=4M conv=fsyncAfter that, we have our OS installed in the microSD so we have our Raspberry Pi ready!
Login
Now is the moment to insert the microSD back to the raspberry, connect it to your screen and plug it in.
In our TV appears something like that:

As you can notice on the bottom I already logged in. The user is pi and the default password raspberry. It is super recommended to change the password the first time you log in.
Enable ssh
Next step is to enable the ssh connection as we want to manage the Raspberry from our laptop, not from the TV so first is reading the documentation.
Second is use the systemctl to start and enable the service:
sudo systemctl start sshsudo systemctl enable sshWe can check if its working with:
sudo systemctl status sshAnd it will appear something like:
ssh.service - OpenBSD Secure Shell server Loaded: loaded (/lib/systemd/system/ssh.service; enabled; vendor preset: enabled) Active: active (running) since XXX Docs: man:sshd(8) man:sshd_config(5) Main PID: 440 (sshd) Tasks: 1 (limit: 2063) CGroup: /system.slice/ssh.service 440 /usr/sbin/sshd -DAfter that, we need to discover the IP of our Raspberry. For that we can use:
ifconfigAnd something like that will appear: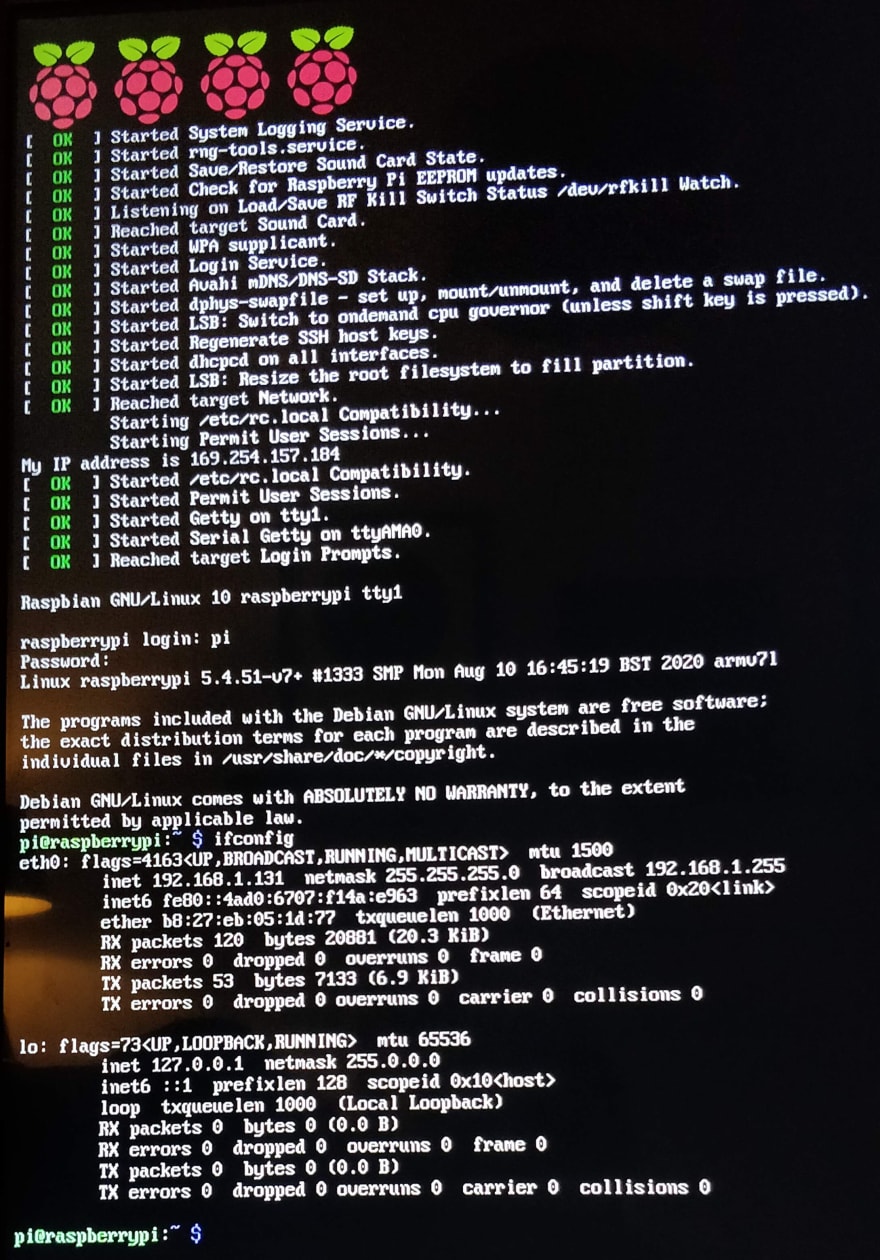
In my case you can see it is 192.168.1.131, so I will use that as reference; yours probably will be different because it depends on your network.
Now we can go to our laptop and connect via ssh:
ssh pi@192.168.1.131It will ask the password but we already know which one is because we logged in in the Raspberry directly (remember you change it ).
Config an USB Drive as media storage
First we want to update and have the latest dependencies, so type:
sudo apt-get updatesudo apt-get upgradeI decided to use an USB drive formatted as ExFAT since I only work with Linux. Plug the USB drive to the Raspberry Pi and restart it.
From the terminal execute:
sudo fdisk -lWhich will list all the partitions recognised by the system. Identify the one associated with the external drive. In my case it was:
Disk /dev/sda: 1.8 TiB, 2000398934016 bytes, 3907029168 sectorsDisk model: External USB 3.0Units: sectors of 1 * 512 = 512 bytesSector size (logical/physical): 512 bytes / 512 bytesI/O size (minimum/optimal): 512 bytes / 512 bytesDisklabel type: dosDisk identifier: 0x0072438bDevice Boot Start End Sectors Size Id Type/dev/sda1 2048 3907028991 3907026944 1.8T 7 HPFS/NTFS/exFATNow install the exFAT drivers, otherwise the file-system will not be recognised:
sudo apt-get install exfat-fuseAnd create the directory where the disk will be mounted:
sudo mkdir /media/storageNow we can mount the disk with:
sudo mount /dev/sda1 /media/storage Remember to replace sda1 with the actual device name that you found with sudo fdisk -l.
To unmount it we can use:
sudo umount /media/storageIdeally, we want the drive to be always connected, so we configure the mount at boot and save to type those commands every time we restart the Raspberry.
First we find the identifier:
sudo blkidIn my case the result was:
/dev/mmcblk0p1: LABEL_FATBOOT="boot" LABEL="boot" UUID="4AD7-B4D5" TYPE="vfat" PARTUUID="d5603eaf-01"/dev/mmcblk0p2: LABEL="rootfs" UUID="2887d26c-6ae7-449d-9701-c5a4018755b0" TYPE="ext4" PARTUUID="d5603eaf-02"/dev/mmcblk0: PTUUID="d5603eaf" PTTYPE="dos"/dev/sda1: UUID="1200CB0C6CE045EE" TYPE="ntfs" PTTYPE="atari" PARTUUID="0072438b-01"What we are interested in is the UUID of our external drive. In my case that's 1200CB0C6CE045EE.
Now we can edit the file:
sudo nano /etc/fstabAnd add this line at the bottom:
UUID=1200CB0C6CE045EE /media/storage exfat defaults,auto,umask=000,users,rw 0 0Don't forget to replace the UUID with yours.
Transmission BitTorrent
Next step is to have a BitTorrent client to download the torrents (only legal ones of course) and for that we would need to install Transmission.
Execute the following command:
sudo apt-get install -y transmission-daemon transmission-cli transmission-commonNew we need to stop the demon to apply changes to the configuration that will allow us to manage it remotely:
sudo service transmission-daemon stopsudo vi /etc/transmission-daemon/settings.jsonLook for rpc-whitelist and rpc-whitelist-enabled and make sure they look like this:
"rpc-whitelist": "127.0.0.1,192.168.*.*","rpc-whitelist-enable": "true",Please note that this is assuming that your internal network works on 192.168.0.1/24. If otherwise please change the value accordingly.
Also, we can modify download-dir and incomplete-dir to point at the external USB drive, for example:
"download-dir": "/media/storage/downloads","incomplete-dir": "/media/storage/.tmp","incomplete-dir-enabled": true,Please make sure that the directories exist on your external USB drive (we've created on the previous section).
Set up the user and password:
"rpc-password": "superSecret","rpc-port": 9091,"rpc-url": "/transmission/","rpc-username": "gopher",Next step is to change the peer-port because sometimes your provider will block the default one. You can select the one you want between the range 49152-65535. In my case I decided to use the 51228. So find the next line:
"peer-port": 51413,And change it for the decided port:
"peer-port": 51228,Also you can manage the download/upload speed from the configuration editing the following lines:
"speed-limit-down": 3000,"speed-limit-down-enabled": true,"speed-limit-up": 900,"speed-limit-up-enabled": true,Now we can start the service again:
sudo service transmission-daemon startThe web interface is already available at the address http://192.168.1.131:9091 (replace the IP address with the one used by the Raspberry Pi in your network).
You can login using both username and password as transmission.
Install Sonarr
Sonarr is a PVR for Usenet and BitTorrent users. It can monitor multiple RSS feeds for new episodes of your favorite shows and will grab, sort and rename them. It can also be configured to automatically upgrade the quality of files already downloaded when a better quality format becomes available.
We need to install dependencies like libmono-cil-dev and mono 3.10. I used this link as a reference. For that we need to type:
sudo apt-get install libmono-cil-devwget http://sourceforge.net/projects/bananapi/files/mono_3.10-armhf.debsudo dpkg -i mono_3.10-armhf.debAfter that, we can install Sonarr:
sudo apt-key adv --keyserver keyserver.ubuntu.com --recv-keys 0xA236C58F409091A18ACA53CBEBFF6B99D9B78493echo "deb http://apt.sonarr.tv/ master main" | sudo tee /etc/apt/sources.list.d/sonarr.listsudo apt-get updatesudo apt-get install nzbdronesudo chown -R pi:pi /opt/NzbDroneAutostart script
We need to create the file /etc/systemd/system/nzbdrone.service:
sudo nano /etc/systemd/system/nzbdrone.serviceAnd put inside:
[Unit]Description=Sonarr DaemonAfter=network.target[Service]User=piGroup=piType=simpleExecStart=/usr/bin/mono /opt/NzbDrone/NzbDrone.exe -nobrowserTimeoutStopSec=20KillMode=processRestart=on-failure[Install]WantedBy=multi-user.targetWe can start, check the status and enable if the service is working with the following commands respectively:
sudo systemctl start nzbdronesudo systemctl status nzbdronesudo systemctl enable nzbdroneThe web interface is already available at the address http://192.168.1.131:8989 (replace the IP address with the one used by the Raspberry Pi in your network).
Install Jackett
Jackett works as a proxy server: it translates queries from apps (Sonarr, Radarr, SickRage, CouchPotato, Mylar, Lidarr, DuckieTV, qBittorrent, Nefarious etc.) into tracker-site-specific http queries, parses the html response, then sends results back to the requesting software. This allows for getting recent uploads (like RSS) and performing searches. Jackett is a single repository of maintained indexer scraping & translation logic - removing the burden from other apps.
We start downloading the latest Jackett release:
wget -q https://github.com/Jackett/Jackett/releases/latest -O - | grep -E \/tag\/ | awk -F "[><]" '{print $3}'Or if you already know the release:
wget -q https://github.com/Jackett/Jackett/releases/download/v0.16.1937/Jackett.Binaries.LinuxARM32.tar.gzThen we need to unzip the file and move it to the correct path:
tar zxvf Jackett.Binaries.LinuxARM32.tar.gz sudo mv Jackett /opt/Change ownership of Jackett to the main user of the Raspberry Pi that in our case is pi:
sudo chown -R pi:pi /opt/JackettAutostart script
We need to create the file /etc/systemd/system/jackett.service:
sudo nano /etc/systemd/system/jackett.serviceAnd put inside:
[Unit]Description=Jackett DaemonAfter=network.target[Service]SyslogIdentifier=jackettRestart=alwaysRestartSec=5Type=simpleUser=piGroup=piWorkingDirectory=/opt/JackettExecStart=/opt/Jackett/jackett --NoRestartTimeoutStopSec=20[Install]WantedBy=multi-user.targetWe can start, check the status and enable if the service is working with the following commands respectively:
sudo systemctl start jackettsudo systemctl status jackettsudo systemctl enable jackettThe web interface is already available at the address http://192.168.1.131:9117 (replace the IP address with the one used by the Raspberry Pi in your network).
Install Bazarr
Bazarr is a companion application to Sonarr and Radarr. It manages and downloads subtitles based on your requirements. You define your preferences by TV shows or movies and Bazarr takes care of everything for you.
As a dependency for it we would need to install python3. So first of all let's do that:
sudo apt-get install python3 idle3Next we need to have git to download the repo and pip for manage the package installation:
sudo apt-get install git python3-pip python3-distutilsNow time for install the dependencies for Bazarr:
sudo apt-get install libxml2-dev libxslt1-dev python3-libxml2 python3-lxml unrar-free ffmpeg libatlas-base-devWith that we are ready to install Bazarr in our Raspberry. We need to clone the repo directly from GitHub using git and we do directly to the destination folder opt/bazarr typing the following command:
sudo git clone https://github.com/morpheus65535/bazarr.git /opt/bazarrThen we need to go to that folder and install the requirements defined inside it with:
cd /opt/bazarrpython3 -m pip install -r requirements.txt NOTE: Don't worry about lxml not being installed at this step, you have installed the module through apt-get anyway.
Change the ownership to pi user:
sudo chown -R pi:pi /opt/bazarrAnd we can start and test Bazarr:
python3 bazarr.py After the messages of starting Bazarr and configuring it, check if it works in http://192.168.1.131:6767/.
Connect with Sonarr
Next step is to connect it with Sonarr. The official documentation is super straightforward and easy to follow, so I will not put it here. Just one thing that is not clear enough at least for me and it's about Sonarr API Key and it's location, so as a tip I will put here that:
- Sonarr API Key is under
Settings/General/Security
Autostart script
We need to create the file /etc/systemd/system/bazarr.service:
sudo nano /etc/systemd/system/bazarr.serviceAnd put inside:
[Unit]Description=Bazarr DaemonAfter=syslog.target network.target# After=syslog.target network.target sonarr.service radarr.service[Service]WorkingDirectory=/opt/bazarr/User=piGroup=piUMask=0002Restart=on-failureRestartSec=5Type=simpleExecStart=/usr/bin/python3 /opt/bazarr/bazarr.pyKillSignal=SIGINTTimeoutStopSec=20SyslogIdentifier=bazarrExecStartPre=/bin/sleep 30[Install]WantedBy=multi-user.targetWe can start, check the status and enable if the service is working with the following commands respectively:
sudo systemctl start bazarrsudo systemctl status bazarrsudo systemctl enable bazarrThe web interface is already available at the address http://192.168.1.131:6767 (replace the IP address with the one used by the Raspberry Pi in your network).
Install Plex
Plex brings together all the media that matters to you. Your personal collection will look beautiful alongside stellar streaming content. Enjoy Live TV & DVR, a growing catalog of great web shows, news, and podcasts. It's finally possible to enjoy all the media you love in a single app, on any device, no matter where you are.
First of all we need to add a new repository and it's key. This will add to the Raspberry's OS the repositories where we need to download the installation and the future updates. It's like a list of links where the system reads automatically the programs it needs for the installation and the updates.
echo deb https://downloads.plex.tv/repo/deb public main | sudo tee /etc/apt/sources.list.d/plexmediaserver.listNext step is adding the signatures of the repos. The system has to be sure that the repos we added manually are correct and they don't have malware. For that we need to add the key and helps system to verify those repos.
curl https://downloads.plex.tv/plex-keys/PlexSign.key | sudo apt-key addWe can now update our package list and install Plex Media Server:
sudo apt-get updatesudo apt-get install plexmediaserverYou can complete the setup opening the following link with your browser:
The web interface is already available at the address http://192.168.0.10:32400/web (replace the IP address with the one used by the Raspberry Pi in your network).
When you are requested to add libraries, you should add the download folder of Transmission, in our example /media/storage/downloads.
And simply enjoy your media player with your favourite series .
If you are interested also in films you can install Radarr which is an independent fork of Sonarr reworked for automatically downloading movies via Usenet and BitTorrent. The project was inspired by other Usenet/BitTorrent movie downloaders such as CouchPotato.
In a future post I probably try to Dockerize all that setup and will include Radarr, or not... we will see
I hope you enjoyed it and if you have any doubts please reach me out here or on any social network!
Original Link: https://dev.to/charly3pins/raspberry-pi-media-player-with-plex-transmission-sonarr-bazarr-and-jackett-2k1l
Dev To
More About this Source Visit Dev To