
An Interest In:
Web News this Week
- April 16, 2024
- April 15, 2024
- April 14, 2024
- April 13, 2024
- April 12, 2024
- April 11, 2024
- April 10, 2024
Some of Our Sources
- Techcrunch
- Technology Review
- Simplebits
- Pearsonified
- Web Designer Depot
- 24 Ways
- Freelance Switch
- Android Dissected
- Codrops
- Dev To
Help Webnuz
Referal links:
Command-Line Interfaces: Structure & Syntax
If you are a developer, chances are you have used or read about CLIs already (maybe to execute git or npm commands or in some library's documentation).
I work with multiple CLIs every day (docker, dotnet, npm, git, etc.), but I had never stopped to learn much about their structure or syntax until recently. Reading documentation and examples is usually enough to get by.
However, I'm currently developing my own CLI for a personal project, so I decided to learn more about CLI design, structure, syntax, and conventions. I did my research, which I documented and decided to share here in this post.
- 1. Introduction
- 2. Arguments
- 3. Options
- 4. The --help flag
- 5. CLI description syntax conventions
- Conclusion
- 6. References
1. Introduction
A CLI or Command Line Interface is an application that handles user interaction through the Command Line.
They don't have graphics (except, maybe, for ASCII Art ).
All the information is presented to the user in the form of text and the user interacts with it by typing in commands.
CLIs can be faster than GUIs for certain tasks (especially for monotonous tasks and when you're already familiar with the commands). One of the main advantages they have over GUI is that they're easier to *automate* (running "npm install" in a CI pipeline could be a lot trickier without a CLI).
1.1. Structure
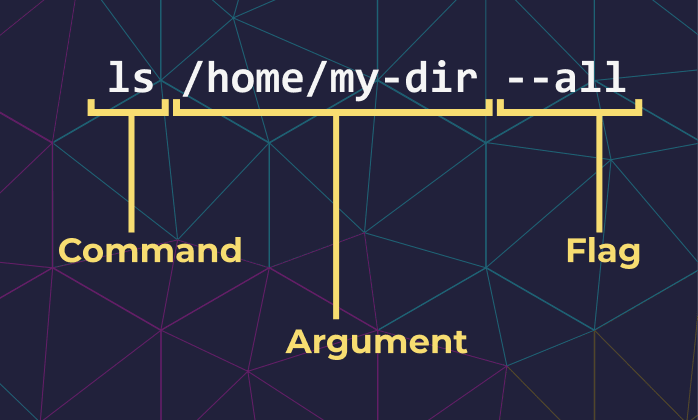
Most CLIs are designed with the following structures:
<command> [arguments] [options]- Example:
ls /home/dir --all
- Example:
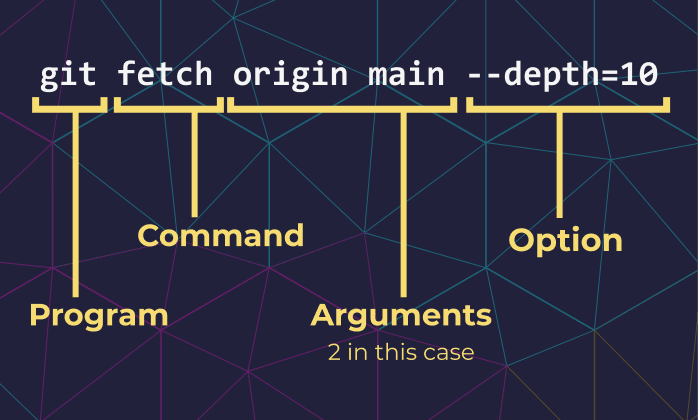
<program> <command> [arguments] [options]- Example:
git fetch origin main --depth=10
- Example:
<program> [arguments] [options]- Example:
docker -v
- Example:
Commands are usually represented as verbs and programs as nouns (as they are usually a short version of the program's name). There are some cases where a second (or third, or more) noun is used to narrow the scope in which the command will operate, for example:
docker container startHere, we have the program (docker), the context (container), and the command (start).
2. Arguments
Arguments in a CLI allow users to send data to the application, sometimes in a command context. They are often called positional arguments because they are identified by their position, which means users must write the value for each argument in the correct position.
mycli command argValue1 argValue2 |_______| |_______| 0 1They can be required or not. If they are not required, the command's behavior may vary in the absence of the parameter, often using a default value instead.
# No argument provided -> Installs all dependencies from the package.json> npm install# Argument value: some-package -> Installs only some-package> npm install some-packageAnother example:
# No arguments -> Uses default remote and branch.> git fetch# Passing a specific remote and branch as arguments.> git fetch origin main3. Options
Options are named parameters that can be passed to a command and are represented by key-value pairs.
Unlike positional arguments, their position is not important.
You're probably familiar with the following example:
# Key: --message # Value: "commit message"git commit --message "commit message"Options are usually (not always) used to represent optional parameters. In most cases, if a parameter is required, a positional argument is the best way to go.
Some options have aliases, which are short versions of the same option, easier to type and remember. They're usually identified by a single dash prefix:
# Long version> mycli --help# Alias> mycli -hDifferent delimiters are supported, depending on the CLI and Operating System. These are some of the most common:
# Single space> mycli --file text.txt# => mycli --file=text.txt# :> mycli --file:text.txt3.1. Flags
Options that don't require a value are often called Flags. They are boolean, meaning their presence indicates "true" and their absence "false".
Some examples of commands using flags:
> git push --force> npm install --save-dev4. The --help flag
Informing our users about the available commands and their arguments and options can be tricky without a GUI.
That's when the --help flag comes in.
When we include the help flag after a command, we ask the CLI to give us more information about it.
Usually, this information will include a short description of the command, arguments, options, and aliases.
Example:
> npm install --help4.1. Common aliases for the --help flag:
-help, -h, -?, -H4.2. Levels of verbosity
Some CLIs allow the user to ask for different levels of help.
For example, the dotnet CLI will print the short version when we use -h or --help , and the long version when we use -H or -HELP.
# Short versiondotnet <command> -h# Long versiondotnet <command> -HSimilarly, git CLI prints a summary of the command briefly explaining how to use it when we use -h, but redirects to the offline HTML documentation when we use --help:
# Short versiongit <command> -h# Offline HTML docsgit <command> --helpLearning about the different levels of verbosity was really helpful (I've been using it frequently), although it's a shame there's not a standard for it.
4.3. The help command
Some CLIs also provide a help command, which usually gives more detailed information than the --help flag:
program help <command-name>For example, both dotnet CLI and npm CLI will open a browser and redirect you to the command's full documentation when we use the help command:
dotnet help <command>npm help <command>5. CLI description syntax conventions
When reading a CLI's documentation or a "man" page, you'll likely come across a particular syntax used to describe commands, their arguments, and options (located often under "Synopsis").
I used to not pay much attention to it (other than trying and figuring out the general anatomy of the command) and going straight to the examples. But after learning about it and how to interpret it, these descriptions have become much more useful to me.
5.1. Required Parameters
Required parameters are often represented using just the name of the param, although in some cases, you may find them between angle brackets:
dotnet new <template>: We can't create a new dotnet project without specifying a template.mv source dest: When moving a file/directory, we must specify the source and destination parameters.
5.2. Optional Parameters
Optional parameters are most commonly represented using square brackets: mycli command [optionalParameter]
docker container ls [options]We can add some flags and options to alter the command's behavior.git remote [-v | --verbose]We can use -v or --verbose to get more information about each git remote.
5.3. Arguments that can receive many values
Ellipses indicate the argument/option expects many values. It can be applied to optional or required parameters
Here's how it looks like applied to optional parameters:
mycli command [parameter...]The previous statement tells us our parameter expects 0 to N values.
Required parameters that receive many values are usually represented in one of two ways. Here is one of them:
mycli command <myParameter> [myParameter...]This statement tells us the command receives at least a single value for <myParameter> but can also receive more values, represented by [myParameter...] resulting in 1 to N values.
Here's an example from the Docker CLI:
docker container start <container> [container...]When executing the start command, we must specify at least one container, but we can also start more than one in the same command.
The second way of representing required parameters with many 1 to N values is as follows:
mycli command <myParameter...>- Or:
mycli command myParameter...
Since we are not using square brackets, it's clear myParameter is required, which indicates it needs at least one value (1 to N).
Here's an example:
mkdir directory...We need to specify at least one directory to create when using mkdir, but we can also create more than one.
5.4. Mutually exclusive arguments
Some arguments cannot be used together in the same command. Their exclusive relationship is represented using pipes:
mycli command [ --option1 | --option2 ]The square brackets tell us we don't have to use any of those options, and the pipe tells us that, if we decide to use them, we can't use them both at the same time. So any of the following are valid:
mycli commandmycli command --option1mycli command --option2
But the following would be invalid:
mycli command --option1 --option2
An example from git commit:
git commit [ -a | --interactive | --patch ]- The previous statement tells us we can use any of those flags (
-a,--interactiveor--patch) but not together - Also, the square brackets indicate we can also decide not to use any of them.
Here's what happens when we try to use -a and --patch together:
> git commit -a --patch fatal: Only one of --include/--only/--all/--interactive/--patch can be used.This syntax is often used to represent aliases: git remote [ - v | --verbose ]. Both flags are valid individually, but it doesn't make sense to use them simultaneously.
Similarly, there are cases when at least one option must be included. In those cases, we use vertical bars, and we group the parameters using curly brackets or parentheses, like so:
mycli command { --option1 | --option2 }- Or:
mycli command ( --option1 | --option2 )
The curly brackets or parentheses indicate that at least one option must be included.
Here's an example from git remote:
git remote set-head <name> (-a | --auto | -d | --delete | <branch>)- The parenthesis indicates that we must choose at least one of those options
- The pipes tell us we can't choose two or more of them
If we don't use any of the required options, we get this error:
> git remote set-head origin usage: git remote set-head <name> (-a | --auto | -d | --delete | <branch>) -a, --auto set refs/remotes/<name>/HEAD according to remote -d, --delete delete refs/remotes/<name>/HEADAnother example from dotnet new:
dotnet new <template> [-lang|--language {"C#"|"F#"|VB}]- So, the square brackets indicate that passing a
-langor--languageis optional - The curly braces and pipe indicate that we must choose between C#, F#, and VB.
Conclusion
I know I could have developed my CLI without stopping to learn any of this. After all, there are libraries that would take care of the syntax and interpretation of commands. Nonetheless, I found it extremely interesting, and I have been using this new knowledge a lot after acquiring it. Finding and reading CLIs documentation has become a lot easier, and I learned many tips that will definitely help me develop a better, more intuitive CLI following the conventions and standards described in this article.
6. References
Original Link: https://dev.to/paulasantamaria/command-line-interfaces-structure-syntax-2533
Dev To
More About this Source Visit Dev To