
An Interest In:
Web News this Week
- April 1, 2024
- March 31, 2024
- March 30, 2024
- March 29, 2024
- March 28, 2024
- March 27, 2024
- March 26, 2024
Some of Our Sources
- Technology Review
- Smashing Magazine
- Abduzeedo
- TutsPlus - Design
- You The Designer
- Web Design Ledger
- Reencoded
- CSS Globe
- Willems Lab
- The Verge
Help Webnuz
Referal links:
How to Build Your Own Voice Call API in Android?
Lets Explore!
Do you desire to build a voice call application in android?
Peeking around but still confused! Come on, Dont lose hope!
This is your place to explore for the exceptional. Lets dive deep and know how to build a simple android Voice calling app?
Before getting into this exciting journey, its salient to have some understanding about what the Voice Calling API is all about?
What is Voice Call API and How Does it Works?
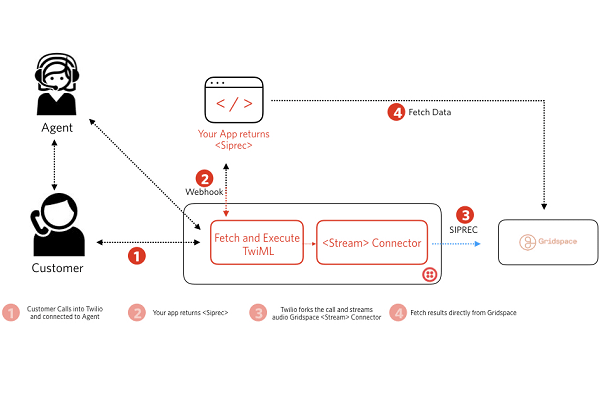
Well to start with, voice calling api is a tool that is used by the software developers to make and receive phone calls easily. In other words can say that it's the voice API that bridges the Public Switched Telephone Network (PSTN) and the applications get connected to the internet.
This API permits the software to be built into any existing application that includes iOS, Android, and web applications, easily.
Moving ahead as to how the task is being performed by this voice calling API. It is much essential to know about VoIP (Voice over internet protocol), to have a better understanding.
VoIP is a feature whose functionality is when added to an application, you can make and receive calls over the internet alone without interfacing with the PSTN.
Voice API has been built for a variety of uses from basic phone to phone calling, app to phone calling, conference calling, and much more. It is mainly to provide the developers a programmatic control over the calls.
Broad Vision on Building a Voice Call API & SDK
As we have already discussed about voice call API, Android places the calls via built-in applications that are easy to make and receive calls anywhere around. Even it allows us to place calls through the app.
While working in the way at the back of the screen everything is about programming. This is called the action intended to proceed further, which is nonetheless ACTION_CALL.
The intent object ACTION_CALL is when used and passed over proper data. It helps to launch the build-in phone call application to make the phone call.
Let's know how?
STEP 1: Action intent to Make a call - To execute this process of calling the action used here is ACTION_CALL. And the syntax used over here to add action call:
Intent myIntent = new Intent(Intent.ACTION_CALL); // this is for Action_call
Other than this for the same process you can also make use of ACTION_DIAL,
Intent myDialIntent = new Intent(Intent.ACTION_DIAL); // this is for Action_Dial
STEP 2: Data Intent to Make a call - For instance, if there is a need to make a call let us say -91-1234234679. We need to set the number using setData in tel, this is the URL as been given below:
myIntent.setData(Uri.parse("tel:91-123-456-7890"));And in case if we want to use take the number from the user, then the getData would be something like the below from the user:
myIntent.setData(Uri.parse("tel:"+text_Phone.getText().toString()));startActivity(myIntent);Explore Voice Calling APIs Most Common Calling Scenarios
Let's have a look at some of the common scenarios, How does voice call apps use the API and have control over them?
These three scenarios can get the most:
- Answer the call
- Accommodating a call
- Ending a Call
1.Answer the Call
Before making a call from your android mobile you must ensure that there is no call being executed at that particular moment.
This is so as because the telecom subsystem provides certain constraints when it comes to active calls in other apps.
Let's consider the two cases:
I. No other app are actively on call:
- Once your App receives a call
- Call notification will be sent via addNewIncomingCall(PhoneAccountHandle, Bundle) to the telecom subsystem.
- This subsystem will then bind to your app's ConnectionService implementation. With that a new instance of Connection class takes place using onCreateIncomingConnection(PhoneAccountHandle, ConnectionRequest).
- Later on this telecom subsystem informs the app and shows the incoming calls to users onShowIncomingCallUi().
- Once the user accepts the incoming call, it gets set to setActive(). If not, then get REJECTED with setDisconnected(DisconnectCause) execution, followed by the Destroy() method.
II. Active Calls that other App has can't be kept on Hold:
Sometimes, it does happen that some important call needs to be attended and can't be put on hold. In such cases the things are as follows:
- As soon as an incoming call receives a new call over the voice call app.
- The notification will be sent to the telecom subsystem as Call addNewIncomingCall(PhoneAccountHandle, Bundle)
- This subsystem binds to your app's ConnectionService implementation. It later on requests a new instance over the connecting objects that have been used, onCreateIncomingConnection(PhoneAccountHandle, ConnectionRequest).
- Now, it's the telecom subsystem that displays the incoming call on UI.
- If the user tends to accept the call, this subsystem calls upon onAnswer() method. Thus, indicates the telecom subsystem as the setted call is as setActive().
- If in turn the user rejects the call, this subsystem calls upon the onReject() method. Then passes on the message as REJECTED by setting the call as setDisconnected(DisconnectCause).
- And the later will be called as Destroy() method
Now, accommodating a call or placing a call is all about something that we are supposed to handle when the call cannot be connected due to some constraints that are imposed by the telecom framework.
In general, if we want to place a call we must follow the below things:
- First must initiate the call via application.
- Use the method placeCall(call, bundle) and then intimate the telecom subsystem about the new call. Now the rest of parameter would be as follows:
- Here, the Uri parameter represents the address of the callee. For numbers must use tel:
- Well, the parameters give information about the application. All this is done by adding the phoneAccountHandle object of the app to EXTRA_PHONE_ACCOUNT_HANDLE extra.
- These parameters can also specify if the bundle includes video by executing EXTRA_START_CALL_WITH_VIDEO_STATE .
- On the whole, this telecom subsystem binds to the voice call app's ConnectService implementation.
i) If in case the app is unable to call, the subsystem invokes: onCreateOutgoingConnectionFailed(PhoneAccountHandle, ConnectionRequest). It generates a message to the application as the call can't be set.
ii) But if the app is able to make a call, then it will invoke: onCreateOutgoingConnectionFailed(PhoneAccountHandle, ConnectionRequest) specifying the application as the call can't be set at the first place instantly make the update by activating the call, invoke setActive() to inform telecom subsystem about the same.
Once the call get connected, we would need to end the call at some stage, in that place to end the session, we need to do the following,
- Call the method setDisconnected(DisconnectCause).
- If in case the call gets terminated by the user LOCAL parameter will be executed. Similarly, the parameter REMOTE will be executed on if the call is disconnected by a third party.
- Once done the entire process is followed by the parameter destroy().
Steps to Build Your Voice Call API in Android
Step 1 : We have to begin with creating a new project by filling in the details. Then that needs to be opened by activity_main,xml file, and thus defines the layout as given below:
xmlns:android="http://schemas.android.com/apk/res/android" xmlns:tools="http://schemas.android.com/tools" android:orientation="vertical" android:layout_width="match_parent" android:layout_height="match_parent"> android:id="@+id/textView2" android:layout_width="wrap_content" android:layout_height="wrap_content" android:layout_centerHorizontal="true" android:layout_marginLeft="100dp" android:layout_marginTop="100dp" android:fontFamily="@font/aclonica" android:text="DataFlair " android:textColor="@color/colorPrimaryDark" android:textSize="50dp" /> android:id="@+id/fstTxt" android:layout_width="wrap_content" android:layout_height="wrap_content" android:layout_marginLeft="100dp" android:layout_marginTop="100dp" android:fontFamily="@font/acme" android:text="Please Enter the Mobile No" android:textColor="#0F8B80" android:textSize="20dp" /> android:id="@+id/mblTxt" android:layout_width="wrap_content" android:layout_height="wrap_content" android:layout_marginLeft="100dp" android:ems="10" android:hint="Enter the number here" android:textColor="#84E2DB" tools:layout_marginTop="20dp"> android:id="@+id/btnCall" android:layout_width="wrap_content" android:layout_height="wrap_content" android:layout_marginLeft="150dp" android:layout_marginTop="20dp" android:text="Dial" />
Step 2: Now this is followed by coding as in mainActivity.java file. Thus follows:
package com.DataFlair.callexample;import android.Manifest;import android.content.Intent;import android.content.pm.PackageManager;import android.net.Uri;import android.os.Build;import android.os.Bundle;import android.view.View;import android.widget.Button;import android.widget.EditText;import androidx.appcompat.app.AppCompatActivity;import androidx.core.app.ActivityCompat;public class MainActivity extends AppCompatActivity {private EditText text_Phone;private Button b_utton;@Overrideprotected void onCreate(Bundle savedInstanceState) {super.onCreate(savedInstanceState);setContentView(R.layout.activity_main);text_Phone = (EditText) findViewById(R.id.mblTxt);mybutton = (Button) findViewById(R.id.btnCall);mybutton.setOnClickListener(new View.OnClickListener() {@Overridepublic void onClick(View v) {callPhoneNumber();}});}@Overridepublic void onRequestPermissionsResult(int requestCode, String[] permissions, int[] grantResults) {if (requestCode == 101) {if (grantResults[0] == PackageManager.PERMISSION_GRANTED) {callPhoneNumber();}}}public void callPhoneNumber() {try {if (Build.VERSION.SDK_INT > 22) {if (ActivityCompat.checkSelfPermission(this, Manifest.permission.CALL_PHONE) !=PackageManager.PERMISSION_GRANTED) {ActivityCompat.requestPermissions(MainActivity.this, new String[]{Manifest.permission.CALL_PHONE}, 101);return;}Intent callIntent = new Intent(Intent.ACTION_CALL);callIntent.setData(Uri.parse("tel:" + text_Phone.getText().toString()));startActivity(callIntent);} else {Intent callIntent = new Intent(Intent.ACTION_CALL);callIntent.setData(Uri.parse("tel:" + text_Phone.getText().toString()));startActivity(callIntent);}} catch (Exception ex) {ex.printStackTrace();}}}Step 3: This is followed by Manifest.xml file:
uses-permission android:name="android.permission.CALL_PHONE" /> application android:allowBackup="true" android:icon="@mipmap/ic_launcher" android:label="@string/app_name" android:roundIcon="@mipmap/ic_launcher_round" android:supportsRtl="true" android:theme="@style/AppTheme"> activity android:name=".MainActivity"> intent-filter action android:name="android.intent.action.MAIN" category android:name="android.intent.category.LAUNCHER" intent-filter activity meta-data android:name="preloaded_fonts" android:resource="@array/preloaded_fonts" applicationmanifest
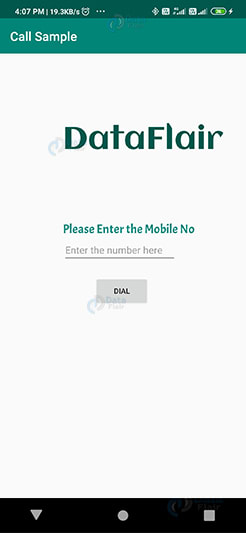
Step 4: As the final step, the application needs to be commanded as run.
a) The outcome of the application will be somewhat like this
b) Once done, need to enter the phone number
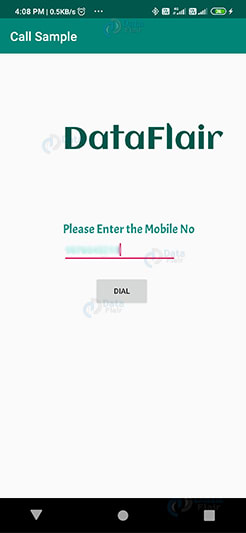
c) As soon as the phone number has been entered, it will ask for the permission to move forward

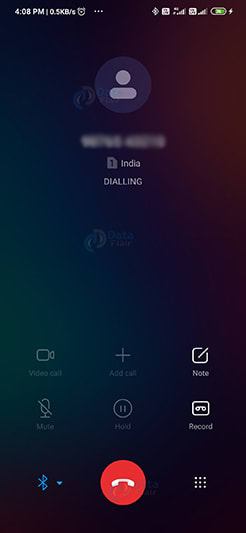
d) Once, the above steps are completed automatically the call would be placed
Epilogue
Now you must have gotten a better insight about the entire process with a detailed explanation as how to build a voice call API for any Android studio. With this now it's your turn to implement the same and get to explore the outcome with flying colors.
But still, if you think you need some clarification over the same. Let us know in the comment section to guide you further with pleasure!
Code & Image References Taken From:
Original Link: https://dev.to/deepikamanoharan/how-to-build-your-own-voice-call-api-in-android-33ac
Dev To
More About this Source Visit Dev To