
An Interest In:
Web News this Week
- April 1, 2024
- March 31, 2024
- March 30, 2024
- March 29, 2024
- March 28, 2024
- March 27, 2024
- March 26, 2024
Some of Our Sources
- Techcrunch
- Just Creative
- The Logo Smith
- TutsPlus - Design
- Creative Curio
- Crazy Leaf Design
- Fudge Graphics
- Line 25
- Spyre Studios
- TechPowerUp
Help Webnuz
Referal links:
Deploying your first ReactJS application into the Cloud
In one of my previous posts, I went through the process of showing you how to containerized a ReactJS application using Docker. But once you get your application containerized and built beautifully with Docker, what should an awesome dev like you do now?!?
How about deploy a React application into the cloud to share with the world!!
Don't believe you can do it! Well after this Blog, you will have an awesome Dad Jokes React Site in the cloud just like this one: Dad Joke React App Website

So today, I am going to show you step-by-step, how to take a React application and deploy it using IBM Cloud.
Special thanks to Kyle Smith for creating the visual design for our React site.

First Things First
So in order for us to deploy our application into IBM Cloud, we will need to sign up for a free IBM Cloud Lite account. This account will allow you to deploy your application for free using IBM Cloud and let you try out different technologies on the cloud. Definitely a great way to get Cloud exposure.
Next, download my sample React JS application called Dad Jokes App. This is based off my previous "Dad Joke UI" code but has a slight change that allows you to do the needed REST API calls within the application without the need of NodeJS Server such as my previously created "Dad Jokes API". Here is a link to my github to download the code we will be deploying into the cloud: Dad Jokes App.
Now that we have a IBM Cloud account and the code we need, let's get ready to deploy our code into the cloud.
Setting up your Cloud Environment
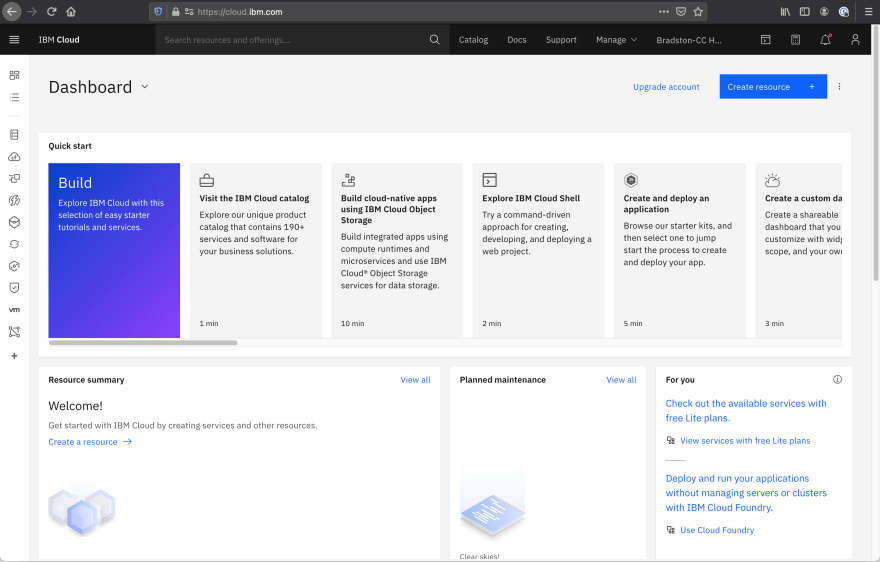
So the first thing we are going to need to do is to make sure we are signed into our IBM Cloud account and navigate to the IBM Cloud dashboard. It should look something like this:
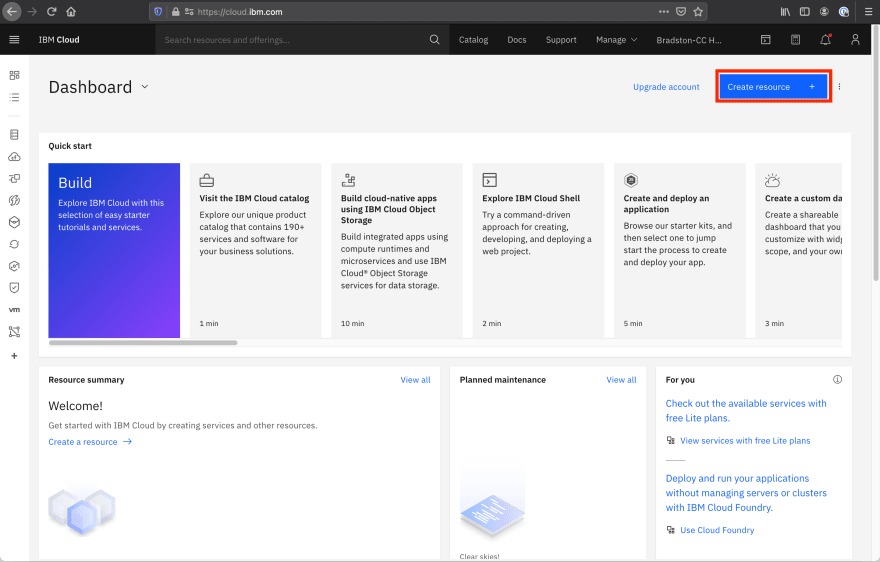
Once on the dashboard, we are going to select the button "Create resource" located in the top right corner of the page:
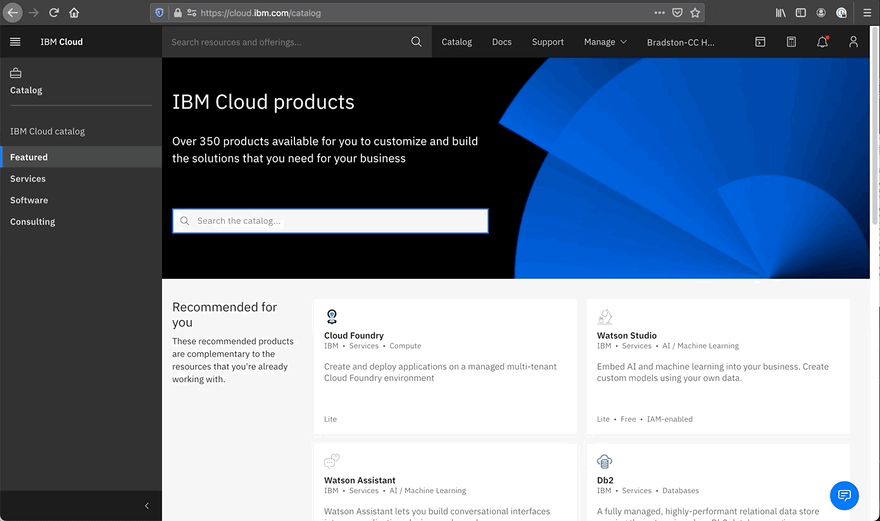
Once we select that, we will be brought to the IBM Cloud catalog which shows all the different services that are available for use. Definitely checkout all the different services that are offered like AI, databasing, etc. at a later time but for now we will be looking for a specific resource: Cloud Foundry.
To easily find Cloud Foundry, type "Cloud Foundry" in the "Search the catalog..." box located in the top-center of the page and then press Enter/Return on your keyboard:
You should now be presented with a list of results that match the keyboard we just typed. The first result should be Cloud Foundry and should look something like this:

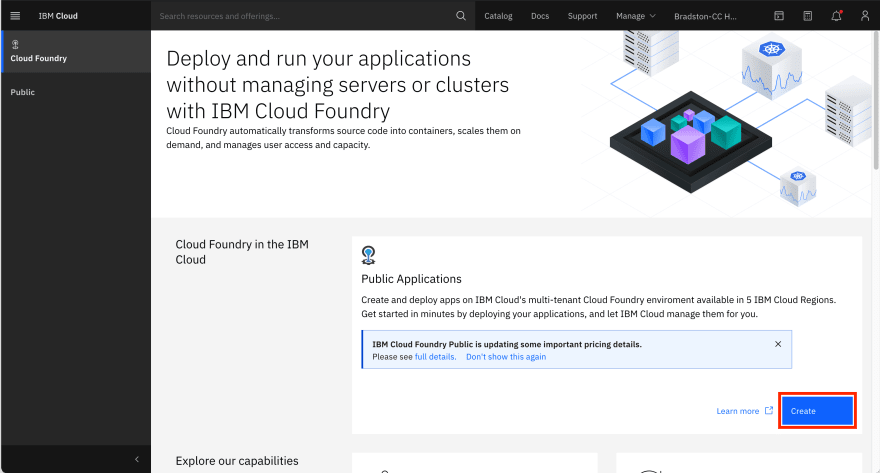
Select Cloud Foundry and allow the page to to load. You should now see the Cloud Foundry Dashboard page:

Just a note, we will be specifically be using Cloud Foundry to deploy our ReactJS application into the Cloud. Cloud Foundry allows us to easily deploy applications with different runtime languages into the cloud with relative ease. If you'd like to learn more about Cloud Foundry and what it is check out this link for more info.
Now that we are on the dashboard, we need to go ahead and create our resource that will be used to host our ReactJS application. On the right side of the page, select the "Create" button:
Once selected, you should be presented with the "Create a Cloud Foundry Sample App" page. We will use this page to configure our application environment:
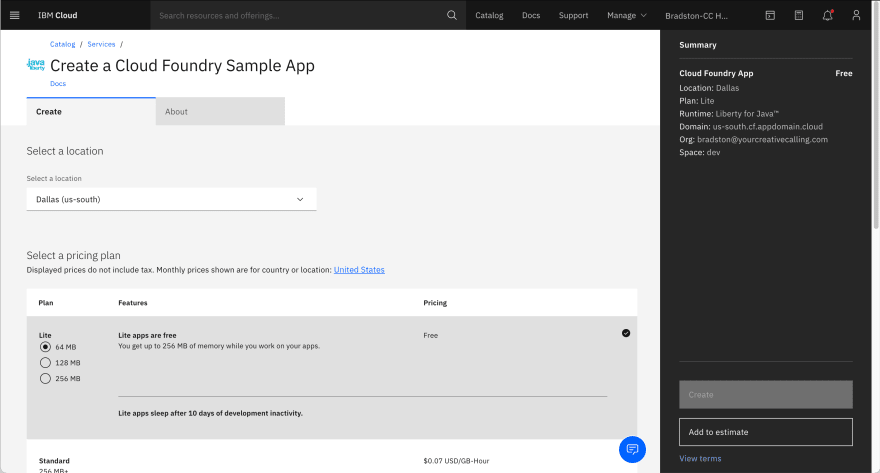
First thing we will do is select the location we would like our application to be hosted out of. I recommend using the closest location to where you are currently located:

Next we will select our pricing plan. Select the lite Plan, as it is free, with 64MB of memory as our application is pretty light-weight.:

Next we will be select the runtime that our application will be running in for deployment. We will be selecting "SDK for Node.js". But as you can see there are many other environments you can choose from for applications in the future:

Next we will enter a unique host application name and a unique host name. For ease I recommend setting the application name and unique name as "Dad Joke App-" + your initials for the name and "dad-joke-app-" + your initials for the host name. So in my case my application name will be "Dad Joke App-BSH" and my unique host name will be "dad-joke-app-bsh". Once you have entered your names, you most likely don't need to change anything else unless you would like to change the domain, organization or space:

And if you desire, you can add tags to your application which can be used for "categorizing" your app and for searching in the future. This not necessary at this point:

Once all fields are filled appropriately, you can confirm the details of our soon to be created resource in the upper right side of the page and then select the "Create" button on the bottom right of the page:

Once your resource is created, you should be presented with a page that looks similar to this. If you select the "Visit App URL" link in the top center of the page you will be able to see your newly created resource with a starter app already hosted there. When you first arrive at the page you likely see that your application is just starting but it should be up and running soon:
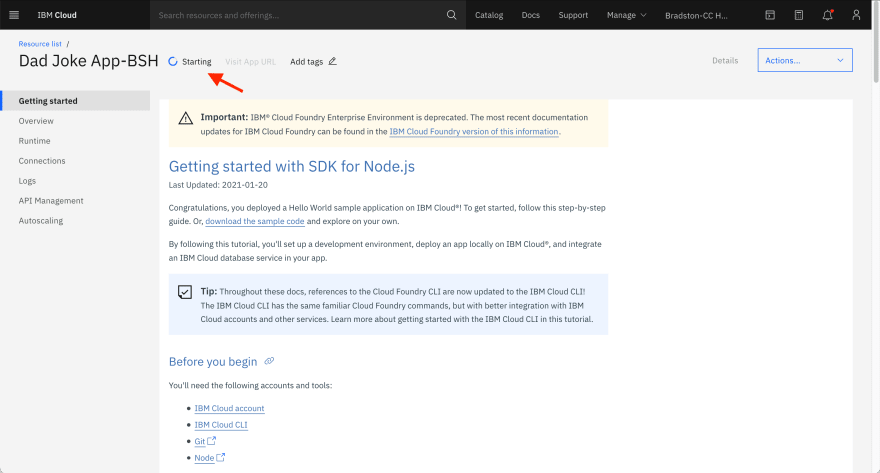
When the starter app has finished starting, the starting text and icon should be replaced by a green check and the word "Running":

Feel free to explore our newly created resource page to check out the different information about our application. The Overview page is a great place to look to check the health of our application and if we would like to manually scale our application memory size and number of instances:

Setting up our React App to Be Deployed to the Cloud
Now that we have our resource created, it is time to deploy our Dad Jokes App code into the cloud. In order to do that we will need to do one quick thing to ensure that our local machine can communicate directly with our IBM Cloud account. We will need to download the IBM Cloud CLI. This will allow us to run commands that will allow us to interact and modify our IBM Cloud account from our local machines terminal as well as allow us deploy our application. You only need to do this step once and you will always have the tools you need to access IBM cloud from your local machine terminal. Here is the link to the IBM Cloud installers. Select the appropriate installer and install the IBM Cloud CLI on your machine. The above link should bring you to a page that looks like this:
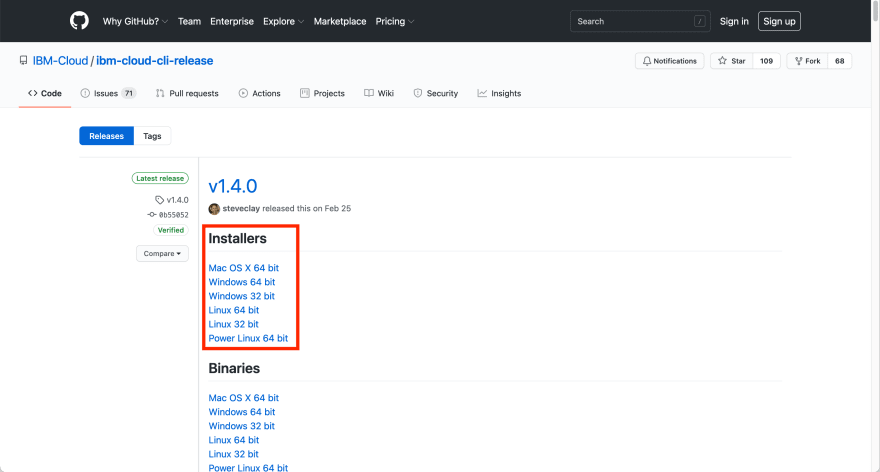
Note: Depending on when you are viewing this post, there may be a newer addition of the installer. So please only use the above image as reference.
Setting up IBM Cloud CLI (Command Line Interface) for deploying our app
Now that you have installed the CLI, let's do a quick check to ensure that IBM Cloud CLI is correctly installed on our machine. Type this command in your terminal:
ibmcloudYou should see some information populate your terminal window about IBM Cloud and its version and usage. If you do not see this information, please check that you installed the tools correctly.

Now that we have installed the CLI, we are almost ready to deploy our application in the wild.
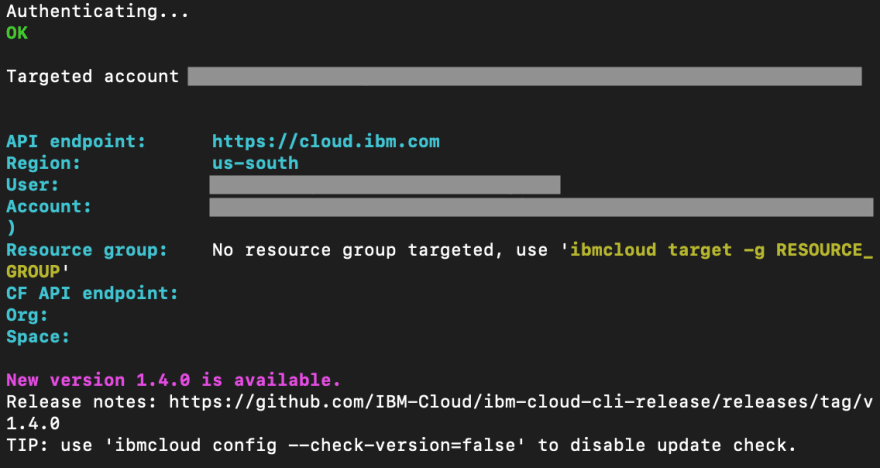
With our terminal window open, we are going to type this command to log into our IBM Cloud account via the terminal:
ibmcloud loginYou should be presented with the API endpoint your are connected to and the Region. Type in and enter your email followed by entering your password. NOTE: If you are a SSO user of IBM Cloud you will have to use the command "ibmcloud login --sso" and follow the process presented there:

Once successfully logged in, your terminal should look something like this:
Note: If you already had the IBM Cloud CLI installed, you may be prompted to update your CLI. Please feel free to update your version if you so desire.
In some cases, your "Resource group", "CF API endpoint", "Org" and "Space" may already be correctly assigned, but to be sure we are pointing to correct place, we going to quickly assign them with the information we desire. So in our terminal window we are going to insert this command:
imbcloud target --cfThis will target our Cloud Foundry org and space to ensure we are pointing to the correct location to host our app.

Note: In some cases, your Resource group may say "No resource group targeted". In our case, this won't have an impact, but if you have and know your resource group and would like to set that value enter the command ibmcloud target -g resource-group-name.
As a sanity check to make sure that we have all the necessary Cloud Foundry CLI tools installed on our system, lets run this command:
ibmcloud cf installIf it asks you to update to latest version, go ahead and update to have the latest working version on your system.
Now we will briefly check to make sure everything is configured correctly. Type this command:
ibmcloud cf appsThis command will list all apps in out Cloud Foundry organization and space. You should see your recently created "Dad Joke APP-" in the list applications printed out in the terminal. If you do not, please revisit the steps above and ensure your are targeting the Cloud Foundry org and space.

Now that we have our IBM Cloud environment configured in our terminal, there is only a few steps left. We need to push our application code into the cloud so it will run in our environment and be should at our URL.
Configuring our React App to be deployed
First, we must navigate into the root directory of our application code that we downloaded from Github. If you are not already in that directory in your terminal, your command should look something like this:
cd <your-directory-path>/Dad-Joke-AppBefore we can deploy the application, we need build the React code and make some minor changes to the github code to ensure that our code properly deploys.
So, now that we are in the folder we are going to run two commands. First will be this:
npm installThis will install all needed frameworks we need to run our application locally. In our case, any React related frameworks and our networking package, axios, for doing API requests to the icanhazdadjokes API to get our dad jokes.
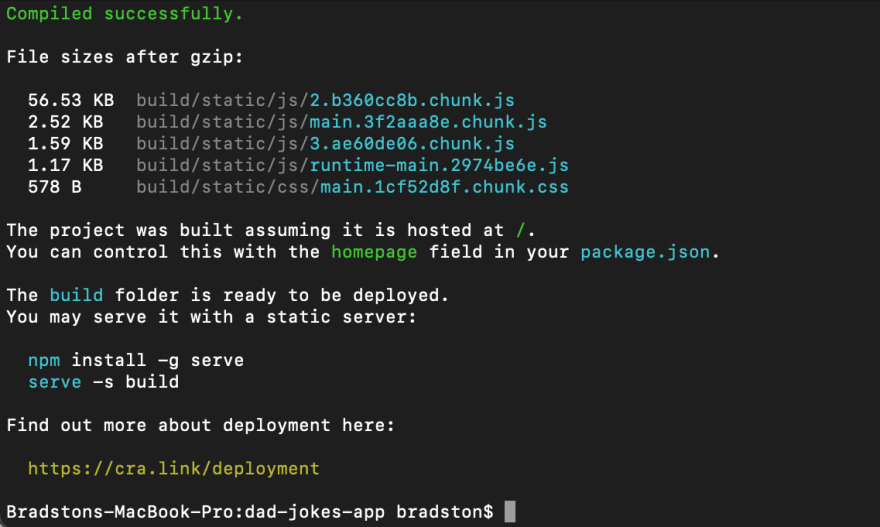
Now we will build our react application using the build command:
npm run buildWe will need to run this command in order to make a production ready build of our React application that can be hosted on our Cloud foundry hosting environment. If your build was successful, you should see something like this:
Once we've done that, all we will do is navigate to our folder that holds our Dad Joke app and open the file that is called the "manifest.yml" and edit some lines. In the file you will change two lines: "name" and "- route". You will need to update them from what they are currently to reflect the names that we used when we created our resource. The name is what is displayed in your resource dashboard page in the top left corner and the route is the link that you are sent to when you select the "Visit App URL" link.
So in my case, those lines will change from this:
name: my-app-name...- route: route.server.cf.appdomain.cloudto:
name: Dad Joke App-BSH...- route: dad-joke-app-bsh.us-south.cf.appdomain.cloudHere is what my final manifest.yml file looks like:
applications: - name: Dad Joke App-BSHmemory: 64Mpath: build/buildpack: staticfile_buildpack routes: - route: dad-joke-app-bsh.us-south.cf.appdomain.cloudNote: Ensure that your " - name" field and " - route" field matches the route and names of your created Cloud Foundry application. If they do not, you will accidentally make a new application and/or route(website URL) in our upcoming steps.
You may have noticed that on "buildpack" line we have "staticfile_buildpack". Since we will be deploying a static webpage using React, this ensures that Cloud foundry prepares the correct environment for us. If you are interested in learning more about why this buildpack was chosen, check out this link for more info on the Static file buildpack.
Deploying our React app into the Cloud
Now that we have made those minor changes, we are ready to deploy our application into the cloud.
In the same terminal we used to log into IBM Cloud, while still in the application directory, enter this command
ibmcloud cf pushNote: You do not have to specify the application name at the end of the terminal command "ibmcloud cf push" because IBM Cloud CLI uses the manifest.yml file to determine what you are pushing.
Your code is now being pushed to IBM cloud to be deployed. This may take a few minutes. You can check the status of the push by navigating to the resource dashboard page and selecting Runtime in the left-hand panel:

Once the application is up and running you should see the green check and words "Running" showing near the app name in the top left corner as well as information about app running under the "Instances" section of the page:

Once it is up and running, select the "Visit App URL" to see your Dad Joke App live and in action.
And just like that, you deployed a React application into the cloud!
If this is your first time deploying an application into the cloud, this can seem like a lot of steps, but after you do it once our twice, it will feel a lot more natural and you will probably be able to condense some of these steps down to be more efficient. Also, once you really understand the basics using the IBM Cloud CLI, you can create and push your app without ever having to use the IBM Cloud UI. In the future, I may create a follow up blog post showing how easy that really is!
Beyond that, I encourage you to experiment and test pushing up different configurations of this application into the cloud to see what works and doesn't. One of the key skills you should aim to acquire when it comes to developing in the cloud is what things work and do not work. There is no better time than now to experiment with the Cloud and learn along the way.
If you have any questions, thoughts or topics you would like to see me cover next, please feel free to leave a comment below
If you are interested in learning more about IBM Cloud check out this link: link
If you want to learn how to containerize a ReactJS app using Docker Check out this link: link
If you haven't already, sign-up for your free IBM Cloud lite account so you can get hands on experience with cloud and all of the services it has to offer. Check out this link to sign-up: link
Thanks for checking out this blog post. Have a great one!
==== FOLLOW ME ON SOCIAL MEDIA ====
Twitter: Bradston Dev
Dev.to: @bradstondev
Youtube: Bradston YT
Original Link: https://dev.to/ibmdeveloper/deploying-your-first-reactjs-application-into-the-cloud-31je
Dev To
More About this Source Visit Dev To