
An Interest In:
Web News this Week
- April 1, 2024
- March 31, 2024
- March 30, 2024
- March 29, 2024
- March 28, 2024
- March 27, 2024
- March 26, 2024
Some of Our Sources
- BoingBoing
- Spoon Graphics
- Abduzeedo
- Vandelay Design
- Line 25
- Specky Boy
- Spyre Studios
- Hashedout
- The Verge
- TechPowerUp
Help Webnuz
Referal links:
Simulate Real-World User Behavior in Apache JMeter Load Tests
A realistic load test helps you prepare your application and infrastructure adequately for the surge of people that will browsing and using your site. By configuring your test plan to mimic real-world user behavior, the results you get from the load test can help inform design and capacity decisions you will make to keep your site robust.
In the previous post, we created a basic Jmeter Test Plan for a 3-endpoint API written in Flask and Python. That's a good start. But to create a Test Plan that closely resembles real user behavior, we have to add more elements to our test plan.
If you want to follow along without going through the previous post, you can pick up right where we left off from the previous blog post by downloading this JMeter test plan. Also, you will have to set up the Flask application, so you will have the same application we are load testing against. Setup instructions are found in the README.me file of this repository.
[1] Add Thinking Time with the "Uniform Random Timer"
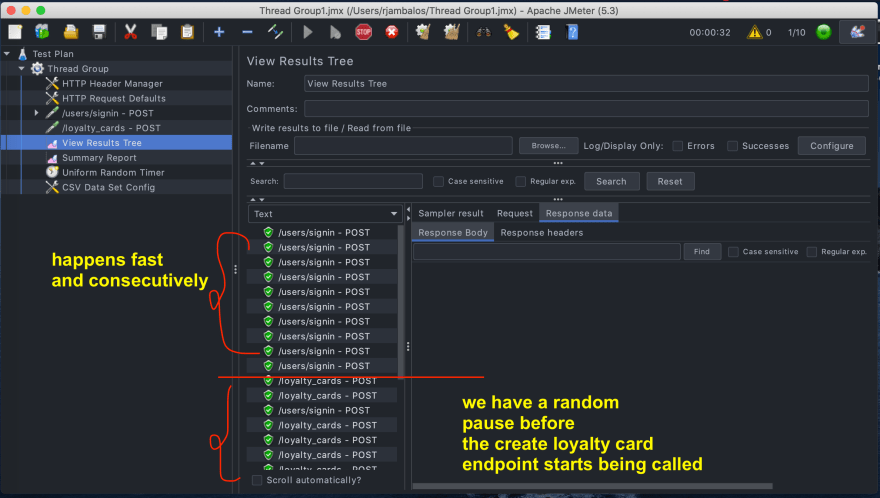
When users browse your website, they look around the page first for a few seconds before moving on to the next page. They click the "View Product" page, take at least a few seconds to look at the product, and then add it to the cart. To simulate this thinking time, we add the Uniform Random Timer to our load tests:

Once created, let's configure a minimum delay of 2secs and a maximum delay of 7 seconds. JMeter chooses a random value between 2s-7s for the delay. You may want to adjust this value to reflect better how users actually use your site.

Now, let's run the load test. You'd see it takes a bit longer than before because of the delays introduced. This means we have successfully emulated user thinking time.
[2] Vary user input with the "CSV Data Input"
Users type in different sign-in credentials when they browse your site. They also buy different products. This puts a strain on your system because the response is more difficult to cache.
If we have a test plan with 20 virtual users (VUs) logging in using the same email and password and buying the same product, our performance test results become too optimistic. Our database or cache might have been optimized already to keep returning the same results.
To fix this, we introduce the "CSV Data Input" element into our test plan. First, let's define the CSV file from which we will get the values. Save this CSV file with a filename of "sample_data.csv". Place it in the same directory as we saved the JMeter load test we are working with.
first_name,last_name,email,passwordraphael,jambalos,[email protected],jambyiscooltest,jambalos,[email protected],driveiscoolultra,jambalos,[email protected],ultraplayeriscoolsuper,jambalos,[email protected],superuseriscoolcode,jambalos,[email protected],codemaestroiscoolThen, let's use this CSV file in the load test by creating the "CSV Data Set Config" element.

In the filename part, find the CSV file you just created. You could type sample_data.csv if you followed my earlier instruction of just placing the CSV file in the same directory as the JMeter test plan. If the file is stored elsewhere, click Browse to find the file.

For each virtual user, the CSV Data Set Config gets one row from the CSV and loads it as values to the variable names you specified in the element. For example, VU#1 will have the row "ultra,jambalos,[email protected],ultraplayeriscool" and the variable names available to that user will be:
- first_name: ultra
- last_name: jambalos
- email: [email protected]
- password: ultraplayeriscool
VU#2 will have a different row and hence have a different set of values for the four variables specified above. In order to have different values for each VU, we need to review the 2 endpoints we created in the previous post and replace some value fields with variable names instead of hardcoded data.
For the sign-in route, replace the value of the email and password keys with these values: "${email}" and "${password}".

For the route loyalty cards create, do the same for first name and last name:

Now, running the load test, we see different values used for email, password, first_name, and last_name

[3] Add conditions for gateway actions
When the call to the login endpoint fails, the actions after it also fails. If we have 10 endpoints to call after login, a failed login overstates an error 10 times over. Also, real-world users retry the login rather than trying pages that are inaccessible to them.
The solution to this problem is to ensure that each VU only tries the 10 endpoints if the login succeeded. For this, we create the If Controller:

Now, drag the If Controller right below the sign-in endpoint and make sure to "drag in" the /loyalty-cards POST endpoint. This makes sure that the endpoint will only execute if the login was a success. Make sure to set the condition of the if config element to: ${JMeterThread.last_sample_ok}

[4] Set up a test environment similar to the production
Up to this point, our load test is configured to allow us to test quickly so we can get feedback on what to improve. This is why our load test only runs for 30secs and has only 10 VUs. At this volume, we are sure that even if you host your application locally, the load will be adequately handled.
But load tests are not of much value if we test at low volumes. After all, load tests answer the question: "how many users making requests concurrently can my website handle?". To have a load test that truly adds value to our team, we need to test at higher volumes (think 100-500 VU or more). And to test at higher volumes, we need to set up a test environment that can accommodate that load.
In setting up the test environment, we need to make it similar to our production setup:
- The database and the application servers are of the same size and count.
- The application and web servers have the same configuration as the production setup
- The data in the database is roughly the same size as in production.
For some teams, replicating the database and server fleet (i.e., 10 r5.large EC2 instances and 1 24.xlarge database) won't be possible. For this, what we usually do is a scaled-down version of the app (i.e., think 2 r5.large EC2 instance and 4xlarge database). Then, we multiply the capacity by the scaling factor to get the estimated capacity of production.
For our example, the scaling factor is 5. Our test environment is 1/5 the size of our production setup. If our test environment can accommodate 500 users, we assume the production setup can accommodate 2500 users.
[5] Disable Listeners during high-volume load tests
Thus far, we had the "View Results Tree" and "Summary Report" listeners to help us build and improve our load test. But when testing on high volumes, these 2 listeners suck up a lot of resources (particularly memory) that we could have used for the load test operation.
When you are ready for your high-volume test, disable the two listeners. Once you do, it should be grayed out in the GUI:

[6] Run Jmeter in CLI mode
When load testing, we usually change the parameters of the load test. I usually start at 100 VU. If the app can handle it, I push it up to 200 VU, then 300 VU, etc.
At the current state of our load test, if we use the CLI, we would have to modify the test plan locally with the GUI, then re-upload it to get from 100VU to 200VU. There has to be a better way!
For this, we introduce CLI parameters. Click on the thread group and replace the values of the fields with the following values species below. Notice that the 1st parameter sets the variable name and the second parameter sets the value of this variable in case there is none provided in the CLI command.
- Number of Threads:
${__P(users,10)} - Ramp-up period:
${__P(rampupPeriod,10)} - Duration:
${__P(duration,30)}
Your Thread Group should look like this:

We also modify our CSV Data Set Config to parameterize the CSV filename using ${__P(csvFilename,'sample_test_data.csv)}.

Now, it's time to run our load test via CLI. Notice that we intentionally did not include the csvFilename parameter and instead relied on its default value.
jmeter -n -t jmeter_test_plan.jmx \ -l "$(date +'%Y%m%d%H%M%S').csv" \ -Jusers=50 \ -JrampupPeriod=60 \ -Jduration=360 \ -e -o "$(date +'%Y%m%d%H%M%S')_folder"We specified a load test using 50 Virtual Users (VUs), a duration of 6 minutes (360s), and a ramp-up period of 1 minute. This is definitely more high volume than our 10VU / 30s load testing we have done prior. We also specified the JMeter test plan file that we have been working on. We also specified the paths on where to save the output CSV file and the HTML report (you will see both of this later).
Once you run the test, your CLI should look like this.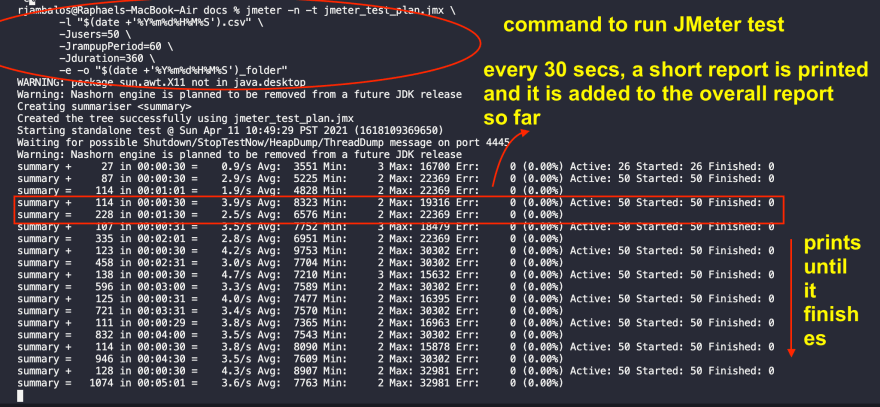
After the test, notice that JMeter has created a folder and a CSV file in the directory we specified in the command. The CSV contains a report of every HTTP request made to our test environment.
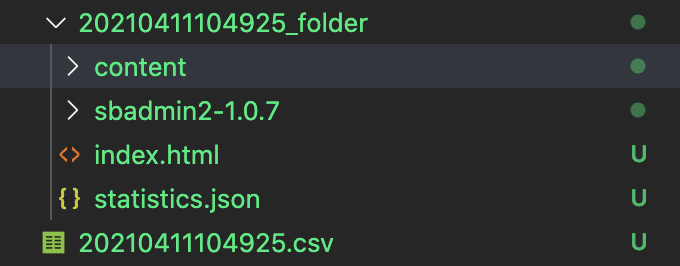
The folder contains an HTML report with graphs and tables showing how the test went. Open the file index.html to see this report:

You can use this report to examine how the load test went. There are also advanced options to configure the contents of this report.
What's next?
Now, we have a realistic load test plan that can be configured to run hundreds of virtual users. So far, we have run the test plan on our local machine. But our local machine has a limit. It starts to fail once we do a load test with 1000 VUs or more.
In the next post, we detail options on how to run load tests to accommodate a high number of virtual users.
Special Thanks
Special thanks to Allen for making my posts more coherent.
The authoritative JMeter book of Rodrigues, Mouawad, and Milamber entitled Master Apache JMeter From load testing to DevOps really helped me understand JMeter in more clarity. I highly suggest you purchase this book if you want to learn more about JMeter.
Original Link: https://dev.to/raphael_jambalos/simulate-real-user-behavior-in-apache-jmeter-load-tests-58bl
Dev To
More About this Source Visit Dev To