
An Interest In:
Web News this Week
- April 1, 2024
- March 31, 2024
- March 30, 2024
- March 29, 2024
- March 28, 2024
- March 27, 2024
- March 26, 2024
Some of Our Sources
- BoingBoing
- Technology Review
- Pearsonified
- Creative Curio
- FanExtra - PSD
- Noupe
- My Ink Blog
- Fudge Graphics
- Line 25
- TechPowerUp
Help Webnuz
Referal links:
React - Redux In Less Then 7 Minutes

Overview
In this article, I will cover some fundamental concepts of redux and how to build a simple application(Counter App) using react and redux.
Redux
Redux is predictable state container for javascript applications. This means whenever there are changes within the application including both data and UI changes, those changes are contained in a single javascript object called the state. The state is often referred to as the single-source-of-truth because it is never mutated or modified, but instead recreated. With a single-source-of-truth we can better predict the state of the application at a giving moment.
Redux Fundamentals
Before diving into the application lets cover some Redux fundamentals.
State
The state is a javascript object that represents the entire state of a redux application. It can be a simple object with a single value or a more complex object.
{counter: 0}The state is accessible throughout the entire application and is managed by a centralized container known as the store. The only way to access the store is by dispatching an action.
Actions
An action is an description of how the store should change the state.
{ type: 'INCREMENT', value: 5, }The change within the application is understood by the action's type property. All actions have a type property. The type property explains to the store how to respond and recreate the state. The creation of the state is handled by a reducer.
Reducers
A reducer is a javascript function that will create a new state based on some action type.
const reducer = (state = initialState, action) => { switch (action.type) { case actionType.ADD: return { ...state, counter: state.counter + 1 } } return state;}Reducers are often referred to as pure javascript functions. A pure javascript function is a function that giving the same input will always return the same output. They are called pure functions because they are predictable and include no side effects such as network or database calls. The most import job of a reducer is to recreate the state for the store.
Store
A store is a javascript object that holds the application's state. There should only be a single store in a redux application.
{ dispatch: Dispatch getState: () => State subscribe: (listener: () => void) => () => void replaceReducer: (reducer: Reducer) => void}Store Methods
dispatch(action): Dispatches an actiongetState(): Returns the current statesubscribe(listener): Adds a change listenerreplaceReducer(nextReducer): Replaces the reducer
Redux Pattern
The redux pattern can visualized as below.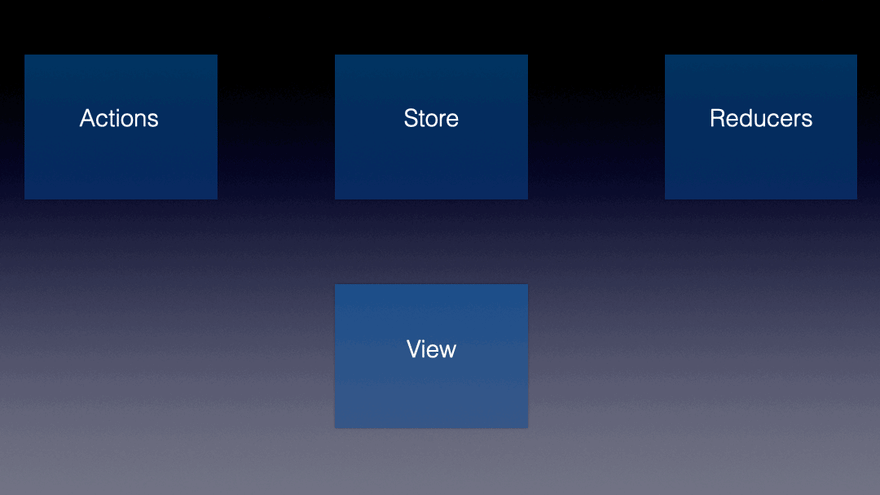
React and Redux (Counter App)
In this section, I will cover the steps to build a simple counter application with react and redux. The application View Code Repository.
Getting Started
First, I'll create a basic react app with npx and install the needed dependencies: react-redux and redux.
npx create-react-app redux-practicecd redux-practicenpm i react-redux reduxNext, I'll create three new directories to manage the files of my application.
mkdir src/storemkdir src/containersmkdir src/componentssrc/store- Reducers and actions needed for redux storesrc/containers- Components connected to the redux storesrc/components- Presentational level components
I'll start off by working on the actions and reducers which will be located in the the store directory.
touch src/store/actions.jstouch src/store/reducers.jsFirst, I'll define my actions. This application wont have very many for the sake of simplicity and demonstration.
src/store/actions.js
export const ADD = 'ADD';export const SUBTRACT = 'SUBTRACT';Next, I'll create the reducer function needed for the store.
src/store/reducers.js
import * as actionType from './actions';const initialState = { counter: 0}const reducer = (state = initialState, action) => { switch (action.type) { case actionType.ADD: return { ...state, counter: state.counter + 1 } case actionType.SUBTRACT: return { ...state, counter: state.counter - 1 } default: return state }}export default reducer;In the above code snippet I've imported all the actions from actions.js , then created a state variable to initialize the state for this reducer, and created my reducer function. The reducer function takes two arguments state, which if not initialized will be set to the initialState, and action which will be passed in once an action is dispatched. I'll use a switch state to determine the action type and using the actions from actions.js handle each case accordingly.
Now that I have my reducer and actions created I'll create my store. The store should be created at the top level component which in this case is index.js
src/index.js
import React from 'react';import ReactDOM from 'react-dom';import { createStore } from 'redux';import { Provider } from 'react-redux';import reducer from './store/reducers';import './index.css';import App from './App';const store = createStore(reducer);ReactDOM.render( <React.Fragment> <Provider store={store}><App /></Provider> </React.Fragment>, document.getElementById('root'));In the index.js file I imported createStore from redux, as well as Provider from react-redux. I also imported my reducers which I will need for my createStore function. The createStore function takes in the reducers and returns the redux store. I use the Provider which has a prop called store and I pass the store created above to the Provider prop. At this point the redux store is accessible throughout the entire react application.
Next, I'll create two components to represent the counter application.
mkdir src/components/CounterButtonmkdir src/components/CounterLabeltouch src/components/CounterButton/CounterButton.jstouch src/components/CounterLabel/CounterLabel.jsThese components are presentational components so they will be very simple.
CounterButton.js
import React from 'react';import './CounterButton.css';function CounterButton(props) { return ( <div className="CounterButton"> <button type="button" onClick={props.clicked} className="btn btn-primary"> {props.label} </button> </div> )}export default CounterButton;CounterLabel.js
import React from 'react';import './CounterLabel.css'function CounterLabel(props) { return ( <div className='CounterLabel'> {props.value} </div> )}export default CounterLabel;Next, I'll create the counter component which will be connected to the redux store.
touch src/containers/Counter.jsCounter.js
import React, { Component } from 'react';import { connect } from 'react-redux';import * as actionType from '../store/actions';import CounterLabel from '../components/CounterLabel/CounterLabel';import CounterButton from '../components/CounterButton/CounterButton';import './Counter.css';class Counter extends Component { render() { return ( <div className="Counter"> <CounterLabel value={this.props.ctr} /> <CounterButton clicked={this.props.onAdd} label="Add" /> <CounterButton clicked={this.props.onSubtract} label="Subtract" /> </div> ) }}const mapStateToProps = state => { return { ctr: state.counter }}const mapDispatchToProps = dispatch => { return { onAdd: () => dispatch({ type: actionType.ADD }), onSubtract: () => dispatch({type: actionType.SUBTRACT}) }}export default connect( mapStateToProps, mapDispatchToProps)(Counter);Within the Counter.js I import the connect function from react-redux package which is used directly on the component at the end of the file. The connect function takes two arguments, first mapStateToProps which is responsible for selecting a part of the state that the component needs, and second mapDispatchToProps which is responsible for dispatching actions to the store. The onAdd and onSubtract functions are passed as props to the ControlButtons and when clicked dispatch their respective actions to the store. At this point are simple counter application is complete.
When To Use Redux
The application in this article is very simple for learning purposes. In most cases you will not need redux for an application of this size. A state management system is good for large scale applications where state management is difficult to understand. Here are a few pointers on when to use redux that I got from Maxillian over at Academind.
- Local UI State - Redux not recommended
- Persistent State - Redux can be used for the data you need to display
- Client State - Look to use Redux

Conclusion
As always take care and if you found this article helpful please leave a rating or if you have a question leave a comment and I'll try to get back to you as soon as possible.
Original Link: https://dev.to/meddy672/react-redux-in-less-then-7-minutes-had
Dev To
More About this Source Visit Dev To