
An Interest In:
Web News this Week
- April 1, 2024
- March 31, 2024
- March 30, 2024
- March 29, 2024
- March 28, 2024
- March 27, 2024
- March 26, 2024
Some of Our Sources
- TutsPlus - Code
- Team Treehouse
- Abduzeedo
- You The Designer
- FanExtra - PSD
- My Ink Blog
- Specky Boy
- Android Dissected
- Android Headlines
- TechPowerUp
Help Webnuz
Referal links:
Preview environments per Pull Request using AWS CDK and Github Actions
TL;DR The code is here . The rest of this post gives information and context about it.
Table of contents
Introduction
One of the biggest challenges today when delivering software is to move fast. Moving fast and keeping a high quality and confidence in your code is not an easy task.
Services like Vercel, Netlify, Render, Qovery or Railway are all working toward that goal, making our lives way easier. All these platforms allow us to quickly iterate, delivering value by focusing only on our code and forgetting about the nightmare that devops can be. I'm grateful for each of them.
But what if devops could be good old regular code? So accessible that you could actually spin up your entire infrastructure in few lines of code. By directly using a cloud provider you have no more limits, at a lower cost!
As an example, I'm going to show you how to setup preview environments in your Pull Requests on Github, using AWS CDK and Github Actions. Preview environments are a terrific tool to share your work before it goes to production or to run end-to-end tests. It gives a lot of confidence to have a mirror of your production infrastructure to play with.
Target
At the end of this tutorial, we should be able to :
- Trigger a preview environment deployment by labelling a Pull Request with
deploy - As long as the Pull Request is labeled with
deploy, we should have our preview environment updated on each push - When the label
deployis removed from the Pull Request or the Pull Request is closed, the preview environment should be destroyed - All the deployments should be integrated with Github Deployments API to have useful feedbacks from within the Pull Requests or on the repository's home page
Prerequisites
- Node.js LTS (v14.16.0)
- AWS :
- Sign up and get your access keys
- Set the access keys as secrets under the names
AWS_ACCESS_KEY_IDandAWS_SECRET_ACCESS_KEYin your repository. - Set them on your development machine to run the various cdk commands. Don't forget to set a default region (previous link) if you want to deploy in a different region than
us-east-1.
AWS
Architecture

The architecture is composed of CloudFront (CDN) in front of a private S3 Bucket (file storage). CloudFront serves the sources stored in the bucket to the outside world.
CDK
The AWS Cloud Development Kit is an open source software development framework to define your cloud application resources using familiar programming languages such as TypeScript in the context of this post.
TypeScript gives us autocompletion and type safety on every part of our infrastructure, no more back and forth with the documentation, everything is available with a few keystrokes.
You can forget the hundreds of lines of CloudFormation yaml files or the confusing AWS Console UI. As an infrastructure as code framework, CDK is an abstraction over these low level constructs with sensible defaults.
File structure
A typical CDK project is composed of :
bin/app.tsthe main file instantiating the stacks and called by the cdk CLIlib/*-stack.tsthe stacks implementationscdk.jsonthe configuration file for the cdk CLI
Let's see what is inside each of these files.
cdk.json
{ "app": "yarn ts-node bin/app.ts", "context": { "@aws-cdk/core:newStyleStackSynthesis": true }}The app key is used to tell cdk how to start our app.
The context key can contain feature flags like the one used here. In a future release of the AWS CDK, "new style" stack synthesis will become the default, but for now we need to opt in using the feature flag.
bin/app.ts
import * as cdk from '@aws-cdk/core';import AwesomeStack from '../lib/awesome-stack';const app = new cdk.App();/** * The name of the stack depends on the STAGE environment variable so we can deploy the infrastructure multiple times in parallel * @example * AwesomeStack-pr-1-awesome-branch * AwesomeStack-production */const stackName = 'AwesomeStack-' + process.env.STAGE;new AwesomeStack(app, stackName);The stack's name is an important concept. This is what we will be referring to when deploying with the cdk CLI. You can note that in our case, this name depends on a STAGE environment variable. This allow us to dynamically deploy a whole new stack by Pull Request as the STAGE variable is derived from the Pull Request number and the branch name (more on this later)!
lib/awesome-stack.ts
import * as cloudfront from "@aws-cdk/aws-cloudfront";import * as cloudfrontOrigins from "@aws-cdk/aws-cloudfront-origins";import * as s3 from "@aws-cdk/aws-s3";import * as s3Deployment from "@aws-cdk/aws-s3-deployment";import * as cdk from "@aws-cdk/core";/** * The CloudFormation stack holding all our resources */export default class AwesomeStack extends cdk.Stack { constructor(scope: cdk.Construct, id: string, props?: cdk.StackProps) { super(scope, id, props); /** * The S3 Bucket hosting our build */ const bucket = new s3.Bucket(this, "Bucket", { autoDeleteObjects: true, removalPolicy: cdk.RemovalPolicy.DESTROY, }); /** * The CloudFront distribution caching and proxying our requests to our bucket */ const distribution = new cloudfront.Distribution(this, "Distribution", { defaultBehavior: { origin: new cloudfrontOrigins.S3Origin(bucket), viewerProtocolPolicy: cloudfront.ViewerProtocolPolicy.REDIRECT_TO_HTTPS, }, defaultRootObject: "index.html", }); /** * Output the distribution's url so we can pass it to external systems */ new cdk.CfnOutput(this, "DeploymentUrl", { value: "https://" + distribution.distributionDomainName }); /** * Upload our build to the bucket and invalidate the distribution's cache */ new s3Deployment.BucketDeployment(this, "BucketDeployment", { destinationBucket: bucket, distribution, distributionPaths: ["/", "/index.html"], sources: [s3Deployment.Source.asset('./website')], }); }}The stack class is the unit where we declare all the resources that will be created during the deployment. To create a stack you need to extend the cdk.Stack class.
The removalPolicy is often available on stateful resources such as S3 bucket or RDS databases. The default is to keep you from making a mistake so data are kept after destroying an environment. In our case we want to clean-up everything so we have to tell AWS to explicitly DESTROY our bucket.
At the beginning of this post I talked about CDK providing sensible defaults. The general rule is that every resource you create is private by default. It means that if you want to expose them you have to do it explicitly. Security wise this is a very good point. The objects in our bucket here are not publicly accessible, only CloudFront can read them.
cdk.CfnOutput is a construct that allow you to export arbitrary values at the end of the deployment. It will be very useful to pass the deployed URL to Github Deployment API.
This is it, this is our infrastructure, in 30 lines of actual code. Not bad!
CLI
Now that the infrastructure is sorted out, let's see how we interact with the CDK CLI. I defined 3 main commands as scripts in the package.json file.
yarn bootstrap
CDK_NEW_BOOTSTRAP=1 cdk bootstrap --cloudformation-execution-policies arn:aws:iam::aws:policy/AdministratorAccessDeploying AWS CDK apps into an AWS environment (a combination of an AWS account and region) may require that you provision resources the AWS CDK needs to perform the deployment. These resources include an Amazon S3 bucket for storing files and IAM roles that grant permissions needed to perform deployments. The process of provisioning these initial resources is called bootstrapping. More infos here.
Basically you need to call this command manually only once per account/region you want to deploy to.
yarn deploy
cdk deploy "AwesomeStack-${STAGE}" --require-approval never --outputs-file cdk.out.jsonThis command reads from the cdk.json config file and triggers the deployment of the resources. Here I specified that I don't want it to be interactive (I accept all the resources/roles creation). Also I save all the values exported with cdk.CfnOutput to a json file.
If you run the command multiple times, CloudFormation will diff your changes automatically and only update the resources accordingly!
You can notice that in order to run this command, I expect to have the STAGE environment variable set. Also, I'm only targeting a single stack but cdk deploy also accepts globs if you have multiple stacks to deploy.
yarn destroy
cdk destroy "AwesomeStack-${STAGE}" --forceHere is the destruction of the stack on AWS, the --force option is used to be non interactive as we'll call these commands inside our Github Actions.
This concludes the infrastructure part of this post, I hope you're still there for the automation!
Github automation
Github Deployments API
Github has dedicated UIs and status integration when deploying code in a repository. It's pretty deep in their REST API and I didn't notice a lot of adoption for this feature.
I see a lot of benefits using it :
- Having nice feedbacks directly in the Pull Request about the status of the current deployment.
- Seeing all the active deployments from the repository's home page.
- Automatic communication with third-party services such as Checkly that need infos about the deployments in order to start their own workflow.
Github as the concept of environment to group deployments together in a sequential way. In our case we will create one environment per Pull Request.
Github Actions
GitHub Actions makes it easy to automate all your software workflows, now with world-class CI/CD. Build, test, and deploy your code right from GitHub.
One of the big strength of Github Actions is its ecosystem and marketplace. As someone using a lot of OSS packages on npm I feel like home, there is always a package to achieve what I want!
To achieve our automation target, we will need 2 actions. One for the deployment of the stack during the lifecycle of the Pull Request, and one for cleaning everything up when the Pull Request is closed.
Pull Request deploy
This first action is triggered in two cases :
- When you add the label
deployon the Pull Request - When you open or push to a Pull Request labeled with
deploy. Thepushevent on a Pull Request is part of thesynchronizedevent.
The first deployment will create all the resources for the environment and is often the slowest. Subsequent deployments will be way faster as CloudFormation diff the changes and only update the required resources.
In order to have one isolated environment per Pull Request we need to derive the STAGE environment variable from the Pull Request number and the branch name so the resulting stack name is unique to our Pull Request on AWS. I made a special step for this purpose.
There is a last npm script that I didn't mention earlier that eases the passage of the deployment's url from the step deploy the stack on AWS to the step update the github deployment status, the postdeploy script :
node --eval "console.log('::set-output name=env_url::' + require('./cdk.out.json')['AwesomeStack-${STAGE}'].DeploymentUrl)"It reads the DeploymentUrl exported by the cdk.CfnOutput in the cdk.out.json after the deployment is over. Then it set the value as a step's output in order to be accessible by the next steps.
The postdeploy script is automatically called after the deploy script thanks to the pre and post scripts convention.
Notable actions from the community which were very convenient in this workflow :
rlespinasse/github-slug-actionexposes the slug/short values of some GitHub environment variables inside the workflow. It allowed me to directly get a slug version of the branch name to build the STAGE environment variable. (refs/heads/feat/new_feature -> feat-new-feature)aws-actions/configure-aws-credentialsconfigures AWS credential and region environment variables for use in other GitHub Actions. The environment variables will be detected by all AWS tools to determine the credentials and region to use for AWS API calls.bobheadxi/deploymentsis abstracting over the Github Deployments API and makes it a breeze to create/update/delete Github deployments.
name: "Pull Request deploy"on: pull_request: types: [labeled, opened, synchronize]jobs: deploy: if: | (github.event.action == 'labeled' && github.event.label.name == ':rocket: deploy') || (github.event.action != 'labeled' && contains(github.event.pull_request.labels.*.name, ':rocket: deploy')) runs-on: ubuntu-latest steps: - name: inject slug/short variables uses: rlespinasse/[email protected] - name: set STAGE variable in environment for next steps run: echo "STAGE=pr-${{ github.event.number }}-${{ env.GITHUB_HEAD_REF_SLUG }}" >> $GITHUB_ENV - name: create a github deployment uses: bobheadxi/[email protected] id: deployment with: step: start token: ${{ secrets.GITHUB_TOKEN }} env: ${{ env.STAGE }} ref: ${{ github.head_ref }} no_override: false transient: true - name: checkout the files uses: actions/checkout@v2 - name: install node dependencies uses: bahmutov/npm-install@v1 - name: configure AWS credentials uses: aws-actions/configure-aws-credentials@v1 with: aws-access-key-id: ${{ secrets.AWS_ACCESS_KEY_ID }} aws-secret-access-key: ${{ secrets.AWS_SECRET_ACCESS_KEY }} aws-region: eu-west-3 - name: deploy the stack on AWS id: cdk_deploy run: yarn deploy - name: update the github deployment status uses: bobheadxi/[email protected] if: always() with: step: finish token: ${{ secrets.GITHUB_TOKEN }} status: ${{ job.status }} deployment_id: ${{ steps.deployment.outputs.deployment_id }} env_url: ${{ steps.cdk_deploy.outputs.env_url }}Pull Request clean-up
The clean-up action is triggered in two cases :
- When you remove the label
deployfrom the Pull Request - When you close the Pull Request labeled with
deploy. Theclosedevent is also emitted after the Pull Request is merged as it's automatically closed by Github.
This actions ensures that your preview environment is destroyed on AWS as soon as you don't need it anymore. It also delete the associated Github deployments so you don't see them in the UI anymore.
Notable action from the community which was very convenient in this workflow :
strumwolf/delete-deployment-environmentfinds and delete all deployments as well as the GitHub environment they are deployed to. We can't delete a Github environment if it contains any noninactivedeployment. This action marks all the deployments as inactive and delete the whole chain.
name: "Pull Request clean-up"on: pull_request: types: [unlabeled, closed]jobs: clean-up: if: | (github.event.action == 'unlabeled' && github.event.label.name == ':rocket: deploy') || (github.event.action == 'closed' && contains(github.event.pull_request.labels.*.name, ':rocket: deploy')) runs-on: ubuntu-latest steps: - name: inject slug/short variables uses: rlespinasse/[email protected] - name: set STAGE variable in environment for next steps run: echo "STAGE=pr-${{ github.event.number }}-${{ env.GITHUB_HEAD_REF_SLUG }}" >> $GITHUB_ENV - name: checkout the files uses: actions/checkout@v2 # there is a bug with the actions/cache used in bahmutov/npm-install@v1 on "closed" event # more infos here : https://github.com/actions/cache/issues/478 - name: install node dependencies run: yarn --frozen-lockfile - name: configure AWS credentials uses: aws-actions/configure-aws-credentials@v1 with: aws-access-key-id: ${{ secrets.AWS_ACCESS_KEY_ID }} aws-secret-access-key: ${{ secrets.AWS_SECRET_ACCESS_KEY }} aws-region: eu-west-3 - name: destroy the stack on AWS run: yarn destroy - name: delete the github deployments and the corresponding environment uses: strumwolf/[email protected] with: token: ${{ secrets.GITHUB_TOKEN }} environment: ${{ env.STAGE }}Workflow in pictures
deploy added on the Pull Request, imminent take-off
Oops, something went wrong, let's fix this
New push, here we go again, the previous deployment is marked as Destroyed
YAY it worked!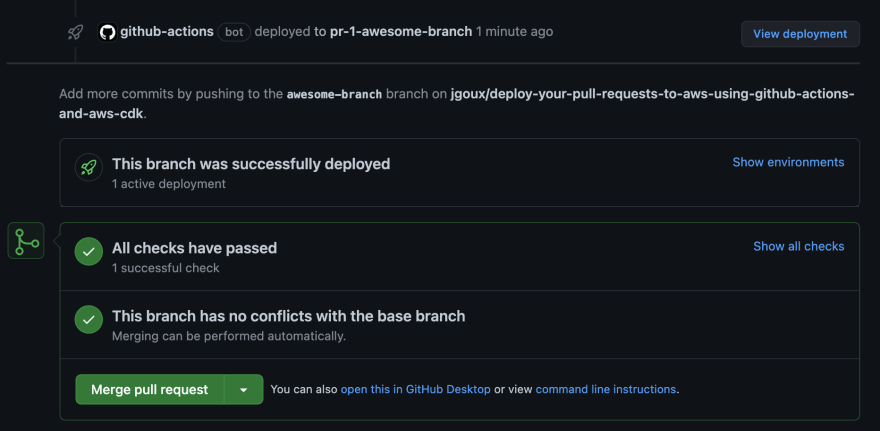
Clicking on the View deployment link led me here, interesting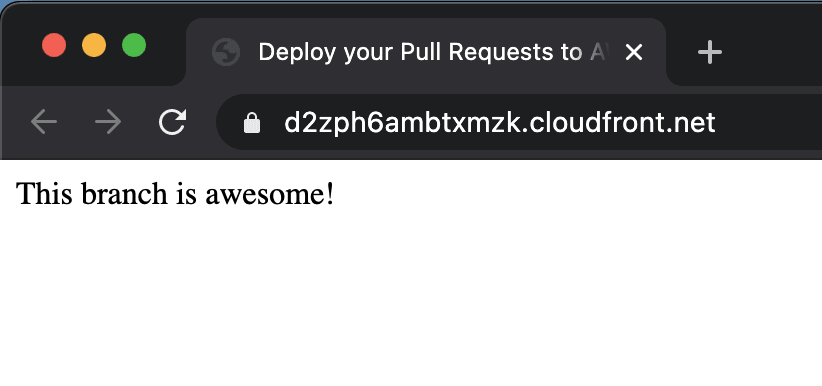
You can notice the new Environments block in the bottom right corner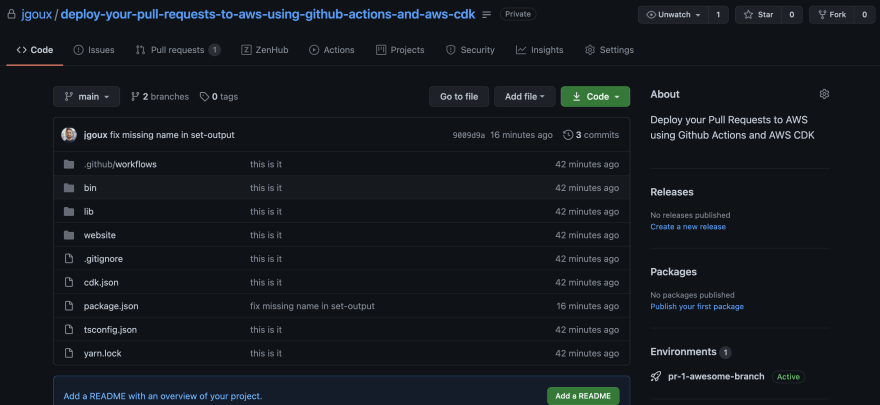
Conclusion
You now have all the building blocks to make your own workflow, how cool is that?! The cloud is the limit now!
Here are some ideas (and maybe future posts) :
- Using your own custom domain to have pretty preview urls like
https://pr-1-my-awesome-branch.jgoux.devusing AWS Route53. - Going full stack and serverless, adding lambdas and a RDS database to the stack with the same previews and isolation guarantees!
- Generating infrastructure dynamically based on your application's code
- Strategies to speed up the deployment with CDK and optimizing costs by splitting your stack into an always up and shared
StableStackand temporariesDynamicStack-${STAGE}.
I want to use this post to thanks all the people that took the time to answer my numerous questions across Twitter, Github issues, Discord, Zoom, Slack and more recently the AWS CDK Slack community.
I can't list everyone, I ask too many questions , but I want to give a special thanks to Thorsten Hoeger and Kenneth Winner for proofreading this post. I'm very grateful to be in communities of such talented, opened and nice people.
This is my first post ever, over the years I greatly benefited from OSS and I want to give back to the community.
Don't hesitate to ping me on Twitter if you want to chat about anything, my DMs are always open!
Original Link: https://dev.to/jgoux/preview-environments-per-pull-request-using-aws-cdk-and-github-actions-bfi
Dev To
More About this Source Visit Dev To