
An Interest In:
Web News this Week
- April 18, 2024
- April 17, 2024
- April 16, 2024
- April 15, 2024
- April 14, 2024
- April 13, 2024
- April 12, 2024
Some of Our Sources
- Web Designer Wall
- Team Treehouse
- Spoon Graphics
- Smashing Magazine
- You The Designer
- Web Design Ledger
- Spyre Studios
- Android Headlines
- Hashedout
- TechPowerUp
Help Webnuz
Referal links:
10 minutes to deploy a Docker compose stack on AWS ECS illustrated with Hasura and Postgres
Introduction
The ecs-cli command is a little gem
ecs-cli allows you to deploy a Docker stack very easily on AWS ECS using the same syntax as the docker-compose file format version 1, 2 and 3
The selling point of ecs-cli is to reuse your docker-compose.yml files to deploy your containers to AWS
ecs-cli translates a docker-compose-yml to ECS Task Desfinitions and Services
In this article we will explore how to:
- Use the tool
ecs-clito create an AWS ECS cluster to orchestrate a set of Docker Containers - Add observability to the cluster thanks to AWS Cloud LogGroups
- Use ecs-cli to deploy a set of Docker containers on the Cluster
- Leverage AWS EFS to add persistence to the Cluster and add support of stateful workloads
Amazon Elastic File System is a cloud storage service provided by Amazon Web Services designed to provide scalable, elastic, concurrent with some restrictions, and encrypted file storage for use with both AWS cloud services and on-premises resources
As an example we will deploy a Docker stack composed of:
- HASURA : an open source-engine that gives you an instant GraphQL & Rest API
- PostgresSQL 13.2 for the persistence layer
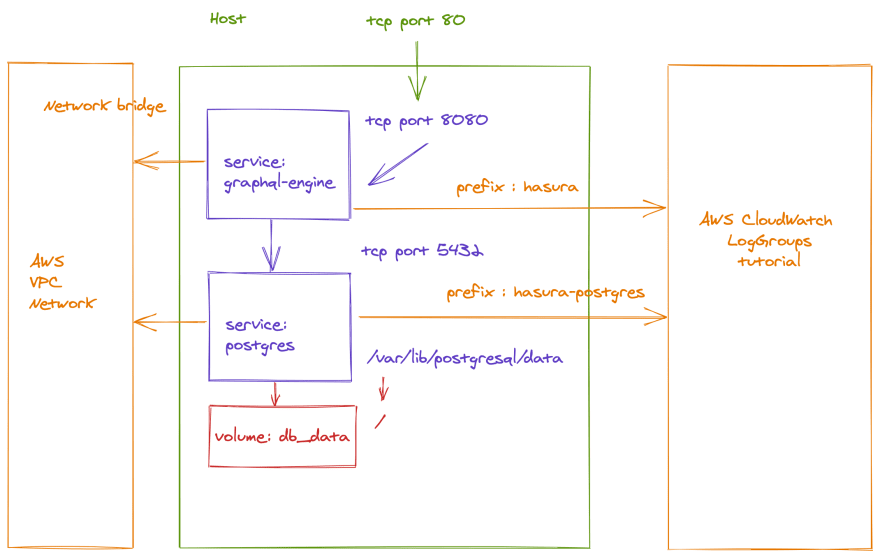
Target architecture
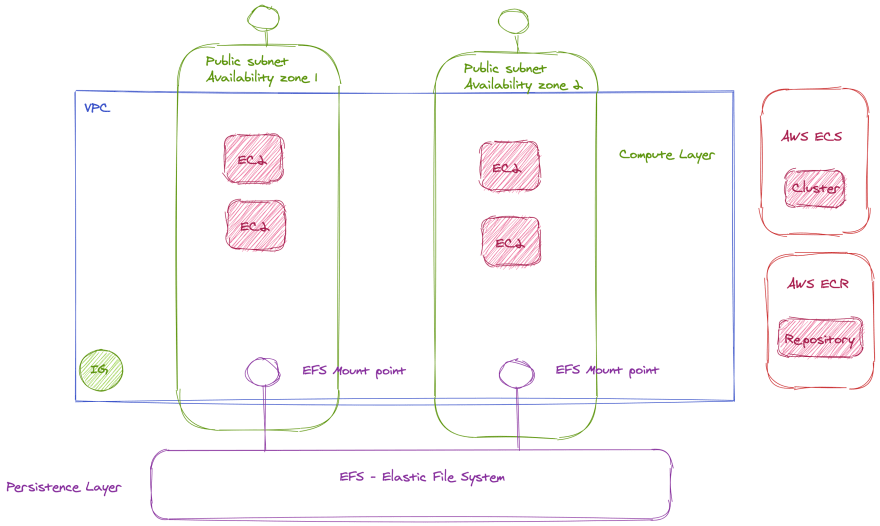
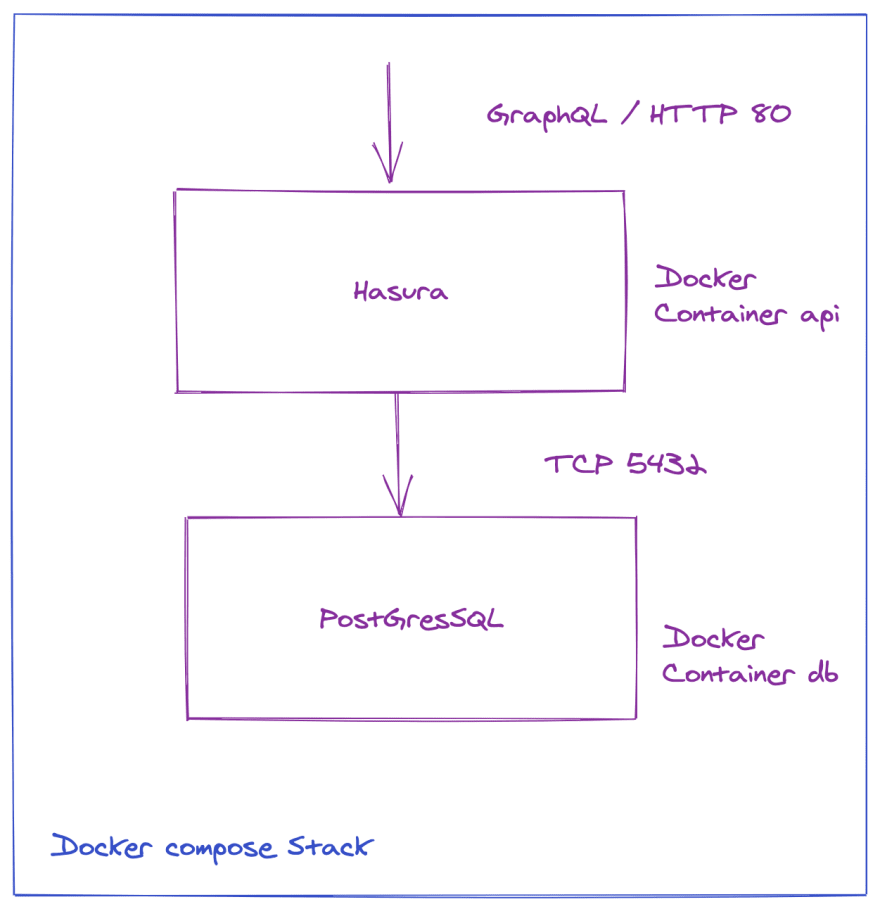
Docker stack
This Docker Stack will be deployed on the AWS ECS Cluster
7 Steps
- Install
ecs-cli - Configure
ecs-cli - Create the cluster Stack
- Create a
Docker Compose Stack - Deploy the docker compose stack on
AWS ECS - Create an elastic filesystem
AWS EFS - Add persistence to Postgres SQL thanks to
AWS EFS
Prerequisites (for macOS)
Step1 : Install ecs-cli
The first step is to install the ecs-cli command on your system:
The complete installation procedure for macOS, Linux and Windows is available with this link.
For macOS the installation procedure is as follows:
Download ecs-cli binary
sudo curl -Lo /usr/local/bin/ecs-cli https://amazon-ecs-cli.s3.amazonaws.com/ecs-cli-darwin-amd64-latest install gnupg (a free implementation of OpenPGP standard)
brew install gnupg get the public key of ecs-cli (I have copied the key in a GIST for simplicity)
https://gist.githubusercontent.com/raphaelmansuy/5aab3c9e6c03e532e9dcf6c97c78b4ff/raw/f39b4df58833f09eb381700a6a854b1adfea482e/ecs-cli-signature-key.key import the signature
gpg --import ./signature.key make ecs-cli executable
sudo chmod +x /usr/local/bin/ecs-cli verify the setup
ecs-cli --version Configure ecs-cli
Prerequisite
- AWS CLI v2 must be installed. If it's not the case you can follow these instructions on this link.
- You need to have an AWS_ACCESS_KEY_ID / AWS_SECRET_ACCESS_KEY with administrative privileges
To create your AWS_ACCESS_KEY_ID you can read this documentation
Your environment variables must be configured with a correct pair of AWS_ACCESS_KEY_ID / AWS_SECRET_ACCESS_KEY
export AWS_ACCESS_KEY_ID="Your Access Key"export AWS_SECRET_ACCESS_KEY="Your Secret Access Key"export AWS_DEFAULT_REGION=us-west-2The following script configure an ECS-profile called tutorial for a cluster named tutorial-cluster on the us-west-2 region with a default launch type based on EC2 instances:
configure.sh
#!/bin/bashset -ePROFILE_NAME=tutorialCLUSTER_NAME=tutorial-clusterREGION=us-west-2LAUNCH_TYPE=EC2ecs-cli configure profile --profile-name "$PROFILE_NAME" --access-key "$AWS_ACCESS_KEY_ID" --secret-key "$AWS_SECRET_ACCESS_KEY"ecs-cli configure --cluster "$CLUSTER_NAME" --default-launch-type "$LAUNCH_TYPE" --region "$REGION" --config-name "$PROFILE_NAME"Step2 : Creation of an ECS-Cluster
We will create an ECS-Cluster based on ec2 instance.
ECS allows 2 launch types EC2 and FARGATE
- EC2 (Deploy and manage your own cluster of EC2 instances for running the containers)
- AWS Fargate (Run containers directly, without any EC2 instances)
If we want to connect to the ec2 instances with ssh we need to have a key pair
Creation of a key pair called tutorial-cluster :
aws ec2 create-key-pair --key-name tutorial-cluster \ --query 'KeyMaterial' --output text > ~/.ssh/tutorial-cluster.pem Creation of the Cluster tutorial-cluster with 2 ec2-instances t3.medium
create-cluster.sh
#!/bin/bashKEY_PAIR=tutorial-cluster ecs-cli up \ --keypair $KEY_PAIR \ --capability-iam \ --size 2 \ --instance-type t3.medium \ --tags project=tutorial-cluster,owner=raphael \ --cluster-config tutorial \ --ecs-profile tutorialWe have added 2 tags project=tutorial and owner=raphael to easily identify the resources created by the command
Result
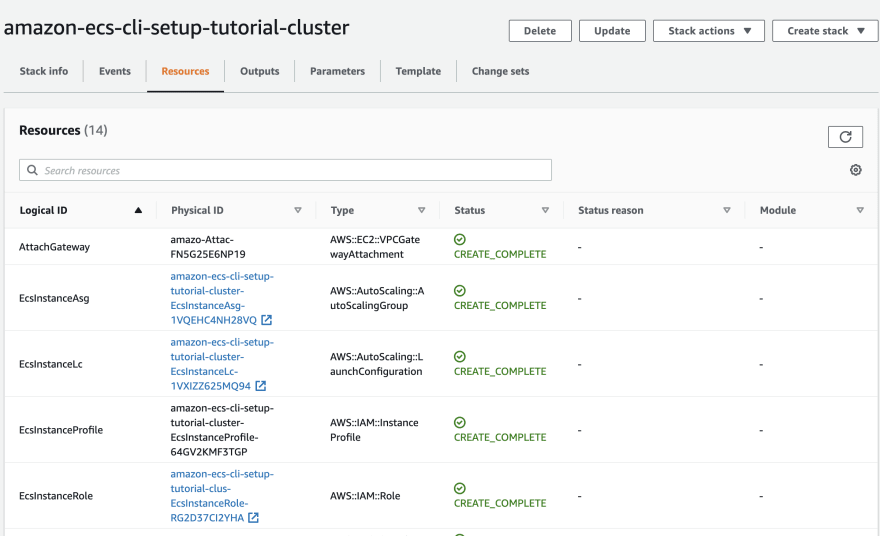
INFO[0006] Using recommended Amazon Linux 2 AMI with ECS Agent 1.50.2 and Docker version 19.03.13-ceINFO[0007] Created cluster cluster=tutorial-cluster region=us-west-2INFO[0010] Waiting for your cluster resources to be created...INFO[0010] Cloudformation stack status stackStatus=CREATE_IN_PROGRESSINFO[0073] Cloudformation stack status stackStatus=CREATE_IN_PROGRESSINFO[0136] Cloudformation stack status stackStatus=CREATE_IN_PROGRESSVPC created: vpc-XXXXXSecurity Group created: sg-XXXXXSubnet created: subnet-AAAASubnet created: subnet-BBBBCluster creation succeeded.This command create:
- A new public VPC
- An internet gateway
- The routing tables
- 2 public subnets in 2 availability zones
- 1 security group
- 1 autoscaling group
- 2 ec2 instances
- 1 ecs cluster
We can now deploy a sample Docker application on the newly created ECS Cluster:
Create a file called docker-compose.yml
version: "3"services: webdemo: image: "amazon/amazon-ecs-sample" ports: - "80:80"This stack can best tested locally
docker-compose upResults:
latest: Pulling from amazon/amazon-ecs-sample
Digest: sha256:36c7b282abd0186e01419f2e58743e1bf635808231049bbc9d77e59e3a8e4914
Status: Downloaded newer image for amazon/amazon-ecs-sample:latest
We can now deploy this stack on AWS ECS:
ecs-cli compose --project-name tutorial --file docker-compose.yml \--debug service up \--deployment-max-percent 100 --deployment-min-healthy-percent 0 \--region us-west-2 --ecs-profile tutorial --cluster-config tutorial To verify that the service is running we can use this command:
ecs-cli psResults:
Name State Ports TaskDefinition Healthtutorial-cluster/2e5af2d48dbc41c1a98/webdemo RUNNING 34.217.107.14:80->80/tcp tutorial:2 UNKNOWNKThe stack is deployed and accessible with the IP address 34.217.107.14
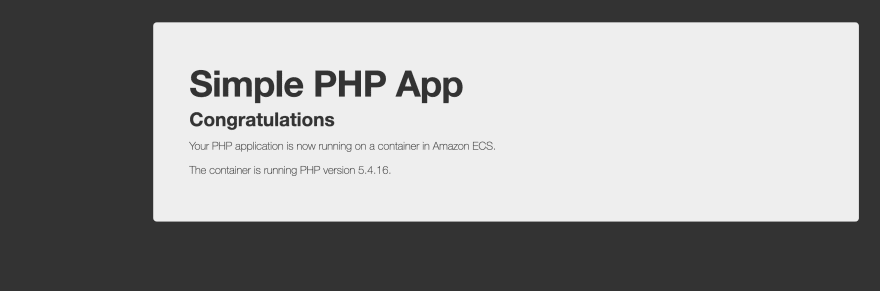
We can now browse the deployed Website:
open http://34.217.107.14 Open the port 22 to connect to the EC2 instances of the cluster
# Get my IPmyip="$(dig +short myip.opendns.com @resolver1.opendns.com)"# Get the security groupsg="$(aws ec2 describe-security-groups --filters Name=tag:project,Values=tutorial-cluster | jq '.SecurityGroups[].GroupId')"# Add port 22 to the Security Group of the VPCaws ec2 authorize-security-group-ingress \ --group-id $sg \ --protocol tcp \ --port 22 \ --cidr "$myip/32" | jq '.' Connection to the instance
chmod 400 ~/.ssh/tutorial-cluster.pemssh -i ~/.ssh/tutorial-cluster.pem [email protected] Once we are connected to the remoter server: we can observe the running containers:
docker psCONTAINER ID IMAGE COMMAND CREATED STATUS PORTS NAMES7deaa49ed72c amazon/amazon-ecs-sample "/usr/sbin/apache2 -" 2 minutes ago Up 2 minutes 0.0.0.0:80->80/tcp ecs-tutorial-3-webdemo-9cb1a49483a9cfb7b101cd1d2a9807d4 amazon/amazon-ecs-agent:latest "/agent" 55 minutes ago Up 55 minutes (healthy) ecs-agentStep3 : Adding observability
If we want to collect the logs for my running instances, we can create AWS CloudWatch Log Groups.
For that we can modify the docker-compose.yml file:
version: "2"services: webdemo: image: "amazon/amazon-ecs-sample" ports: - "80:80" logging: driver: awslogs options: awslogs-group: tutorial awslogs-region: us-west-2 awslogs-stream-prefix: demo And then redeploy the service with a create-log-groups option
ecs-cli compose --project-name tutorial --file docker-compose.yml \--debug service up \--deployment-max-percent 100 --deployment-min-healthy-percent 0 \--region us-west-2 --ecs-profile tutorial --cluster-config tutorial \--create-log-groups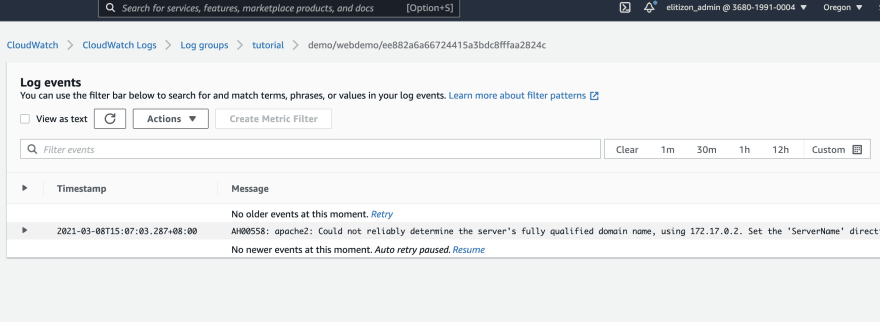
We can now delete the service
ecs-cli compose --project-name tutorial --file docker-compose.yml \--debug service down \--region us-west-2 --ecs-profile tutorial --cluster-config tutorialDeploying a more complex stack
We are now ready to deploy HASURA and Postgres

docker-compose.yml
version: '3'services: postgres: image: postgres:12 restart: always volumes: - db_data:/var/lib/postgresql/data environment: POSTGRES_PASSWORD: postgrespassword graphql-engine: image: hasura/graphql-engine:v1.3.3 ports: - "80:8080" depends_on: - "postgres" restart: always environment: HASURA_GRAPHQL_DATABASE_URL: postgres://postgres:postgrespassword@postgres:5432/postgres ## enable the console served by server HASURA_GRAPHQL_ENABLE_CONSOLE: "true" # set to "false" to disable console ## enable debugging mode. It is recommended to disable this in production HASURA_GRAPHQL_DEV_MODE: "true" HASURA_GRAPHQL_ENABLED_LOG_TYPES: startup, http-log, webhook-log, websocket-log, query-log ## uncomment next line to set an admin secret # HASURA_GRAPHQL_ADMIN_SECRET: myadminsecretkeyvolumes: db_data: We can test the stack locally:
docker-compose up &Then
open localhost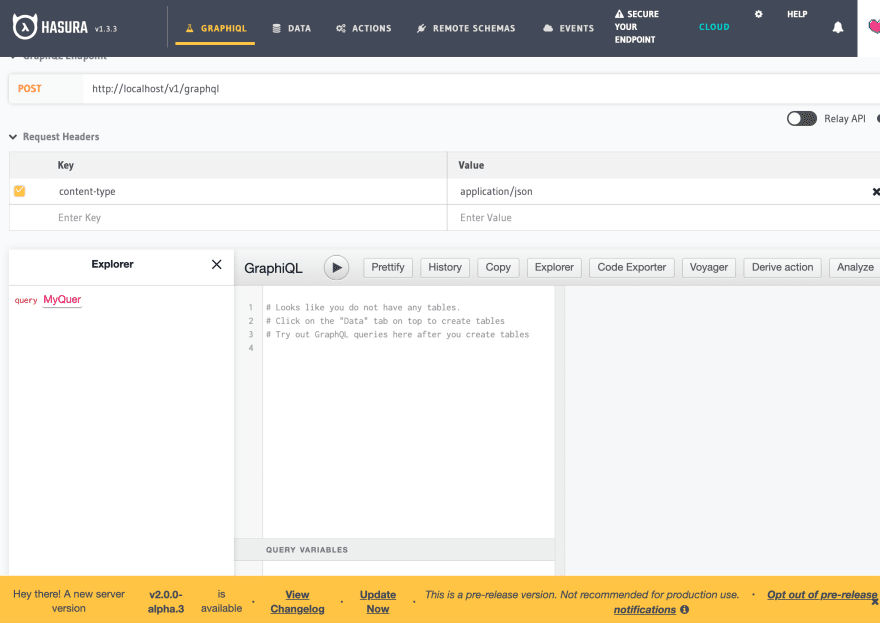
We can now deploy this stack on AWS ECS
But before that we need to update the file docker-compose.yml
We must add:
- A
loggingdirective - A
linksdirective
version: '3'services: postgres: image: postgres:12 restart: always volumes: - db_data:/var/lib/postgresql/data environment: POSTGRES_PASSWORD: postgrespassword logging: driver: awslogs options: awslogs-group: tutorial awslogs-region: us-west-2 awslogs-stream-prefix: hasura-postgres graphql-engine: image: hasura/graphql-engine:v1.3.3 ports: - "80:8080" depends_on: - "postgres" links: - postgres restart: always environment: HASURA_GRAPHQL_DATABASE_URL: postgres://postgres:postgrespassword@postgres:5432/postgres ## enable the console served by server HASURA_GRAPHQL_ENABLE_CONSOLE: "true" # set to "false" to disable console ## enable debugging mode. It is recommended to disable this in production HASURA_GRAPHQL_DEV_MODE: "true" HASURA_GRAPHQL_ENABLED_LOG_TYPES: startup, http-log, webhook-log, websocket-log, query-log ## uncomment next line to set an admin secret # HASURA_GRAPHQL_ADMIN_SECRET: myadminsecretkey logging: driver: awslogs options: awslogs-group: tutorial awslogs-region: us-west-2 awslogs-stream-prefix: hasuravolumes: db_data:We need to create a file called ecs-params.yml to specify extra parameters:
version: 1task_definition: ecs_network_mode: bridgeThis file will be used by the ecs-cli command.
we can then launch the stack:
ecs-cli compose --project-name tutorial --file docker-compose.yml \ --debug service up \--deployment-max-percent 100 --deployment-min-healthy-percent 0 \ --region us-west-2 --ecs-profile tutorial \--cluster-config tutorial --create-log-groupsResults:
DEBU[0000] Parsing the compose yaml...DEBU[0000] Docker Compose version found: 3DEBU[0000] Parsing v3 project...WARN[0000] Skipping unsupported YAML option for service...  option name=restart service name=postgresWARN[0000] Skipping unsupported YAML option for service...  option name=depends_on service name=graphql-engineWARN[0000] Skipping unsupported YAML option for service...  option name=restart service name=graphql-engineDEBU[0000] Parsing the ecs-params yaml...DEBU[0000] Parsing the ecs-registry-creds yaml...DEBU[0000] Transforming yaml to task definition...DEBU[0004] Finding task definition in cache or creating if needed  TaskDefinition="{
  ContainerDefinitions: [{
      Command: [],
      Cpu: 0,
      DnsSearchDomains: [],
      DnsServers: [],
      DockerSecurityOptions: [],
      EntryPoint: [],
      Environment: [{
          Name: \"POSTGRES_PASSWORD\",
          Value: \"postgrespassword\"
        }],
      Essential: true,
      ExtraHosts: [],
      Image: \"postgres:12\",
      Links: [],
      LinuxParameters: {
        Capabilities: {

        },
        Devices: []
      },
      Memory: 512,
      MountPoints: [{
          ContainerPath: \"/var/lib/postgresql/data\",
          ReadOnly: false,
          SourceVolume: \"db_data\"
        }],
      Name: \"postgres\",
      Privileged: false,
      PseudoTerminal: false,
      ReadonlyRootFilesystem: false
    },{
      Command: [],
      Cpu: 0,
      DnsSearchDomains: [],
      DnsServers: [],
      DockerSecurityOptions: [],
      EntryPoint: [],
      Environment: [
        {
          Name: \"HASURA_GRAPHQL_ENABLED_LOG_TYPES\",
          Value: \"startup, http-log, webhook-log, websocket-log, query-log\"
        },
        {
          Name: \"HASURA_GRAPHQL_DATABASE_URL\",
          Value: \"postgres://postgres:postgrespassword@postgres:5432/postgres\"
        },
        {
          Name: \"HASURA_GRAPHQL_ENABLE_CONSOLE\",
          Value: \"true\"
        },
        {
          Name: \"HASURA_GRAPHQL_DEV_MODE\",
          Value: \"true\"
        }
      ],
      Essential: true,
      ExtraHosts: [],
      Image: \"hasura/graphql-engine:v1.3.3\",
      Links: [],
      LinuxParameters: {
        Capabilities: {

        },
        Devices: []
      },
      Memory: 512,
      Name: \"graphql-engine\",
      PortMappings: [{
          ContainerPort: 8080,
          HostPort: 80,
          Protocol: \"tcp\"
        }],
      Privileged: false,
      PseudoTerminal: false,
      ReadonlyRootFilesystem: false
    }],
  Cpu: \"\",
  ExecutionRoleArn: \"\",
  Family: \"tutorial\",
  Memory: \"\",
  NetworkMode: \"\",
  RequiresCompatibilities: [\"EC2\"],
  TaskRoleArn: \"\",
  Volumes: [{
      Name: \"db_data\"
    }]
}"DEBU[0005] cache miss                                    taskDef="{

}" taskDefHash=4e57f367846e8f3546dd07eadc605490INFO[0005] Using ECS task definition                     TaskDefinition="tutorial:4"WARN[0005] No log groups to create; no containers use 'awslogs'INFO[0005] Updated the ECS service with a new task definition. Old containers will be stopped automatically, and replaced with new ones  deployment-max-percent=100 deployment-min-healthy-percent=0 desiredCount=1 force-deployment=false service=tutorialINFO[0006] Service status                                desiredCount=1 runningCount=1 serviceName=tutorialINFO[0027] Service status                                desiredCount=1 runningCount=0 serviceName=tutorialINFO[0027] (service tutorial) has stopped 1 running tasks: (task ee882a6a66724415a3bdc8fffaa2824c).  timestamp="2021-03-08 07:30:33 +0000 UTC"INFO[0037] (service tutorial) has started 1 tasks: (task a1068efe89614812a3243521c0d30847).  timestamp="2021-03-08 07:30:43 +0000 UTC"INFO[0074] (service tutorial) has started 1 tasks: (task 1949af75ac5a4e749dfedcb89321fd67).  timestamp="2021-03-08 07:31:23 +0000 UTC"INFO[0080] Service status                                desiredCount=1 runningCount=1 serviceName=tutorialINFO[0080] ECS Service has reached a stable state        desiredCount=1 runningCount=1 serviceName=tutorial
And then we can verify that our container are running on AWS ECS Cluster
ecs-cli psResults
Name State Ports TaskDefinition Healthtutorial-cluster/00d7ff5191dd4d11a9b52ea64fb9ee26/graphql-engine RUNNING 34.217.107.14:80->8080/tcp tutorial:10 UNKNOWNtutorial-cluster/00d7ff5191dd4d11a9b52ea64fb9ee26/postgres RUNNING tutorial:10 UNKNOWN And then:
open http://34.217.107.14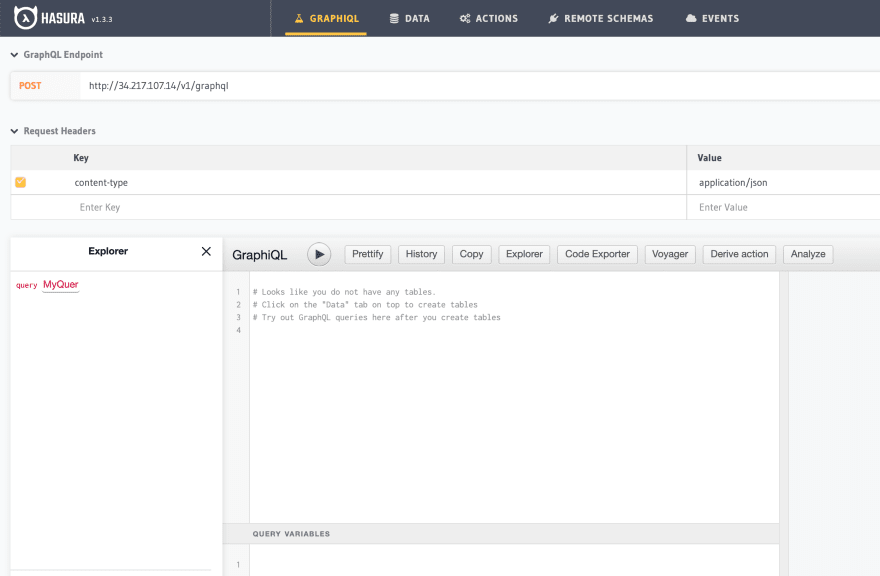
We can now stop the stack
ecs-cli compose downTo add persistent support to my solution we can leverage AWS EFS : Elastic File System
Step 4: Add a persistent layer to my cluster

Create an EFS file system named hasura-db-file-system
aws efs create-file-system \ --performance-mode generalPurpose \ --throughput-mode bursting \ --encrypted \ --tags Key=Name,Value=hasura-db-filesystemResults:
{ "OwnerId": "XXXXX", "CreationToken": "10f91a50-0649-442d-b4ad-2ce67f1546bf", "FileSystemId": "fs-5574bd52", "FileSystemArn": "arn:aws:elasticfilesystem:us-west-2:XXXXX:file-system/fs-5574bd52", "CreationTime": "2021-03-08T16:40:19+08:00", "LifeCycleState": "creating", "Name": "hasura-db-filesystem", "NumberOfMountTargets": 0, "SizeInBytes": { "Value": 0, "ValueInIA": 0, "ValueInStandard": 0 }, "PerformanceMode": "generalPurpose", "Encrypted": true, "KmsKeyId": "arn:aws:kms:us-west-2:XXXXX:key/97542264-cc64-42f9-954e-4af2b17f72aa", "ThroughputMode": "bursting", "Tags": [ { "Key": "Name", "Value": "hasura-db-filesystem" } ]} Add mount points to each subnet of the VPC:
aws ec2 describe-subnets --filters Name=tag:project,Values=tutorial-cluster \ | jq ".Subnets[].SubnetId" | \xargs -ISUBNET aws efs create-mount-target \ --file-system-id fs-5574bd52 --subnet-id SUBNETThe next step is to allow NFS connection from the VPC
We need first to get the security group associated with each mount target
efs_sg=$(aws efs describe-mount-targets --file-system-id fs-5574bd52 \ | jq ".MountTargets[0].MountTargetId" \ | xargs -IMOUNTG aws efs describe-mount-target-security-groups \ --mount-target-id MOUNTG | jq ".SecurityGroups[0]" | xargs echo ) Then we need to open the TCP port 2049 for the security group of the VPC
vpc_sg="$(aws ec2 describe-security-groups \ --filters Name=tag:project,Values=tutorial-cluster \ | jq '.SecurityGroups[].GroupId' | xargs echo)" Then we need to authorize the TCP/2049 port from the default security group of the VPC
aws ec2 authorize-security-group-ingress \--group-id $efs_sg \--protocol tcp \--port 2049 \--source-group $vpc_sg \--region us-west-2 We can now modify the ecs-params.yml to add persistence support:
- We use the ID of the EFS volume that has been created on the latest step :
fs-5574bd52
version: 1task_definition: ecs_network_mode: bridge efs_volumes: - name: db_data filesystem_id: fs-5574bd52 transit_encryption: ENABLED Then we can redeploy our stack:
ecs-cli compose --project-name tutorial --file docker-compose.yml \ --debug service up \--deployment-max-percent 100 --deployment-min-healthy-percent 0 \ --region us-west-2 --ecs-profile tutorial \--cluster-config tutorial --create-log-groupsEt voil : the stack is operational
Summary
We have deployed an ECS-CLI Cluster and launched a docker compose stack
The next step will be to expose and secure the stack using an AWS Application Load Balancer
The scripts associated with this article is available at
https://github.com/raphaelmansuy/using-ecs-cli-tutorial-01.git
Original Link: https://dev.to/raphaelmansuy/10-minutes-to-deploy-a-docker-compose-stack-on-aws-illustrated-with-hasura-and-postgres-3f6e
Dev To
More About this Source Visit Dev To