
An Interest In:
Web News this Week
- March 27, 2024
- March 26, 2024
- March 25, 2024
- March 24, 2024
- March 23, 2024
- March 22, 2024
- March 21, 2024
Some of Our Sources
- TutsPlus - Code
- Pearsonified
- Creative Curio
- Web Designer Depot
- Reencoded
- Line 25
- Specky Boy
- Android Headlines
- The Verge
- TechPowerUp
Help Webnuz
Referal links:
How to Do Calligraphy on Procreate

Curious about how to do calligraphy on Procreate? In this tutorial, we'll look at settings, techniques, and brushes that can help you create beautiful calligraphy styled writing and hand lettering in Procreate.
What You'll Need
You'll need Procreate for iPad for this tutorial. It is recommended that you also use an Apple Pencil for its pressure sensitivity (Generation 1 or 2, depending on your iPad model). However, if you're looking for extra content, check out these resources:
These can be perfect additions, once you've given the basics a try. Now, let's dig into some of the basics of how to do calligraphy in Procreate.
Follow along with us over on our Envato Tuts+ YouTube channel:
1. How to Adjust the Pressure Curve
Step 1
If you jump right into Procreate without adjusting any settings, you might not necessarily get the lines you're looking for. Yes, brushes make a big difference here, but so does the Pressure Curve.
The Pressure Curve determines how Procreate reacts to the pressure you apply to your pen. This is a huge deal for any type of drawing in Procreate, but it's especially important if you're looking to do hand lettering. Many calligraphy styles rely on varied line width in a single stroke. So, to achieve that effect, our line needs to adjust based on how hard we press on our pen.
Begin by tapping on your Actions, at the top of Procreate. It looks like a wrench icon.

Step 2
Next, tap on Prefs, while your Actions are expanded.

Step 3
Then, tap on Edit Pressure Curve.

Step 4
The resulting graph is our Pressure Curve. So what does this graph mean, and how do we edit it?
The bottom of the graph, your x-axis, is your pressure. The left would be the lightest touch, and the right would be the hardest.
The side of the graph, your y-axis, is your value. So, for example, the left would be hardly any "ink", while the right would be the maximum amount.
Let's illustrate what this means with an example. Here's a basic Pressure Curve. We have one point at the very bottom left and one point at the very top right. This means that if I press softly, there won't be much "ink", but if I press really hard, there will be a larger stroke.
In this example, I started the stroke soft-handed at the bottom, pressed hard, and then lightened the stroke at the end.

Step 5
Now, let's do the opposite. In this graph, there's one point at the very top left and one point at the very bottom right. This means that my pen will let out a lot of "ink" when I press very, very lightly... but the harder I press, the less linework I'll see.
It's unlikely someone would want to work this way, but give these values a try. Checking out the differences can help you understand how this graph works and how to customize it. The spot at the end of the line is where I lifted my pen, because it was a light press.

Step 6
However, our Pressure Curve doesn't have to be this simple. We can add extra points by tapping on the graph. This is where things can get advanced. Instead of simply pressing harder or softer, we can tweak how this transition from hard to soft or thick to thin plays out.
In this example, I've set my Pressure Curve to an S shape. We can create extra points on our Pressure Curve's graph by tapping on the line. If you want to delete a point, just tap on it again and select Delete.
This Pressure Curve tells Procreate that we want our line to start really thin, with a gradual transition in the beginning. As we move towards our maximum amount of ink, the transition gets much more dramatic and harsh. Here's an example of how these lines work in action.

Step 7
So what's the best Pressure Curve for calligraphy on Procreate? That might vary, based on how much pressure you like to use when you're drawing. It can also vary depending on the look that you're going for. For example, here's another possible Pressure Curve you could use.
In this case, my lines get thick pretty quickly and easily, but there's still taper here to my strokes. Notice how we don't necessarily have to apply maximum pressure to get the maximum "ink" in this scenario. This can be handy if you like to draw with a lighter hand.

2. How to Use Procreate Calligraphy Brushes
Step 1
There are a lot of awesome Procreate brushes out there, but it's helpful to understand your brush settings. This way, you can get the most out of your brushes and customize your results to meet your needs.
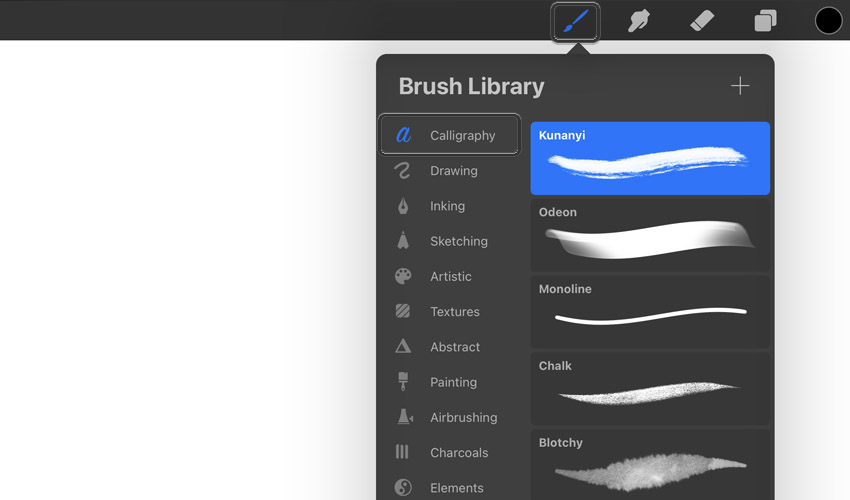
Start by opening up your Brush Library, which you can do by clicking on the brush icon. Procreate has a category called Calligraphy by default.
Step 2
Let's start by making a Duplicate brush of the Brush Pen within the Calligraphy Brush Library. Swipe left and select Duplicate.
Making a duplicate brush can be handy, because then you can have both the original, default brush and your customized one saved for use.

Step 3
Tap on your brush to go into the Brush Studio to customize it.
Note: Make sure your Pressure Curve is where you'd like it to be. Those settings will affect how your brush behaves.
We won't go into creating an entire calligraphy Procreate brush from scratch, but there are Procreate brush settings for calligraphy that are very helpful to know.
First, under your Stroke Path, check out StreamLine.
This is a really important setting, because it smooths out your lines for you. The higher the value, the smoother your lines will be.

Step 4
Use the Drawing Pad, on the right side of the Brush Studio, to test this setting out (Tip: You can clear the Drawing Pad by clicking the Drawing Pad button and selecting Clear Drawing Pad).
You don't have to redraw to see the effects of your settings either. Draw a line, then tweak the settings, and the line will change to reflect these new values.

Step 5
Next, let's take look at our Properties. In here, we can adjust our Brush Behavior. Take a look at your Maximum and Minimum Sizes. I like to draw a sample line with varied line weight and then adjust these values to see the line contrast it will give me.
I set my Maximum Size to 70% and my Minimum Size to 5%. Choose the values that you like best. The sample brush stroke on the Drawing Pad illustrates what these settings will look like when the pen has little pressure or a lot of pressure (the stroke was drawn with alternating hard and gentle presses).

Step 6
You may also want to adjust the Maximum and Minimum Opacity, especially if you want to mimic an ink or watercolor look and feel. Likewise, we can use a test line with varied pressure applied to test out how these values look.
I kept my Maximum Opacity at Max and my Minimum Opacity at 1%. Chose the values that you prefer. Notice how the line in the Drawing Pad has changed to reflect these values. The harder the press, the darker the line.
There are many more Procreate brush settings for calligraphy, but these are ones you'll likely want to test out.

Want to learn more about Procreate brush settings for calligraphy, creating, and customizing Procreate brushes? Creating the best calligraphy pen Procreate can offer you depends on these settings.
Check out this free tutorial for the full walkthrough:

3. How to Do Calligraphy in Procreate
Step 1
Now that we've tested out these different settings, let's give them a test run. In order to mimic a calligraphy aesthetic, we're going to need to be conscious of how and when we apply pressure to our brush.
For example, let's use the Brush Settings we've already explored. I'm going to pair this with the S curve Pressure Curve from Part 1, Step 6.
Here's a sample of what my lines look like in a simple, looped shape. When drawing upwards, I press lightly, and then I press down firmly when drawing strokes downwards. This can be a nice practice shape for testing out your strokes.

Step 2
We can then apply this concept to entire words. For example, using those settings, pressing lightly on upstrokes, firmly on downstrokes, here's a sample of the word "hello".
I wrote the word out in minimal strokes, focusing on this shift in pen pressure. Take your time; it's not a race.

Step 3
But how in the world do you get it to come out perfectly, especially without guidelines? Is it really just a matter of writing out the type, over and over again?
Yes and no. Procreate is a digital medium, so we have the luxury of undo and layers. One thing I like to do is practice a few times, and even draw out my composition with a pencil, in Procreate, beforehand. You can also create your own Procreate calligraphy practice sheets this way. Note, this is just one possible way you could do this, not the only way.
For example, on a new layer, I sketched out a calligraphy template Procreate design. Here's what it looks like. I used the HB pencil, in the Sketching Brush Library. I like to do this to plan out my design first, but if you prefer to freehand your work, that's great too!

Step 4
Then, I can lower the opacity on my sketch, in my Layers panel. This is going to act as my calligraphy template Procreate design.

Step 5
Create a New Layer by clicking on the Plus Sign in your Layers. This is where we'll draw our letters. See how this could also be used to create your own Procreate calligraphy practice sheets? This can be a handy way to use and create guidelines.

Step 6
Now, when I draw my lines, I have some guides to help me place them. This makes it a lot easier to focus on the pen pressure, rather than blind placement of the strokes.
Take a look at this sample lettering, created with these techniques and settings. What would you write out in your next Procreate calligraphy drawing?

Looking for Procreate Calligraphy Brushes?
Whether you're looking for the best calligraphy pen Procreate can offer or you're looking for a collection of stylistic calligraphy Procreate brushes, check out these offerings from Envato Elements. One low price gets you all these brushes, as well as access to many other brushes, fonts, illustrations, and much more.
1. Firstype - Procreate Lettering Brushes

Love hand lettering? Give this set of 20 brushes a try. This is an awesome download because it also comes with handy guides to help you practice and place your letters.
2. Twentyletter Calligraphy Brush Procreate Set

Here is another lovely set of Procreate calligraphy brushes, perfect for experimenting with hand lettering. It comes with 20 brushes, each with different textures and qualities.
3. Auld Inks Lettering and Calligraphy Brush Procreate Set

These ink brushes are an awesome choice for a number of projects, including hand lettering and calligraphy. Try them out in your Procreate drawings and embellishments too.
4. Procreate Lettering and Calligraphy Brushes

If you like texture to your brushes, then you'll like this Procreate brush set. Check out some of the sample strokes in the previews. The results are awesome.
5. Start Type - Procreate Brush Set

This hand lettering starter kit is a wonderful choice if you're new to Procreate calligraphy and hand lettering. Use the guides to help you place your letters consistently and confidently.
What Kind of Procreate Calligraphy Would You Draw?
Now that we've explored how to do calligraphy on Procreate, what would you create? Working digitally can be such a fun way to recreate a calligraphic style for posters, T-shirts, and so much more.
Love Procreate and want to learn more? We've got free Procreate tutorials you can check out right now, here on Envato Tuts+. Whether you're looking for Procreate basics or walkthroughs of full illustrations, there's plenty to see.
 ProcreateHow to Install and Use Procreate Brushes
 ProcreateHow to Install and Use Fonts in Procreate
 ProcreateHow to Use Procreate Layers
 ProcreateHow to Use Photoshop Brushes in Procreate
 ProcreateHow to Create a Stylish Neon Portrait in Procreate
Original Link: https://design.tutsplus.com/tutorials/how-to-do-calligraphy-on-procreate--cms-36570
TutsPlus - Design
More About this Source Visit TutsPlus - Design