
An Interest In:
Web News this Week
- March 20, 2024
- March 19, 2024
- March 18, 2024
- March 17, 2024
- March 16, 2024
- March 15, 2024
- March 14, 2024
Some of Our Sources
- Joshua Blankenship
- Pearsonified
- Spoon Graphics
- TutsPlus - Design
- You The Designer
- Web Designer Depot
- Noupe
- Crazy Leaf Design
- Web Resource Source
- Willems Lab
Help Webnuz
Referal links:
Step by Step Guide to install Istio Service Mesh in Kubernetes
In this tutorial you will learn how to install Istio Service Mesh in a Kubernetes cluster.
We will deploy an example demo microservices application in the cluster, so that we can see all the features and visualization for those microservices in Istio
If you want to learn what Istio and Service Mesh actually is and what it's used for, you can watch my previous video where I explain that in detail: Istio & Service Mesh - simply explained in 15 Mins
For the demonstration I will use a local Minikube cluster.
Steps we will go through
1. Start local Minikube cluster
So the first thing we need to do is start the Minikube cluster.
As Istio requires much resources, we need to start Minikube with higher CPU and memory than the default configuration:
minikube start --cpus 6 --memory 8192
2. Download Istio & configure Istioctl
As a next step, we need to actually install Istio release package and configure Istioctl - the command line interface for Istio to be added to our $PATH.
Istio Download Link
3. Install Istio in Minikube cluster
With Istioctl installed, we can now use it to install Istiod in our K8s cluster, which is the main Istio component.
The command to do that is as simple as to execute:
istioctl install
This should be the result of running the command: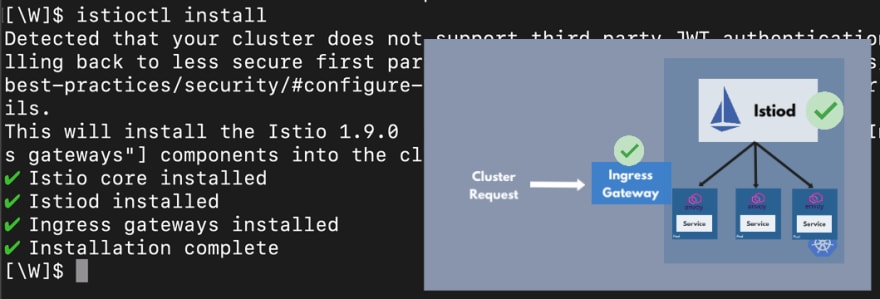
4. Deploy a Microservices Application
If you remember the Istio service mesh architecture, you know that we have this Istiod component, which is the control plane and we have the data plane, which are basically the proxies that are injected into the application Pods. So if you have a microservice application, you would have a Pod for each microservice.
Then Istio would inject envoy proxy in each of those micro
service Pods.
So that means in order to see Istio in action, we need to deploy an example microservices application, where the proxies will be injected.
So in this step we need to actually deploy the microservice application in the cluster.
For the demo I'm using this example microservices-demo app: https://github.com/GoogleCloudPlatform/microservices-demo
To deploy the application in the cluster:
kubectl apply -f kubernetes-manifests.yaml
5. Configure automatic Envoy Proxy Injection
No we explicitly need to tell Istio to inject the proxies into every Pod that starts in the cluster, since it doesn't inject proxies by default.
The configuration is actually very simple. We just need to label a namespace in which the pods are running with a label called "istio-injection=enabled" like this:
kubectl label namespace default istio-injection=enabled
To see the proxies being injected, you will need to restart the microservice Pods. You can do that by deleting the pods and then re-applying the Kubernetes manifests yaml file.
6. Install Istio Addons for Monitoring & Data Visualization
Now we have the Istio component running in a cluster that automatically injects the envoy proxy container into every Pod that we create in a default namespace.
That's great, but we don't have any data visualization for what's going on in our microservices.
Istio actually collects the metrics from all these proxy containers, so you have all these data about how your microservices are performing, what kind of requests they're getting, metrics data and so on. But we don't see any of this here.
This is where Istio Addons come in and in the Istio official documentation you actually can see the available integrations, which ship with the Istio release package:
In the Istio installation folder under samples/addons you can see the Kubernetes YAML files for those services.
In order to install them in the cluster, you just need to apply those Kubernetes YAML files using kubectl apply command. E.g. to install Kiali:
kubectl apply -f istio-1.9.0/samples/addons/kiali.yaml
With Kiali for example you get a great visualization, where you can see how your microservices are communicating with each other:
Configuration for data visualization to work:
There is one thing that you need to have in your manifest files for this graph to work. Whenever you're deploying your microservices in Istio enabled cluster, you actually have to have an "app" label on your Deployments and Services:
Without having this, the Pods will still deploy and you won't have any errors, but the visualization will not work!
Hope this tutorial was helpful for you!
Watch the full video here
Courses & Ebooks & Bootcamp
Become a DevOps Engineer - full educational program: https://bit.ly/3gEwf4V
Udemy courses - get biggest discount here: http://bit.ly/2OgvzIO
Kubernetes 101 - compact and easy-to-read ebook bundle: https://bit.ly/3mPIaiU
Like, share and follow me for more content:
Original Link: https://dev.to/techworld_with_nana/step-by-step-guide-to-install-istio-service-mesh-in-kubernetes-d6d
Dev To
More About this Source Visit Dev To