
An Interest In:
Web News this Week
- April 1, 2024
- March 31, 2024
- March 30, 2024
- March 29, 2024
- March 28, 2024
- March 27, 2024
- March 26, 2024
Some of Our Sources
- Technology Review
- Smashing Apps
- You The Designer
- Creative Curio
- Fuel Your Creativity
- Reencoded
- Line 25
- Spyre Studios
- Android Headlines
- Willems Lab
Help Webnuz
Referal links:
BUILD THE REST API USING PYTHON DJANGO - PART 3
Table Of Contents
* INTRO
* MODELS
* HOW DO WE TRANSLATE RELATIONSHIPS
* MODELS
* EMPLOYEE MODEL
* SECTOR
* PROJECT
* EXPOSE MODELS TO ADMIN PANEL
* CODE
* THANK YOU
INTRO
Hello, hackers! I hope you are all having a great weekend, it is a beautiful Sunday, and let's complete this week with another part of the "Building the REST API using Python Django" series.
If you haven't read the previous chapter, it's about setting up the environment and the project.

Please feel free to connect with me via Twitter, Instagram or LinkedIn
Let's start!

MODELS
We start with an image from the previous post, our ER diagram.
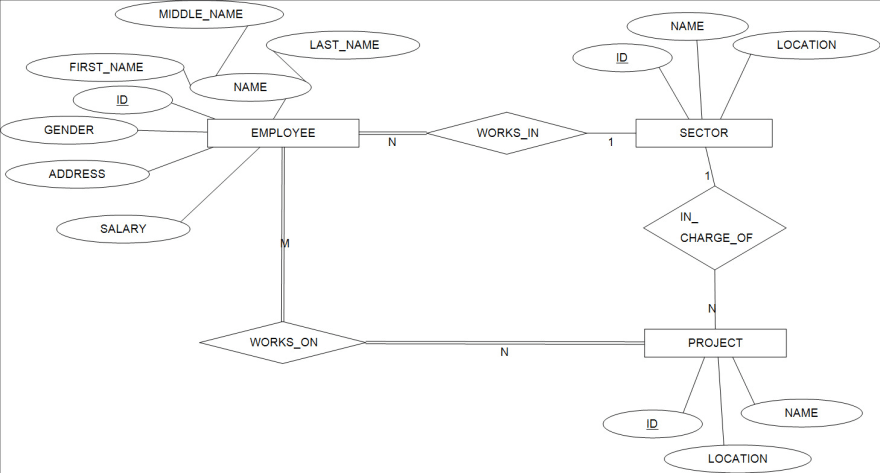
Each entity represented with the rectangular shape is a model, a class that has attributes that are represented by the oval shape.
Relationships are represented by the rhomboid shapes and are crucial for determining how the models are related.
HOW DO WE TRANSLATE RELATIONSHIPS
ONE-ON-ONE RELATIONSHIPS - For any binary type of relationships let's call it R(1:1) in the ER scheme, we identify the relations S and T that correspond to the entity types participating in the relationship R. We choose one of two relations, let's say relation S, and we include a foreign key that represents a corresponding primary key of the relation T.
ONE-ON-MANY RELATIONSHIPS - For any binary type of relationship let's call it R(1:N) in the ER scheme, we identify relation S that participates on the N side of the relationship. In the S we include the foreign key that corresponds to the primary key of the relation T.
MANY-TO-MANY RELATIONSHIPS - For any binary type of relationship let's call it R(M:N) in the ER scheme, we create a totally new relation P, so-called pivot table. The P includes the foreign keys corresponding to the primary keys of the relations that represent entity types participating in the relationship R.
We have two relationships that correspond to ONE-TO-MANY relationships and only one relationship corresponding to MANY-TO-MANY relationships.
This means that in the EMPLOYEE-SECTOR relationship the corresponding entity type on the N side of the relationship is Employee, which means, it will hold a foreign key to the Sector entity type.
In the SECTOR-PROJECT relationship, the corresponding entity type on the N side of the relationship is the Project entity type, which means, it will hold a foreign key to the Sector entity type.
In the EMPLOYEE-PROJECT relationship, we have a MANY-TO-MANY relationship. This means, that a new table, a pivot table, will be created with the foreign keys corresponding to the primary keys of the Employee and the Project entity type, respectively.
EMPLOYEE MODEL
In the models.py we add the following code.
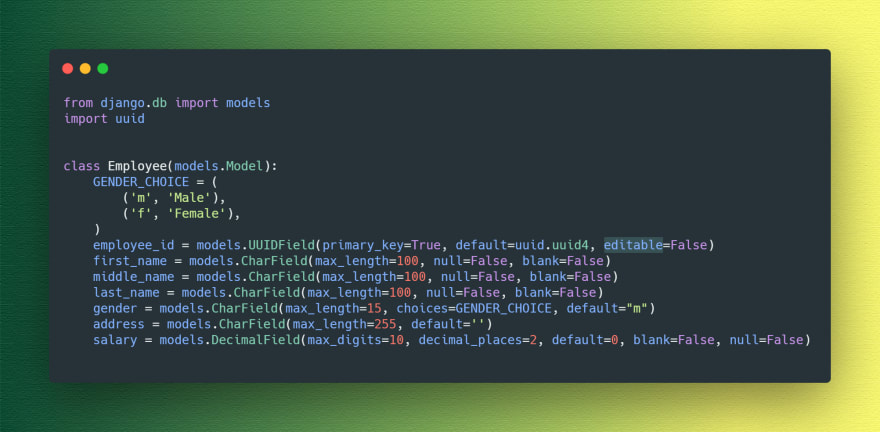
employee_id - is a unique identifier represented by the 128-bit number, it's a self-generated, non-editable field.
first_name, middle_name, last_name - are character fields with specified maximum length and are required
gender - is a character field that is representing the choices for the gender specified by GENDER_CHOICES
address - is a character field representing an address
salary - is a decimal field, with two decimal points and is required
Now let's make our first migrations:
python manage.py makemigrationspython manage.py migrateIn your migrations folder you should see something like this:
SECTOR MODEL

PROJECT MODEL

Execute the code for creating another migration and migrate the models.
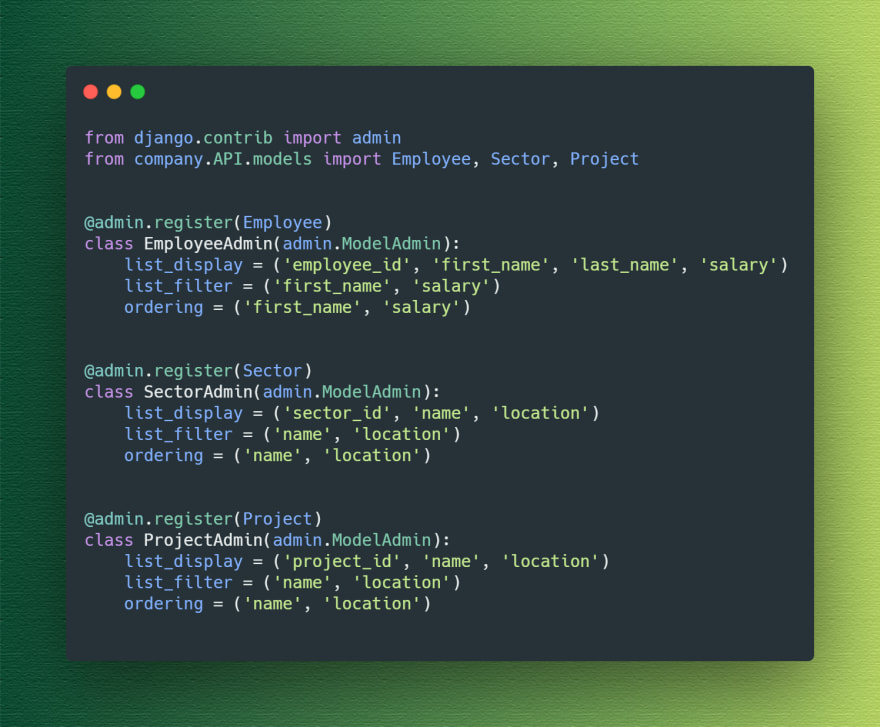
EXPOSE MODELS TO ADMIN PANEL
In our admin.py we add the following code
Let's run our server, open it up in the browser, log in, redirect to the admin page HTTP://127.0.0.1:8000/admin and check if our models are exposed.
In your browser you should see this:
Try adding an employee, project, and sector. You should be able to add the data you want.
CODE
 Dwarf95 / PythonDjangoTutorial
This is an official repository of the Codespresso Dev.to tutorial, regarding the "Building the REST API using Python Django" series.
PythonDjangoTutorial
This is an official repository of the Codespresso Dev.to tutorial, regarding the "Building the REST API using Python Django" series.
HOW TO RUN PROJECT
- Setup you PostgreSQL database (name: company)
- Edit settings.py and specify DATABASES name to company
- Pull the code from this repository
- Open it up in the PyCharm
- Open terminal and execute pip install -r requirements.txt
- Run python manage.py migrate
- Run python manage.py runserver
That's it for now, I hope you enjoyed it. In the next chapter, we will set up a new url.py file for an API and write our views. Stay tuned!
THANK YOU FOR READING!
References:
School notes...
School books...
Please leave a comment, tell me about you, about your work, comment your thoughts, connect with me!
SUPPORT ME AND KEEP ME FOCUSED!![]()
Have a nice time hacking!
Original Link: https://dev.to/codespresso/build-the-rest-api-using-python-django-part-3-16c
Dev To
More About this Source Visit Dev To