
An Interest In:
Web News this Week
- April 23, 2024
- April 22, 2024
- April 21, 2024
- April 20, 2024
- April 19, 2024
- April 18, 2024
- April 17, 2024
Some of Our Sources
- BoingBoing
- Just Creative
- Joshua Blankenship
- The Logo Smith
- Vandelay Design
- Creative Curio
- Web Design Ledger
- Specky Boy
- CSS Tricks
- Codrops
Help Webnuz
Referal links:
JavaScript app localization with i18next and Localazy
Localization is hardly the most favourite part of development for anyone. Regardless of whether it is a web, mobile, or desktop app, it is time-consuming and error-prone. This article shows a quick and seamless way of integrating the process into any JavaScript app.
We wont use any JavaScript framework only to stay focused on the sole purpose of this article. All code examples are supposed to demonstrate the general concept, so feel free to take any part of them and adapt it to your own apps specific needs.
Why Localazy and i18next?
Localazy is a developer-focused localization management platform that supports a wide variety of frameworks and an even more comprehensive range of formats through its CLI. Localazys best features are a pro-active review process, highly accurate translation memory supported by community-shared translations, and a simple, crystal clear UI which is not bloated with rarely used options.
As well show shortly, it works seamlessly with i18next library, which is one of the most popular choices when it comes to internationalization in JavaScript apps. Thanks to that, managing translations in professional teams or even in open-source projects where anybody can contribute is a piece of cake .
Create a new project
Lets start with an empty project. We will use npm to manage dependencies, so make sure you have Node.js installed. You can verify the installation by running npm -v.
mkdir localize-js-app && cd localize-js-app && npm initAfter running the above command and answering the initial questions, a package.json file should be created. Lets complete our empty project structure to look like the tree below. These should be all the files well need initially.
. index.html package.json src i18n.js index.js style.cssPaste the following content into your index.html file. This will be our app index, and were not going to touch it anymore, since were going to create all content dynamically with JavaScript.
<!DOCTYPE html><html><head> <title>Localize Javascript App with Localazy</title> <link rel="stylesheet" href="style.css"/> <meta charset="UTF-8" /></head><body> <div id="app"></div> <script src="src/index.js"> </script></body></html>To work with the project more conveniently, lets install parcel-bundler first.
If you dont know Parcel yet, its a web application bundler, with a great developer experience. It offers blazing-fast performance and requires zero configuration. So basically with one package installed, youll get a development server with hot-reloading and production builds. Excellent for quick projects and rapid prototyping.
npm install -D parcel-bundlerYou can then simplify running the Parcel bundler by adding a run and build task to the scripts section in your package.json. Once done, try to run the development server with npm start.
{ "scripts": { "start": "parcel index.html --open", "build": "parcel build index.html" }}Add source language
Create new src/locales folder next to our index.js file and put an en.json file inside it. This will be our base language for the app.
. index.html package.json src i18n.js index.js locales en.json style.cssLets add a couple of simple translatable strings in English.
{ "hello_localazy": "Hello Localazy!", "calendar": "Calendar", "field": "Field", "event": "Event", "title": "Title", "color": "Color"}As a next step, were going to install the i18next library. It will help us to quickly load all the locales we have, get our content translated by some convinient methods it provides and eventually to implement a custom language switcher. We will get to it shortly.
npm install i18nextTo test that the library works for us, we need to import the base strings and initialize the i18next object.
Add the following content to the i18n.js file.
// i18n.jsimport i18next from "i18next";import enJson from "./locales/en.json";export const i18n = i18next;export const initI18n = (callback) => { i18next.init({ lng: "en", debug: true, resources: { en: { translation: enJson, }, }, }, function (err, t) { // Call this function once i18next is initialized callback() });}And run the initializer in index.js. We pass the createPageContent function as a callback when the initialization finishes. To test that the translations are loaded correctly, we simply set some text to the #app content. Note that this is not an optimal approach and might get unmaintainable in bigger projects, but it should serve well for our demonstrating purposes.
// index.jsimport { i18n, initI18n } from "./i18n";const createPageContent = () => { document.querySelector("#app").innerHTML = i18n.t("hello_localazy");}initI18n(createPageContent);Going back to the browser while having the server running, you should see the Hello Localazy! greeting to appear. Awesome, we have the basic setup working, but lets get the phrases translated now.
Now, thats where the fun begins. In real-life projects, we dont want to handle translations in JSON manually, its usually very tedious and error-prone. Also, we need some sort of a quality control mechanism, to ensure that the translations meet the required standards. With Localazy you get all of this plus automated translations as a bonus.
Integrate with Localazy
Go to Localazy signup and create an account, then create a new app. Im leaving it public, this way other people can freely contribute with their translations. Source language is English, and community translations enabled. They will help us to translate some parts of the app automatically.

Now in your app, from the available integrations select JavaScript. The setup steps you see there is a general-purpose quick start, but Ill give you more precise instructions here, so read on. The only thing needed is to note down the readKey and writeKey, we will need them in a moment.

Now we need to configure our app to synchronize strings with Localazy. Go back to your apps terminal and install Localazy CLI.
npm install -D @localazy/cliThen create a new file called localazy.json in your project root, paste the following content. This is a configuration for the CLI weve just installed. Dont forget to fill in the keys, youve noted earlier. If you would like to better understand the used configuration, go to the Localazy CLI documentation, where youll find all the necessary details.
// localazy.json{ "writeKey": "<your-write-key>", "readKey": "<your-read-key>", "upload": { "type": "json", "files": "src/locales/en.json" }, "download": { "files": "src/locales/${lang}.json" }}In package.json add upload and download tasks to the "scripts" section, right after the parcel commands. You can also add a list task, to check what files are available on the platform, but we wont need it in this article specifically.
{ "scripts": { "start": "parcel index.html --open", "build": "parcel build index.html", "upload": "localazy upload", "download": "localazy download", "list": "localazy list" }}If set up correctly, you should be able to run npm run upload to upload strings. Note that you can always run the tasks with the -s option to simulate the action and verify that everything is configured correctly. No files will be uploaded or written then.
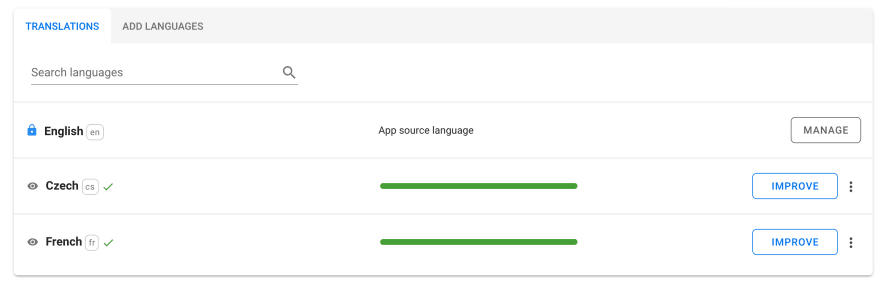
Now go back to your app at Localazy, you should see our base language (English) to appear. If successful, try to add some new language. Some of the languages might be already translated by ShareTM technology. Adding one of these languages will show you a review button, where you can approve the suggested phrases. If you add language without suggestions, you can start translating immediately with the help of classic machine translations.

After adding some languages and translating or approving a few phrases, go back to the app and run the download task as npm run download. You should see the new languages to appear immediately in the locales folder. Note that only approved phrases or phrases translated directly by you the owner will be downloaded.
As an example, Ive added French and Czech and translated them fully.
Next step to use the downloaded translations. Open the i18n.js file again and import the new files like the following. Im importing the JSON directly, and then Im adding it to the resources object. To try out your app in a different language, simply set lng property to "fr" for example. You should see the translated message to appear in your app.
// i18n.jsimport i18next from "i18next";import enJson from "./locales/en.json";import frJson from "./locales/fr.json";import csJson from "./locales/cs.json";export const i18n = i18next;export const initI18n = (callback) => { i18next.init({ lng: "en", debug: true, resources: { en: { translation: enJson, }, fr: { translation: frJson, }, cs: { translation: csJson, }, }, }, function (err, t) { // Call this function once i18next is initialized callback() });}Weve just implemented the basic i18next functionality, and were able to translate our content. However, we dont have an option to change the current language because its hardcoded. Lets implement the language switcher as a next step.
Implement language switcher
Localazy CLI has an additional option called metadata file, which lets you retrieve current languages metadata directly from Localazy. This enables you to quickly implement language switcher, by knowing exactly which languages will be available and what are their full localized names and other properties. The language metadata file is available in JavaScript, Typescript or JSON file format. We will use the JavaScript version since it also contains plurals resolver, which we will use later. Lets configure it in the "download" section in localazy.json file.
{ "download": { "files": "src/locales/${lang}.json", "metadataFileJs": "src/localazy-meta.js" }}Now run the npm run download command again, you should see a new localazy-meta.js file appear. Lets use the metadata file directly and add a few convenience methods to our i18n.js file for it.
import i18next from "i18next";import LocalazyMeta from './localazy-meta';import enJson from "./locales/en.json";import frJson from "./locales/fr.json";import csJson from "./locales/cs.json";export const i18n = i18next;export const getSupportedLangCodes = () => { return LocalazyMeta.languages.map(l => l.language)}export const getBaseLanguage = () => { return LocalazyMeta.baseLocale;}export const getCurrentLanguage = () => { return window.localStorage.i18nextLng || 'en';}export const getLanguages = ()=>{ return LocalazyMeta.languages;}export const initI18n = (callback) => { i18next.init({ lng: getBaseLanguage(), fallbackLng: getBaseLanguage(), debug: true, supportedLngs: getSupportedLangCodes(), resources: { en: { translation: enJson, }, fr: { translation: frJson, }, cs: { translation: csJson, }, }, }, function (err, t) { callback() });}We will now create a really basic language switcher directly in our index.js file.
import { i18n, initI18n, getLanguages, getCurrentLanguage } from "./i18n";const createLanguageSelector = () => { let template = '<select id="selector">'; getLanguages().forEach(l => { template += ` <option ${l.language === getCurrentLanguage() ? "selected" : ""} value="${l.language}"> ${l.localizedName} </option>` }) template += '</select>'; return template;}const getTranslatedContent = () => { return i18n.t("hello_localazy");}const updateTranslatedContent = () => { document.querySelector("#content").innerHTML = getTranslatedContent();}const initPageContent = () => { document.querySelector("#app").innerHTML = ` ${createLanguageSelector()} <div id="content"> ${getTranslatedContent()} </div>`; document.querySelector("#selector").addEventListener("change", (e) => { i18n.changeLanguage(e.target.value); updateTranslatedContent(); })}initI18n(initPageContent);I'm also adding a few lines of CSS to the styles.css file. Just enough to make the page okay to look at, but you can embrace your creativity here.
#selector { width: 150px;}#content { margin-top: 1rem;}Thats all needed for a language switcher. Your app should now look like the following.

Add plurals support
Different languages come with various pluralization rules, and its one of the most challenging tasks to get right when localizing apps. Languages like French or English have more straightforward rules, a word can have either singular or plural form. (also called as one and other ). This is not the case for Czech for example which has rules for one ,few and other quantities. All possible forms for all common languages are well defined in the CLDR Language Plural Rules.
However, i18next supports plural rules for some languages, but unfortunately, its not the entire set. Moreover, i18next calls one form as singular which, in my opinion, creates confusion as it deviates from the CLDR standard.
Luckily, Localazy covers the entire specification automatically in the language metadata file, where it returns correct plural rules for languages which are part of the specification.
Lets change some of our base phrases into plural forms in the en.json file. There are multiple ways of defining plurals in JSON. We will use an object notation, but you can read about all other options here: File Format - JSON.
{ "hello_localazy": "Hello Localazy!", "calendar": { "one": "Calendar", "other": "Calendars" }, "field": { "one": "Field", "other": "Fields" }, "title": { "one": "Title", "other": "Titles" }, "event": { "one": "Event", "other": "Events" }, "color": { "one": "Color", "other": "Colors" }}To enable that feature in the CLI, we need to also add plural_object in the "upload" section of our localazy.json file.
{ "upload": { "type": "json", "features": ["plural_object"], "files": "src/locales/en.json" }, "download": { "files": "src/locales/${lang}.json", "metadataFileJs": "src/localazy-meta.js" }}Now, try to run the npm run upload task again and go to the Localazy web interface. If you now try to translate
some of the new phrases, you should see that all plurals are displayed in a slightly different interface, which accommodates according to each language plural rules as per the CLDR specification.

Try to add some example translations for the phrases and run npm run download task again.
We will now add a plural helper into i18n.js file, which will resolve correct plural form for each language as defined in Localazy.
// i18n.js//...export const getKeyPlural = (key, count) => { const currentLanguage = LocalazyMeta.languages.find(l => l.language === i18next.language); const pluralType = currentLanguage.pluralType(+count); return `${key}.${pluralType}`;}//...Then we will update the getTranslatedContent function in index.js file to resolve our pluralized content. You can tweak the count variable to display different plural forms.
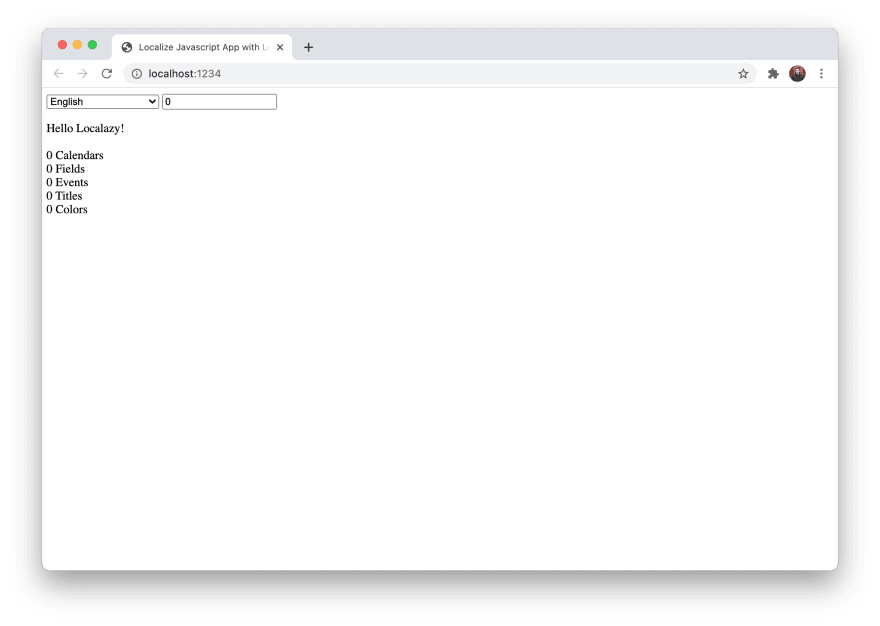
// index.jsimport { i18n, initI18n, getLanguages, getCurrentLanguage, getKeyPlural as p } from "./i18n";let count = 0;//...const getTranslatedContent = () => { return `${i18n.t("hello_localazy")}<br><br> ${count} ${i18n.t(p("calendar", count))}<br> ${count} ${i18n.t(p("field", count))}<br> ${count} ${i18n.t(p("event", count))}<br> ${count} ${i18n.t(p("title", count))}<br> ${count} ${i18n.t(p("color", count))}`;}//..To improve the example a little bit, we will add a number input and update the count variable according to the input value, so we can test the functionality based on our input. Heres the final index.js file.
import { i18n, initI18n, getLanguages, getCurrentLanguage, getKeyPlural as p } from "./i18n";let count = 0;const createLanguageSelector = () => { let template = '<select id="selector">'; getLanguages().forEach(l => { template += ` <option ${l.language === getCurrentLanguage() ? "selected" : ""} value="${l.language}"> ${l.localizedName} </option>` }) template += '</select>'; return template;}const getTranslatedContent = () => { return `${i18n.t("hello_localazy")}<br><br> ${count} ${i18n.t(p("calendar", count))}<br> ${count} ${i18n.t(p("field", count))}<br> ${count} ${i18n.t(p("event", count))}<br> ${count} ${i18n.t(p("title", count))}<br> ${count} ${i18n.t(p("color", count))}`;}const updateTranslatedContent = () => { document.querySelector("#content").innerHTML = getTranslatedContent();}const initPageContent = () => { document.querySelector("#app").innerHTML = ` ${createLanguageSelector()} <input id="count" type="number" placeholder="count" value="${count}" min="0"/> <div id="content"> ${getTranslatedContent()} </div>`; document.querySelector("#selector").addEventListener("change", (e) => { i18n.changeLanguage(e.target.value); updateTranslatedContent(); }) document.querySelector("#count").addEventListener("input", (e) => { if (e.target.value) { count = e.target.value; updateTranslatedContent(); } })}initI18n(initPageContent);And the final example will look like following. Changing the number should correctly update the plural form.
Closing words
I hope youve enjoyed this sneak peek on what Localazy can do for you and understood how easy it is to start localizing any JavaScript app with it. If you would like to play around with the prototype, you can check it out on CodeSandbox. The whole git repository is available on GitHub. If you have any questions, just join us on our Discord for a chat.
Original Link: https://dev.to/localazy/javascript-app-localization-with-i18next-and-localazy-5045
Dev To
More About this Source Visit Dev To