
An Interest In:
Web News this Week
- April 19, 2024
- April 18, 2024
- April 17, 2024
- April 16, 2024
- April 15, 2024
- April 14, 2024
- April 13, 2024
Some of Our Sources
- BoingBoing
- Mashable
- Inspiredology
- My Ink Blog
- Web Design Ledger
- Reencoded
- CSS Globe
- Line 25
- CSS Tricks
- Hashedout
Help Webnuz
Referal links:
An Introduction to Scraping (Almost) Anything With Puppeteer and Node.js
Despite the macabre name, headless browsers aren't scary (at least, to most people). They're similar to standard web browsers, but are controlled through code instead of with a mouse and keyboard. You can do almost anything with a headless browser on a page that you can do with a normal web browser, including submit forms, wait for asynchronous JavaScript, and set cookies. When used in combination with modern cloud platforms, it's easier than ever to create automated scrapers.
In this article, I'll walk you through a few web scraping tricks and examples using Puppeteer, a headless browser based on Chromium that has become an industry standard, and Node.js. We'll also use Autocode to easily run and iterate on our scraper code.
All you need to get started is a free Autocode account. Let's dive in!
TL;DR (30s)
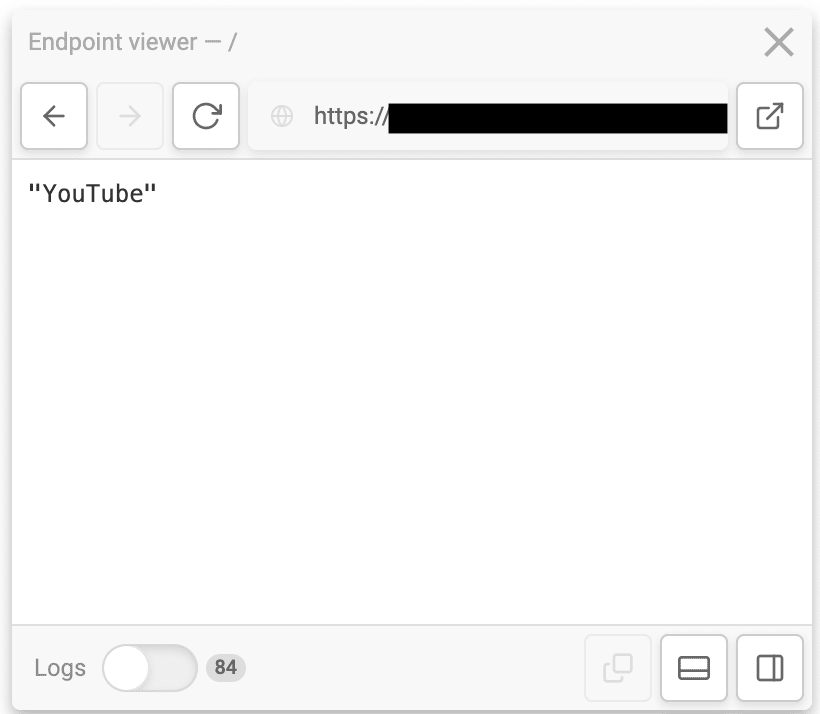
Getting a basic scraper working is simple. Start by going to https://autocode.com and creating or logging into your account. Create a new project, and paste the following code into the editor:
// authenticates you with the API standard libraryconst lib = require('lib')({token: process.env.STDLIB_SECRET_TOKEN});const puppeteer = require('autocode-puppeteer');let browser = await puppeteer.launch();let page = await browser.newPage();await page.goto('https://www.youtube.com/'); // Any URL you'd likelet title = await page.title();await browser.close();return title;Autocode will automatically add required dependencies, so all you need to do now is, press the Save or Run button to push your code live. And that's it! You're now scraping the title of the page (what you'd see in the tab bar when you open the site in Chrome) with Puppeteer.
Breaking It Down
Here's what happens in the above code:
- We require a variant of Puppeteer configured to work in the Autocode environment. Note that the default Puppeteer package will not work due to dependency size constraints.
- We prepare Puppeteer by launching it and opening a new page.
- We navigate to the desired page with
await page.goto(). - Once on the right page, we use the
page.title()method to scrape the page title. - We close the browser instance when we're finished.
This flow is analogous to opening Chrome on your computer, typing https://youtube.com/ in the navbar, checking the title of the page, and finally closing the browser. We'll follow this general pattern when web scraping with Puppeteer.
We're just scratching the surface of what's possible, but there's something important to emphasize first.
With Great Power...
Many websites disallow scraping, and use tools like reCAPTCHA or contain a robots.txt file containing guidelines for scrapers and other automated tools. You should always check and respect site rules before scraping.
Scraping Data From Page Content
Now that you've got the basics down, let's explore how to scrape more useful data from a page. One key piece of functionality Puppeteer provides is the ability to query a page for HTML elements with CSS selectors. For example, Puppeteer's page.$$eval() method takes a selector and allows you to run code in the context of the browser on all elements matching the selector.
Here's what it looks like in action:
// authenticates you with the API standard libraryconst lib = require('lib')({token: process.env.STDLIB_SECRET_TOKEN});const puppeteer = require('autocode-puppeteer');let browser = await puppeteer.launch();let page = await browser.newPage();await page.goto('https://www.youtube.com/');let videoData = await page.$$eval('a#video-title-link', (titleLinkEls) => { return titleLinkEls.map((titleLinkEl) => { return { title: titleLinkEl.getAttribute('title'), link: 'https://youtube.com' + titleLinkEl.getAttribute('href') }; });});await browser.close();return videoData;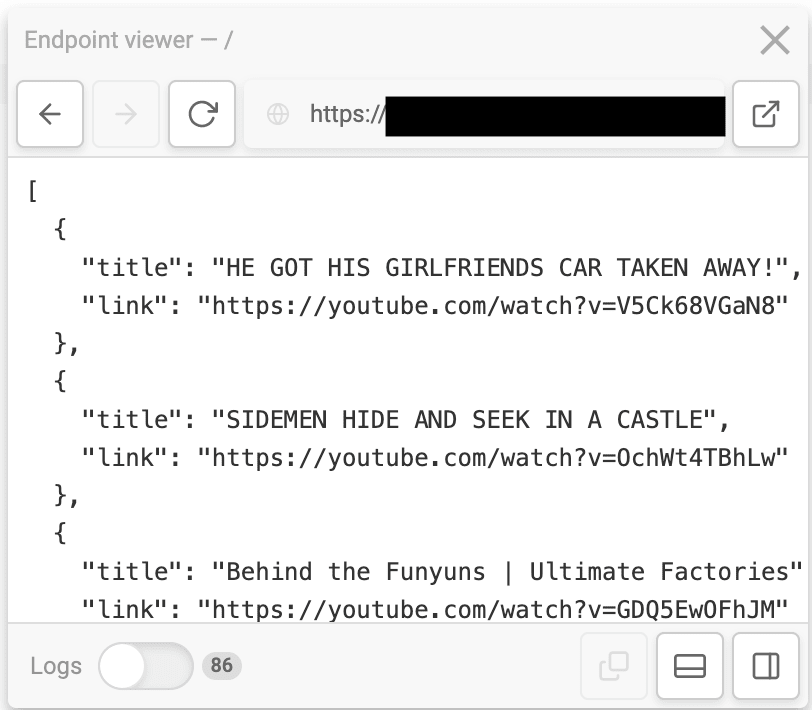
Once we've loaded YouTube in a page, we can use the page.$$eval() function to query for each video link on the front page and return the name of the video and a link to it. We've essentially created a custom trending video API!
Crafting Selectors With Chrome Devtools
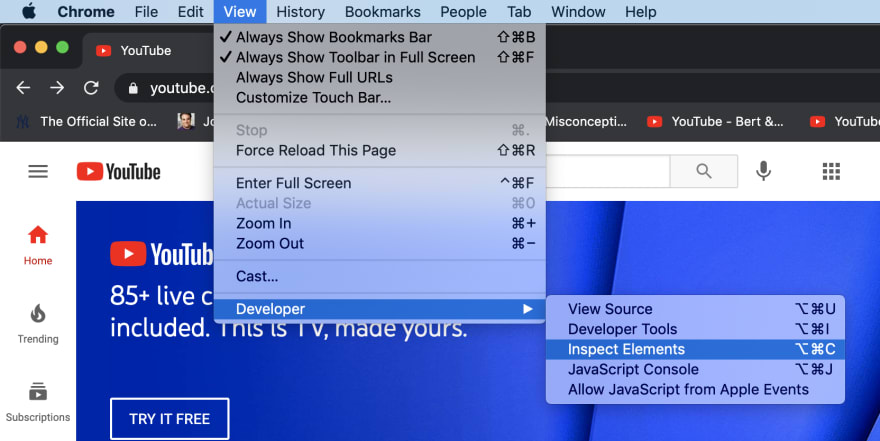
One tricky part about creating scrapers is figuring out what elements of the page contain relevant data - after all, it's not immediately obvious that a#video-title-link matches all the video links on YouTube. One convenient tool for this is the inspector in Chrome's devtools.
You can open the inspector under View > Developer > Inspect Elements in the topbar, or by using the keyboard shortcut CMD + Option + C:
Once you have the inspector open, you can mouse over elements on the page and see them highlighted. Clicking one will show the element in the devtools window, including its attributes and position in the DOM.
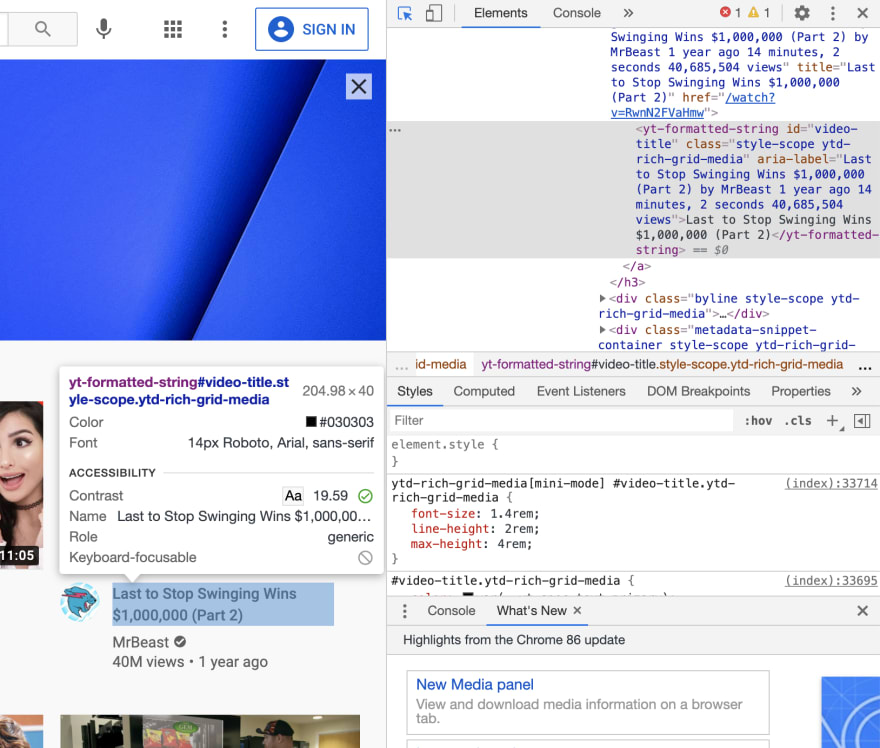
With the inspector, you should be able to figure out a way to reference the correct elements and scrape the data you want.
Debugging With Screenshots
Puppeteer allows you to take screenshots of pages using the page.screenshot() method. This can be especially useful to see the current page state when composing flows that involve interaction with page.click() or page.select(), much like a console.log statement.
For example, let's say you want to build a flow that involves clicking on the first video on the front page of YouTube to scrape its like and dislike count. You might try something like this:
// authenticates you with the API standard libraryconst lib = require('lib')({token: process.env.STDLIB_SECRET_TOKEN});const puppeteer = require('autocode-puppeteer');/*** An HTTP endpoint that acts as a webhook for HTTP(S) request event* @returns {object.http} result*/module.exports = async (context) => { let browser = await puppeteer.launch(); let page = await browser.newPage(); await page.goto('https://www.youtube.com/'); await page.click('a#video-title-link'); let screenshot = await page.screenshot(); await browser.close(); return { statusCode: 200, body: screenshot, headers: { 'Content-Type': 'image/png' } };}Note: To make the screenshot return as an image rather than just binary data, we must pass back the proper Content-Type header. The above code is an example of how to do this in Autocode with the object.http return type. To return other types of data, you'll need to remove the return type or change the return type to match the type of data you're returning. For more information, you can read about the FunctionScript specification Autocode uses for parameters and return types.
If you were to try running the above code a few times, you would notice that the screenshot is either not changing from the main page, or that you'd see something like this:

This would clue you in to the fact that you need to wait for parts of the page to load using something like page.waitForSelector():
// authenticates you with the API standard libraryconst lib = require('lib')({token: process.env.STDLIB_SECRET_TOKEN});const puppeteer = require('autocode-puppeteer');/*** An HTTP endpoint that acts as a webhook for HTTP(S) request event* @returns {object.http} result*/module.exports = async (context) => { let browser = await puppeteer.launch(); let page = await browser.newPage(); await page.goto('https://www.youtube.com/'); await page.click('a#video-title-link'); await page.waitForSelector('#top-level-buttons'); let screenshot = await page.screenshot(); await browser.close(); return { statusCode: 200, body: screenshot, headers: { 'Content-Type': 'image/png' } };}Other use-cases include combining screenshots with the Autocode scheduler, a file hosting platform like Box, and a package like pixelmatch to create daily screenshot diffs for regression testing.
Other Tips
Tuning Your Scraper
The web is a wild place, and new standards are appearing all the time. If a technique doesn't work the way you expect on a first attempt, you may need to try a different method, like waiting for a selector or even just waiting for a set amount of time rather than a DOMContentLoaded event, or using a different selector. Luckily, Puppeteer has plenty of options!
Increasing Your Autocode Timeout
Complicated flows that involve visiting multiple pages or flows that visit slow pages may require more than the default 10 second timeout on Autocode. If your scraper is consistently timing out, you can try increasing the timeout under Advanced Settings in the bottom left corner of the Autocode editor.

Free accounts can increase their timeouts to up to 30 seconds, while Professional Tier accounts can go up to 2 minutes.
Simulating Logged-In States (Advanced)
Many websites show different data based on whether or not the current viewer is logged in. To simulate this state in Puppeteer, you might be able to use the page.setCookie() method using cookies obtained from the Chrome devtools. You can also attempt to use and submit a site's login form directly with your username and password, but many sites use CAPTCHAs to prevent this.
Be careful not to set cookies under the wrong domain if you try this!
Limitations
Because web scrapers usually rely on the structure of the DOM for pages they visit, frontend updates can break scrapers. For this reason, it's often better to use a supported API if it is available to you.
If your desired data follows a specific format and the page you're scraping obfuscates their CSS attributes or changes them frequently, Puppeteer does have a page.content() method that returns the current DOM structure of the page as a string. You can then use a regex or some other method to extract your data.
Thank You!
Puppeteer is an extremely powerful tool, and if you're interested in a deeper dive, I would encourage you to check out the official documentation.
If you have any questions or feedback, a good place to get in touch with me is the Autocode community Slack channel. You can get an invite under Docs > Ask for Help in Slack in the topbar on autocode.com. You can also reach out to me on Twitter @Hacubu.
If you want to stay up to date on the latest from Autocode, I would also encourage you to follow @AutocodeHQ. Happy hacking!
Original Link: https://dev.to/hacubu/an-introduction-to-scraping-almost-anything-with-puppeteer-and-node-js-e9g
Dev To
More About this Source Visit Dev To