
An Interest In:
Web News this Week
- April 1, 2024
- March 31, 2024
- March 30, 2024
- March 29, 2024
- March 28, 2024
- March 27, 2024
- March 26, 2024
Some of Our Sources
- Mashable
- Just Creative
- Abduzeedo
- Creative Curio
- Crazy Leaf Design
- Specky Boy
- CSS Tricks
- Android Dissected
- Codrops
- The Verge
Help Webnuz
Referal links:
How to implement an API using Vuejs & Axios
Case study: Hacker News API
Prerequisite
- Laptop with an Internet connection
- An API client (e. g: Postman or Insomnia)
- A code editor
- Basic knowledge of Javascript, Vue.js, Axios, CSS, HTML
- Concentration
This tutorial will get you started with Hackernews API, get you aquatinted with the 5 major endpoints shipped with this API, explain how you can make different requests, as well as teach you how to build a simple restful API based news aggregator on top of the API. The Hacker News API is developed by Hackernews in partnership with Googles Firebase with the aim to make the public Hacker News data available in near real-time. This tutorial will not cover API development in-depth but will work you through how to test and consume API endpoints effectively.
How to follow this tutorial
This tutorial is divided into 3 deferent sections as follows:
- Getting Started
- Making API requests to the available endpoints
- The Hacker News Reader App
To get the best out of this tutorial, I will advise you to follow this tutorial one section after the other as each section seamlessly introduces the other. If you are ready to learn new techniques, join me lets set the ball rolling.
Getting Started
Before we begin, a tour around the endpoints shipped with this API will give you glims of how the API is designed, structured, and served. The Hackernews API has 5 major endpoints that are used to aggregate news stories, jobs, poles, and comments on the Hackernews website. For basic information and to explain how simple the API is, I will explain the 5 endpoints by making the requests to endpoints listed below using Postman:
- Items
- Users
- Top Stories
- Max Item ID
- Changed Items and Profiles
The base URL for the endpoints is http://hacker-news.firebaseio.com/Items/v0/item/.json
The Item endpoint returns all link posts, comments, jobs, Ask HN posts, and polls all categorized as items. They can be accessed by their unique id at this endpoint. Lets test the items endpoint together, open Postman set your Request URL like so: https://hacker-news.firebaseio.com/v0/item/8861.json, select GET as your request type and press send. You should get the same result as the screenshot below:
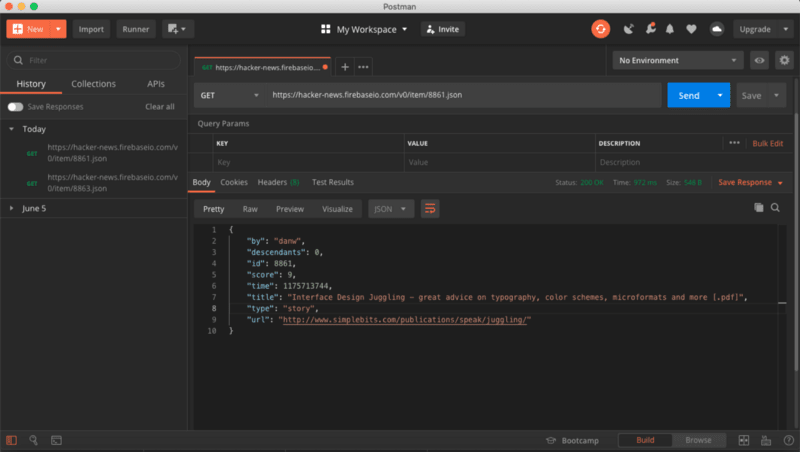
You noticed I replaced the integrid with /v0/item/8861.json/ as the unique identifier for this particular item. Note: an item can either be a story, comment, job, ask, etc., you can as well traverse the tree and get even deeper. We will practice more on traversing in the Hackernews Reader App section.
Users /v0/user/<userid>.json
Each user is uniquely identified by case-sensitive ids, and live under /v0/user/. This endpoint only reveals users that have public activity (e.g: comments or story submissions) on the website. The screenshot below is a result of a GET request to the URL https://hacker-news.firebaseio.com/v0/user/john.json.

You noticed the unique identifier this time is john. What if you are looking to get all the comments the user has made so far? The ideal solution would be using the submitted array to access items the user has published. Remember, the endpoint only return a user with activity. We will dive deeper into this in the next section.
Top Stories /v0/topstories.json
This endpoint returns the item ids for the top 500 stories on Hackernews. You can use this endpoint to access the ids of the top items on the site. The latest stories can be accessed at /v0/topstories (also contains jobs) and /v0/newstories. Best stories can be accessed as well at /v0/beststories. The screenshot below is the result of a GET request to https://hacker-news.firebaseio.com/v0/topstories.json.
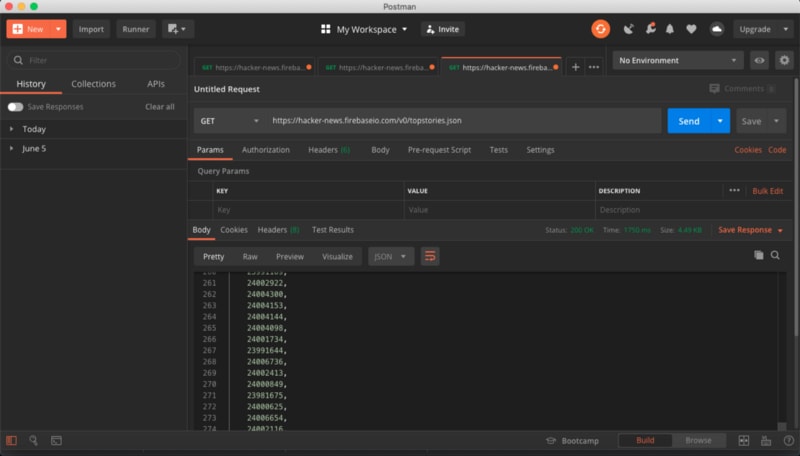
There is more you can achieve with this endpoint, we will be making use of this API endpoint in the Hackernews Reader App section.
Max Item ID
This endpoint returns the current largest item id /v0/maxitem. This might be the right approach to guessing backward to discover all items available on the API.
Changed Items and Profiles
This API returns a list of items and profiles that have changed in realtime. Thanks to Firebase for this awesome feature, the item, and profile changes are at /v0/updates. This endpoint can be very helpful if you are looking to track real-time changes within your application.
The Hacker News Reader App

If you have been following this tutorial up to this point, congratulations you are fully equipped with the knowledge and understanding needed to build the Hackernews Reader App. Lets start off by making a request to fetch 50 top stories and order them in descending order, and get them sorted by votes. This will be the building block for our Reader App. We will use Javascript to handle the logic for this application, Vue.js, to build the front-end and Axios for sending requests to the endpoints respectively.
What is Vue.js?
Vue is a progressive framework for building user interfaces. Vue is designed from the ground up to be incrementally adoptable. The core library is focused on the view layer only and is easy to pick up and integrate with other libraries or existing projects. On the other hand, Vue is also perfectly capable of powering sophisticated Single-Page Applications when used in combination with modern tooling and supporting libraries. I didnt choose vue.js for this tutorial for any other reason other than its simplicity, and how it is easy to get along with. This reason isnt limited to what you can achieve with vue.js, you can also build this application with other front-end frameworks like react.js or angular. You can read the documentation and get started with vue.js here.
What is Axios?
Axios is a promise-based HTTP client for the browser and node.js. Axios is a Javascript library pretty easy to integrate with any front-end framework or existing application written in Javascript. We will not be using axios within vue.js because I dont want us to make multiple requests within our components. We will create a story-service that will handle all requests to our endpoints, pass the output via props within components. Click here to read instructions on how to install axios via the node.js package manager (npm).
Setup and Installation:
- Create a new application
- Install Axios
- Create a service folder
Lets get started, navigate to your working directory, and copy-paste the code below on your terminal to create a vue.js application. Make sure you have vue-cli installed on your machine. You can follow instructions on how to install and get started with vue-cli here.
$ vue create vue-hackernewsSelect your preferred add-ons and type the code below:
$ cd vue-hackernews$ npm run serveIf you got everything set up correctly, you should have the result below:
App running at:- Local: http://localhost:8081/- Network: http://172.20.10.3:8081/Hold-down command key and click on the local link to view the Web App in your browser (cmd + click). Bravo!! You should get the result below:

Install Axios:
Copy-paste the code below on your terminal to install Axios:
$ npm i axiosNow that you have generated the barebones of the Reader App, create a new folder inside the src folder name its services. Next, lets rouse through our folder structure and remove some content we dont need. Below is a traversing tree of what our folder structure looks like.
vue-hackernews public style.css src assets css main.css bk-sale.png componets singleStory.vue storyItem.vue router index.js services storyService.js views home.vue singleStory.vue App.vue main.jsFolder Structure Explained:
The Hackernews Reader App is a single page application built with the aim to illustrate how you can build an application on top of the Hackernews API. If you used veu-cli to generate the application, you should have a similar folder structure as the folder structure above. The /src folder is the entry-point for our application, it contains all folders and relevant files for our web app. The /asset folder contains the stylesheet and images for the application, the /components folder holds all the components for the application, the /router folder contains index.js a script responsible for routing in the application, the /services folder is a custom folder I created, it contains all services for the application, the /view folder contains all the views for the application (e.g: home.vue and singleStory.vue), the App.vue renders all the views/routes in the application, lastly, the main.js file is a script that renders App.vue component the parent component for the entire application by passing it to vue.js engine which will in-turn convert it to HTML that is readable on web browsers.
Building the story-service
Navigate into the services folder, create a new file called storyService.js, copy-paste the code below:
import axios from 'axios'; const baseUrl = 'https://hacker-news.firebaseio.com/v0'; /* * Fetch list of the top 50 stories * returns stories[]. */ export async function getTopStories() { let stories = []; const response = await axios.get(`${baseUrl}/topstories.json`, { params: { limitToFirst: '50', } }); stories = response.data; return stories; } /* * Fetch items based on 'ids' from getTopStories() * returns items[]. */ export async function storiesWithItems(){ let items = []; getTopStories().then(stories => { stories.forEach(id => { axios.get(`${baseUrl}/item/${id}.json`).then( res => { items.push(res.data); }); }); }); return items; } /* * Makes request based on the 'id' param * returns response[]. */ export async function getSingleItem(id){ let response; response = await axios.get(`${baseUrl}/item/${id}.json`); return response.data; }; /* * Makes request based on the 'id' passed to the * getSingleItem(<id>), loops through kids[]; * returns comments[]. */ export async function getSingleStoryComments(id) { let comments = []; getSingleItem(id).then(res => { res.kids.forEach(comment => { axios.get(`${baseUrl}/item/${comment}.json`).then(res => { comments.push(res.data); }); }) }); return comments; } /* * Sorts the result based on the property score; * returns a sorted array. */ export function sortByScore(a, b){ if (a.score < b.score) { // a comes before b in the sorted order return -1; }else if(a.score > b.score){ // a comes before b in the sorted order return 1; }else{ // a and b are the same return 0 } }The concept of these services can be likened to a troop of soldiers fighting together for a single cause. We could have as well built the entire App with one or two functions, but we have to make our App reusable, maintainable, also easy to read and understand.
getTopStories():
I started off by importing axios, then I declared a constant to hold the baseurl for our API, the getTopStories() function makes an asynchronous request to the topstories.json endpoint and returns 50 stories ordered by votes in descending order. You noticed within the params Object I include the orderBy: votes and limitToFirst: 50, these parameters are passed as headers through the URL when the request is sent and will be received by the endpoint to retrieving the data. You can read more on retrieving data in Firebase here.
The getTopStroies() function only returns ids for the first 50 top stories. To access details of the stories we need to make another iterative request based on the result we get to the /item/${id}.json endpoint. We could have as well handled this within this function, but we need to keep maintainability in mind, so we will let another function handle that.
storiesWithItems():
This function relies on the getTopStories() function to fetch stories associated with the ids it returns. They are a lot of ways you can get this task done, I chose to make a new request to /item/${id}.json endpoint by iterating each ids returned from the getTopStroies() function. Each item found within the loop is pushed to the item array which is returned when the loop ends.
getSingleItem(id):
The getSingleItem() sends a request to the /item/${id}.json endpoint and returns a single item based on the itemid passed to it. This function is also used by the getSingleStoryComments(id) to fetch comments associated with the current item.
getSingleStoryComments(id):
This function is similar to the storiesWithItem() function, its primary purpose is to return all the comments associated with a single item by iterating its kids array and making a request to the /item/${id}.json endpoint with each of the kid. Its amazing how the Hackernews API is structured, comments are items with the type: comment and are direct children of the story object accessible via the kids array.
Sorting the items based on the highest vote:
sortByScore(a, b):
The sortByScore() is a callback function that defines the sort order for our items, the function is often passed as a parameter to the javascript function sort. In our case, the sorting is done based on the item with the highest vote. It compares the first element (a) with the next (b) in the object of an array based on the highest score, reduces its index number, and push it forward one step each time a match is not found vis-visa. Read more on the sort function here.
Building the components
Now that you are done with building the story service, lets create the components needed for our application. Navigate to the component folder and create singleitem.vue and singleStoryItem.vue components.
copy and paste the code below to create the signgleItem.vue:
<template> <div class="story"> <span class="score">{{ item.title | url }}</span> <router-link :to="{ path: '/story/' + item.id }" >{{ item.title }} </router-link><br /> <span class="own-url">{{ item.url | host }}</span><br /> <span class="meta"> by: <span class="author">@{{ item.by }} </span> | Time: {{ item.time }} Ago | {{ item.descendants }} comments </span> </div> </template> <script> export default { name: 'storItem', props:{ item: { type: Object, required: true, }, index:{ type: Number, required: true, } }, filters:{ url: function(str){ return str.substring(0, 2).toUpperCase(); } } } </script> <style scoped> .item { border-radius: 5px; padding: 20px; background: white; display: flex; flex-direction: column; justify-content: center; align-items: center; position: relative; } .salepill { background: rgb(232, 35, 25); color: white; font-family: 'Barlow', sans-serif; position: absolute; right: 30px; top: 60px; padding: 2px 10px 4px; text-transform: uppercase; font-size: 13px; font-weight: 700; border-radius: 1000px; } .author{ color: #FFF; border-radius: 10px; background: teal; } .own-url{ font-size: .8rem; color: black; } .story { background-color: #fff; padding: 20px 30px 20px 80px; border-bottom: 1px solid #eee; position: relative; line-height: 20px; } .score { color: #f60; font-size: 1.1em; font-weight: 700; position: absolute; top: 50%; left: 0; width: 80px; text-align: center; margin-top: -10px; } .story a { color: #34495e; font-weight: 600; text-decoration: none; } .story a span { font-size: 0.85em; margin-left: 10px; color: #828282; } .story .meta { font-size: 0.85em; color: #828282; } </style>This component is created with flexibility in mind, it accepts the item and Index as props. Props in vue.js are used to pass data from one component to the other. We won't dive really deep into veu.js as it is beyond the scope of this tutorial.
The singleStoryItem.vue component:
copy and paste the code below to create the component.
<template> <div class="comment-container"> <h2 class="story-title">{{ item.title }}</h2> <p class="score">Votes: {{ item.score }}</p> <p class="author-url">{{ item.url }}</p> <div v-for="(comment, index) in comments" :key="index"> <div class="comment-wrap"> <div class="comment-block"> <p class="comment-text">{{ comment.text }}</p> <div class="bottom-comment"> <div class="comment-author">{{ comment.by }}</div> <div class="comment-date">{{ comment.time }}</div> </div> </div> </div> </div> </div> </template> <script> export default { name: "single-story", props:{ item: { type: Object, required: true, }, comments:{ type: Array, required: true, } } } </script> <style scoped> .comment-container{ width: 60%; margin: 0 auto; color: #000; } .story-title, .score, .author-url{ padding: 1rem; } .story-title{ text-transform: uppercase; font-weight: 900; } .author-url{ font-size: .8rem; font-weight: 900; } .score{ font-weight: 900; } .comment-wrap { margin-bottom: 1.25rem; display: table; width: 100%; min-height: 5.3125rem; } .photo { padding-top: 0.625rem; display: table-cell; width: 3.5rem; } .photo .avatar { height: 2.25rem; width: 2.25rem; border-radius: 50%; background-size: contain; } .comment-block { padding: 1rem; background-color: #fff; display: table-cell; vertical-align: top; border-radius: 0.1875rem; -webkit-box-shadow: 0 1px 3px 0 rgba(0, 0, 0, 0.08); box-shadow: 0 1px 3px 0 rgba(0, 0, 0, 0.08); } .comment-block textarea { width: 100%; resize: none; } .comment-text { margin-bottom: 1.25rem; } .bottom-comment { color: #acb4c2; font-size: 0.875rem; } .comment-date { float: left; } .comment-actions { float: right; } .comment-actions li { display: inline; margin: -2px; cursor: pointer; } .comment-actions li.complain { padding-right: 0.75rem; border-right: 1px solid #e1e5eb; } .comment-actions li.reply { padding-left: 0.75rem; padding-right: 0.125rem; } .comment-actions li:hover { color: #0095ff; } </style>The singleStoryItem.vue component is similar to singleItem.vue the difference is that I removed the index prop and added the comment prop with the type: Array. You will understand why I have chosen to build this component this way in the next section.
Building the Home and SingleStory View:
Home view:
copy and paste the code below to create the home view:
<template> <div class="home"> <div class="banner"> <h2 class="header">Hacker News API Implementation</h2> <img class="home-img" src="../assets/bk-sale.png"> </div> <storyItem v-for="(story, index) in stories" :key="index" :item="story" :index="index"></storyItem> </div> </template> <script> // @ is an alias to /src import storyItem from '@/components/storyItem.vue'; import { storiesWithItems, sortByScore } from '../services/storyService'; export default { name: 'Home', components: { storyItem }, data(){ return{ stories: [], } }, created(){ storiesWithItems().then(res => { this.stories = res.sort(sortByScore); }); }, } </script> <style scoped> .content { /*no grid support*/ float: left; width: 79.7872%; /* grid */ display: grid; grid-template-columns: repeat(10, 1fr); padding: 0 !important; margin: 30px; } .banner{ display: flex; flex-direction: row; align-content:space-between; background-color: teal; } .header{ font-weight: 900; margin: 4rem; width: 60%; } .home-img{ width: 40%; } </style>You noticed I imported the singleItem component as a child component and the storiesWithItem() function from the storyService into the home view. The data supplied to the props is the response from storiesWithItems() function. This is part of the reason why it was wise to make our App rousable, so we ended up making only one request with the created block to execute this task.
SingleStory View:
copy and paste the code below to create the home view:
<template> <div class="home"> <div class="banner"> <h2 class="header">Hacker News API Implementation</h2> <img class="home-img" src="../assets/bk-sale.png"> </div> <div class="container"> <singleStoryItem :item="story" :comments="comments"></singleStoryItem> </div> </div> </template> <script> // @ is an alias to /src import singleStoryItem from '@/components/singleStoryItem.vue'; import {getSingleItem, getSingleStoryComments } from '../services/storyService'; export default { name: 'Home', components: { singleStoryItem }, data(){ return{ story: {}, comments: [], } }, created(){ getSingleItem(this.$route.params.id).then(res => { this.story = res; }); getSingleStoryComments(this.$route.params.id).then(res => { this.comments = res; }) }, } </script> <style scoped> .content { /*no grid support*/ float: left; width: 79.7872%; /* grid */ display: grid; grid-template-columns: repeat(10, 1fr); padding: 0 !important; margin: 30px; } .banner{ display: flex; flex-direction: row; align-content:space-between; background-color: teal; } .header{ font-weight: 900; margin: 4rem; width: 60%; } .home-img{ width: 40%; } </style>The output for the above code will result in the screenshot below:

Finally, update the App.vue, router.js and main.css like so:
router.js:
import Vue from 'vue' import VueRouter from 'vue-router' import Home from '../views/Home.vue' import Single from '../views/SingleStory.vue'; Vue.use(VueRouter) const routes = [ { path: '/', name: 'Home', component: Home }, { path: '/story/:id', name: 'single', component: Single, } ] const router = new VueRouter({ mode: 'history', base: process.env.BASE_URL, routes }) export default routerYou noticed the story path has a parameter /story/:id which will be passed to the getSingleStoryComments(id) to fetch the current item associated with the id. This is really helpful thanks to the vue.js $router.params object.
App.vue:
<template> <div id="app"> <div id="nav"> <router-link to="/"> Home </router-link> </div> <router-view/> </div> </template> <style> @import url('./assets/css/main.css'); </style>main.css:
/* ---- global styles ---- */ body, html { padding: 0; margin: 0; background: #f3f3f3; font-size: 16px; word-spacing: 1px; -ms-text-size-adjust: 100%; -webkit-text-size-adjust: 100%; -moz-osx-font-smoothing: grayscale; -webkit-font-smoothing: antialiased; box-sizing: border-box; font-family: Avenir, Helvetica, Arial, sans-serif; } #app { font-family: Avenir, Helvetica, Arial, sans-serif; -webkit-font-smoothing: antialiased; -moz-osx-font-smoothing: grayscale; color: white; } h1, h2, h3, h4 { font-family: Avenir, Helvetica, Arial, sans-serif; font-weight: 700; } p, li { font-family: 'Barlow', sans-serif; } #nav{ background-color: teal; height: 40px; } #nav a { text-decoration: none; color: #ffffff; margin: .7rem; margin-top: .8rem; } *, *:before, *:after { box-sizing: border-box; margin: 0; } .container { padding-right: 15px; padding-left: 15px; margin-right: auto; margin-left: auto; }The full codebase for this tutorial will be available here.
Constrain:
While I appreciate the APIs simplicity, Ive found out that the API requires making a lot of network requests to achieve a single task which I feel isnt right considering the runtime. Take for instance, in order to pull all comments associated with a particular item requires making iterative requests to the item endpoint, imagine an item that has up to 300 comments, it will take a lot of time to load.
The Hackernews API is read-only, which limits the kind of request you can make to read-only. Despite the simplicity of the API, it is good at some things and not for others.
Conclusion:
There is a lot of approaches you can leverage to implement this API especially to improve runtime. You can cache the item objects in the browser and only have to make a network request to get the current top 50 ids, then only request the ones that arent currently cached, and then order the items by the order in the top 50 list. Feel free to dig deep into this API and explore other concepts. Ill like to hear from you please drop a comment below. Thank you for reading.
Original Link: https://dev.to/eaetukudo/how-to-implement-an-api-using-vuejs-axios-3m95
Dev To
More About this Source Visit Dev To