
An Interest In:
Web News this Week
- April 1, 2024
- March 31, 2024
- March 30, 2024
- March 29, 2024
- March 28, 2024
- March 27, 2024
- March 26, 2024
Some of Our Sources
- Engadget
- The Logo Smith
- Spoon Graphics
- Creative Curio
- Noupe
- Web Design Ledger
- Reencoded
- Freelance Switch
- Daily Now
- Hashedout
Help Webnuz
Referal links:
Creating a Killer GitHub Profile README Part 1
README's. You know, those markdown files that get created when you generate a new project or create a GitHub repository. Perhaps you're a developer who updates the README file for each project you work on. Or maybe you're a developer who leaves the boilerplate content inside.
As of July 2020, GitHub now allows developers to create a profile-level repository and use the README to add some personality to their page.
I've known about this for a few months now but only recently dove in. And, well... I may have gone a bit overboard.
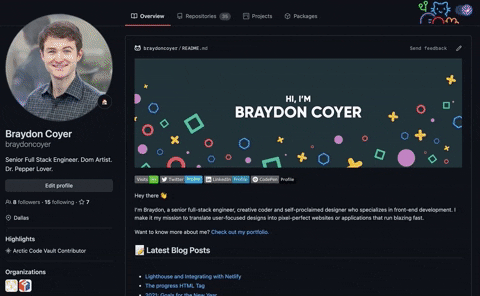
Check out my GitHub profile here.
Many developers, I believe, inject a bunch of 'cool' widgets and badges in their profile instead of realizing that their GitHub profile is very much like a portfolio it should highlight what makes you unique.
There are many articles and tutorials on the web (some linked throughout this article) that show you how to add basic information to your README.md file images, badges and statistics. But I wanted something a bit more personal; I wanted a unique profile that accomplished a few things:
- Provided a route for visitors to find my other social outlets
- Highlighted my most recently published articles
- Displayed pinned repositories in a visual-appeasing fashion
- Allowed visitors to see some of my GitHub statistics
- Listed some of my skills for those interested or for future employers
- End the experience with something a bit more fun; a quote from an API I built.
I encourage you to make your own list what do you want on your profile? How is it going to highlight what makes you unique?
In this two-part article series, I will walk through, step by step, how I created my profile so that you can make your own README.md file stand out from the crowd.
Understanding Limitations
If you're new to markdown files in general, it's important to have a high-level idea of what we'll be doing. After all, you can't provide solutions without understanding limitations.
I knew that I wanted basic content and information in my README things like images, headings, badges that redirect users when clicked and even graphs and widgets that display GitHub statistics. Tutorials are scattered across the internet and make implementing these things relatively easy.
But I also knew I wanted my README to be dynamic; I wanted it to automatically fetch my most recent blog posts and to display a quote from The Office API that I built. This is where things get tricky. Markdown files can't make API requests on their own, so how would I inject content dynamically?
GitHub Actions. These built-in repository pipelines allow developers to automate tasks and workflows and is what I used to fetch blog posts and request a random quote from my API. These workflows can trigger files or functions to obtain information and inject the content into my README. I assigned a cron job to run the workflow every hour so my profile is always up-to-date with new articles and visitors get a fresh quote each time they visit my profile.
There's a few 'gotchas' with this implementation that we'll discuss in the next article, but I hope this gives you a high-level overview of how we'll approach the problem.
Create Your Profile Repository
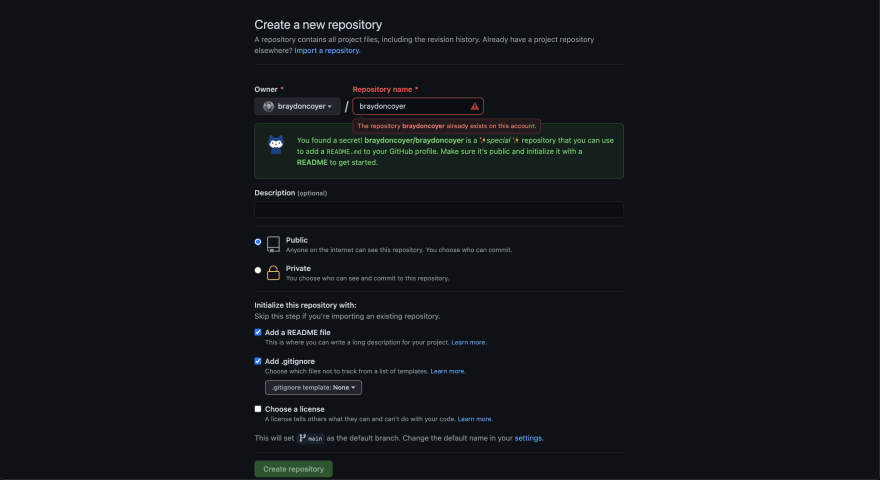
Go to GitHub and create a new repository that has the same name as your GitHub username. My username is braydoncoyer, so I created a repository with the name braydoncoyer. If youve done this correctly, GitHub will display a secret message (pictured below).
I set the repository access to private until I was ready for the world to see it, but feel free to make it public if you want.
I also initialized the repository with README.md and .gitignore files.
NOTE: The screenshot below is giving me an error because I've already created a profile-level repository. You shouldn't see this error. Also, if you didn't know, GitHub recently shipped dark mode.
Once I created the repository, I cloned it down and opened it in my favorite editor.
Create a README Template
Although I initialized the repository with a README.md file, I quickly found out that I needed to edit my content in a separate file and use it as a template a skeleton of static content that will be used to construct the final README.md file. There are several reasons for this, but here are two of the most important:
- Eventually, the GitHub Actions workflow will trigger files that will use the template, inject the dynamic content and then take the entire template and paste it in the README file.
- If you're editing the
README.mdfile directly, you're going to have LOTS of merge conflicts after the dynamic injection performs its magic.
With that said, at the root level of my repository, I created a new file called README.template.md. This is the file I will be editing manually.
Banner Image
I decided I wanted visitors to be greeted with a nice banner image that directed visitors to my portfolio when it was clicked.
I opened Illustrator, created a 1500x500 document and designed the banner image according to my personal style.
Back in my repository, I created a new root-level directory named assets , placed the image in the folder and consumed it in the README.template.md file.
[](https://braydoncoyer.dev)Social Badges
One of my goals with my GitHub profile README is to direct visitors to my other social networks (Twitter, LinkedIn and CodePen, specifically).
To do that, I made sure I had social badges listed at the top of the profile so that it's one of the first things visitors see.
To create these badges, I used shields.io and edited the badge text, badge color and destination URL.
I thought it would also be fun to keep a track of my profile visits, so I created a badge and listed it next to the social badges.
To create your own visits badge, copy the 'Visits Badge' markdown content below and change the repository destination in the URL (everything after '/visits/').
[](https:braydoncoyer.dev)[](https://twitter.com/BraydonCoyer)[](https://www.linkedin.com/in/braydon-coyer/)[](https://codepen.io/braydoncoyer)The Introduction Section
Believe it or not, the banner image and social badges don't take up that space. Now that visitors have an optional route to see my other social networks, they need to know a little about me.
I only wrote a small blurb for the introduction. If visitors want to know more about me, they can find that information on my portfolio website or LinkedIn profile. Don't make the mistake of overwhelming visitors with too much information.
At the end of the introduction, I present the visitor with a call-to-action to visit my portfolio website again, I don't want to overwhelm the visitor, but rather give just enough information about me and provide a way for them to read more if they desire.
Latest Blog Posts
Next, I want visitors to see my most recent blog posts. This needs to be dynamic and updated with regular cadence. The hard work will eventually be delegated to a separate file that the GitHub Action workflow will run, but in order for that file to know where to inject the content, it requires a certain pattern in the template.
For now, I put the following under the blog post section:
<!-- BLOG-POST-LIST:START --><!-- BLOG-POST-LIST:END --> To inject my blog feed into the
README.mdfile, I followed Darsh Shah's article How to Add Your Recently Published Articles to Your GitHub Profile README using GitHub Actions
Pinned Repositories & GitHub Stats
Along with my most recent blog posts, I wanted to shift the spotlight to a few of my other repositories and display some statistics. To accomplish this, I used Anurag Hazras GitHub ReadMe Stats - The content you retrieve from his API can be wrapped in an <img> tag and styled in various ways. The documentation is easy to follow; I encourage you to check it out!
<!-- Pinned Repositories -- ><a href="https://github.com/braydoncoyer/tailwindcss-v2-dark-mode-template"> <img align="center" style="margin:1rem 0.5rem" src="https://github-readme-stats.vercel.app/api/pin/?username=braydoncoyer&repo=tailwindcss-v2-dark-mode-template&title_color=ffffff&text_color=c9cacc&icon_color=4AB197&bg_color=1A2B34" /></a><br><a href="https://github.com/braydoncoyer/ng-limeade"> <img align="center" style="margin:0.5rem" src="https://github-readme-stats.vercel.app/api/pin/?username=braydoncoyer&repo=ng-limeade&title_color=ffffff&text_color=c9cacc&icon_color=4AB197&bg_color=1A2B34" /></a><a href="https://github.com/braydoncoyer/officeapi"> <img align="center" style="margin:0.5rem" src="https://github-readme-stats.vercel.app/api/pin/?username=braydoncoyer&repo=officeapi&title_color=ffffff&text_color=c9cacc&icon_color=4AB197&bg_color=1A2B34" /></a><!-- GitHub Stats -- ><a href="https://github.com/braydoncoyer"> <img align="center" style="margin:0.5rem" src="https://github-readme-stats.vercel.app/api/top-langs/?username=braydoncoyer&hide=html,css&title_color=ffffff&text_color=c9cacc&icon_color=4AB197&bg_color=1A2B34" /></a><a href="https://github.com/braydoncoyer"> <img align="center" style="margin:0.5rem" src="https://github-readme-stats.vercel.app/api?username=braydoncoyer&show_icons=true&line_height=27&count_private=true&title_color=ffffff&text_color=c9cacc&icon_color=4AB097&bg_color=1A2B34" alt="Braydon's GitHub Stats" /></a>Skills
Next, I needed a way to show visitors my skills as a full-stack web developer. I didn't want to put my skills in an unordered list; it would take up a lot of space on the page and the unordered list doesn't provide much of a stylish flare.
Instead, I used badges from shield.io and displayed the badges inline on the page, using the same background color as the banner image to keep design consistency throughout the profile.
Because I wanted to list a lot of skills, I decided to have some core-skills displayed by default, and optionally show more skills using a <details> tag.
[](https://img.shields.io/badge/Code-Angular-informational?style=flat&logo=angular&logoColor=white&color=4AB197)...<details><summary>More Skills</summary>[](https://img.shields.io/badge/Style-CSS-informational?style=flat&logo=css3&logoColor=white&color=4AB197)...</details>To see the full list of badges I used in the README.template.md file, click HERE.
The Office Quote
Before visitors leave my profile I wanted to end their experience with something unique and with a personal touch. Very much like the blog post section, a GitHub Action workflow will run a script that will look for a pattern in the README.template.md and inject a random quote.
I put the following pattern in the Office quote section:
<p>{office_quote}</p><p>{office_character}</p>Check back at the top of the hour for a new quote!With that, the static content is complete and satisfies the goals I listed for my profile.
Conclusion
In the next article, Ill show you how I created my GitHub Action workflow and injected the dynamic content into the README.md file!
Thanks for reading! If you liked this article and want more content like this, subscribe to my newsletter and make sure to follow me on Twitter!
daily.dev delivers the best programming news every new tab. We will rank hundreds of qualified sources for you so that you can hack the future.
Original Link: https://dev.to/dailydotdev/creating-a-killer-github-profile-readme-part-1-33nm
Dev To
More About this Source Visit Dev To