
An Interest In:
Web News this Week
- April 1, 2024
- March 31, 2024
- March 30, 2024
- March 29, 2024
- March 28, 2024
- March 27, 2024
- March 26, 2024
Some of Our Sources
- BoingBoing
- Simplebits
- Abduzeedo
- Fuel Your Creativity
- Inspiredology
- Crazy Leaf Design
- CSS Globe
- Specky Boy
- Codrops
- Hashedout
Help Webnuz
Referal links:
Instant messaging app made with React, Typescript, Node & Socket.io
Hello everyone, I am back on Dev.to today to share another of my project!
We all know how important it is to practice regularly in order to improve our development skills. As I am getting more confident, I try to build more complex and robust applications.
This last project was a lot of fun to build. It took me almost a month to deploy it (I mainly work after school hours).
Enjoy reading
Table of contents
- Project Introduction
- Features
- Tech Stack
- Wireframe & Design
- Data modeling & API routing
- Project Organization
- Sprint 01: Frontend
- Sprint 02: Backend
- Sprint 03: Fix & Deploy
- Conclusion
Project Introduction
I am glad to introduce GroupChat
This challenge's wireframes are provided by devchallenges which offers many cool ideas of projects to build and practice. Take a look if you are missing inspiration!
Ok, let's talk about GroupChat, it is an instant messaging app that allows users to create channels and chat with people interested in a particular topic.
Sounds simple ? Well, I would not say that it was "complicated" but it is always challenging to try something new.
It was the first time I have worked with socket.io and it was also my first medium-sized project built with TypeScript.
Features
Custom Authentication (Email - Password)
Login as guest (limited access)
Random Avatar / Profile image upload
Authorization (json web tokens)
End to End input validation
Create and join channels
Instant messaging
Bug report
Mobile friendly
Tech Stack
Once again, I went for my best friend the MERN stack which includes:
MongoDB
Express
React
Node
In addition to above technologies, I worked with TypeScript to improve the robustness of my code and with Redux to manage the app state.
I should also mention socket.io that enables real-time, bidirectional and event-based communication between the browser and the server.
For deployment, an easy and efficient way is to host the frontend on Netlify and backend with Heroku.
Here is a list of tools I usually work with to enhance my programming experience:
OS: MacOS
Terminal: iterm2
IDE:VSCode
Versioning: Git
Package Manager: NPM
Project Organization: Notion
Wireframe & Design
To be honest, I don't have too much pleasure designing a product's UI. So, I decided to work with existing wireframes and focus on the code instead.
As I said already, I inspired from devchallenges. Quick overview:

Data modeling & API routing
Database design and API routing are important steps. Make sure you have an action plan before starting coding, or it will be a disaster
Here is a simple data model made with Lucidchart:

It is indeed simple, but it is enough for this project.
As you could guess, we are building a REST API with Node/Express which involves HTTP requests.
Let's imagine our routes:

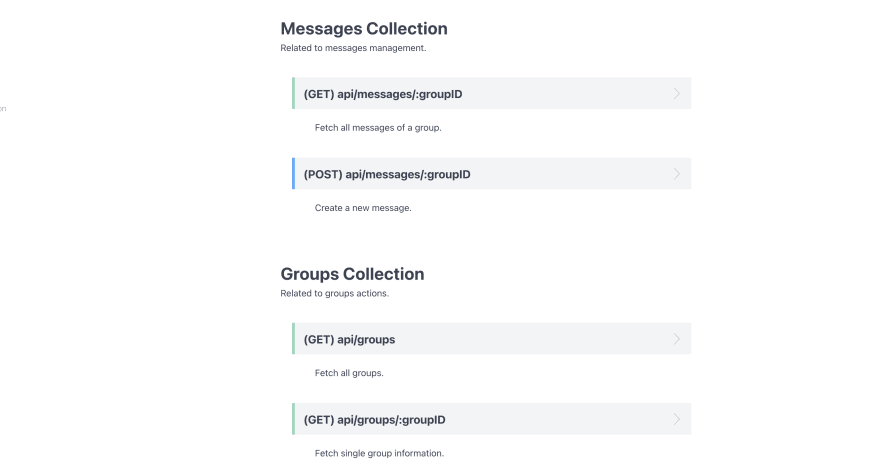
Note: API doc made with Apiary
Project Organization
I love when everything is clean and well-organized. Here is the folder structure I decided to work with:

Simple, clean and consistent
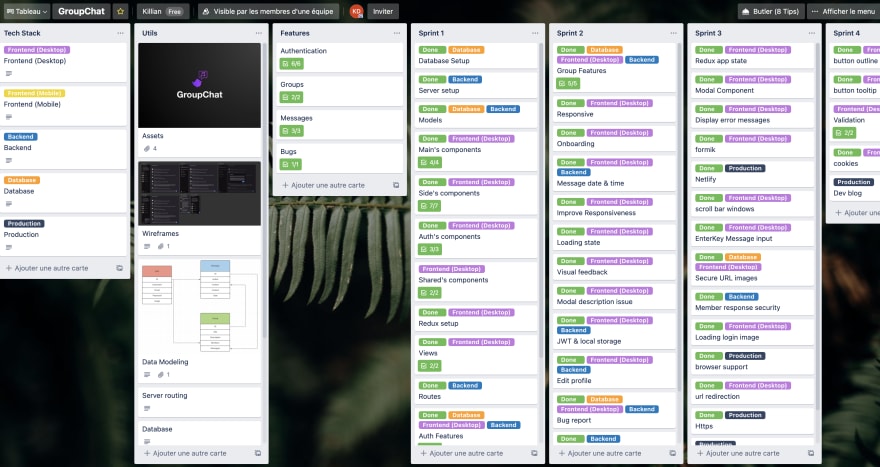
In order to keep track of my progress, I made myself a task board on Trello
Before you head over to the next step, I will briefly talk about the Git workflow.
As I was the only one working on this project, GitHub flow worked just fine.
Every addition to the code has a dedicated branch and the code is reviewed (by myself only...) for each new PR.
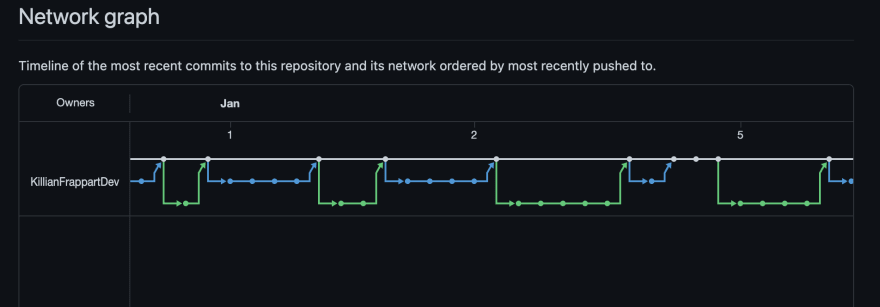
Note: Around 180 commits and 40 branches were created
Sprint 01: Setup & Frontend
It is always so exciting to start coding, this is my favorite part of the process.
I would say that the first week was the easiest.I began with setting up both Frontend and Backend which means install dependencies, environment variables, CSS reset, create a database, ...
Once setup is done, I built every single component that should appear on the screen and made sure they are mobile friendly (flex, media queries, ...).
Speaking of components and UI, here is a simple example:
// TopBar/index.tsximport React from 'react';import { IconButton } from '@material-ui/core';import MenuIcon from '@material-ui/icons/Menu';// Local Importsimport styles from './styles.module.scss';type Props = { title?: String; menuClick: () => void;};const TopBar: React.FC<Props> = props => { return ( <div className={styles.container}> <div className={styles.wrapper}> <IconButton className={styles.iconButton} onClick={props.menuClick}> <MenuIcon className={styles.menu} fontSize="large" /> </IconButton> <h2 className={styles.title}>{props.title}</h2> </div> </div> );};export default TopBar;// TopBar/styles.module.scss.container { width: 100%; height: 60px; box-shadow: 0px 4px 4px rgba($color: #000, $alpha: 0.2); display: flex; align-items: center; justify-content: center;}.wrapper { width: 95%; display: flex; align-items: center;}.title { font-size: 18px;}.iconButton { display: none !important; @media (max-width: 767px) { display: inline-block !important; }}.menu { color: #e0e0e0;}Nothing fancy, it is a basic implementation of TypeScript (I still have a lot to learn) and SCSS modules.
I like SCSS a lot and wrote an introduction for anyone interested:

You can also notice that some components (icons, inputs, ...) are imported from my favorite UI library out there: Material UI.
Speaking of TypeScript, the first days were really painful and tiring but in the end, it appeared to be extremely easy to catch bugs during development.
If you find struggling with TypeScript, you may want to have a look to this post:
I am not so familiar with Redux and I had to spend some time reading the doc in order to make it right.
Another cool tool I worked with is Formik which manages form validation in a smart and simple way.

// Login/index.tsximport React, { useState } from 'react';import { Link } from 'react-router-dom';import axios from 'axios';import { TextField, FormControlLabel, Checkbox, Snackbar, CircularProgress } from '@material-ui/core';import MuiAlert from '@material-ui/lab/Alert';import { useDispatch } from 'react-redux';import { useFormik } from 'formik';import * as Yup from 'yup';import { useHistory } from 'react-router-dom';// Local Importsimport logo from '../../../assets/gc-logo-symbol-nobg.png';import CustomButton from '../../Shared/CustomButton/index';import styles from './styles.module.scss';type Props = {};type SnackData = { open: boolean; message: string | null;};const Login: React.FC<Props> = props => { const dispatch = useDispatch(); const history = useHistory(); const [isLoading, setIsLoading] = useState(false); const [checked, setChecked] = useState(false); const [snack, setSnack] = useState<SnackData>({ open: false, message: null }); // Async Requests const loginSubmit = async (checked: boolean, email: string, password: string) => { setIsLoading(true); let response; try { response = await axios.post(`${process.env.REACT_APP_SERVER_URL}/users/login`, { checked, email: email.toLowerCase(), password: password.toLowerCase() }); } catch (error) { console.log('[ERROR][AUTH][LOGIN]: ', error); setIsLoading(false); return; } if (!response.data.access) { setSnack({ open: true, message: response.data.message }); setIsLoading(false); return; } if (checked) { localStorage.setItem('userData', JSON.stringify({ id: response.data.user.id, token: response.data.user.token })); } dispatch({ type: 'LOGIN', payload: { ...response.data.user } }); history.push(''); setIsLoading(false); }; const formik = useFormik({ initialValues: { email: '', password: '' }, validationSchema: Yup.object({ email: Yup.string().email('Invalid email address').required('Required'), password: Yup.string() .min(6, 'Must be 6 characters at least') .required('Required') .max(20, 'Can not exceed 20 characters') }), onSubmit: values => loginSubmit(checked, values.email, values.password) }); return ( <div className={styles.container}> <Link to="/"> <img className={styles.logo} alt="logo" src={logo} /> </Link> <form className={styles.form}> <TextField className={styles.input} id="email" label="Email" variant="outlined" type="text" helperText={formik.touched.email && formik.errors.email} error={formik.touched.email && !!formik.errors.email} {...formik.getFieldProps('email')} /> <TextField className={styles.input} id="password" label="Password" variant="outlined" type="password" {...formik.getFieldProps('password')} helperText={formik.touched.password && formik.errors.password} error={formik.touched.password && !!formik.errors.password} /> <FormControlLabel className={styles.check} control={ <Checkbox checked={checked} onChange={() => setChecked(prev => !prev)} name="checked" color="primary" /> } label="Remember me" /> <CustomButton type="submit" onClick={formik.handleSubmit} isPurple title="Login" small={false} /> </form> <Link to="/signup"> <p className={styles.guest}>Don't have an account? Sign Up</p> </Link> {isLoading && <CircularProgress />} <Snackbar open={snack.open} onClose={() => setSnack({ open: false, message: null })} autoHideDuration={5000}> <MuiAlert variant="filled" onClose={() => setSnack({ open: false, message: null })} severity="error"> {snack.message} </MuiAlert> </Snackbar> </div> );};export default Login;Sprint 02: Backend
The server is pretty straightforward, it is a classic representation of what a Node/Express server should look like.
I created mongoose models and their associations.
Then, I registered routes and connected corresponding controllers. Inside my controllers, you can find classic CRUD operations and some custom functions.
Thanks to JWT, it was possible to work on the security, which was an important point for me.
Now comes the coolest feature of this app, bidirectional communication or maybe should I say socket.io ?
Here is an example:

// app.js - Server side// Establish a connectionio.on('connection', socket => { // New user socket.on('new user', uid => { userList.push(new User(uid, socket.id)); }); // Join group socket.on('join group', (uid, gid) => { for (let i = 0; i < userList.length; i++) { if (socket.id === userList[i].sid) userList[i].gid = gid; } }); // New group socket.on('create group', (uid, title) => { io.emit('fetch group'); }); // New message socket.on('message', (uid, gid) => { for (const user of userList) { if (gid === user.gid) io.to(user.sid).emit('fetch messages', gid); } }); // Close connection socket.on('disconnect', () => { for (let i = 0; i < userList.length; i++) { if (socket.id === userList[i].sid) userList.splice(i, 1); } });});// AppView/index.tsx - Client side useEffect(() => { const socket = socketIOClient(process.env.REACT_APP_SOCKET_URL!, { transports: ['websocket'] }); socket.emit('new user', userData.id); socket.on('fetch messages', (id: string) => fetchMessages(id)); socket.on('fetch group', fetchGroups); setSocket(socket); fetchGroups(); }, []);I discovered express-validator and it helped a lot to provide input validation on the server side. With no doubt, a library that I am going to use again.
Sprint 03: Fix & Deploy
Alright, the app is looking good and features are working fine. It is time to finish this portfolio project and start a new one.
I am not a pro of cloud solution and complex CI/CD methods so I will satisfy with a free hosting service.
Heroku has a free solution that works fine for the backend. 5 minutes after my node server was uploaded, it was running independantly. Awesome
I experienced some security issues with the client. Usually, everything is ok when I send my React app to Netlify via GitHub but not this time.
Many of my friends could not reach the given URL because of some "security reasons" and I had to buy a domain name to fix it. No big deal here, 15 euros for a year does not seem overpriced.
Finally, images uploaded by users are stored on my Cloudinary account via their public API.
Conclusion
Once again, I enjoyed myself so much working on this project and learned a lot.
It was a pleasure to share the process with you and I can't wait to hear your tips and feedbacks.
This project is nothing more than a portfolio project and there is no "production" intention behind. However, the code is open sourced on GitHub, feel free to do whatever you want with it.
 KillianFrappartDev / GroupChat
Instant messaging webapp project made with React, Redux, TypeScript, Node, MongoDB & Socket.io
I know that there is a lot to improve in term of code quality, security, optimization, ... Whatever, I managed to finish this and the result looks pretty cool and I hope you like it as well.
Live version: GroupChat
Never stop challenging yourself
Original Link: https://dev.to/killianfrappartdev/instant-messaging-app-made-with-react-typescript-node-socket-io-27pc
Dev To
More About this Source Visit Dev To