
An Interest In:
Web News this Week
- April 24, 2024
- April 23, 2024
- April 22, 2024
- April 21, 2024
- April 20, 2024
- April 19, 2024
- April 18, 2024
Some of Our Sources
- Techcrunch
- Technology Review
- The Logo Smith
- Abduzeedo
- TutsPlus - Design
- You The Designer
- Inspiredology
- Reencoded
- Line 25
- Web Resource Source
Help Webnuz
Referal links:
How to quickly mock an API server in a client-side project
Photo by Lars Kienle on Unsplash
Introduction
In this post I'd like to demonstrate two simple tools that you can use to simulate fetching data from an API that can greatly facilitate frontend web development. This can be helpful for focusing on UI development without worrying about the server-side implementation of the project. It can also be helpful for setting up a proof-of-concept projects without having to worrying about protecting real data, or for setting up consistent fake data for end-to-end testing. The two tools I'll demonstrate are Mockaroo for generating sets of dummy data, and json-server for creating a fake API that a front-end application can make requests to.
Prerequisites
This tutorial is aimed squarely at folks getting familiar writing browser-side code with HTML, CSS, and Javascript. That said, these tools can help support more robust front-end projects as well. If you've got a bit of knowledge of HTML and Javascript and some familiarity with the command line, then you'll be able to get the tools in this article to work for you.
Before we start, you'll need the following installed:
- Node.js. I'm using version 14 as I write this, but any LTS version should do.
- Some way of serving static HTML and Javascript files locally. I use http-server and it's fast and really simple, but there are several other options.
To get started, create a tiny web project that'll consist of just an HTML page and a JSON file to will hold our fake data:
$ mkdir file_viewer$ cd field_viewer$ touch index.html db.jsonThese files can stay empty for now; We'll paste in a little bit of code at the end of this tutorial to get it all working.
Step one: Data modeling
I'm imagining a web application that allows users to upload files, then it shows a list of all the files that have been saved.
For this very simple example, we'll create a mock backend for an API that lists all of the file metadata (e.g., file name, file type, date created) after uploading.
Before generating mock data, we need to get some idea of what our data will look like, what properties each object will have when it's returned from the API. We'll need to know the properties we want and what primitive Javascript type they'll be. Our file metadata can look something like this:
id: numberfileName: stringfileType: stringcreatedDate: Dateemail: stringactive: booleanAn example json object with those properties might look like:
{ "id": 30, "fileName": "The Chrysanthemum and the Dandelion", "fileType": ".pdf", "createdDate": "2020-11-18T01:36:46Z", "email": "[email protected]", "active": true}Step two: Generate mock data with Mockaroo
Now that we have an idea of what our data looks like, we can use Mockaroo, a browser-based tool that can generate thousands of realistic looking records for us. Mockaroo has a variety of subscription-based utilities for creating mock APIs, but for this demonstration we'll use it for basic mock data generation which we can do for free.
The first part of Mockaroo is a form for adding properties to our mock data objects. Play around with the different data types that they offer and you'll see it can generate random data for a wide range of situations. Many of the data types have settings to further customize what gets generated. You can customize the behavior further by passing values through your own functions. Below, I'll create settings for each of the properties in our file metadata object, but feel free to add and change anything you find that's interesting. The rest of this tutorial will still work.
Below you can see the settings that I selected for the mock data object above:
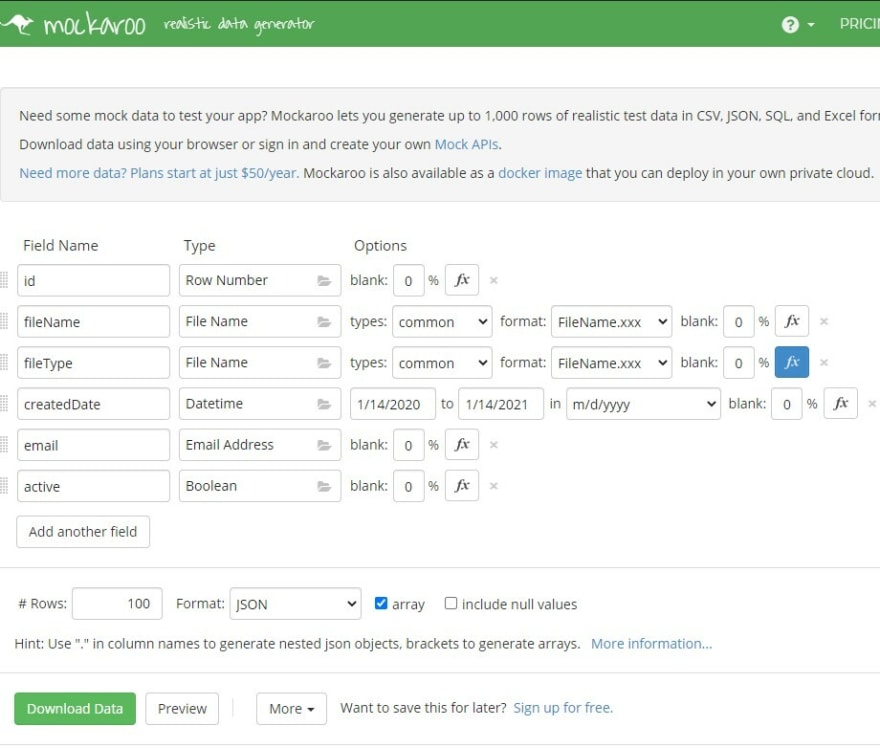
id: For this field, I selected the Row Number data type which will number all of the records in order. This will help with fetching individual records from our fake API further on in this article.
fileName and email: For these two properties, Mockaroo can generate realistic random values by searching for and selecting the File Name and Email types respectively.
createdDate and active: For the createdDate, I can use Mockaroo's Datetime type and set it to return an ISO date which Javascript can parse, and I've set it to return dates from the past year. For the active property (which indicates if our file has been deleted or not), I can return a boolean.
fileType: For file types, I'd like my application to only allow Microsoft Word, Excel, and PDF files to be used, so in Mockaroo, I'll use a custom function to populate those values. Mockaroo allows us to write functions in Ruby to allow values to be transformed before returning. I'm going to click the fx button for the fileType row and add the following:
['.docx', '.xlsx', '.pdf'].sampleThis will randomly select one item from that array and return it.
Now that my data objects are defined, I'll select # Rows: 100 and Format: JSON from the bottom of the form. I'll also select array and deselect include null values. Again, this is what my Mockaroo form looks like:
I'll click the Preview button to make sure my objects look like what I expect, then click Download Data to save it as a JSON file.
Serving the mock data with json-server
Now that we have some data, let's create a fake server that we can fetch it from.
json-server is a very light Node.js tool that can allow a frontend developer to define some API endpoints and sets of data that can be returned to a client application. This way, the mock data is completely separate from the client-side code and it can be switched out once the project is ready for a real API. In this article, we'll just set up the server and make a GET request to it, but json-server can also POST and save objects as well as more advanced uses.
First, install the json-server npm package globally:
$ npm install -g json-serverOpen the file at the root of the FileViewer directory - ./db.json - that you created above. This will hold all of the json data:
As a quick test just to make sure it works, paste the following into db.json:
{ "posts": [ { "id": 1, "title": "json-server", "author": "typicode" } ], "comments": [ { "id": 1, "body": "some comment", "postId": 1 } ], "profile": { "name": "typicode" }}This comes directly from the json-server documentation.
Run the json server with this command:
$ json-server --watch db.jsonIn a browser, paste in http://localhost:3000/posts/1 and it should return the first object in the posts array in our json file:
{ "id": 1, "title": "json-server", "author": "typicode" }Now that we know the server is working, stop the server (CTRL+C).
Open db.json again and clear the contents. We'll define an endpoint for our mock data called files:
{ "files": []}Open the JSON file that was downloaded from Mockaroo (it should be called MOCK_DATA.json). Copy all of the contents. Replace the empty "files" array with these contents so it looks something like this:
{ "files": [ {"id":1,"fileName":"nulla.xls","fileType":".xlsx","createdDate":"2020-02-27T05:10:27Z","email":"[email protected]","active":true}, {"id":2,"fileName":"sapien urna.png","fileType":".xlsx","createdDate":"2020-12-20T05:12:00Z","email":"[email protected]","active":false}, {"id":3,"fileName":"vel augue.ppt","fileType":".docx","createdDate":"2020-10-03T05:06:18Z","email":"[email protected]","active":true}, {"id":4,"fileName":"mauris morbi non.txt","fileType":".docx","createdDate":"2020-04-26T13:44:41Z","email":"[email protected]","active":true}, {"id":5,"fileName":"sapien sapien non.ppt","fileType":".pdf","createdDate":"2020-04-16T17:56:06Z","email":"[email protected]","active":true}, // ... ]}Run json-server again and request the /files endpoint: http://localhost:3000/files.
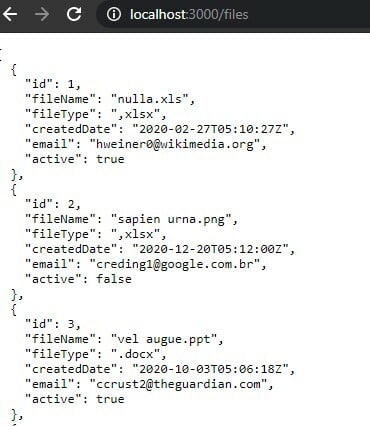
It should load all 100 of the fake records that Mockaroo generated. Add an id number at the end of the url (http://localhost:3000/files/42) and it should return the one record with that id.

Finally, we can make an AJAX request from inside of our (tiny) web application to make sure it can connect with our front end code.
Open the index.html file that was created earlier and paste the following:
<!DOCTYPE html><html> <head> <title>File Viewer</title> <link href="css/bootstrap.min.css" rel="stylesheet"> </head> <body> <h1>File Viewer</h1> <script> fetch('http://localhost:3000/files') .then(response => response.json()) .then(data => console.log('Data from our mock backend: ', data)); </script> </body></html>Open a separate terminal window and cd into the FileViewer project created above. Start an HTTP server from this location (if you installed http-server, the command is just $ http-server --open).
In a browser, navigate to the http-server url (it would be http://localhost:8080 by default) and open a dev tools console. The page should have printed the mock data to the console.

Conclusion
In this tutorial, we walked through a very basic way to define data for a web application, generate hundreds of realistic records, then serve them from a mock API that can be consumed by the application. This is only a very bare minimum implementation of these steps. I highly advise going through the Mockaroo and json-server documentation for a wide variety of other uses and configurations that can suit your frontend development needs even more closely.
Original Link: https://dev.to/jsheridanwells/how-to-quickly-mock-an-api-server-in-a-client-side-project-1nji
Dev To
More About this Source Visit Dev To