
An Interest In:
Web News this Week
- March 21, 2024
- March 20, 2024
- March 19, 2024
- March 18, 2024
- March 17, 2024
- March 16, 2024
- March 15, 2024
Some of Our Sources
- Spoon Graphics
- Six Revisions
- TutsPlus - Design
- You The Designer
- Fuel Your Creativity
- Inspiredology
- Line 25
- Web Resource Source
- Android Dissected
- Android Headlines
Help Webnuz
Referal links:
Learn the basics of Socket.io by making a Multiplayer Game
With the increasing demand for Multiplayer Games in today's world, developers must take note of the technologies that go into creating such thoroughly enjoyable and immersive games, while at the same time, keeping in mind the challenges that come with them. Real-time communication of data between players is key when it comes to creating multiplayer games, and there are various libraries capable of handling the intricacies entailed within. One such popular library is Socket.io, which finds major use in the creation of chat applications, real-time collaborative environments, games and whatnot.

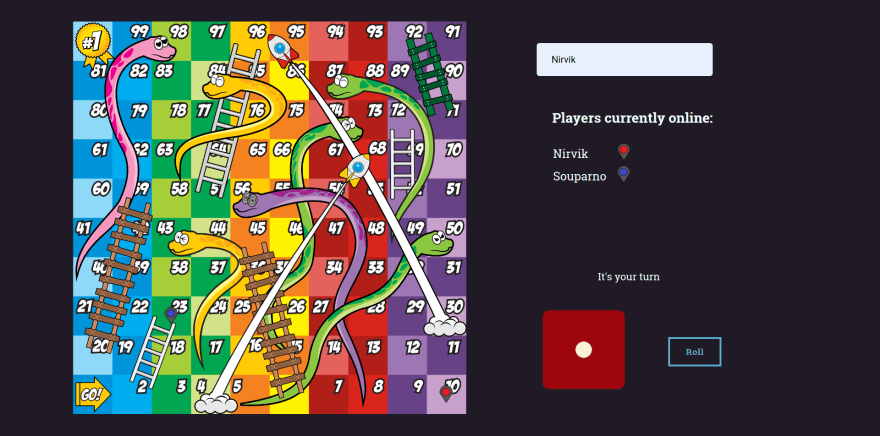
So, we decided to dabble into the basics of creating a multiplayer game that would appeal to many and at the same time be simple enough to code. This is when it crossed our minds to recreate Snakes and Ladders, the iconic board game that a lot of us spent countless hours on, growing up.
Prerequisites
There aren't any prerequisites as such, as we will be coding the game from scratch. However, some basic knowledge of setting up an Express server on Node.js and some Vanilla JS would ensure a thorough understanding of the topics covered.
The Project
The entire project has been divided into the following sections for clarity and the separation of concerns:
What we'll be making
Let's formulate what we need to do to achieve the desired result. First of all, we need a bare-minimum server that will send requests to all the connected clients. We'll need to set up socket connections for real-time communication. Finally, we'll need some frontend HTML, CSS and Vanilla JS code for the game logic.
Downloading the Starter Project
We have provided the starter code for the project so that you can directly get down to coding the important stuff without having to go through the trouble of having to organize all the game assets and files into relevant folders. A completely written css file has also been provided to eliminate the need for styling the html components from scratch, as it is not directly related to the purpose of the article. You are always free to include your own custom css if you want to, but it won't be necessary. You can download the starter project here.
Installing the necessary packages
Once you have downloaded the starting files, you need to install the necessary packages. Inside the main folder, you will find the package.json file. Run the following command to install the required packages, namely, express, socket.io and http:
npm installYou must have Node.js installed to run the command. If Node.js is not installed, go to the Node.js official website, as linked above and download the latest version for your desired operating system. Once downloaded and installed, run the command again.
Setting up the server
We begin by setting up our express server and socket.io. Write the following code inside the server.js file:
const express = require("express");const socket = require("socket.io");const http = require("http");const app = express();const PORT = 3000 || process.env.PORT;const server = http.createServer(app);// Set static folderapp.use(express.static("public"));// Socket setupconst io = socket(server);server.listen(PORT, () => console.log(`Server running on port ${PORT}`));The Skeleton
All the front-end code for a Node.js and Express project normally goes into a public folder, which we have already specified inside server.js. Before proceeding to write the game logic, it is important to create an html file with the necessary components for the user to be able to interact with the game. Go ahead and include the following code in the index.html file inside the public folder:
<!DOCTYPE html><html lang="en"> <head> <meta charset="UTF-8" /> <meta name="viewport" content="width=device-width, initial-scale=1.0" /> <title>Snakes and Ladders</title> <link href="https://fonts.googleapis.com/css?family=Roboto" rel="stylesheet" /> <link rel="stylesheet" href="css/styles.css" /> </head> <body> <div class="board"></div> <img src="images/red_piece.png" alt="" hidden="true" id="red-piece" /> <img src="images/blue_piece.png" alt="" hidden="true" id="blue-piece" /> <img src="images/yellow_piece.png" alt="" hidden="true" id="yellow-piece" /> <img src="images/green_piece.png" alt="" hidden="true" id="green-piece" /> <div class="container"> <canvas id="canvas"></canvas> </div> <div class="info-box"> <div class="form-group"> <input type="text" class="form-input" id="name" placeholder="Your name" required /> <button class="btn draw-border" id="start-btn">Join</button> </div> </div> <div id="players-box"> <h3>Players currently online:</h3> <br> <table id="players-table"></table> </div> <div id="current-player"></div> <button class="btn draw-border" id="roll-button" hidden>Roll</button> <div class="dice"> <img src="./images/dice/dice1.png" alt="" id="dice" /> </div> <button class="btn draw-border" id="restart-btn" hidden>Restart</button> <script src="/socket.io/socket.io.js"></script> <script src="js/index.js"></script> </body></html>The index.html file will contain a very special element, the canvas, where our game would come to life. The canvas tag is used to draw graphics using Javascript. It has built-in functions for drawing simple shapes like arcs, rectangles, lines. It can also display text and images.
For socket.io to be able to communicate with the back-end express server from the front-end, we add the following script tag:
<script src="/socket.io/socket.io.js"></script>Finally, we use another script tag pointing to the index.js file, which will hold the game logic as well as the code for socket communication across the clients.
Setting up socket connection
The way that Socket.io works, is pretty simple. Essentially, the clients emit certain events, which the server can listen to and in turn pass them on to all or a select portion of the clients, that find a use for that information. To establish the connection, we need to add the connection event listener to the io object in the server.js file as follows:
io.on("connection", (socket) => { console.log("Made socket connection", socket.id);});This tells the server to establish a socket connection with all the clients and display the id of the sockets as soon as the connection is established. The console.log statement serves as a way to ensure a successful connection in case things go wrong.
At the same time, inside the index.js file under the public folder, add the following code:
const socket = io.connect("http://localhost:3000");This tells the socket to connect to the front-end of the client, which is available at the mentioned URL.
The Game Logic
Now, we will divert our focus to the logic that dictates the game. We will write all the code in the index.js file. The entire logic can be divided into the following sub-categories:
- Initialization -We declare the following global variables:
let canvas = document.getElementById("canvas");canvas.width = document.documentElement.clientHeight * 0.9;canvas.height = document.documentElement.clientHeight * 0.9;let ctx = canvas.getContext("2d");let players = []; // All players in the gamelet currentPlayer; // Player object for individual playersconst redPieceImg = "../images/red_piece.png";const bluePieceImg = "../images/blue_piece.png";const yellowPieceImg = "../images/yellow_piece.png";const greenPieceImg = "../images/green_piece.png";const side = canvas.width / 10;const offsetX = side / 2;const offsetY = side / 2 + 20;const images = [redPieceImg, bluePieceImg, yellowPieceImg, greenPieceImg];const ladders = [ [2, 23], [4, 68], [6, 45], [20, 59], [30, 96], [52, 72], [57, 96], [71, 92],];const snakes = [ [98, 40], [84, 58], [87, 49], [73, 15], [56, 8], [50, 5], [43, 17],];First of all, we set the size of the canvas to match the dimensions of the game board and get the context of the canvas, which will be required to draw player-pins. After this, we declare a collection players, which will be required to keep track of the players currently in the game and a currentPlayer that stores a reference to the player who is playing the game on the particular front-end client. Then we store references to the four player-pins, namely, red, blue, yellow and green. We initialize the variables side, offsetX and offsetY which will be required to adjust the position of the player-pins on the canvas. Finally, the variables ladders and snakes are initialized, which are collections that store the set of points connected by ladders and snakes respectively, as depicted on the game board. This will be required to alter the position of the player-pins when the land on a square with a ladder or a snake.
- The Player class - We wanted to use an OOP(Object Oriented Programming) paradigm to represent the players, which makes it easier to assign relevant properties and functions. The
Playerclass is modelled as follows:
class Player { constructor(id, name, pos, img) { this.id = id; this.name = name; this.pos = pos; this.img = img; } draw() { let xPos = Math.floor(this.pos / 10) % 2 == 0 ? (this.pos % 10) * side - 15 + offsetX : canvas.width - ((this.pos % 10) * side + offsetX + 15); let yPos = canvas.height - (Math.floor(this.pos / 10) * side + offsetY); let image = new Image(); image.src = this.img; ctx.drawImage(image, xPos, yPos, 30, 40); } updatePos(num) { if (this.pos + num <= 99) { this.pos += num; this.pos = this.isLadderOrSnake(this.pos + 1) - 1; } } isLadderOrSnake(pos) { let newPos = pos; for (let i = 0; i < ladders.length; i++) { if (ladders[i][0] == pos) { newPos = ladders[i][1]; break; } } for (let i = 0; i < snakes.length; i++) { if (snakes[i][0] == pos) { newPos = snakes[i][1]; break; } } return newPos; }}Each Player object requires an id, a name, a position on the board denoted by pos and a pin image as denoted by img. We then write the functions draw, updatePos and isLadderOrSnake respectively, to draw and update the position of the players and to find whether the player's square on the board has a ladder or a snake. The updatePos method just updates pos with the number that the player just rolled on the dice and checks a condition that keeps the player from going beyond the 100th square on the board. One thing to note here is that the player's position, though starts at 1, is denoted by 0, which makes the drawing logic simpler. The isLadderOrSnake function takes an argument as the position of the player and compares it with the squares in the collection ladders and snakes and accordingly returns the new position of the player on the board. The draw function might seem a bit complicated but all it does is draw the player-pins on the correct squares on the board. The function takes care of the alternate right and left movement across rows and the upward movement across columns.
- The utility functions - Apart from the functions that we wrote inside the
Playerclass, we need to write two more utility functions as follows:
function rollDice() { const number = Math.ceil(Math.random() * 6); return number;}function drawPins() { ctx.clearRect(0, 0, canvas.width, canvas.height); players.forEach((player) => { player.draw(); });}The rollDice function returns a random number between 1 and 6 while the drawPins function cycles through the players collection and draws the respective player-pins using their draw function.
- Firing socket events and handling them - So far, we have written the code for the game entities. However, if we don't fire socket events from the front-end, none of the players will be able to communicate their positions and other data among themselves. First of all, add the following line of code below the
io.connectfunction in theindex.jsfile:
socket.emit("joined");Then add the following event listeners to the relevant html elements as follows:
document.getElementById("start-btn").addEventListener("click", () => { const name = document.getElementById("name").value; document.getElementById("name").disabled = true; document.getElementById("start-btn").hidden = true; document.getElementById("roll-button").hidden = false; currentPlayer = new Player(players.length, name, 0, images[players.length]); document.getElementById( "current-player" ).innerHTML = `<p>Anyone can roll</p>`; socket.emit("join", currentPlayer);});document.getElementById("roll-button").addEventListener("click", () => { const num = rollDice(); currentPlayer.updatePos(num); socket.emit("rollDice", { num: num, id: currentPlayer.id, pos: currentPlayer.pos, });});document.getElementById("restart-btn").addEventListener("click", () => { socket.emit("restart");});The joined event emitted by the socket informs a new player who has just joined the game about the players who have already joined the game, which means their position and their pin image. That is why it is fired as soon as a new user joins. Following this, we have added three click event listeners to the start button, roll button and restart button. The start button takes the name of the newly joined player and creates a new currentPlayer object. Following this, a few of html tags are manipulated to convey the status of the game, following which a join event is emitted, which notifies the server of the newly joined player. The roll button event listener simply rolls the dice and updates the position of the currentPlayer and sends the number rolled on the dice along with their id and name. The restart button as the name suggests fires a restart event from the front-end.
We also need to be able to receive these events on the server-side. Write the code as provided below inside the connection event listener of the io object3:
socket.on("join", (data) => { users.push(data); io.sockets.emit("join", data); }); socket.on("joined", () => { socket.emit("joined", users); }); socket.on("rollDice", (data) => { users[data.id].pos = data.pos; const turn = data.num != 6 ? (data.id + 1) % users.length : data.id; io.sockets.emit("rollDice", data, turn); }); socket.on("restart", () => { users = []; io.sockets.emit("restart"); });});The backend has the same event listeners, along with a users collection, which stores and relays information about the players who are playing.
We also need to be able to handle these events on the front-end and the code for that is:
socket.on("join", (data) => { players.push(new Player(players.length, data.name, data.pos, data.img)); drawPins(); document.getElementById( "players-table" ).innerHTML += `<tr><td>${data.name}</td><td><img src=${data.img} height=50 width=40></td></tr>`;});socket.on("joined", (data) => { data.forEach((player, index) => { players.push(new Player(index, player.name, player.pos, player.img)); console.log(player); document.getElementById( "players-table" ).innerHTML += `<tr><td>${player.name}</td><td><img src=${player.img}></td></tr>`; }); drawPins();});socket.on("rollDice", (data, turn) => { players[data.id].updatePos(data.num); document.getElementById("dice").src = `./images/dice/dice${data.num}.png`; drawPins(); if (turn != currentPlayer.id) { document.getElementById("roll-button").hidden = true; document.getElementById( "current-player" ).innerHTML = `<p>It's ${players[turn].name}'s turn</p>`; } else { document.getElementById("roll-button").hidden = false; document.getElementById( "current-player" ).innerHTML = `<p>It's your turn</p>`; } let winner; for (let i = 0; i < players.length; i++) { if (players[i].pos == 99) { winner = players[i]; break; } } if (winner) { document.getElementById( "current-player" ).innerHTML = `<p>${winner.name} has won!</p>`; document.getElementById("roll-button").hidden = true; document.getElementById("dice").hidden = true; document.getElementById("restart-btn").hidden = false; }});socket.on("restart", () => { window.location.reload();});Most of the socket event listeners are fairly simple, and a good look at the function statements tells you that all we do here is display the current status of the game by disabling and enabling the necessary html elements.
Finishing up
Now that everything is in place, it is time to fire up the terminal and run node server.js, which exposes the Node.js server to the port 3000 of localhost. Following this, you can visit http://localhost:3000 with multiple browser windows and test out the game.
Takeaways
This project is meant to serve an entry point to the endless possibilities of the realm of multiplayer games and socket communication. We have aimed at explaining the absolute basics here and there is room for a lot of improvement. For instance, currently, the game allows only 4 players to play concurrently but in reality, such a game is supposed to have specific rooms which players can join, thus allowing several players to concurrently access the game. You can also add an in-game chatbox, where players can chat with each other while playing. The movement of the player-pins on the canvas is also instantaneous, which isn't that attractive. It is highly recommended that you try out adding such features to the game to get an even stronger grasp of the underlying technicalities.
Resources
 Soupaul / snakes-and-ladders-multiplayer
A multiplayer Snakes and Ladders Game made using NodeJS and Socket.IO
The master branch contains the completed project, whereas the starter branch provides the starting code.
This article was co-authored by:


We hope you found this insightful.
Do visit our website to know more about us and also follow us on :
Also, don't forget to drop a like and comment below if you are interested in learning more about game development using Javascript. You can freely raise doubts and suggest improvements.
Until then,
Stay Safe and May The Source Be With You!

Original Link: https://dev.to/nitdgplug/learn-the-basics-of-socket-io-by-making-a-multiplayer-game-394g
Dev To
More About this Source Visit Dev To