
An Interest In:
Web News this Week
- April 1, 2024
- March 31, 2024
- March 30, 2024
- March 29, 2024
- March 28, 2024
- March 27, 2024
- March 26, 2024
Some of Our Sources
- Technology Review
- Simplebits
- The Logo Smith
- Six Revisions
- Abduzeedo
- Noupe
- Fudge Graphics
- Web Design Ledger
- Codrops
- Dev To
Help Webnuz
Referal links:
Nginx concepts I wish I knew years ago
Nginx is a web server that is used as a reverse proxy, load balancer, mail proxy, and HTTP cache and follows the Master-Slave Architecture.
Woah! A complicated term and a confusing definition filled with big confusing words, right? Don't worry, I can help out with first understanding the basic barebones of the architectures & terms in Nginx. Then we'll move on to installing and creating Nginx configurations.

To keep things easy, just remember: Nginx is an amazing web server.
Web server, in simple terms, is like a middleman. Let's say for instance you want to go to dev.to so you type the address https://dev.to, your browser finds out the address of a webserver for https://dev.to and then direct it to a backend server which will give back the response to the client.
Proxy v/s Reverse Proxy
The underlying feature of Nginx is proxies. So it's required to understand what is proxy and reverse proxy now.
Proxy
Alright, so we have clients (>= 1), an intermediate web server(in this case, we call it proxy), and a server. The main thing that happens in this is that the server doesn't know which client is requesting. Bit confusing? Let me explain with a diagrammatic sketch.

In this, let client1 & client2 send requests request1 & request2 to the server through the Proxy server. Now the backend server will not know whether request1 is sent by client1 or client2 but performs the operation.
Reverse Proxy
In simplest terms, a reverse proxy is a reverse of what a proxy does. Here, we will have let's say a single client, an intermediate web server, and several backend servers (>=1). Let's do this with a diagrammatic sketch as well!
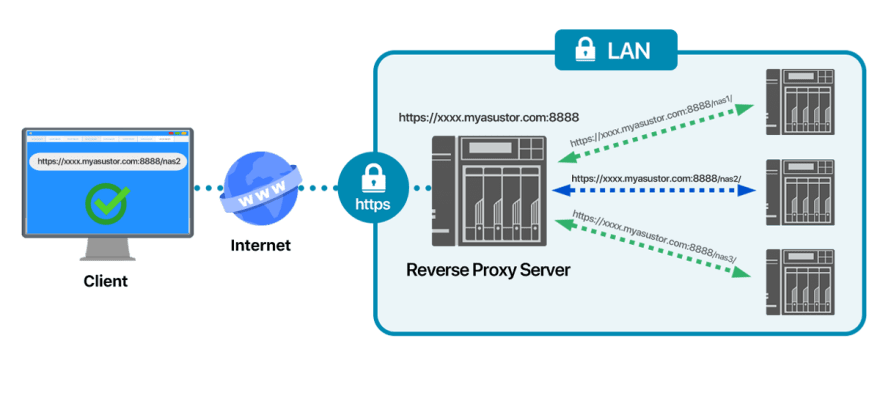
In this, a client will send a request through the webserver. Now the webserver will send the particular request to any of the many servers through an algorithm, one being round-robin (the cutest one!), and send back the response through the webserver to the client. So here, the client isn't aware which backend server it is interacting with.
Load Balancing
Damn another new term but this term is simpler to understand as it is one instance application of reverse proxy itself.
Let's go with the basic difference. In load balancing, you must have 2 or more backend servers but in reverse proxy setup, that's not a necessity. It can work with even 1 backend server.
Let's look at it from behind the scene, if we have a lot of requests from the clients this load balancer checks the status of each backend server and distributes the load of the requests, and sends a response faster to the client.
Stateful v/s Stateless Applications
Okay, guys, I promise I am real close to starting with the Nginx code. Let's get all the barebones clear!
Stateful Applications
This application store an additional variable for saving the information that can work for a single instance of a server only.
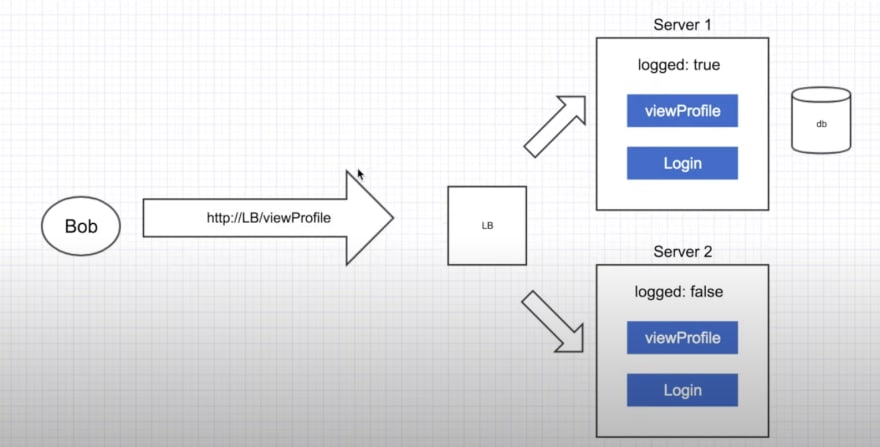
What I mean is if for a backend server server1 some information is stored it won't be stored for the server server2 thus the client (here Bob) interacting may/may not get the desired result as it could be interacting with server1 or server2. In this case, server1 will allow Bob to view the profile but server2 won't. Thus, even if it prevents many API calls with the database and is faster, it can lead to this problem across different servers.
Stateless Applications
Now stateless is more API calls with the database but fewer problems exist when it comes to the interaction of the client with different backend servers.

I know you didn't get what I mean. It's simple if I send a request from a client to let's say backend server server1 through web server it will provide a token back to the client to use to access any further requests. The client can use the token and send a request to the webserver. This web server will send the request along with the token to any of the backend servers and each will provide the same desired output.
What is Nginx?
Nginx is the web server and I have been using the term web server in the entire blog till now. It's like a middleman honestly.
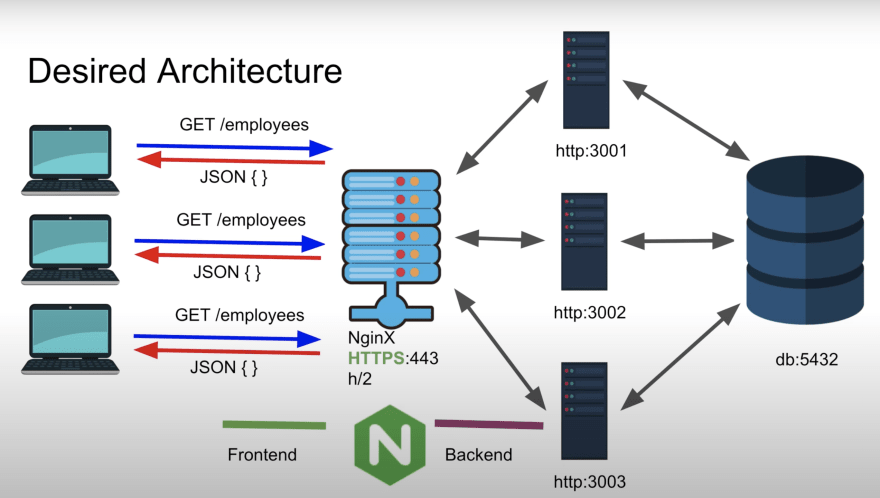
The diagram isn't confusing, it's just a combination of all the concepts I have explained till now. In this, we have 3 backend servers running at port 3001, 3002, 3003 and all these backend servers use the same database running at port 5432.
Now when a client sends a requests GET /employees on https://localhost (by default on port 443), it will pass this requests to any of the backend server based on the algorithm and take the information from the database and send the JSON back to the Nginx web server and sent back to the client.
If we're to use an algorithm such as round-robin, what it'll do is let's say client 2 has sent a request to https://localhost then the Nginx server will pass the request first to port 3000 and send the response back to the client. For another request, Nginx will pass the request to 3002 and so on.
Too much information right! But by this point, you have a clear understanding of what Nginx is and the terms used with Nginx. Now we'll move on the understanding the installation and configuration techniques.
Installation Process
We're here at last! I am so proud if you've understood the concept to reach the coding part of Nginx at last.

Okay, let me just tell you the installation process is super duper easy on any system just one-liner honestly. I am a Mac OSX user, so will be writing the commands based on it. But it will be done similarly for ubuntu and windows and other Linux distros.
$ brew install NginxThis is only required and you have Nginx on your system now! Amazing I am sure!
So easy to run!
To run this and check if Nginx is working on your system, it's again way too simple.
$ nginx # OR $ sudo nginxAfter this, go on your favorite browser and check out http://localhost:8080/ and you'll get the below-observed screen!

Basic Configuration Setup & Example
Okay, we will be doing an example and seeing the magic of Nginx.
First, create the directory structure in the local machine as follows:
. nginx-demo content first.txt index.html index.md main index.html temp-nginx outsider index.htmlAlso, include basic context within the html and md files.
What we're trying to achieve?
Here, we have two separate folders nginx-demo and temp-nginx, each containing static HTML files. We're going to focus on running both these folders on a common port and set rules that we like.
Coming back on track now. For making any changes to the Nginx default configuration, we will make a change in the nginx.conf that is located in the usr/local/etc/nginx path. Also, I have vim in my system so I make changes using vim but you're free to use your editor of choice.
$ cd /usr/local/etc/nginx$ vim nginx.confThis will open a file with the default nginx configuration which I really don't want to use. Thus, the way I normally do is make a copy of this configuration file and then make changes to the main file. We'll be doing the same as well.
$ cp nginx.conf copy-nginx.conf$ rm nginx.conf && vim nginx.conf This will now open an empty file and we'll be adding our configuration for it.
Add a basic setup of configuration. It is a must requirement to add the
events {}as it is generally used to mention the number of workers for Nginx architecture. We are usinghttphere to tell Nginx that we'll be working at layer 7 of the OSI model.In this, we've told nginx to listen on port 5000 and to point to the static file mentioned within the main folder.
http { server { listen 5000; root /path/to/nginx-demo/main/; } } events {}We'll add additional rules next for the
/contentand/outsiderURL where outsider will be pointing to a directory outside the root directory mentioned in the 1st step.Here
location /contentsignifies that whichever root I define in the leaf directory for this, the content sub URL will be added to the end of the root URL defined. Thus, here when I specify root asroot /path/to/nginx-demo/it simply means that I am telling Nginx athttp://localhost:5000/path/to/nginx-demo/content/show me the content of the static files within the folder.http { server { listen 5000; root /path/to/nginx-demo/main/; location /content { root /path/to/nginx-demo/; } location /outsider { root /path/temp-nginx/; } } } events {}Pretty cool! Now Nginx is not only limited to defining URL roots but also to set rules such that I can block the client from accessing certain files.
We're going to write an additional rule within our main server defined to block any .md files from being accessed. We can use regex in Nginx so we'll define the rule as follows:
location ~ .md { return 403; }Let's end this by learning the popular command
proxy_pass. Now we've learned what a proxy and reverse proxy is so here we'll begin by defining another backend server running at port 8888. So now we've got 2 backend servers running at port 5000 and 8888.What we'll do is that when the client accesses port 8888 through Nginx we'll pass this request to port 5000 & send the response back to the client!
server { listen 8888; location / { proxy_pass http://localhost:5000/; } location /new { proxy_pass http://localhost:5000/outsider/; } }
Let's see the final complete code altogether!
http { server { listen 5000; root /path/to/nginx-demo/main/; location /content { root /path/to/nginx-demo/; } location /outsider { root /path/temp-nginx/; } location ~ .md { return 403; } } server { listen 8888; location / { proxy_pass http://localhost:5000/; } location /new { proxy_pass http://localhost:5000/outsider/; } } } events {}Run this code using sudo nginx.
Extra Nginx Commands!
To start an Nginx web server for the first time.
$ nginx #OR $ sudo nginxTo reload a running Nginx web server.
$ nginx -s reload #OR $ sudo nginx -s reloadTo stop a running Nginx web server.
$ nginx -s stop #OR $ sudo nginx -s stopTo know which processes of Nginx are running on your system.
$ ps -ef | grep Nginx
The 4th command is important when by any chance the first 3 commands lead to some error, what you can normally do is find all running Nginx processes using the 4th command and kill the processes, and start it again.
To kill a process, you need the PID and then kill it using:
$ kill -9 <PID>#OR $ sudo kill -9 <PID>We've come to an end with the basic understanding of Nginx and its configuration. If you're interested in the advanced configuration of Nginx, do let me know through comments. Till then enjoy coding and explore the magic of Nginx!
Original Link: https://dev.to/aemiej/nginx-concepts-i-wish-i-knew-years-ago-23o0
Dev To
More About this Source Visit Dev To