
An Interest In:
Web News this Week
- March 21, 2024
- March 20, 2024
- March 19, 2024
- March 18, 2024
- March 17, 2024
- March 16, 2024
- March 15, 2024
Some of Our Sources
- Simplebits
- Web Designer Wall
- The Logo Smith
- Smashing Magazine
- You The Designer
- Inspiredology
- Freelance Switch
- Design Modo
- Web Resource Source
- Daily Now
Help Webnuz
Referal links:
I Developed A Little Scanner Web App At Christmas To Learn New Skills
This last Christmas holidays, except visiting my parents for a couple of days, after having forced myself in a sort of auto-lockdown period first, I did not have any big plans. Thats why, I took the opportunity to improve my software development knowledge.
As I better learn concept by applying them to real application rather than writing examples, I decided to create a little scanner Progressive Web Apps entirely made with the web.
I called it Rebel Scan because, it is just a little scanner app, you rebel scum!
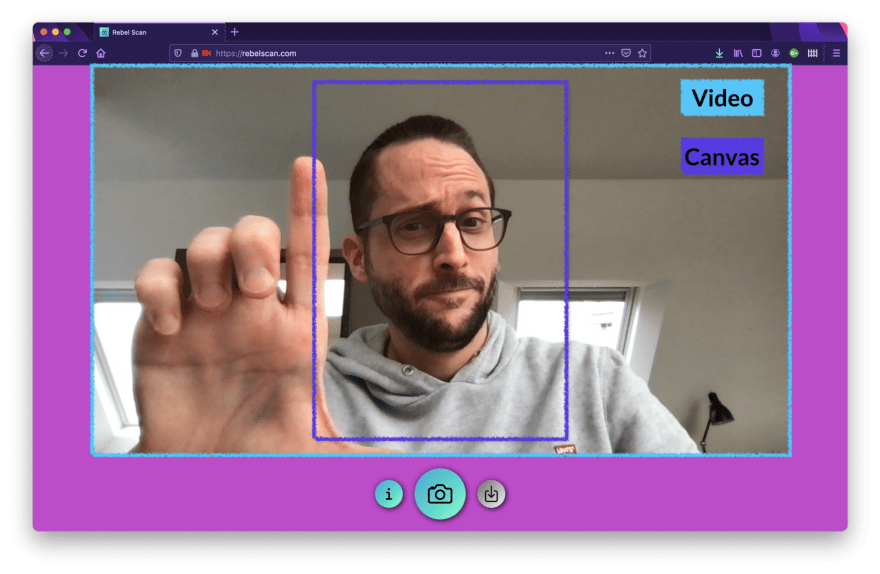
A potato demo video of Rebel Scan
Introduction
It is important to note that this little scanner does not aim to be the most perfect scanner the world has ever seen. I am not even sure I will use it in the future. The image processing is not the best, there is no text extraction and on mobile it only shares PNG (see last chapter about it). It had absolutely no other goal that helping me learn new skills.
Therefore, before development begins, I defined the following objectives I never had tried before and, which I was eager to test:
- Give a try to Next.js
- Capture and crop a video stream using the MediaDevices.getUserMedia() API
- Generate React bindings for a Web Component developed with Stencil
- Share files using strictly only the Web Share API
Without revealing the ending, I can confirm it was a success and, I was able to develop my little application. However, there was a couple of surprises along the way. Lets tackle these, step by step.
Meta
The Progressive Web App, the result of this post and my experiment, is available online at rebelscan.com and its source code is available on GitHub.
Next.js
Prior to this experiment and, thus since around a year, my favorite tech stack to implement websites was: Gatsby for the development, GitHub actions for deployment purpose and Firebase as hosting.
Next.js by Vercel, without any surprise, was an excellent experience. I only scratched its surface and, I only used it to deploy a pre-rendered app but, it confirmed all the positive tweets and blogs I read about it.
It is really well documented and getting started is straight forward. In comparison to Gatsby, I really liked that it took me absolutely no time to discover how to set up TypeScript and, that the configuration seemed closer to a bare-bones dependency setup.
In addition, Next.js has a built-in support for internationalized (i18n) routing. Needless to say, as a Swiss-French person, living in the Swiss-German part and writing posts in English, I greatly value such a feature .
On the other side, without having done any research or statistics, I have the impression that the Gatsbys ecosystem, in terms of plugins notably, is currently wider. As for example, with Gatsby there is one to generate automatically both sitemaps.xml and robots.txt where, with Next.js, it would need a bit more coding.
That being said, I am talking about peanuts. Both stacks are amazing and let me unleash performant websites and applications. I love them both .

MediaDevices.getUserMedia()
Oh boy, this one gave me a hard time .
The API itself is a wonderful piece of software and being able to capture a video stream with the Web is just amazing but, the feature I was looking to develop was a bit challenging regarding its responsiveness across devices. Indeed, my goal was to display the full video behind a cropped section (two distinct elements), without breaking points, and this regardless of the screen or camera size.
It aint probably rocket science for some but, to me, it was a bit challenging for the following reasons:
- You cannot use the video without HTTPS (from another device)
- The video size is unpredictable
- Finding the proper ratio and method took many iterations
HTTPS
It is possible to develop and test the camera stream locally but, as soon as you want to test it with your mobile phone, you need an HTTPS connection.
Therefore, I had two options. Either generate a certificate and run an HTTPS server on my laptop to which, I would connect from my device, or, use the commit, push, test, try harder method.
I let you check my commit history of the 2nd January 2020 to guess which method I went for .

The Video Size Is Unpredictable
Ask for portrait, gets landscape. Asks for landscape, gets portrait.
Basically, you Android phone is like one of my best friend: he does what he wants, period.
const stream = await navigator.mediaDevices.getUserMedia({ audio: false, video: { width: {ideal: 1920}, height: {ideal: 1080}, facingMode: 'environment', },});const [track] = stream.getVideoTracks();const settings = track.getSettings();videoRef.current.width = settings.width;videoRef.current.height = settings.height;// Android (portrait): <video width="1080" height="1920"/>Ratio
It took me several iterations to find out the appropriate method and ratio(video to cropping section) to achieve my goal.
In a first version, it all worked out but, the quality of the scanned document was way to pixelated. In a second one, I did manage to improve it but, once applied on my phone, it felt like having an enormous zoom constantly added to the camera.
Finally, I figured out that I had both to handle portrait and landscape video sizes, crop these to my canvas and to find the exact CSS rules to make everything responsive for any devices.
const canvasPadding = 64;let y = videoSize.height - canvasPadding;let x = (y * 210) / 297;const maxWidth = videoSize.width - canvasPadding;if (x > maxWidth) { x = maxWidth; y = (x * 297) / 210;}const deltaX = (videoSize.width - x) / 2;const deltaY = (videoSize.height - y) / 2;const context = scanRef.current.getContext('2d');context.drawImage(videoRef.current, deltaX, deltaY, x, y, 0, 0, 2100, 2970);In above snippet, I calculate the section of the image, using a format A4, and I am looking to crop it while ensuring that the results wont be larger than the video (remember, the size is unpredictable). If so, I do the contrary and take the width as maximum value. Finally, I draw my section in a 2D canvas with my expected ratio.

Source: MDN Web Docs CanvasRenderingContext2D.drawImage()
Takeaway
It felt a bit like roller coaster of emotion developing this video conversion until I was finally able to implement my original idea but, I am happy with the results and, I will for sure reuse this technology in the future in news apps. The web is pretty slick (once in place ).
One more thing
Oh and, One more thing: it might not work on iPhone even if it works like a charm with Safari on OSX. I just did a quick test with my (real) iPhone and it thrown an error.
NotAllowedError: The request is not allowed by the user agent or the platform in the current context, possibly because the user denied permission.
After some research, I found a Webkit post explaining that video can, under certain rules, be automatically played on iOS. It did not work anyway therefore, I changed the UX on iPhone to start the process only after a user interaction.
Nevertheless, it did solve the video issue but, lead to another one. The video was not streamed in the cropped canvas.
As I did not find any solution, in last resort, I decided to play my last card: calling my mum to ask her to test the feature on her iPad . On the phone, she tried it and, called then my dad to take photos of the device to send me these "screenshots" per WhatsApp .
To my surprise, it dit work out! Therefore, I came to the conclusion the iPhone with low memory cannot stream a video to canvas.
React bindings with Stencil
If you read for the first time one of my blog post, you probably dont know but, I am a big fan of Web Components and Stencil.
Even if I created multiple libraries and applications, notably most of the eco-system of our open source editor for presentations, DeckDeckGo, I never had tried before to generate bindings for frameworks .
Naturally, I thought that using this experiment was a good excuse to do so.
As any other Stencil things related, I have to say that once again, the all process was relatively easy. I basically just had to follow the documentation.
The only aha moment I had regarding this subject happened when I finally understood that the bindings have to be packaged and, delivered through NPM by another project, another repo!
Thats why the output target are made for. They copy the definitions file from the Web Components project to the bindings one.
Once every thing was in place and published, I was able to use my Web Component to apply Instagram-like WebGL filters to photos in my experiment, in order to add the scanning effect, using a combination of desaturate, saturation and contrast.
Meantime, since I was already there, I also developed some improvements and breaking changes to the component. I even implemented (see that branch) the usage of an OffscreenCanvas to defer the WebGL work to a web worker in order to improve the rendering in my little scanner. Unfortunately, I ultimately decided to not unleash this feature. It is really well supported by Chrome but, only available behind a flag in Firefox and, not even implemented in Safari.
Checkout its showcase.
Share Files With Web Share API
I used the Web Share API in the past but, never to share files. Because the results of the little scanner had to be PDF and, to be stored in the cloud, it was the perfect use case too.
Regarding this feature, I would lie if I would not tell you, I lost two good hours while implementing it. Not that the code or API was unclear, even if the Typescript definition does not handle yet the files option, but, I faced some weird errors at runtime. Even in Chrome which is known to be always top notch when it comes to API implementation.
DOMException: Failed to execute share on Navigator: Must be handling a user gesture to perform a share request.
Finally, I figured out that these two following were my mistakes:
- The
filesto be share have to beFile. It does not work withBlob. - Currently, PDF are not supported! I found out a list of supported formats, stored as a Google Doc (?), linked in the middle of a blog post of web.dev. After tweeting about it, it was confirmed it was a known issue or request.
Well, since I could not share PDF, at least for now, I used PNG and, it worked out like a charm ultimately.
export const shareImage = async (src) => { const res = await fetch(src); const blob = await res.blob(); const file = new File([blob], 'rebelscan.png', {type: 'image/png', lastModified: Date.now()}); await navigator.share({ // @ts-ignore files: [file], title: 'Rebel Scan', url: 'https://rebelscan.com', });};On desktop, until Chrome supports it in its next version v89 (related issue), I implemented my go to strategy aka: if available, use the File System API and, if not, fallback on a good old school download.
In addition, my mum discovered that the files seems to not be yet implemented on iOS. At least on her iPad (I did not ask her which version), the share was successfully triggered but, no image was attached to the resulting email. That's why, I also implemented to "old school" download solution for such devices.
export const savePdf = async (src) => { const blob = convertToPdfBlob(src); if ('showSaveFilePicker' in window) { await saveFilesystem(blob); return; } download('rebelscan.pdf', blob);};/* File System API */const saveFilesystem = async (content) => { const fileHandle = await getNewFileHandle(); await writeFile(fileHandle, content);};function getNewFileHandle() { const opts = { types: [ { description: 'PDF', accept: { 'application/pdf': ['.pdf'], }, }, ], }; return showSaveFilePicker(opts);}async function writeFile(fileHandle, content) { const writer = await fileHandle.createWritable(); await writer.write(content); await writer.close();}/* Old school is the new school (download) */const download = (filename, blob) => { const a = document.createElement('a'); a.style.display = 'none'; document.body.appendChild(a); const url = window.URL.createObjectURL(blob); a.href = url; a.download = filename; a.click(); window.URL.revokeObjectURL(url); if (a && a.parentElement) { a.parentElement.removeChild(a); }};Takeaway
It is all fun and game until you try it out on a real mobile device.
I am joking (a bit ) with the above sentence but, it is a good reminder that any web applications should always be tested and, if possible, not simulated, on multiple devices.
On a personal point of view, I am really happy to have invested some times to learn these wonderful pieces of software and, I hope to reuse these learnings in my personal projects or those of my clients in the future.
Happy New Year
David
You can reach me out on Twitter or my
website. Give a try to
DeckDeckGo for the slides of your next presentations.

Original Link: https://dev.to/daviddalbusco/i-developed-a-little-scanner-web-app-at-christmas-to-learn-new-skills-3ghl
Dev To
More About this Source Visit Dev To