
An Interest In:
Web News this Week
- April 18, 2024
- April 17, 2024
- April 16, 2024
- April 15, 2024
- April 14, 2024
- April 13, 2024
- April 12, 2024
Some of Our Sources
- Slashdot
- TutsPlus - Code
- Team Treehouse
- Just Creative
- Smashing Apps
- Noupe
- Design Modo
- Android Dissected
- Android Headlines
- Daily Now
Help Webnuz
Referal links:
Chatbot for your website using Dialogflow
Chatbot is computer program which simulates human conversation through voice or text commands.
Now days every website contains chatbot (virtual assistant) that can be available anytime for better user experience, improve customer services, user engagement and capturing interest.
We are going to use Googles dialogflow API for developing chatbot which include Following 5 simple steps.
- Create google project.
- Dialogflow setup and agent creation.
- Create intent (question answer tree)
- Integration
- Customization
1. Create google project.
First you need to create google project. If you already have one then you can skip this step. You can create it from here as below.
2. Dialogflow setup and agent creation.
Dialogflow is a natural language understanding platform that makes it easy to design and integrate chatbot. It is open source and free (Standard Edition).
Go here and login using your gmail. After successful login you need to create agent for your chatbot using create agent button.

To create new agent, type name of agent, select language and time zone, select google project ID that we created in step 1. And create your agent.

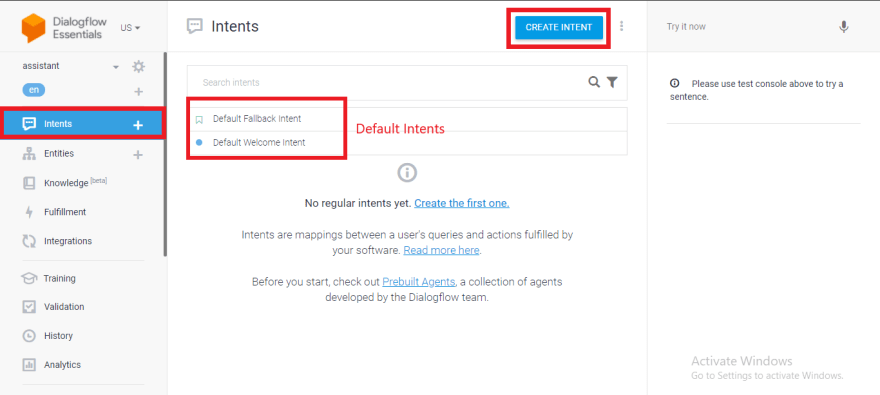
3. Create intent (Question answer tree)
After agent creation, next step is to design question answer tree for chatbot. For that we need to create intent.
When we create agent, two intent are created automatically which are
- Default Fallback Intent: which is use when chatbot not able to recognise user question.
- Default Welcome Intent: to greet user when he starts conversation with chatbot.
Note that we can change chatbot response by editing these default intents.
To create new intent click on CREATE INTENT button,
Here I am creating a new intent named myself, which will be use when user ask questions like
What is your name?
Tell me about yourself?
Who are you?
In training phrases field, you can add all possible questions that user can ask as below.

In the responses field you can add response given by chatbot. We can add more than one reply to display verity of answers and to increase user interest. And click on SAVE button to save the intent.
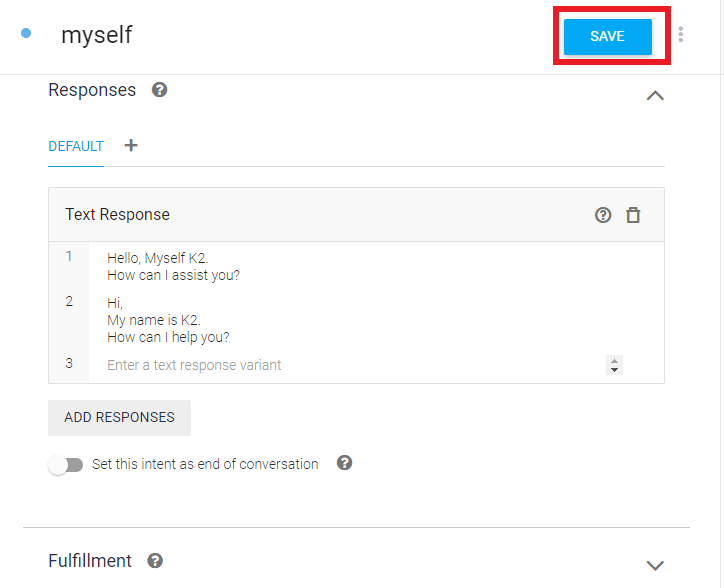
There are other fields like contexts, events, action and parameters, fulfilment. I am keeping these fields empty. You can make use of them according to your requirement.
We can create multiple intents to build complete question answer tree.
We can make use of test console (on right side) to test our intent.

4. Integration
After designing question answer tree using intents, now it is time to integrate chabot with website.
Click on integrations option from vertical navigation bar. For web integration we are going to use Dialogflow Messenger.
To use Dialogflow Messenger, first enable it and get integration code by clicking on it.


Copy above code and paste it in your webpage html code. As below
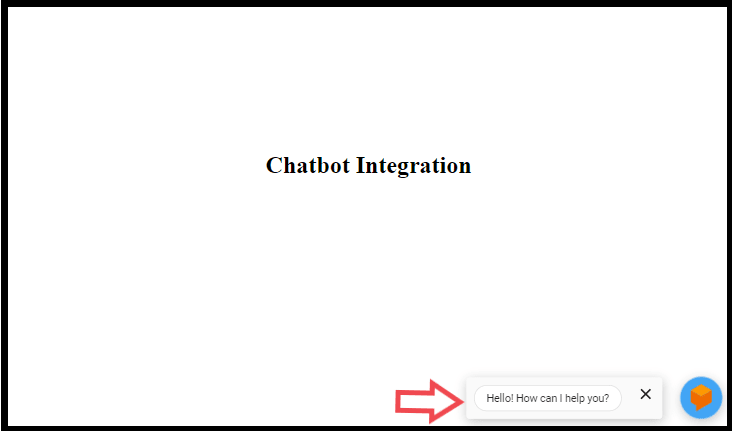
<html><head> <meta name="viewport" content="width-device-width, initial-scale=1"> <!-- dialogflow style bootsrap --> <script src="https://www.gstatic.com/dialogflow-console/fast/messenger/bootstrap.js?v=1"></script> <style> .text-center { margin: 0; padding:0; text-align: center; position: absolute; top: 50%; left:50%; transform: translateX(-50%) translateY(-50%); } </style></head><body> <!-- center text in webpage --> <div class="text-center"> <h1>Chatbot Integration</h1> </div> <!-- This is the main code for chatbot --> <!-- we can add more fields, refer: https://cloud.google.com/dialogflow/es/docs/integrations/dialogflow-messenger --> <df-messenger intent="WELCOME" chat-title="assistant" agent-id="15d0bf9a-1da9-487f-96a6-aa39f95ada63" language-code="en" ></df-messenger></body></html>Before running make sure to Start a local HTTP server for that page. with a specific port. (I am using apache).
Yup!!, you can see chat widget appear in right bottom corner, test it.

But wait! How to customize style of chatbot?
5. Customization
You can customize the style of your chatbot by setting following css variables, know more

Example:
<style> df-messenger { --df-messenger-bot-message: #bdfcbf; --df-messenger-button-titlebar-color: #7ec472; --df-messenger-chat-background-color: #fafafa; --df-messenger-font-color: black; --df-messenger-send-icon: #7ec472; --df-messenger-user-message: #7ec472; } </style>You can customize various aspects for how the chat dialog appears and behaves. The df-messenger HTML element has the following attributes:

Example:
<df-messenger intent="WELCOME" chat-title="K2" agent-id="15d0bf9a-1da9-487f-96a6-aa39f95ada63" language-code="en"></df-messenger>After above css and html customization chatbot looks like,

Hurrey! This way you can integrate, customize dialogflow chatbot with your own website.
NOTE: You may face issue related to chatbot container hight like below.
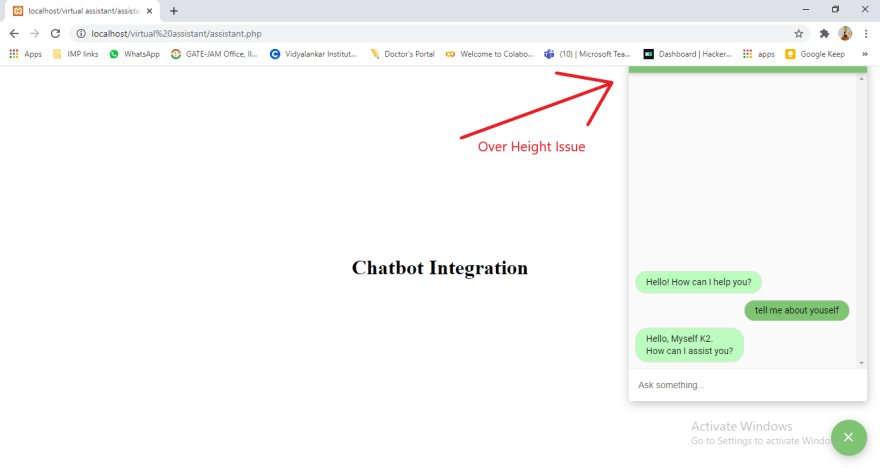
As there is no css variable mentioned in documentation to customize height, we need to add below code into head tag,
<!-- Jquery CDN --> <script src="https://ajax.googleapis.com/ajax/libs/jquery/3.5.1/jquery.min.js"></script> <script> //To minimise the height of chatbox $(document).ready(function() { window.addEventListener('dfMessengerLoaded', function (event) { $r1 = document.querySelector("df-messenger"); $r2 = $r1.shadowRoot.querySelector("df-messenger-chat"); $r3 = $r2.shadowRoot.querySelector("df-messenger-user-input"); //for other mods var sheet = new CSSStyleSheet; // manage box height from here sheet.replaceSync( `div.chat-wrapper[opened="true"] { height: 450px }`); $r2.shadowRoot.adoptedStyleSheets = [ sheet ]; }); }); </script>Hope this article help you!
Important links:
Dialogflow Documentation
CSS and HTML Customization and integration
Original Link: https://dev.to/ketan_patil/chatbot-for-your-website-using-dialogflow-fc7
Dev To
More About this Source Visit Dev To