
An Interest In:
Web News this Week
- April 25, 2024
- April 24, 2024
- April 23, 2024
- April 22, 2024
- April 21, 2024
- April 20, 2024
- April 19, 2024
Some of Our Sources
- Simplebits
- TutsPlus - Code
- TutsPlus - Design
- Inspiredology
- Stylized Web
- Freelance Switch
- Design Modo
- Codrops
- The Verge
- TechPowerUp
Help Webnuz
Referal links:
JWT Authentication Best Practices
Microservices are a great tool when it comes to designing scalable and extensible architectures. They can be used to encapsulate different behaviors or responsibilities in a way that not a lot of other architecture paradigms can represent.
And if you pair them with a REST-based interface, then youre not only writing and creating a platform that can grow and scale automatically (given the right infrastructure of course), but youre also creating a standard and easy-to-use product.
If you havent noticed, Im a fan of microservices and theyre usually the pattern I go with when designing new architectures, working with Big Data on a day-to-day basis, I tend to require flexibility and scalability out of the box, and they provide that to me.
The thing not everyone considers when writing microservices though is that they require a way for you to authenticate against them. Both if youre using a front-end client or just communicating with them through another microservice. And although there are several options out there to solve authentication, I want to cover one of the easiest, yet most powerful, alternative: JSON Web Tokens.
JWT-based Authentication
The basic thing you need to understand JWT-based authentication is that youre dealing with an encrypted JSON which well call token. This token has all the information required for the back-end system to understand who you are and if, indeed, you are who you say you are.
The following diagram shows the steps involved in this process:

As you can see, leaving out the user-based steps, you only need 4 steps:
- First, the client application (here I used a front-end app, but you can do the same with another service) will send a sign-in request. This means youre sending the log-in credentials, just this once.
- Second, the API will validate these credentials and if theyre correct, itll generate the token. This is the most important step because the generated token as I mentioned is nothing more than an encrypted JSON object. This allows you to add as much data into it as you want, and you will want to add data because JWT allows you to perform stateless authorization, which Ill cover in a second.
- Third, with the JWT generated, all you have to do is return it back to the client application.
- Finally, the client app will later send this token on every subsequent request. This token means youve been authenticated and can access the secret section of the application.
That is it, the flow is very straightforward and you dont need to redirect the user anywhere (Im looking at you OAuth!).
But lets get into it with more details, let me break up each step for you to fully understand what is happening behind code.
The back-end side of things
For the back-end, or the microservice if you will, there are two major steps that you need to understand:
- Generating the JSON Web Token. This is key, as I mentioned before because the information you add will be used later (kinda like saying everything you say will be used against you in a court of law).
- Validating the token for received requests. I left this part out of the authentication process because this is actually part of the authorization flow. Very similar, and easy to implement, but worth noting as well.
So, lets get into it.
Generating the JWT
To generate the token on your back-end microservice, youll normally use an existing server-side library. There is no need for you to understand how the token is generated, you just need to understand what goes into it.
So, what actually goes into the token? You can literally use a JSON object such as:
{ "foo": "bar"}And that will be used and sent back to the front-end client, which may be for your business logic it makes sense, maybe your front-end client is waiting for the foo key. However, other than the custom attributes you can add, there are also pre-defined options that have a functional meaning for the specific algorithm that the library is using.
Given Ill be using the jsonwebtoken library for Node.js, the main option you want to take into account is expiresIn. This is critical to generating a proper JWT because you want the token to have an expiration date. Otherwise, it will last forever, potentially leaving an open vulnerability for someone who can capture it and later use it to impersonate your identity.
For this particular library, this value is expressed in seconds if you provide a number (or you can provide a string using a time unit for something like "2 days" to signify 2 days of validity).
And in turn, the library will add another one called iat which stands for Issued At and is a date reference used for expiration checks (i.e thats the date itll take into account when checking if your token is still valid).
And how do you add all this information into the token then? By signing it:
const jwt = require('jsonwebtoken');const token = jwt.sign({ data: 'foobar' }, 'your-secret-key-here', { expiresIn: 60 * 60 }); //1 hourconsole.log(token)//Outputs: eyJhbGciOiJIUzI1NiIsInR5cCI6IkpXVCJ9.eyJkYXRhIjoiZm9vYmFyIiwiaWF0IjoxNjA2NTUzNjc4LCJleHAiOjE2MDY1NTcyNzh9.3oV51hA7SKCqDhG7tbu2XQq7wW2LJE5XtK0HhVwEs0AUsing the sign method you can create the token, notice that your main object (the one containing the actual information you want to transfer to the front-end) is the first parameter, the second one is the secret key or phrase (you can either pass a secret phrase of your choosing, something that youll have to share with your clients) or the content of a PEM key. Either way, the second parameter is used for the encryption algorithm to encode and create the token. Finally, the third attribute contains the configuration options (in our case only the expiration time).
This token (notice the output on the code above) is then returned as part of the authentication response, for the client to use.
Storing the token
As an optional step, you can also store the token in your database to associate it with your user. Normally, you wouldnt need to do this if all the user information can be stored in your token.
However, if there is more information to manage that you can comfortably store in your token, then keeping an association with your users profile inside the database might be a good idea.
In fact, given that looking up this token would be something youd do on every request, a good alternative is to keep both, the token and the relevant information about your user inside some in-memory storage, such as Redis.
The new flow, with storage incorporated and verification support is the following one:
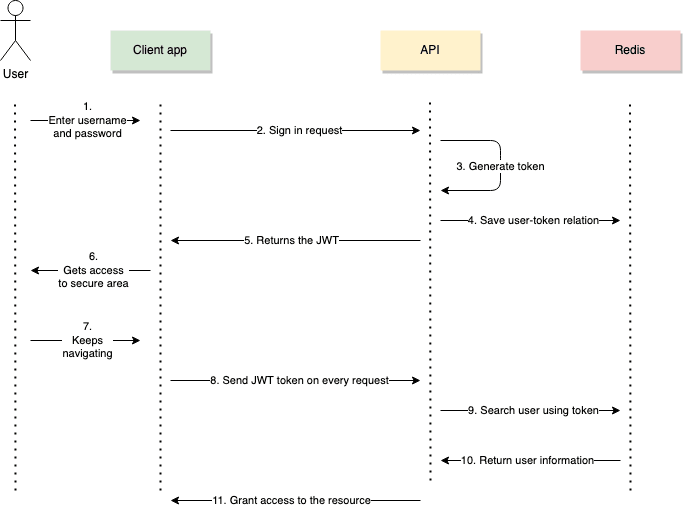
The taxing interaction here is not the first one (#4) with Redis, but rather the second one (#9) because this one would happen on every request received. Well see more about that in a second.
Checking the Token
Just because were getting a token as part of the request, it doesnt mean such a request is safe, it could very well be a fake one or have an invalid or even expired token. This is why on every request of a secured resource (i.e an endpoint that requires an authenticated user to be accessed, or a section of your website that lives inside the members zone) you need to validate the token received.
If youve skipped the storage step, then this is a relatively cheap task. All you have to do is use the same server-side framework to validate it:
const decodedToken = jwt.verify(token, 'your-secret-key-here')console.log(decodedToken)Notice how Im using the same secret phrase, thats definitely important because you need to keep using the same one throughout the same project otherwise validation will not work.
An expired token would throw an exception such as:

And a valid one would just return a valid JSON that you can decode and use however you need.
{ data: 'foobar', iat: 1606581962, exp: 1606581963 }Notice the iat and exp parameters added by the library.
An exception in this context would mean you need to invalidate the clients request and send an invalid response. Normally you would send back a 403 error code since the request is (and the client) is no longer authenticated.
SPA authentication
Now that we understand what it means for an API (or a microservice if you will) to be protected by a JWT authentication process, I wanted to cover the same process from the POV of a SPA application acting as the client app.
In this case, as I mentioned, youll be contacting a service initially by sending your credentials and receiving a token which youll have to use on every following request.
The first thing we need to understand though is that session-based authentication is not the same as token-based auth.
Session-based vs Token-based authentication
At a first glance, both of these strategies might seem similar, which is why I wanted to cover the difference.
Essentially both methods work the same way:
- You authenticate against a service.
- That service validates your credentials and sends back a token
- On every following request, you send that token to authenticate yourself with the service.
So as you can see, the process and the flow of data seem to be the same, but there are some major differences hidden.
- For session-based tokens, the server returns a session key, which references the session data (all data relevant to you as a logged-in user). This data, however, is kept in the memory of the server. This essentially breaks one of the benefits of RESTful APIS: stateless services can scale effortlessly because there is no session information stored in memory. You see, the moment you log-in with a server that keeps session information in memory, every subsequent request sent by you needs to go to that server (because memory cant be shared between different servers, or at least not easily). If youre trying to scale up your architecture to handle more traffic, duplicating services to increase your capacity will not be as straightforward as it would be if you had stateless services.
- Session-based auth stores the session key in the browsers cookies. They send the information as a cookie, and because of that, browsers have a problem when having microservices being served from different domains. This is not a problem for token-based auth, since the token is sent as a request header.
Essentially, these two big differences make token-based authentication more viable and my preferred method to implement whenever I have to do one.
Dealing with XSS and CSRF with JWT
With that being said, there are other actual security threats that you need to take into consideration when implementing your authentication strategy.
This is extremely relevant because you need to be careful about how you handle the JWT on your code. Both of these attacks can potentially take advantage of your vulnerabilities and use your token for malicious purposes.
XSS or Cross-Site Scripting implies an attacker is somehow injecting malicious code into the front-end, affecting all users of the application. This can be achieved when the platform is using user input without validating it or even encoding it. Imaging listing all logged user names on your homepage, if youre not encoding and checking the input text for each username, an attacker couldve input a JavaScript script instead of an actual username, causing your homepage to execute the script on every users laptop. This is definitely a problematic attack vector if youre manually handling the token with your JavaScript code.
This is why you dont use Local Storage to store the JWT on the front-end. LS is publicly accessible to any JS code stored in the same domain, so if an attacker is capable of injecting code as I mentioned, everyones tokens are accessible. You do not want to use Local Storage to keep the token. Remember that.
CSRF or Cross-Site Request Forgery happens when an attacker takes advantage of the fact that cookies can be sent with every request (even on cross-domain requests). If somehow you as a user are tricked into clicking a malicious link, you can end up on a site sending a request to maybe change your password. Because in the past youve logged in against your secure site before and your browser has the cookie in storage still, the request will succeed. So do not store the token on your cookies either!
Wait, so whats left? No local storage, no cookie, maybe in-memory? Thats definitely an option unless of course, youre not into your users losing their session the moment they refresh the browser.
Instead of going crazy with the fact that were running out of secure options, lets go back to cookies for a minute.
If you properly create the cookies, they can be safe enough for you to trust, that and with a few extra checks, you can provide a relatively secure process, let me explain:
- httpOnly: This option makes sure the cookie is not accessible through JavaScript. This is definitely a must-do when creating your cookies, you dont need (nor want) them to be accessed via user code.
- SameSite policy: As I mentioned before, cookies are sent on every request, unless of course, the browser is new (i.e youre not using Internet Explorer 8 or previous) and that the SameSite policy of your cookie is empty. If you need your tokens to be sent to different domains, then a Lax value would do the trick because it would allow you to make GET requests to other domains, POST request would not be possible, however. This is great because youd have the option to do redirections, but a malicious code would not be able to send a POST request behind your back.
Both these options are great, but theyre not perfect. If youre really looking to find a way to have your application be 100% secured, then youll probably have to make some compromises, such as disabling cross-domain requests, this is all part of the security analysis youll have to perform based on your actual security requirements.
With that being said, and although all these security considerations are important, youll normally be using a library that already takes care of all of them for you. For example, if youre using axios for your HTTP requests in your Vue projects, you can simply set one line of configuration in your main.js file:
axios.defaults.withCredentials = trueWith that line, you wont have to worry about handling a token or even a cookie during the entire process. As long as the back-end API creates the cookie correctly, youll be sending it on every subsequent request. You can access the full code of a sample project that interacts with a JWT-authenticated API here.
Do you need HTTPS with JWT?
This is a very common question when it comes to client-server communication, and its especially common when setting up a JWT-based authentication because people tend to think that if you have your token, then youd good to go.
Truth is, that as Ive mentioned above, being 100% secured is not only hard but nearly impossible. If someone skilled enough wants to hack you, theyll find a way to do it. This is about discouraging 90% of potential attackers by taking care of the basic steps.
So, is HTTPS required? Well, lets consider what HTTPS actually means:
An HTTPS connection between a client and a server-side service is an encrypted channel of communication between the two ends. There is no way (almost) for an attacker to read that stream from outside and figure out whats being sent. So unlike normal HTTP which is not encrypted, HTTPS makes sure only a client that you correctly identified as valid is capable of talking to your services.
What youd normally want to do is have your public sections inside normal HTTP and anything that needs to be secured (i.e that needs you to be logged in to access it) will be behind HTTPS.
When not to use JWT
I always like to say, that there is no silver bullet when it comes to technology, for every reason pushing you towards a particular choice, there are two more pushing you in the opposite direction.
And the same stays true for JWT-based authentication, many developers claim there are better and more secure options out there. The key there is correctly defining what better means to you and then going with that.
After all, your context will be the deciding factor used to make all decisions.
That being said, a very good reason why not to use JWT-based authentication would be when youre developing a stateful back-end. After all, JWT shines when it is used to secure a stateless API, given the stateless nature of the data flow.
Granted, it can be used when state is required as well, but then the line gets very blurry between JWT and session tokens. In these cases, it might be a better idea to go with other alternatives, such as server-side sessions, that were originally designed for it.
Best JWT libraries
The last item I wanted to cover were libraries. If youre working on the back-end side, you dont need anything specific thats compatible with Vue, but for the examples in this article, I used Node.js jsonwebtoken server-side library.
As for the front-end, as I mentioned before, axios is perfectly capable of already providing all the user-level support required to interact with a JWT-authenticated API. However, if youre actually looking to perform more advanced tasks, such as manually decoding the token to use its internal information, you have some options, depending on your front-end framework of choice:
- For VueJS users: you can use something like vuejs-jwt which is a lightweight library that provides you with methods such as
decodeorhasTokenthat help you deal with the token directly. If on the other hand, youre looking for a more robust solution, you can also take a look at vue-auth, which provides you with support for several authentication algorithms, including, of course, JWT. - For Angular users: you have Auth0s library: angular-jwt. It provides you a simple interface to interact withe the token (i.e get its data, check for expiration dates, and so on).
- React users: finally if youre one of those (actually, just kidding, Im a big fan of React), you can use react-jwt which provides a
useJwthook as well, which allows you to react to changes on the validity of a token (you can check this directly on the front-end and immediately react to the expiration event).
Final thoughts
When it comes to securing a RESTful API (or any stateless back-end service really), the JWT-based approach is definitely an interesting option. By default, it might not be the most secure one, but with a little bit of work and configuration, most of the common attack vectors can be tackled.
It provides a great level of control over what you do with, and how you generate, your tokens and it makes scaling your back-end infrastructure trivially simple.
In the end, its up to you to decide, based on your context and your background. To me, JWT authentication has always been a great option and I try to advocate for it as much as I can, given Im also a big fan of RESTful microservices.
How about you? Have you used JSON Web Tokens in the past? Or do you rather using a different approach? Leave a comment down below and share your experience.
Original Link: https://dev.to/deleteman123/jwt-authentication-best-practices-3lf9
Dev To
More About this Source Visit Dev To