An Interest In:
Web News this Week
- April 25, 2024
- April 24, 2024
- April 23, 2024
- April 22, 2024
- April 21, 2024
- April 20, 2024
- April 19, 2024
Story of how I built my Portfolio and Blog using DEV.to and NextJS
I've always wanted to build my very own portfolio website and blog. After many years of laziness.., finally, I mean, FINALLY I've done it.. I have built my own website dineshbalaji.in.. Please do check out the website and let me know your thoughts in the comments..
The idea behind this post is to tell the story of how I did it, the tech involved, what I learned along the way and most importantly to inspire many more people (lazy like me may be..:D) to build their own website.
Ground Rules
These are some of the ground rules that I laid down for myself for developing the website.
- It had to coded out by me from scratch without using WYSWYG editors.
- A good logo.
- I have to learn new stuff as I build it.
- Minimize usage of third-party libraries.
- It has to showcase my coding skills.
- Good Lighthouse Score - Performance and Accessiblity.
- Has to integrate with a CMS for blogging.
- Good SEO.
- Be open sourced for others to use/learn.
- A full-page canvas landing page.. I love them..
The Start
With the ground rules set, I began on October 3rd, 2020. One thing I wanted to absolutely make sure was to track my progress. I've tried building my site a couple of times earlier but I got sidetracked. I was also inspired by this. The way he wrote down whatever little progress he made was the way to go for me. So I did a CHANGELOG. Easy to generate and maintain.
Design
I'm a coder by profession but I do love to design and I'm quite crafty with Sketch. But sticking to my ground rules, Figma, was the first thing I learned. I spent a weekend going through tutorials learning the tool and then went about creating a design system and the website.
The Logo
I had to do a logo for branding. I wanted it to be simple and animatable. I'm happy with what I ended up with.
Being a developer staring endlessly at the screens, I love dark themes and decided to go with it. Chose a couple of popping colors and some shades using crispedge and voila I had my recipe..
Fonts
I created the screens over a week. I made sure all the screens were complete before starting development to ensure there were no stoppages.
Technology
Since I wanted a blog along with the portfolio, SEO was of paramount importance and the best way to do that is to build static sites. I wanted to learn React along the way and there were two choices, NextJS and Gatsby. Gatsby was purely static and NextJS provided the flexibility to switch between static and dynamic based on our need. So I ended up with Next JS.
Hosting
Choosing NextJS came with a benefit. The amazing hosting platform from the team that developed NextJS, Vercel. It has first-class tooling to host your website in minutes and has seamless integration with Github for development, preview and production deployments.
I don't want to bore you guys with a long explanation of each and every detail. I'll just list the tech I used on the website with one-liners.
Base Tech
- NextJS - The base React framework on which the website is built. It allows you to choose between SSR, SSG and CSR.
- DEV.to API - My CMS.. I love DEV.to as a platform for developer blogging and I didn't want to leave it. But at the same time, I wanted a single source of truth for my articles. So I made use of the dev.to API. It's sweet and I got the best of both worlds.
- TailwindCSS with SCSS - I was so happy to have come across TailwindCSS. I strongly recommend this to anyone. Integrating it with SCSS was a pain but if you just use CSS, please try it out.
- Typescript - Must have for anyone doing frontend development in 2020.
Tooling
- stylelint - For linting CSS, sorting and ordering CSS rules. Must have.
- eslint - For linting Typescript code. Must have.
- postcss - For CSS browser vendor pre-fixes, purging of unused TailwindCSS rules.
- husky - For running linting, commit rules before committing code.
- commitzen - Provides a format to your git commit messages. The beautiful change log you saw earlier was possible because of this.
- prettier - Standard for 2020. Does what it says, formats and makes your code look beautiful..
NPM Packages
- framer-motion - All the beautiful animations on the site are powered by this amazing library. You just have to come up with the animations and leave the rest to framer. Highly recommend this one.
- react-copy-to-clipboard - For copying code snippets to your clipboard.
- react-infinite-scroll-component - For loading content on scroll in posts and nuggets page.
- react-intersection-observer - For detecting if elements are scrolled into view.
- react-markdown - For parsing the markdown from DEV.to API's and rendering as HTML.
- react-syntax-highlighter - Plugin for
react-markdownthat highlights code within the markdown. - react-share - Provides social sharing icons and functionality for posts and nuggets.
- reading-time - Estimates the reading time of a given text.
- sitemap - For generating the site's
sitemap.xmlfor SEO. - camelcase - For converting hyphenated strings to camelcase strings.
- @svgr/cli - For optimizing and converting SVG's into React components.
Analytics
- Google Analytics - I'm using it as my data store for posts view count and also for user demographics and content relevancy.
- MS Clarity - This just came out and I really like the heat maps and session playback features they offer.
Development
I am employed full-time so I had to find the time to develop. Most of the website was built over weekends, late nights and early mornings. I used libraries whenever I felt like I was re-inventing the wheel and stuck to coding stuff out when I wanted to showcase my skills.
Particularly, I wanted to ensure that all the canvas-based animations were coded out entirely by me without the use of third party libraries. As a result, I learnt a lot of math and ended up creating mini-libraries Vector.js, Particle.js for the animations on the canvas..
Conclusion
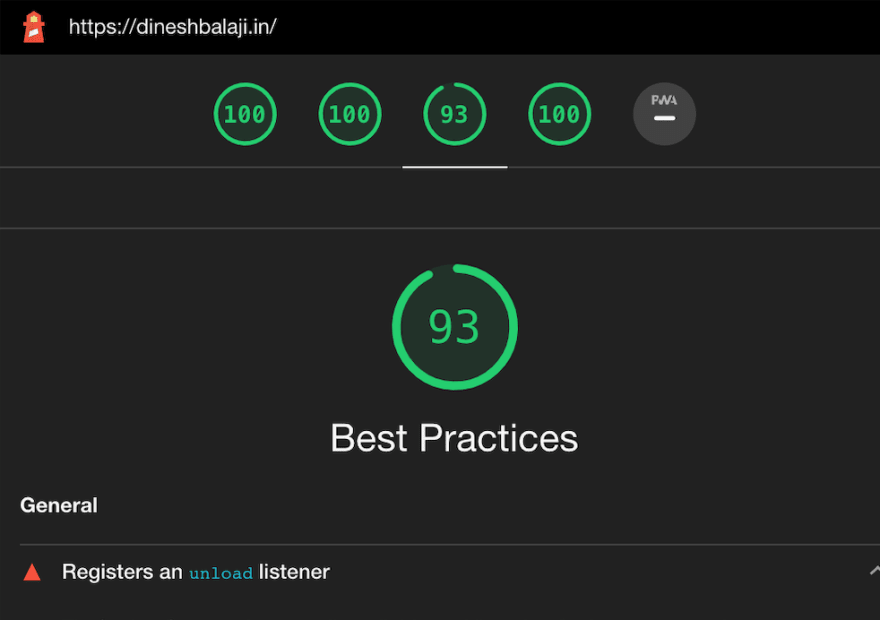
After a month of development, I've done it. I'm really happy with the outcome. This is a lighthouse snapshot of my website.
As you can see, it's green across the board..
I intend to add features to the website as I go along and more importantly I hope that this inspires me to blog more.
I also wanna thank Sowmya and Rashmi for their kind reviews and feedback and the Open Source Community in general for all the amazing libraries and tools..
The source for the website is completely Open Sourced.
I sincerely hope that someone reads this and starts their own journey towards building their very own website.
See you in the next one. Peace.. :)
Original Link: https://dev.to/sidthesloth92/story-of-how-i-built-my-portfolio-and-blog-using-dev-to-and-nextjs-3j85
Dev To
 An online community for sharing and discovering great ideas, having debates, and making friends
More About this Source Visit Dev To


