
An Interest In:
Web News this Week
- April 24, 2024
- April 23, 2024
- April 22, 2024
- April 21, 2024
- April 20, 2024
- April 19, 2024
- April 18, 2024
Some of Our Sources
- Team Treehouse
- Six Revisions
- Vandelay Design
- Naldz Graphics
- FanExtra - PSD
- Reencoded
- 24 Ways
- Spyre Studios
- Design Modo
- Web Resource Source
Help Webnuz
Referal links:
Using HTML Canvas to Snip Screenshots of Your Video
Create snippets of your browser and desktop applications for social media, text recognition, and other image processing stuff.
Loading Video with Screen Capture
You can of course load a video from an mp4 file, but in this post I would like to focus on video objects created from recording your browser or desktop app. To do that, we use getDisplayMedia, a native Javascript async function that will prompt the client to choose a screen or application for recording.
<style> #videoElement { height: 500px; position: absolute; }</style><video id="videoElement" autoplay></video><script>async function startCapture(){ try { videoElement.srcObject = await navigator.mediaDevices.getDisplayMedia({ video: { cursor: 'always'},audio: false}) } catch(err) { console.error("Error" + err) }}startCapture();</script>When you launch the page, the browser would direct you to choose the screen to share.

Superimposing the Canvas on the Video
To draw a rectangle on the video for partial screencapture, we could overlay the video with a canvas element of the same size. Since our video dimensions are determined by the window the client chooses, we execute resize_canvas in the onplay event to resize our canvas once the video is loaded.
.canvas { position: absolute; top: 0; left: 0; z-index: 10; background-color:rgba(255,0,0,0.5);}<video id="videoElement" autoplay onplay="resize_canvas(this)"></video><canvas class="canvas" id="cv1"></canvas><script> function resize_canvas(element){ cv1.width = element.offsetWidth; cv1.height = element.offsetHeight;}</script>If you've followed the code so far you might have noticed we highlighted the canvas in red. So it should look like this once you run it on your browser.

If the canvas is superimposed neatly on the video element, we can hide our red canvas by removing this line.
background-color:rgba(255,0,0,0.5);Drawing a Rectangle to Select Snipping Area
To draw the area we want to snip, we listen to mouse events of the canvas, save the mouse coordinates, and use those coordinates to draw with the canvas context ctx.
let last_mousex = last_mousey = 0;let mousex = mousey = 0;let mousedown = false;let rect = {};const ctx = cv1.getContext("2d");cv1.addEventListener("mouseup", function (e) { mousedown = false;}, false);cv1.addEventListener("mousedown", function (e) { last_mousex = parseInt(e.clientX-cv1.offsetLeft); last_mousey = parseInt(e.clientY-cv1.offsetTop); mousedown = true;}, false);cv1.addEventListener("mousemove", function (e) { mousex = parseInt(e.clientX-cv1.offsetLeft); mousey = parseInt(e.clientY-cv1.offsetTop); if(mousedown) { ctx.clearRect(0,0,cv1.width,cv1.height); //clear canvas ctx.beginPath(); var width = mousex-last_mousex; var height = mousey-last_mousey; ctx.rect(last_mousex,last_mousey,width,height); rect = {x: last_mousex, y: last_mousey, width, height}; ctx.strokeStyle = 'red'; ctx.lineWidth = 2; ctx.stroke(); }}, false);
For the next part, we also declared an object rect to store the width, height, and starting coordinates of the rectangle.
Converting Video to Image with Canvas
First we add a button snip to control the conversion action. To show the cropped image, we add the image element croppedImg. Since our previous elements have an absolute position, we wrap them in a container div.
<div class="container"> <video id="videoElement" autoplay onplay="resize_canvas(this)"></video> <canvas class="canvas" id="cv1"></canvas></div><button id="snip">Snip</button><img id="croppedImg"></img>For the conversion, we calculate the aspectRatio of the video to its size displayed on the canvas. Then we create a new canvas to translate the videoElement to image with the canvas inbuilt function drawImage. For the parameters, we can directly pass the coordinates and width/height stored in the rect object. Finally, we convert the canvas to image with toDataURL and output the result to the html image element.
snip.addEventListener("click", function(e) { VideoToCroppedImage(rect);})function VideoToCroppedImage({width, height, x, y}) { const aspectRatioY = videoElement.videoHeight / cv1.height; const aspectRatioX = videoElement.videoWidth / cv1.width; const cv2 = document.createElement('canvas'); cv2.width = width*aspectRatioX; cv2.height = height*aspectRatioY; const ctx2 = cv2.getContext('2d'); ctx2.drawImage(videoElement, x*aspectRatioX, y*aspectRatioY, width*aspectRatioX, height*aspectRatioY, 0, 0, cv2.width, cv2.height); const dataURI = cv2.toDataURL('image/jpeg'); croppedImg.src = dataURI; }Parameters for drawImage: drawImage(image, sx, sy, sw, sh, dx, dy, dw, dh) 
By multiplying the dimensions of the canvas to the aspectRatio of the video, the final cropped image is at its native resolution.

Now you can pass this image to social media endpoints, processing, and OCR.
Bonus: OCR with Tesseract.js
Add Tesseract.js CDN to our project.
<script src='https://unpkg.com/[email protected]/dist/tesseract.min.js'></script>We declare a function recognize_image that would receive image data and convert it to text with tesseract.js, and insert the result as div to the DOM.
In tesseract.js, we can configure its worker for different languages. Here we initialized it for Japanese.
const { createWorker } = Tesseract;function recognize_image(img) { (async () => { const worker = createWorker(); await worker.load(); await worker.loadLanguage('jpn'); await worker.initialize('jpn'); await worker.setParameters({preserve_interword_spaces: '1'}) const { data: { text }, } = await worker.recognize(img); insertTextToDom(text); await worker.terminate(); })();}function insertTextToDom(text) { let div = document.createElement('div'); div.className = "alert"; div.innerHTML = text; document.body.append(div);}We call our recognize_image function in VideoToCroppedImage when we are done cropping the image in our second canvas.
function VideoToCroppedImage({width, height, x, y}) { .. const dataURI = cv2.toDataURL('image/jpeg'); recognize_image(dataURI)}Since preview is not needed, we can remove the image element and directly pass the image data URI to our function.
The accuracy of the OCR would depend on a multitude of factors including image quality, font, and our trained data.
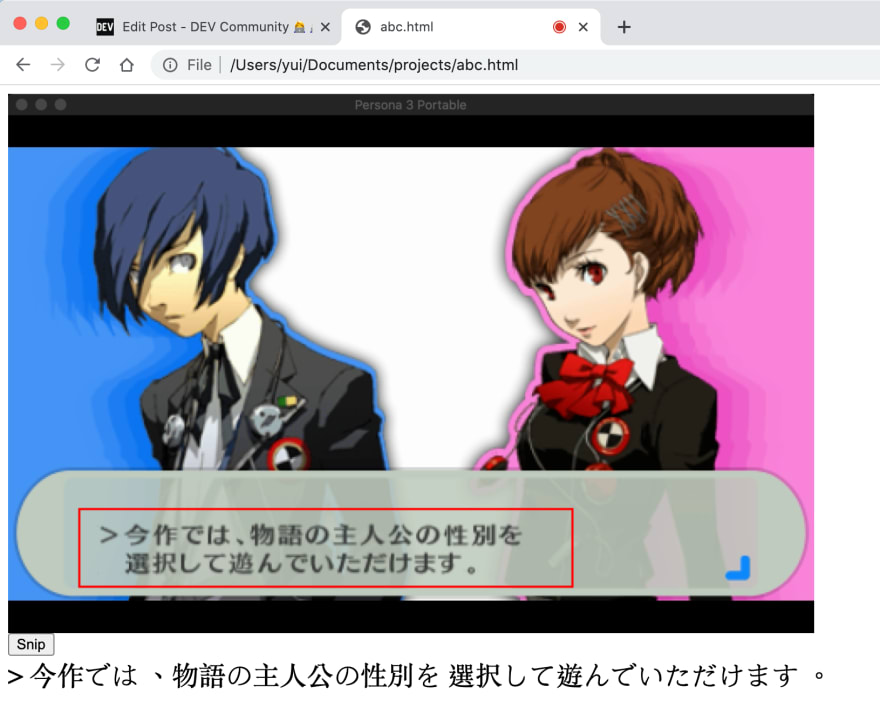
The OCR result in the example above is perfect, but it can vary wildly with your application.
Wrapping Things Up
In this post we talked about how you can record browser and desktop apps with Javascript, superimpose a canvas element to interact with the video, and perform OCR with Tesseract.js. You can find the full source code here:
From here we can improve the accuracy of the OCR with image preprocessing and creating training data for Tesseract, but that will be for another post.
I hope you found this helpful. :)
Original Link: https://dev.to/mathewthe2/using-html-canvas-to-snip-screenshots-of-your-video-4c4h
Dev To
More About this Source Visit Dev To