
An Interest In:
Web News this Week
- April 25, 2024
- April 24, 2024
- April 23, 2024
- April 22, 2024
- April 21, 2024
- April 20, 2024
- April 19, 2024
Some of Our Sources
- Simplebits
- Pearsonified
- The Logo Smith
- You The Designer
- Fuel Your Creativity
- FanExtra - PSD
- Fudge Graphics
- Line 25
- Wal You
- Codrops
Help Webnuz
Referal links:
Node-HarperDB REST API
TLDR
Completed code repo using "books" instead of "games"
Foreword
This post is not just for 'quick immediate gratification.' Depending on your experience level, some of this code may be a bit overwhelming, as I am trying to illustrate some 'DRY' code patterns and modular architecture along the way. Have a look at the repo to get some idea before proceeding, if you like (but don't copy/paste - that's no way to learn )
- This article is inspired by this post:
- .ltag__user__id__399959 .follow-action-button { background-color: #403b8a !important; color: #ffffff !important; border-color: #403b8a !important; }herself from HarperDB covers a lot of background regarding Harper and Node here:

- In order to 'code-along,' all the way through, you may want to check this: This 'starter template repo' - which the full code repo is based on - includes a
webpackconfiguration to allow forimport(instead ofrequire), absolute imports, linting, some basic starter architecture , and some other goodies .


In addition to the 'Node-Harper' stuff, we'll be using '.env', a closure pattern, Postman and modern EcmaScript code patterns and syntax.
The rest of this post will assume that you are using the aforementioned starter template repo, "node-starter.", or something similar.
Overview
We'll be creating a RESTful API written in Node with Express. We'll implement basic CRUD. I'll be making a small catalog of video games, but you can apply whatever you want.
The assumption here is that you do have the foundations of Node down and understand the basics of what a RESTful API is.
I will be using npm to install additional dependencies as we move forward.
Getting Started
Head on over to HarperDB and 'Get Started.'
Once that's done, you can create a new 'instance.' I'll call mine 'video-games,' but you can do s, or 'videos' or whatever.

Take note of your 'username' and 'password.'
On the next screen, 'Instance Specs,' all the defaults are fine - you might pick an 'Instance Region' that's geographically closer to you.
It will take a few minutes to create the instance - that part might be a bit slower than MongoDB .
Once that's done, click on that instance, and we'll need to create a simple schema. This is nothing but a system to describe your data.
I'll just create one called 'dev' and have a table (like a spreadsheet that keeps some data) called 'games' that will keep track of them with an 'id'.'

HarperDB Secret Connection Deets in '.env'
In your project directory, create a '.env' file to hold our connection details.
This file will be ignored via '.gitignore' so it doesn't show up in our repo (it's not there in the 'starter repo' that I mentioned ).
From VS Code (or whatever text editor), you can paste the necessary details as shown below, replacing the relevant ones with your own:
# This will be used by expressPORT=8000INSTANCE_URL=https://node-demo-codefinity.harperdbcloud.comINSTANCE_USERNAME=codefinityINSTANCE_PASSWORD=someSecretSpit# What you entered as your schema nameINSTANCE_SCHEMA=devYou can find your INSTANCE_URL under 'config' tab: 
Express Server
ExpressJS is a middleware framework that sits on top of Node and does great work managing our routing requests. Let's install it: npm i express.
We'll also want: npm i dotenv so we can get those '.env' deets over to our express.
Inside of 'src/index.js,' set up a basic Express server like so:
// 'import' works b/c of the webapack config import express from "express";// We are destructuring 'config' directly from 'dotenvimport { config } from "dotenv";// Intialize stuff from '.env'config();const app = express();// Configure 'Express' to receive URL encoded JSONapp.use(express.urlencoded({ extended: true }));app.use(express.json());// Set up a test routeapp.get("/", (_, res) => { res.end("Express Server");});// Start listening for requests on our 'secret port'app.listen(process.env.PORT, () => { console.log("Server ", process.env.PORT);});Starting the Express Server and Testing the 'Test Route'
The 'starter repo' that I mentioned previously uses webpack and nodemon to build and 'watch' changes to our project.
In one terminal window, from your project directory: npm run watch. And, from a separate terminal window: npm run serve.

Postman (Or Insomnia) to Test Routes
Now, you'll need Postman (or Insomnia).
I will use Postman to test our simple get route where we should get back a response: "Express Server".
- On the left, click 'New Collection.'
- Give it a name and click the button.
- Click the '...' and select, 'Add Request'
- Our local web server is running at, "http://localhost:8000." Enter that into the big field that looks like a browser bar with the word, 'GET' next to it.
- Click the big blue 'Send' button to send that request off and you should see,
Express Serverin the big space there on the right.

Node-Harper Client Connection
We'll need a 'connector' that uses our Node code and our connection deets from '.env' to communicate with our HarperDB instance. We'll use: npm i harperive.
Now, inside of 'db/client.js,' we'll create a 'client connection' to our instance.
import harperive from "harperive";import { config } from "dotenv";config();// Pass in our deets to initialize and export the 'client'export default new harperive.Client({ harperHost: process.env.INSTANCE_URL, username: process.env.INSTANCE_USERNAME, password: process.env.INSTANCE_PASSWORD, // We only have 1 schema so we can set that directly schema: process.env.INSTANCE_SCHEMA,});CRUD Operation Controllers
'db/index.js' will contain the business logic controllers that directly manipulate our database. This will be used later on by our 'express api' that will call upon the correct controller based on the incoming request - sort of the essence of 'basic' RESTful API.
We'll go over the necessary code one hunk at a time, and I'll walk you through my reasoning about why I set up the code this way.
We'll start with a 'closure callback' pattern that each of our CRUD controllers will need. This is because every time we perform one of these operations, we will need to handle an error, or a successful response that will come from Harper.
A Bit Complex...But Can DRY Your Code
const callback = (func) => (err, res) => { if (err) { func(err); } else { func(null, res); }};For every CRUD operation that we will create, add, search and delete, no matter what, we will want to run a callback function in response to either an error - err or a successful response from HarperDB - res.
(func) => (err, res) => { Allows us to create a callback that will use whatever function we want it to use.
if (err) will pass the error to our function, and else will send the 'error' as null so we can proceed with doing something with our 'successful response' - res.
This will make even more sense when we go to actually use it.
Continuing with 'db/index.js':
Using client
import client from "./client";// TODO: 'const callback' code block goes here.// Export out all of our 'controller methods'export default { /** * Insert 1 game at a time only (for simplicity) * title - the game title as a string * platform - the game platform as a string * cb - the function that will handle error/success */ add(title, platform, cb) { // TODO: 'insert' a new video game }, // 'searchParams' is an Object with 'search parameters.' search(searchParams, cb) { // TODO: Search using either a hash/id or a value. }, // 'id' is a string delete(id, cb) { // TODO: Seek and destroy using the given 'id' },};Controller Method Guts
Next, let's insert the 'guts' of each 'controller' method, replacing the TODOs , starting with add:
client.insert( { // We'll hardcode this b/c we only have 1 table: "games", // 'records' MUST be an Array (even if only 1) records: [{ // Object shorthand technique title, platform }] }, // What to do when done? callback(cb) );Note that: callback(cb) is where we save some duplicate code by using const callback closure from earlier .
Next, we have, search. This one is a bit more complex only b/c we have to code this up so that it can handle using searchByHash if we pass in an id , or searchByValues if it's a game or platform .
// Check for an 'id' via OBJECT DESTRUCTURINGconst { id } = searchParams; if (id) { client.searchByHash( { table: "games", hashValues: // MUST be wrapped in an ARRAY [id], // Only send back 'title' attributes: ["title"], }, callback(cb) ); } // We must be searching by something other than 'id' else { // Use array destructuring to pull out our and value const [searchParamsEntry] = Object.entries(searchParams); client.searchByValue( { table: "games", // This is the - 'title' or 'platform' searchAttribute: searchParamsEntry[0], searchValue: searchParamsEntry[1], // Send back all of the details attributes: ["*"], }, callback(cb) ); }Finally, we have delete (a bit simpler ):
client.delete( { table: "games", // Again, the 'id' must be wrapped in an Array hashValues: [id], }, callback(cb) );Express Router
Now that the controllers are out of the way , we can ease into creating our api routes so we can test things.
import { Router } from "express";// Controller methodsimport db from "db";// Express routerconst router = new Router();// POST method to '/games/add/'router.post("/add", (// Destructure 'title' and 'platform' from request{ body: { title, platform } }, res, next) => { db.add(title, platform, // Callback handler (err, dbRes) => { if (err) { // 'Standard' Express 'built-in' error handling next( new Error(` Error adding ${err.error} `) ); } res.status(201); res.json(dbRes); });});// POST method to '/games/search'router.post("/search", (// Destructure 'body' from request{ body }, res, next) => { db.search(body, (err, dbRes) => { if (err) { next( new Error(` Error searching ${err.error} `) ); } res.status(200); res.json(dbRes); });});// 'DELETE' method to '/games'router.delete("/", ({ body: { id } }, res, next) => { db.delete(id, (err, dbRes) => { if (err) { next( new Error(` Error deleting ${err.error} `) ); } res.status(204); res.json(dbRes); });});// Send the 'router' back out for the server to useexport default router;Let's use router in our server. Here's what the file should look like with the starting code along with adding router (I removed the original 'test get' code):
import express from "express";import { config } from "dotenv";// Routerimport api from "api";config();const app = express();app.use(express.urlencoded({ extended: true }));app.use(express.json());// Trigger our Express JSON Router if URL ends with '/games'app.use("/games", api);app.listen(process.env.PORT, () => { console.log("Server ", process.env.PORT);});Test the Each and Every Thing
Assuming that your server is still , we can finish up by testing our routes in Postman.
'http://localhost:8000/games/add' - insert
- Switch 'GET' to 'POST.'
- Click 'Body.'
- Select 'raw.'
- On the right there, select JSON.
- Enter in valid JSON.
- Click 'Send.'
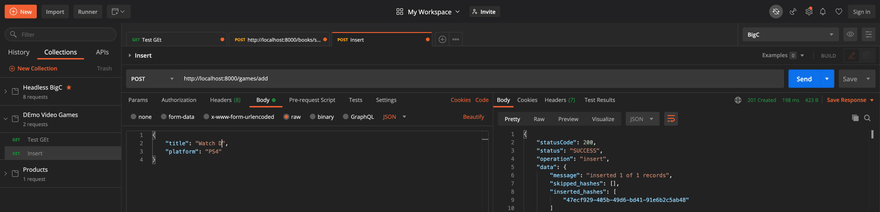
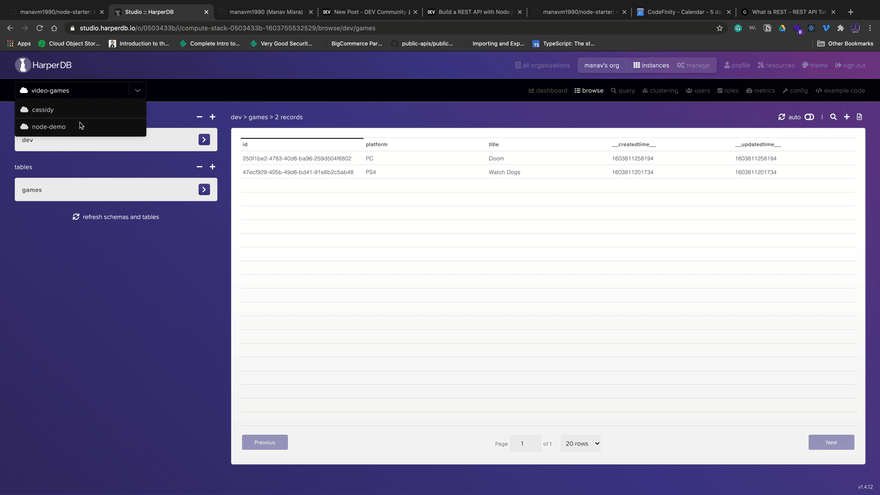
And, on the Harper side, click 'browse' to see the results.
'http://localhost:8000/games/search'
First, let's test out searchByHash.
Grab the 'id' from HarperDB. Just click on the entries and then copy it from the next screen.

Following the same steps in Postman as before, create a 'POST' request and send over some JSON using the id you copied from HarperDB. For example,
{ "id": "47ecf929-405b-49d6-bd41-91e6b2c5ab48"}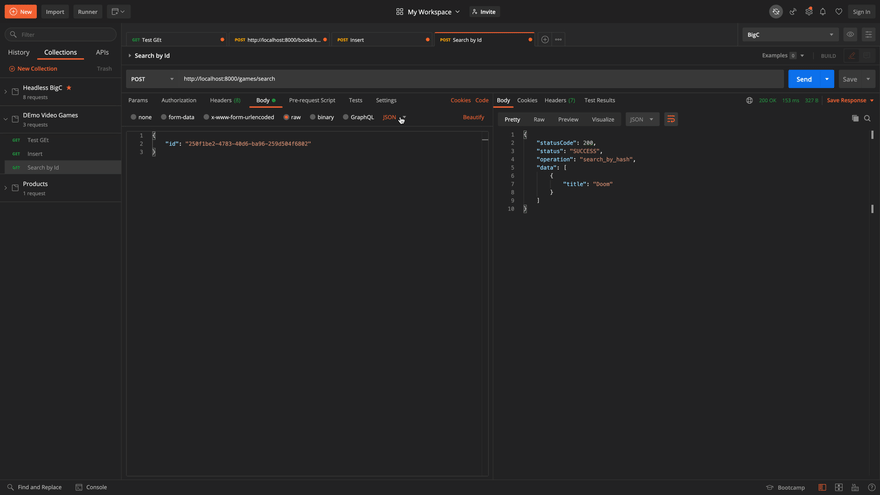
Finishing Up
I'll leave it to you to test out the other 'POST' search, sending in JSON with either "title" or "platform".
For the 'DELETE,' recall that our router was set up to take 'DELETE' requests like so: router.delete("/"
You will create a 'DELETE' request and send it to: 'http://localhost:8000/games,' once again, using an "id".
I am trying to get my YouTube restarted; the problem is that I kind of hate making videos (especially editing)!
Would you like a video version of this tutorial? If there's enough response, maybe I will grin and it.
Original Link: https://dev.to/codefinity/node-harperdb-rest-api-19kb
Dev To
More About this Source Visit Dev To