
An Interest In:
Web News this Week
- April 19, 2024
- April 18, 2024
- April 17, 2024
- April 16, 2024
- April 15, 2024
- April 14, 2024
- April 13, 2024
Some of Our Sources
- Mashable
- Web Designer Wall
- Just Creative
- Smashing Apps
- TutsPlus - Design
- You The Designer
- Creative Curio
- Naldz Graphics
- Specky Boy
- Willems Lab
Help Webnuz
Referal links:
Implement RESTful HTTP API in Go using Gin
Hello and welcome back to the backend master class.
So far we have learned a lot about working with database in Go. Now its time to learn how to implement some RESTful HTTP APIs that will allow frontend clients to interact with our banking service backend.
Here's:
- Link to the full series playlist on Youtube
- And its Github repository
Go web frameworks and HTTP routers
Although we can use the standard net/http package to implement those APIs, It will be much easier to just take advantage of some existing web frameworks.
Here are some of the most popular golang web frameworks sorted by their number of Github stars:
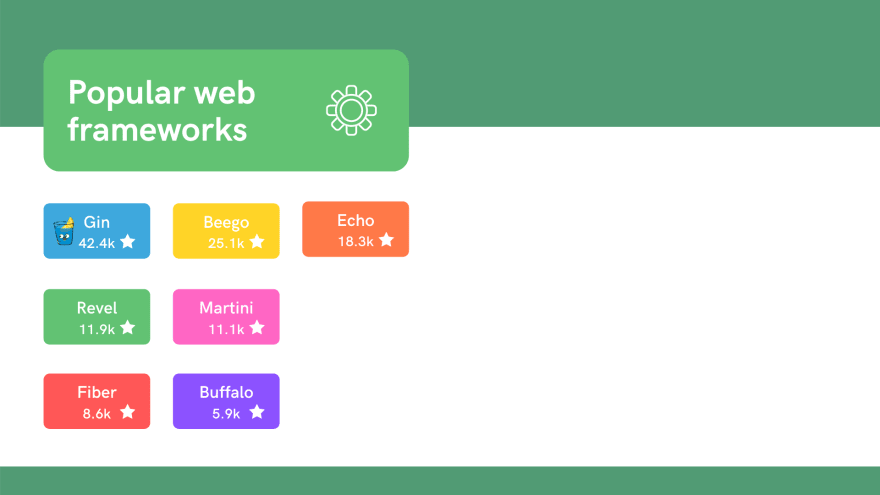
They offer a wide range number of features such as routing, parameter binding, validation, middleware, and some of them even have a built-in ORM.
If you prefer a lightweight package with only routing feature, then here are some of the most popular HTTP routers for golang:

For this tutorial, Im gonna use the most popular framework: Gin
Install Gin
Lets open the browser and search for golang gin, then open its Github page. Scroll down a bit and select Installation.
Lets copy this go get command, and run it in the terminal to install the package:
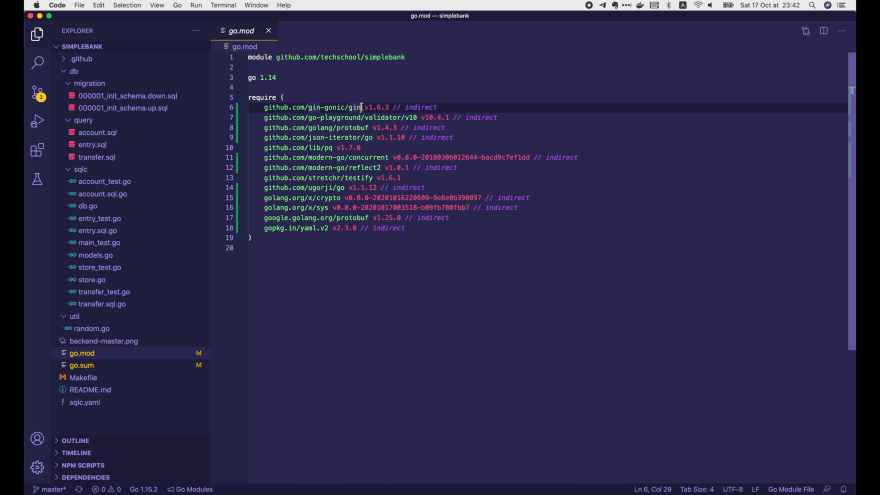
go get -u github.com/gin-gonic/ginAfter this, in the go.mod file of our simple bank project, we can see that gin is added as a new dependency together with some other packages that it uses.
Define server struct
Now Im gonna create a new folder called api. Then create a new file server.go inside it. This is where we implement our HTTP API server.
First lets define a new Server struct. This Server will serves all HTTP requests for our banking service. It will have 2 fields:
- The first one is a
db.Storethat we have implemented in previous lectures. It will allow us to interact with the database when processing API requests from clients. - The second field is a router of type
gin.Engine. This router will help us send each API request to the correct handler for processing.
type Server struct { store *db.Store router *gin.Engine}Now lets add a function NewServer, which takes a db.Store as input, and return a Server. This function will create a new Server instance, and setup all HTTP API routes for our service on that server.
First, we create a new Server object with the input store. Then we create a new router by calling gin.Default(). We will add routes to this router in a moment. After this step, we will assign the router object to server.router and return the server.
func NewServer(store *db.Store) *Server { server := &Server{store: store} router := gin.Default() // TODO: add routes to router server.router = router return server}Now lets add the first API route to create a new account. Its gonna use POST method, so we call router.POST.
We must pass in a path for the route, which is /accounts in this case, and then one or multiple handler functions. If you pass in multiple functions, then the last one should be the real handler, and all other functions should be middlewares.
func NewServer(store *db.Store) *Server { server := &Server{store: store} router := gin.Default() router.POST("/accounts", server.createAccount) server.router = router return server}For now, we dont have any middlewares, so I just pass in 1 handler: server.createAccount. This is a method of the Server struct that we need to implement. The reason it needs to be a method of the Server struct is because we have to get access to the store object in order to save new account to the database.
Implement create account API
Im gonna implement server.createAccount method in a new file account.go inside the api folder. Here we declare a function with a server pointer receiver. Its name is createAccount, and it should take a gin.Context object as input.
func (server *Server) createAccount(ctx *gin.Context) { ...}Why does it have this function signature? Lets look at this router.POST function of Gin:

Here we can see that the HandlerFunc is declared as a function with a Context input. Basically, when using Gin, everything we do inside a handler will involve this context object. It provides a lot of convenient methods to read input parameters and write out responses.
Alright, now lets declare a new struct to store the create account request. It will have several fields, similar to the createAccountParams from account.sql.go that we used in the database in previous lecture:
type CreateAccountParams struct { Owner string `json:"owner"` Balance int64 `json:"balance"` Currency string `json:"currency"`}So Im gonna copy these fields and paste them to our createAccountRequest struct. When a new account is created, its initial balance should always be 0, so we can remove the balance field. We only allow clients to specify the owners name and the currency of the account. Were gonna get these input parameters from the body of the HTTP request, Which is a JSON object, so Im gonna keep the JSON tags.
type createAccountRequest struct { Owner string `json:"owner"` Currency string `json:"currency"`}func (server *Server) createAccount(ctx *gin.Context) { ...}Now whenever we get input data from clients, its always a good idea to validate them, because who knows, clients might send some invalid data that we dont want to store in our database.
Lucky for us, Gin uses a validator package internally to perform data validation automatically under the hood. For example, we can use a binding tag to tell Gin that the field is required. And later, we call the ShouldBindJSON function to parse the input data from HTTP request body, and Gin will validate the output object to make sure it satisfy the conditions we specified in the binding tag.
Im gonna add a binding required tag to both the owner and the currency field. Moreover, lets say our bank only supports 2 types of currency for now: USD and EUR. So how can we tell gin to check that for us? Well, we can use the oneof condition for this purpose:
type createAccountRequest struct { Owner string `json:"owner" binding:"required"` Currency string `json:"currency" binding:"required,oneof=USD EUR"`}We use a comma to separate multiple conditions, and a space to separate the possible values for the oneof condition.
Alright, now in the createAccount function, we declare a new req variable of type createAccountRequest. Then we call ctx.ShouldBindJSON() function, and pass in this req object. This function will return an error.
If the error is not nil, then it means that the client has provided invalid data. So we should send a 400 Bad Request response to the client. To do that, we just call ctx.JSON() function to send a JSON response.
The first argument is an HTTP status code, which in this case should be http.StatusBadRequest. The second argument is the JSON object that we want to send to the client. Here we just want to send the error, so we will need a function to convert this error into a key-value object so that Gin can serialize it to JSON before returning to the client.
func (server *Server) createAccount(ctx *gin.Context) { var req createAccountRequest if err := ctx.ShouldBindJSON(&req); err != nil { ctx.JSON(http.StatusBadRequest, errorResponse(err)) return } ...}Were gonna use this errorResponse() function a lot in our code later, and it can be used for other handlers as well, not just for account handlers, so I will implement it in the server.go file.
This function will take an error as input, and it will return a gin.H object, which is in fact just a shortcut for map[string]interface{}. So we can store whatever key-value data that we want in it.
For now lets just return gin.H with only 1 key: error, and its value is the error message. Later we might check the error type and convert it to a better format if we want.
func errorResponse(err error) gin.H { return gin.H{"error": err.Error()}}Now lets go back to the createAccount handler. In case the input data is valid, there will be no errors. So we just go ahead to insert a new account into the database.
First we declare a CreateAccountParams object, where Owner is req.Owner, Currency is req.Currency, and Balance is 0. Then we call server.store.CreateAccount(), pass in the input context, and the argument. This function will return the created account and an error.
func (server *Server) createAccount(ctx *gin.Context) { var req createAccountRequest if err := ctx.ShouldBindJSON(&req); err != nil { ctx.JSON(http.StatusBadRequest, errorResponse(err)) return } arg := db.CreateAccountParams{ Owner: req.Owner, Currency: req.Currency, Balance: 0, } account, err := server.store.CreateAccount(ctx, arg) if err != nil { ctx.JSON(http.StatusInternalServerError, errorResponse(err)) return } ctx.JSON(http.StatusOK, account)}If the error is not nil, then there must be some internal issue when trying to insert to the database. Thus, we will return a 500 Internal Server Error status code to the client. We also reuse the errorResponse() function to send the error to the client, then return immediately.
If no errors occur, then the account is successfully created. We just send a 200 OK status code, and the created account object to the client. And thats it! The createAccount handler is done.
Start HTTP server
Next, we have to add some more code to run the HTTP server. Im gonna add a new Start() function to our Server struct. This function will take an address as input and return an error. Its role is to run the HTTP server on the input address to start listening for API requests.
func (server *Server) Start(address string) error { return server.router.Run(address)}Gin already provided a function in the router to perform this action, so all we need to do is calling server.router.Run(), and pass in the server address.
Note that the server.router field is private, so it cannot be accessed from outside of this api package. Thats one of the reasons we have this public Start() function. For now, it has just 1 single command, but later, we might want to add some graceful shutdown logics in this function as well.
OK, now lets create an entry point for our server in the main.go file at the root of this repository. The package name should be main, and it should have a main() function.
In order to create a Server, we need to connect to the database and create a Store first. Its gonna be very similar to the code that weve written before in the main_test.go file.
So Im gonna copy these constants for the dbDriver and dbSource, paste them to the top of our main.go file. Then also copy the block of code that establishes connections to the database and paste it inside the main function.
With this connection, we can create a new store using db.NewStore() function. Then we create a new server by calling api.NewServer() and pass in the store.
const ( dbDriver = "postgres" dbSource = "postgresql://root:secret@localhost:5432/simple_bank?sslmode=disable")func main() { conn, err := sql.Open(dbDriver, dbSource) if err != nil { log.Fatal("cannot connect to db:", err) } store := db.NewStore(conn) server := api.NewServer(store) ...}To start the server, we just need to call server.Start() and pass in the server address. For now, Im just gonna declare it as a constant: localhost, port 8080. In the future, we will refactor the code to load all of these configurations from environment variables or a setting file. In case some error occurs when starting the server, we just write a fatal log, saying cannot start server.
One last but very important thing we must do is to add a blank import for lib/pq driver. Without this, our code would not be able to talk to the database.
package mainimport ( "database/sql" "log" _ "github.com/lib/pq" "github.com/techschool/simplebank/api" db "github.com/techschool/simplebank/db/sqlc")const ( dbDriver = "postgres" dbSource = "postgresql://root:secret@localhost:5432/simple_bank?sslmode=disable" serverAddress = "0.0.0.0:8080")func main() { conn, err := sql.Open(dbDriver, dbSource) if err != nil { log.Fatal("cannot connect to db:", err) } store := db.NewStore(conn) server := api.NewServer(store) err = server.Start(serverAddress) if err != nil { log.Fatal("cannot start server:", err) }}Alright, so now the main entry for our server is completed. Lets add a new make command to the Makefile to run it.
Im gonna call it make server. And it should execute this go run main.go command. Lets add server to the phony list.
...server: go run main.go.PHONY: postgres createdb dropdb migrateup migratedown sqlc test serverThen open the terminal and run:
make server
Voila, the server is up and running. Its listening and serving HTTP requests on port 8080.
Test create account API with Postman
Now Im gonna use Postman to test the create account API.
Lets add a new request, select the POST method, fill in the URL, which is http://localhost:8080/accounts.
The parameters should be sent via a JSON body, so lets select the Body tab, choose Raw, and select JSON format. We have to add 2 input fields: the owners name, I will use my name here, and a currency, lets say USD.
{ "owner": "Quang Pham", "currency": "USD"}OK, then click Send.

Yee, its successful. Weve got a 200 OK status code, and the created account object. It has ID = 1, balance = 0, with the correct owners name and currency.
Now lets try to send some invalid data to see what will happen. Im gonna set both fields to empty string, and click Send.
{ "owner": "", "currency": ""}
This time, weve got 400 Bad Request, and an error saying the fields are required. This error message looks quite hard to read because it combines 2 validation errors of the 2 fields together. This is something we might want to improve in the future.
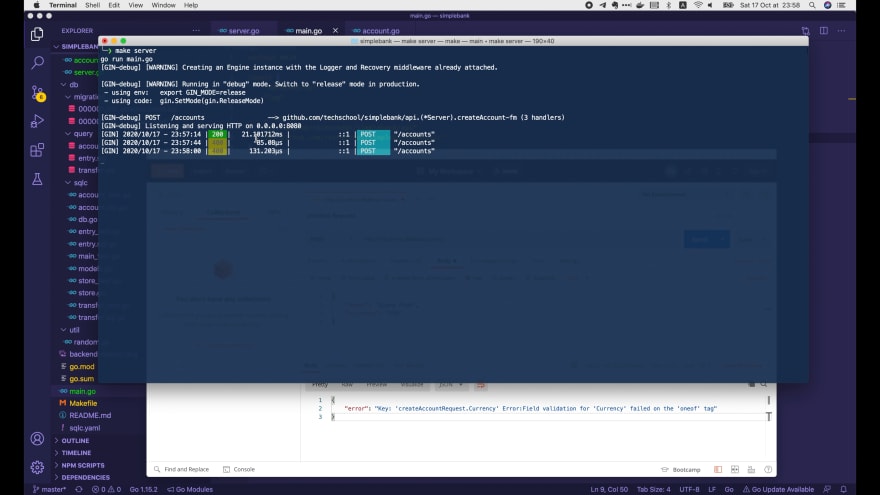
Next Im gonna try to use an invalid currency code, such as xyz.
{ "owner": "Quang Pham", "currency": "xyz"}
This time, we also get 400 Bad Request status code, but the error message is different. It say the validation failed on the oneof tag, which is exactly what we want, because in the code we only allow 2 possible values for the currency: USD and EUR.
Its really great how Gin has handled all the input binding and validation for us with just a few lines of code. It also prints out a nice form of request logs, which is very easy to read for human eyes.
Implement get account API
Alright, next were gonna add an API to get a specific account by ID. It would be very similar to the create account API, so I will duplicate this routing statement:
func NewServer(store *db.Store) *Server { ... router.POST("/accounts", server.createAccount) router.GET("/accounts/:id", server.getAccount) ...}Here instead of POST, we will use GET method. And this path should include the id of the account we want to get /accounts/:id. Note that we have a colon before the id. Its how we tell Gin that id is a URI parameter.
Then we have to implement a new getAccount handler on the Server struct. Lets move to the account.go file to do so. Similar as before, we declare a new struct called getAccountRequest to store the input parameters. It will have an ID field of type int64.
Now, since ID is a URI parameter, we cannot get it from the request body as before. Instead, we use the uri tag to tell Gin the name of the URI parameter:
type getAccountRequest struct { ID int64 `uri:"id" binding:"required,min=1"`}We add a binding condition that this ID is a required field. Also, we dont want client to send an invalid ID, such as a negative number. To tell Gin about this, we can use the min condition. In this case, lets set min = 1, because its the smallest possible value of account ID.
OK, now in the server.getAccount handler, we will do similar as before. First we declare a new req variable of type getAccountRequest. Then here instead of ShouldBindJSON, we should call ShouldBindUri.
If theres an error, we just return a 400 Bad Request status code. Otherwise, we call server.store.GetAccount() to get the account with ID equals to req.ID. This function will return an account and an error.
func (server *Server) getAccount(ctx *gin.Context) { var req getAccountRequest if err := ctx.ShouldBindUri(&req); err != nil { ctx.JSON(http.StatusBadRequest, errorResponse(err)) return } account, err := server.store.GetAccount(ctx, req.ID) if err != nil { if err == sql.ErrNoRows { ctx.JSON(http.StatusNotFound, errorResponse(err)) return } ctx.JSON(http.StatusInternalServerError, errorResponse(err)) return } ctx.JSON(http.StatusOK, account)}If error is not nil, then there are 2 possible scenarios.
- The first scenario is some internal error when querying data from the database. In this case, we just return
500 Internal Server Errorstatus code to the client. - The second scenario is when the account with that specific input ID doesnt exist. In that case, the error we got should be a
sql.ErrNoRows. So we just check it here, and if its really the case, we simply send a404 Not Foundstatus code to the client, and return.
If everything goes well and theres no error, we just return a 200 OK status code and the account to the client. And thats it! Our getAccount API is completed.
Test get account API with Postman
Lets restart the server and open Postman to test it.
Lets add a new request with method GET, and the URL is http://localhost:8080/accounts/1. We add a /1 at the end because we want to get the account with ID = 1. Now click send:

The request is successful, and weve got a 200 OK status code together with the found account. This is exactly the account that weve created before.
Now lets try to get an account that doesnt exist. Im gonna change the ID to 100: http://localhost:8080/accounts/100, and click send again.
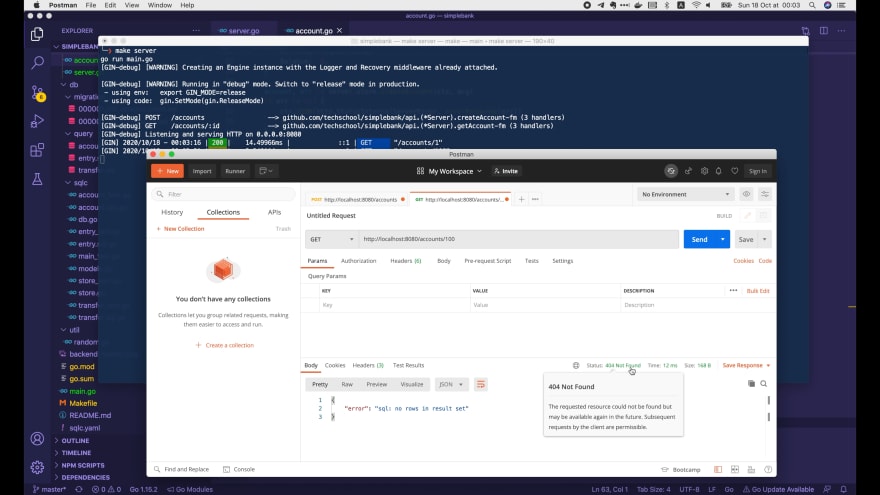
This time weve got a 404 Not Found status code, and an error: sql no rows in result set. Exactly what we expected.
Lets try one more time with a negative ID: http://localhost:8080/accounts/-1

Now we got a 400 Bad Request status code with an error message about the failed validation.
Alright, so our getAccount API is working well.
Implement list account API
Next step, Im gonna show you how to implement a list account API with pagination.
The number of accounts stored in our database can grow to a very big number over time. Therefore, we should not query and return all of them in a single API call. The idea of pagination is to divide the records into multiple pages of small size, so that the client can retrieve only 1 page per API request.
This API is a bit different because we will not get input parameters from request body or URI, but we will get them from query string instead. Heres an example of the request:

We have a page_id param, which is the index number of the page we want to get, starting from page 1. And a page_size param, which is the maximum number of records can be returned in 1 page.
As you can see, the page_id and page_size are added to the request URL after a question mark: http://localhost:8080/accounts?page_id=1&page_size=5. Thats why theyre called query parameters, and not URI parameter like the account ID in the get account request.
OK, now lets go back to our code. Im gonna add a new route with the same GET method. But this time, the path should be /accounts only, since were gonna get the parameters from the query. The handlers name should be listAccount.
func NewServer(store *db.Store) *Server { server := &Server{store: store} router := gin.Default() router.POST("/accounts", server.createAccount) router.GET("/accounts/:id", server.getAccount) router.GET("/accounts", server.listAccount) server.router = router return server}Alright, lets open the account.go file to implement this server.listAccount function. Its very similar to the server.getAccount handler, so Im gonna duplicate it. Then change the struct name to listAccountRequest.
This struct should store 2 parameters, PageID and PageSize. Now note that were not getting these parameters from uri, but from query string instead, so we cannot use the uri tag. Instead, we should use form tag.
type listAccountRequest struct { PageID int32 `form:"page_id" binding:"required,min=1"` PageSize int32 `form:"page_size" binding:"required,min=5,max=10"` }Both parameters are required and the minimum PageID should be 1. For the PageSize, lets say we dont want it to be too big or too small, so I set its minimum constraint to be 5 records, and maximum constraint to be 10 records.
OK, now the server.listAccount handler function should be implemented like this:
func (server *Server) listAccount(ctx *gin.Context) { var req listAccountRequest if err := ctx.ShouldBindQuery(&req); err != nil { ctx.JSON(http.StatusBadRequest, errorResponse(err)) return } arg := db.ListAccountsParams{ Limit: req.PageSize, Offset: (req.PageID - 1) * req.PageSize, } accounts, err := server.store.ListAccounts(ctx, arg) if err != nil { ctx.JSON(http.StatusInternalServerError, errorResponse(err)) return } ctx.JSON(http.StatusOK, accounts)}The req variables type should be listAccountRequest. Then we use another binding function: ShouldBindQuery to tell Gin to get data from query string.
If an error occurs, we just return a 400 Bad Request status. Else, we call server.store.ListAccounts() to query a page of account records from the database. This function requires a ListAccountsParams as input, where we have to provide values for 2 fields: Limit and Offset.
Limit is simply the req.PageSize. While Offset is the number of records that the database should skip, wo we have to calculate it from the page id and page size using this formula: (req.PageID - 1) * req.PageSize
The ListAccounts function returns a list of accounts and an error. If an error occurs, then we just need to return 500 Internal Server Error to the client. Otherwise, we send a 200 OK status code with the output accounts list.
And thats it, the ListAccount API is done.
Test list account API with Postman
Lets restart the server then open Postman to test this request.

Its successful, but weve got only 1 account on the list. Thats because our database is quite empty at the moment. We just created only 1 single account. Lets run the database tests that weve written in previous lectures to have more random data.
make testOK, now we should have a lot of accounts in our database. Lets resend this API request.

Voila, now the returned list has exactly 5 accounts as expected. The account with ID 5 is not here because I think its got deleted in the test. Weve got the account with ID 6 here instead.
Lets try to get the second page.
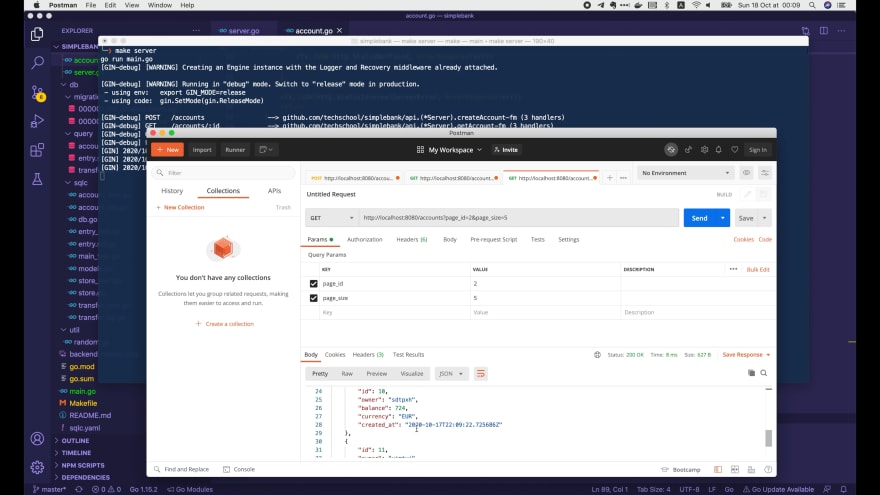
Cool, now we get the next 5 accounts with ID from 7 to 11. So its working very well.
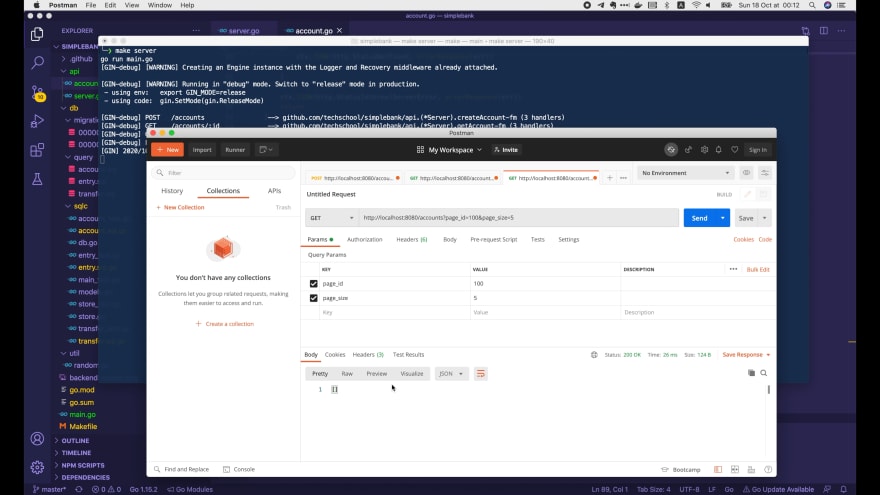
Im gonna try one more time to get a page that doesnt exist, lets say page 100.

OK, so now weve got a null response body. Although its technically correct, I think it would be better if the server returns an empty list in this case. So lets do that!
Return empty list instead of null
Here in the account.sql.go file that sqlc has generated for us:
func (q *Queries) ListAccounts(ctx context.Context, arg ListAccountsParams) ([]Account, error) { rows, err := q.db.QueryContext(ctx, listAccounts, arg.Limit, arg.Offset) if err != nil { return nil, err } defer rows.Close() var items []Account for rows.Next() { var i Account if err := rows.Scan( &i.ID, &i.Owner, &i.Balance, &i.Currency, &i.CreatedAt, ); err != nil { return nil, err } items = append(items, i) } if err := rows.Close(); err != nil { return nil, err } if err := rows.Err(); err != nil { return nil, err } return items, nil}We can see that the Account items variable is declared without being initialized: var items []Account. Thats why it will remain null if no records are added.
Lucky for us, in the latest released of sqlc, which is version 1.5.0, we have a new setting that will instruct sqlc to create an empty slice instead of null.
The setting is called emit_empty_slices, and its default value is false. If we set this value to true, then the result returned by a many query will be an empty slice.
OK, so now lets add this new setting to our sqlc.yaml file:
version: "1"packages: - name: "db" path: "./db/sqlc" queries: "./db/query/" schema: "./db/migration/" engine: "postgresql" emit_json_tags: true emit_prepared_queries: false emit_interface: false emit_exact_table_names: false emit_empty_slices: trueSave it, and open the terminal to upgrade sqlc to the latest version. If youre on a Mac and using Homebrew, just run:
brew upgrade sqlcYou can check your current version by running:
sqlc versionv1.5.0For me, its already the latest version: 1.5.0, so now Im gonna regenerate the codes:
make sqlcAnd back to visual studio code. Now in the account.sql.go file, we can see that the items variable is now initialized as an empty slice:
func (q *Queries) ListAccounts(ctx context.Context, arg ListAccountsParams) ([]Account, error) { ... items := []Account{} ...}Cool! Lets restart the server and test it on Postman. Now when I send this request, weve got an empty list as expected.
So it works!
Now Im gonna try some invalid parameters. For example, lets change page_size to 20, which is bigger than the maximum constraint of 10.

This time weve got 400 Bad Request status code, and an error saying the validation of page_size failed on the max tag.
Lets try one more time with page_id = 0.

Now we still got 400 Bad Request status, but the error is because page_id validation failed on the required tag. What happens here is, in the validator package, any zero-value will be recognized as missing. Its acceptable in this case because we dont want to have the 0 page, anyway.
However, if your API has a zero value parameter, then you need to pay attention to this. I recommend you to read the documentation of validator package to learn more about it.
Alright, so today we have learned how easy it is to implement RESTful HTTP APIs in Go using Gin. You can based on this tutorial to try implementing some more routes to update or delete accounts on your own. I leave that as a practice exercise for you.
Thanks a lot for reading this article. Happy coding and I will see you soon in the next lecture!
If you like the article, please subscribe to our Youtube channel and follow us on Twitter for more tutorials in the future.
Original Link: https://dev.to/techschoolguru/implement-restful-http-api-in-go-using-gin-4ap1
Dev To
More About this Source Visit Dev To