
An Interest In:
Web News this Week
- March 20, 2024
- March 19, 2024
- March 18, 2024
- March 17, 2024
- March 16, 2024
- March 15, 2024
- March 14, 2024
Some of Our Sources
- Techcrunch
- Joshua Blankenship
- TutsPlus - Design
- Creative Curio
- Inspiredology
- Web Designer Depot
- CSS Tricks
- Web Resource Source
- Android Dissected
- TechPowerUp
Help Webnuz
Referal links:
The most basic and essential GIT commands walkthrough
Hello Dev community Developers!
I am coming back with GIT command lines.
When you are working on a project whether on your own or with a team, GIT is a must you should acquire as a developer.
If you just started learning web development or software development, I hope my blog will help you to get to good grips with it.
GIT is a version control system which allows us work in more versatile and flexible ways when it comes to development.
This may sound like an abstract analogy, but, personally I think GIT is a good comparison to train terminals, particularly British ones.
Personally I don't like the train terminals and platforms. They are so confusing. Do not jump to the conclusion that you are on the right train. Ask attendants before you hop on if you are a lone traveller without much experience taking trains in a foreign country. haha
When I got on a train from Liverpool to get back to London a long, long time ago (it was my second time to get on a train in the UK), I actually got on the wrong one, obviously from the wrong platform. When I realised that, I was panicking so much til I got a new ticket to London from the next stop. It was the most nerve-racking time in the middle of nowhere half way around world as a traveller. You may wonder how come she is talking about her train trip in the UK while we were meant to talk about GIT.

My point is that you may easily get lost with GIT like my train trip with a dozen platforms lined up. But, I think it is absolutely fine. Especially, if you work in a big team, when you see so many branches, it is quite overwhelming. No worries, working with GIT is even easier and quicker than getting a new train ticket to London and find the right train again.
One of the benefits of VCS is that it enables us to see what's going as a whole and even on each branch and to roll back in case of an error or if an emergency occurs. Each branch can have a completely different setup and by virtue of it, modern microservices in one repository is also possible. So, all developers keep themselves up-to-date with the whole work flow without checking multiple repositories.
Let's say you just created a project react-app directory locally and also remotely. Once you create a local one, in the react-app directory, create a .gitignore file and includes node-modules, env and .DS_Store as default. Open the terminal and then move to the react-app directory using unix command cd(change directory).
Finally it's time to use actual GIT command lines.
git init
// to create an git repositorygit init 
Good job! you've just created a local repository.
git add
// to add all the files(with full stop `.`) to the indexgit add .
Now all the files in the react-app directory are ready to commit. Until you actually commit it, you can make multiple changes in the directory and repeat the process over and over again without any record during this stage. The full stop . is like a short-cut key that enable us to add all the files which have been changed.
You have made a little change on a README.md file in the directory or you have been working on multiple files and before you commit, you want to see what status you are in now.
git status
// to see working tree status git status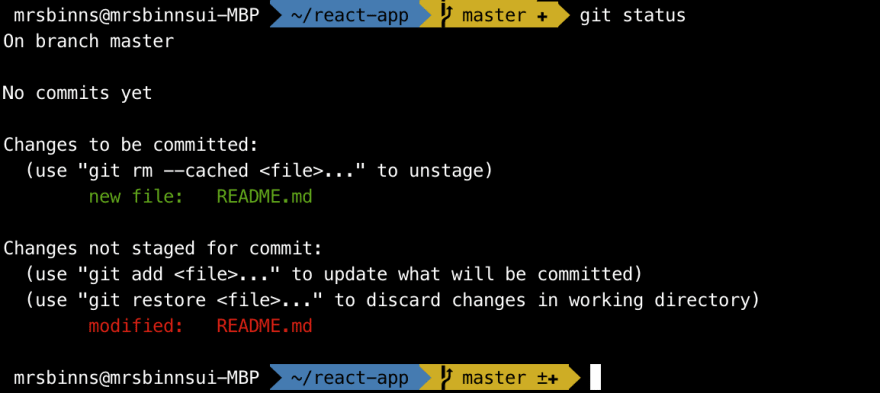
You see the modified: README.md line with the red text on the terminal.
OK, now time to add it again.
Once you add the new README.md, let's commit the whole directory.
git commit
// to record changes to the repository git commit -m "write your commit messages"
Voila!
It's a crucial part to leave a comment regarding the work you have done when you are part of a team. So, other members would be able to see what exactly you have worked on and explain others why you decided to write codes in a certain way, etc.
Now let's push the local change to the remote github repository.
As we haven't set the tracked repository, we should tell git which repository we want to track.
git remote
git remote add origin <your remote git repository HTTP/SSH>I always create a remote repository with the same name as the local one. So, I have used origin. Type git remote and then you will see that the terminal returns origin as the name of the remote repository.
git push
git push -u origin master
Oh my god!
We made it! the remote branch master is now up-to-date with our local branch. These are the very basic steps of working with GIT.
Shall we move onto creating a new branch?
I think this is the most common way you would start when you take on a task. Make sure your local repository is always up-to-date with the remote one. You can easily do that with the git command line git fetch.
git branch & checkout
git branch <new branch name>git checkout <new branch name>
Ok, now you've just created a new branch in order to work on a new task you're given and you also have checked out from master branch to the new testing branch.
This is a very crucial part when you work with multiple people at the same time.
Oh wait!
Have you forgotten to create a branch and you've been coding away on a wrong branch? No worries, I have done that many times. haha
git stash
git stashgit checkout <a branch you need to work on>git stash apply
Ta-Da!
Magic just happened. All the changes you made in a wrong branch is stashed, the master branch is in the clean state and you applied the change to the right branch.
--set-upstream
Now you have added the branch to the index, committed with a new message and finally push it to the remote repository.
As the remote repository doesn't have the same branch yet,
git push --set-upstrem origin <current new branch name>git merge or rebase
Brilliant!
Now you've decided to merge the branch to the master
as you've done an excellent job!
// you are still in the working branch directorygit merge master <the branch name you've completed>git pushThe command line is equivalent to
git checkout mastergit merge <the branch name you've completed>git pushWait a sec!
It's not done yet. There is another option rebase.
When you use merge, you will still have kept all the commit history from the branch you merged into the master. Depending on the situation, all of these unnecessary commit histories on the master branch could be seen to be cumbersome for all the other developers who have never worked on the task. In this kind of case, it would be better to use rebase.
git checkout mastergit rebase <the branch name you've completed>rebase creates a new commit point.
As irrelevant and trivial commit histories are no longer in the master history, the whole team can easily track down the commit history.
But, this is just an example I am referring to. What is best for you and your team is up to you.
There are numerous git command lines such as revert, reset and cherry-pick and so on. However, once you get used to all of these basic git command lines, you will be able to wrap your head around why you would need to use others in certain cases. If you are not 100% comfortable with git, I would recommend you use GIT GUI together. Thank you for reading again and please like my blog if you enjoyed this!
See you next time!
Photo by Tim Bechervaise on Unsplash
Photo by Daniel Mingook Kim on Unsplash
Original Link: https://dev.to/bearcub3/the-most-basic-and-essential-git-commands-walkthrough-1bie
Dev To
More About this Source Visit Dev To