
An Interest In:
Web News this Week
- March 20, 2024
- March 19, 2024
- March 18, 2024
- March 17, 2024
- March 16, 2024
- March 15, 2024
- March 14, 2024
Some of Our Sources
- Mashable
- Team Treehouse
- Smashing Magazine
- TutsPlus - Design
- Fudge Graphics
- Line 25
- Wal You
- Freelance Switch
- Hashedout
- The Verge
Help Webnuz
Referal links:
Creating a Multi-User To-Do Application with Laravel JetStream
Laravel is a modern PHP framework that allows developers to build web applications of all sizes. With a plethora of supporting packages and extensions that compose its ecosystem, Laravel has become a popular choice for enabling developers to focus on their app features rather than spending time on tasks that are part of the application bootstrap.
In addition to the built-in features that come with the framework, some extensions can highly speed up development time - that is the case with the new Laravel JetStream. Quoting the official docs:
Laravel Jetstream is a beautifully designed application scaffolding for Laravel. Jetstream provides the perfect starting point for your next Laravel application and includes login, registration, email verification, two-factor authentication, session management, API support via Laravel Sanctum, and optional team management.
In this tutorial, I'll share what I've learned in the last week while working on a hackaton project with Laravel + JetStream. We'll build a simple to-do application using Livewire actions under a secured area.
1. Environment Setup
First, you'll need to get Laravel installed on your local machine or development environment. Here are a few resources that can help you setting that up:
- How to Install and Run Laravel with LEMP on Ubuntu
- How to Install and Run Laravel on containers with Docker Compose
If you already have a working PHP development environment with Composer, you can create a brand new Laravel application with:
composer create-project --prefer-dist laravel/laravel mytodoIn addition to that, you'll need NPM to install the modules required by Jetstream / Livewire. To install it on a local Linux-based development environment, run:
curl -sL https://deb.nodesource.com/setup_14.x | bash - && \ apt-get install -yq nodejs build-essentialIf you're using a Docker-based setup, you can include the following line to your Dockerfile to get NPM installed:
# Install NPM for LivewireRUN curl -sL https://deb.nodesource.com/setup_14.x | bash - && \ apt-get install -yq nodejs build-essentialOnce you have a working Laravel installation that you can access from your browser, you can proceed with the rest of this tutorial.
2. Installing Jetstream
With a working Laravel installation up and running, the next step is to install Jetstream with Composer. In case you are running this with Docker Compose, don't forget to prefix the next commands with docker-compose exec app:
composer require laravel/jetstreamSet up Jetstream to use Livewire:
php artisan jetstream:install livewireNext, install and build the NPM dependencies:
npm install && npm run devFinally, migrate the database so that all required tables are created:
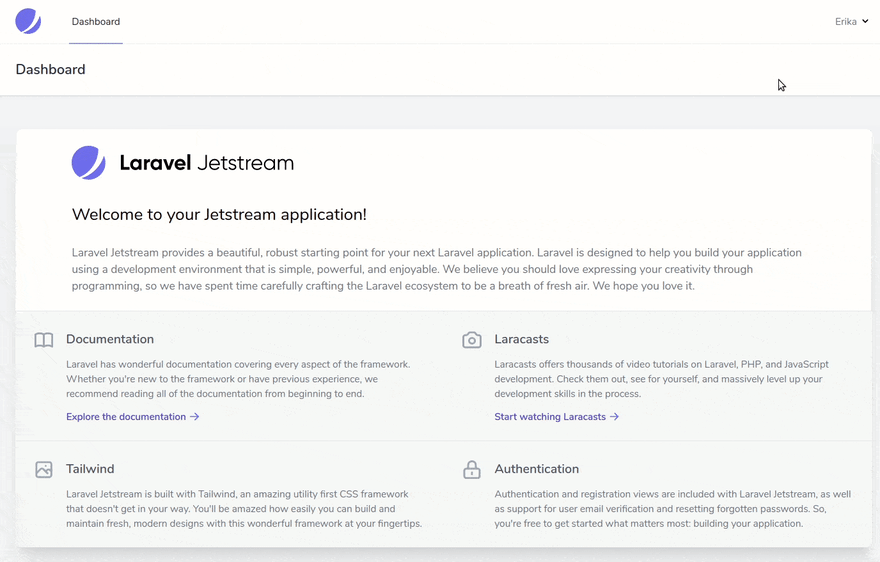
php artisan migrateYou should now be able to access your application and register a new user at /register. Login is available at /login. After registering a user and logging in, you'll be redirected to your application dashboard:
On the top right corner, you'll find the "profile" section, which contains your user settings including 2fa configuration.
2. Creating a Database Migration for the to-do list
We'll need a table to hold our to-do items. This will require a model and a database migration. You can use the following helper artisan command to create a new model:
docker-compose exec app php artisan make:model TodoItemdocker-compose exec app php artisan make:migration create-todo-item-tableTo minimize complexity, we'll create a simple table with no foreign keys / relationships. If you plan on deploying this application to production, however, you should make sure list items are linked to the user who created them, since the registration form is open by default.
Replace the contents of the generated migration file with the following migration class:
<?phpuse Illuminate\Database\Migrations\Migration;use Illuminate\Database\Schema\Blueprint;use Illuminate\Support\Facades\Schema;class CreateTodoItemTable extends Migration{ /** * Run the migrations. * * @return void */ public function up() { Schema::create('todo-item', function (Blueprint $table) { $table->id(); $table->string('description'); $table->boolean('done')->default(false); $table->timestamps(); }); } /** * Reverse the migrations. * * @return void */ public function down() { Schema::dropIfExists('todo-item'); }}You'll need to run the migrations now with:
php artisan migrate3. Creating a New Dashboard Section
Now comes the most interesting part of the work, and also the most challenging, since the gap between getting the initial setup ready and understanding all the components that are installed is quite steep - unless you are used to things like Livewire and TailwindCSS, which I wasn't at first.
Jetstream uses both Blade Components and Livewire components, which might result in confusion for some people. From my short experience figuring all this out, I believe the included Blade components are mostly structural so you can go ahead and create your new dashboard pages using Livewire. This will allow you to integrate javascript actions without writing a single JS line!
We'll create a new section within the dashboard to manage the todo items. Copy the dashboard view to use as base for your new page:
cp resources/views/dashboard.blade.php resources/views/todo.blade.phpNext, create two Livewire components: todo.show and todo.form:
php artisan make:livewire todo.showphp artisan make:livewire todo.formIf you check your application folders now, you'll find a new Livewire directory inside app/Http. These are the component controllers. The generated views are located at resources/views/livewire/todo.
These components will be rendered through the new todo.blade.php. Open that file now and replace the x-jet-welcome section with a Livewire tag to render the show component. We'll also include the form component at the top. This is how the updated view will look like:
#resources/views/todo.blade.php<x-app-layout> <x-slot name="header"> <h2 class="font-semibold text-xl text-gray-800 leading-tight"> {{ __('My To-Do List') }} </h2> </x-slot> <div> <div class="max-w-7xl mx-auto py-10 sm:px-6 lg:px-8"> @livewire('todo.form') </div> </div> <div class="py-12"> <div class="max-w-7xl mx-auto sm:px-6 lg:px-8"> <div class="bg-white overflow-hidden shadow-xl sm:rounded-lg"> @livewire('todo.show') </div> </div> </div></x-app-layout>Also, update the resources/views/navigation-dropdown.blade.php file to include your new section. This is how my updated Navigation Links code looks like:
#resources/views/navigation-dropdown.blade.php...<!-- Navigation Links --> <div class="hidden space-x-8 sm:-my-px sm:ml-10 sm:flex"> <x-jet-nav-link href="{{ route('dashboard') }}" :active="request()->routeIs('dashboard')"> {{ __('Dashboard') }} </x-jet-nav-link> <x-jet-nav-link href="{{ route('dashboard-todo') }}" :active="request()->routeIs('dashboard-todo')"> {{ __('To-Do List') }} </x-jet-nav-link> </div>...Now add a new protected route to routes/web.php. I just copied the dashboard route and updated accordingly:
Route::middleware(['auth:sanctum', 'verified'])->get('/dashboard/todo', function () { return view('todo');})->name('dashboard-todo');If you go to your dashboard now, you should see the new link in the navigation menu. It will show a blank page, since we didn't customize our components yet:

Next, we'll customize our components.
4. Creating to-do item form and listing items in the dashboard
To include new items in the list, we'll need to create a form. The bad news is that there isn't a command to bootstrap that for you, but the good news is that you can use the included profile forms at resources/views/profile as base for your work.
Open the resources/views/livewire/todo/form.blade.php file and replace the content with the following:
#resources/views/livewire/todo/form.blade.php<x-jet-form-section submit="createItem"> <x-slot name="title"> {{ __('Create New To-Do Item') }} </x-slot> <x-slot name="description"> {{ __('Create a new item in your to-do list.') }} </x-slot> <x-slot name="form"> <div class="col-span-6 sm:col-span-4"> <x-jet-label for="description" value="{{ __('Item Description') }}" /> <x-jet-input id="description" type="text" class="mt-1 block w-full" wire:model.defer="state.description" autocomplete="description" /> <x-jet-input-error for="description" class="mt-2" /> </div> </x-slot> <x-slot name="actions"> <x-jet-action-message class="mr-3" on="saved"> {{ __('Saved.') }} </x-jet-action-message> <x-jet-button> {{ __('Save') }} </x-jet-button> </x-slot></x-jet-form-section>The form is ready, but we still need to set up the action that will handle this form. Open the app/Http/Livewire/Todo/Form.php file and update it to include a createItem method:
#app/Http/Livewire/Todo/Form.php<?phpnamespace App\Http\Livewire\Todo;use App\Models\TodoItem;use Livewire\Component;class Form extends Component{ public $description; protected $rules = [ 'description' => 'required|min:6' ]; public function render() { return view('livewire.todo.form'); } public function createItem() { $this->validate(); $item = new TodoItem(); $item->description = $this->description; $item->save(); $this->emit('saved'); }}Update the "show" component controller to inject the To-Do items in the view, after obtaining them with an Eloquent call. We have also implemented here an event listener that will be triggered when a new item is saved, to refresh the list of items:
#app/Http/Livewire/Todo/Show.php<?phpnamespace App\Http\Livewire\Todo;use App\Models\TodoItem;use Livewire\Component;class Show extends Component{ protected $listeners = ['saved']; public function render() { $list = TodoItem::all()->sortByDesc('created_at'); return view('livewire.todo.show', [ 'list' => $list ]); } public function saved() { $this->render(); }}Update the "show" component view to list the items with a @foreach loop:
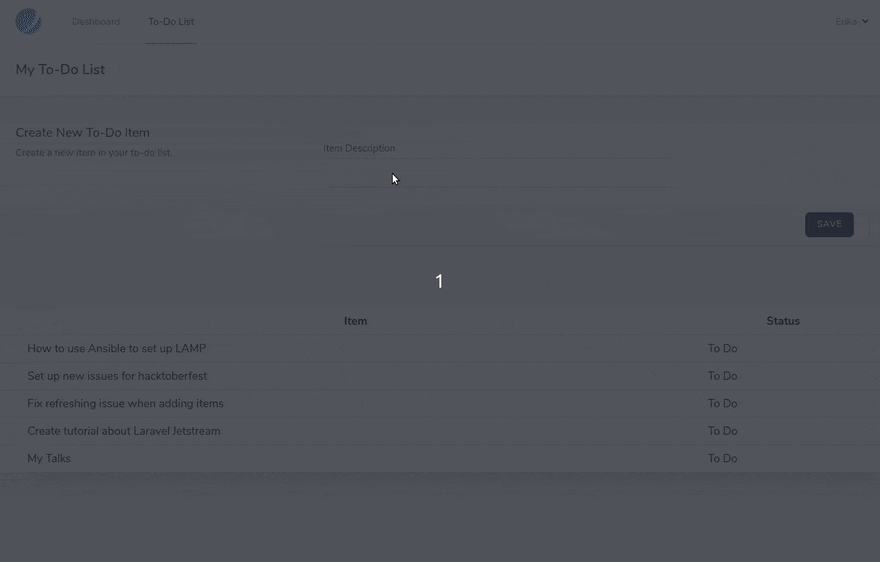
#resources/views/livewire/todo/show.blade.php<div> <table class="table-auto w-full"> <thead> <tr> <th class="px-4 py-2">Item</th> <th class="px-4 py-2">Status</th> </tr> </thead> <tbody> @foreach ($list as $item) <tr @if($loop->even)class="bg-grey"@endif> <td class="border px-4 py-2">{{ $item->description }}</td> <td class="border px-4 py-2">@if($item->done)Done @else To Do @endif</td> </tr> @endforeach </tbody> </table></div>This is how the updated application should look like:

5. Creating Livewire actions to update and delete items
Last but not least, we need to be able to delete items and mark them as "done" (or "undone"). We can implement these quite easily using Livewire actions.
First, update your Todo/Show component controller to include three short methods: markAsDone, markAsToDo, and deleteItem:
#app/Http/Livewire/Todo/Show.php<?phpnamespace App\Http\Livewire\Todo;use App\Models\TodoItem;use Livewire\Component;class Show extends Component{ protected $listeners = ['saved']; public function render() { $list = TodoItem::all()->sortByDesc('created_at'); return view('livewire.todo.show', [ 'list' => $list ]); } public function saved() { $this->render(); } public function markAsDone(TodoItem $item) { $item->done = true; $item->save(); } public function markAsToDo(TodoItem $item) { $item->done = false; $item->save(); } public function deleteItem(TodoItem $item) { $item->delete(); }}Finally, update your view to include operational buttons for those actions:
#resources/views/livewire/todo/show.blade.php<div> <table class="table-auto w-full"> <thead> <tr> <th class="px-4 py-2">Item</th> <th class="px-4 py-2">Status</th> <th class="px-4 py-2">Actions</th> </tr> </thead> <tbody> @foreach ($list as $item) <tr @if($loop->even)class="bg-grey"@endif> <td class="border px-4 py-2">{{ $item->description }}</td> <td class="border px-4 py-2">@if($item->done)Done @else To Do @endif</td> <td class="border px-4 py-2"> @if($item->done) <button wire:click="markAsToDo({{ $item->id }})" class="bg-red-100 text-red-600 px-6 rounded-full"> Mark as "To Do" </button> @else <button wire:click="markAsDone({{ $item->id }})" class="bg-gray-800 text-white px-6 rounded-full"> Mark as "Done" </button> @endif <button wire:click="deleteItem({{ $item->id }})" class="bg-red-100 text-red-600 px-6 rounded-full"> Delete Permanently </button> </td> </tr> @endforeach </tbody> </table></div>And ta-da! Just as that, without writing any actual Javascript, you have dynamic components that call external controllers and refresh automatically. This is my favorite part of it all!
Where to Go from Here
After this initial experimentation, you might want to dive deeper into Livewire and TailwindCSS, in order to customize the appearance of your application as well as implement more complex actions and views.
If you are new to Laravel and want to improve this demo application to make it fully functional, a good experiment is to update the todo items migration and Eloquent model to include a foreign key to the user who owns that item. Then, update the show action accordingly to filter only items for that logged in user.
Quick Links:
Feel free to leave a comment if you have questions, I am still figuring these things out but I hope to write more about Laravel and Jetstream ;)
Original Link: https://dev.to/erikaheidi/creating-a-multi-user-to-do-application-with-laravel-jetstream-2p1k
Dev To
More About this Source Visit Dev To