
An Interest In:
Web News this Week
- April 2, 2024
- April 1, 2024
- March 31, 2024
- March 30, 2024
- March 29, 2024
- March 28, 2024
- March 27, 2024
Some of Our Sources
- TutsPlus - Code
- The Logo Smith
- Vandelay Design
- Fuel Your Creativity
- Web Designer Depot
- FanExtra - PSD
- My Ink Blog
- Specky Boy
- Dev To
- The Verge
Help Webnuz
Referal links:
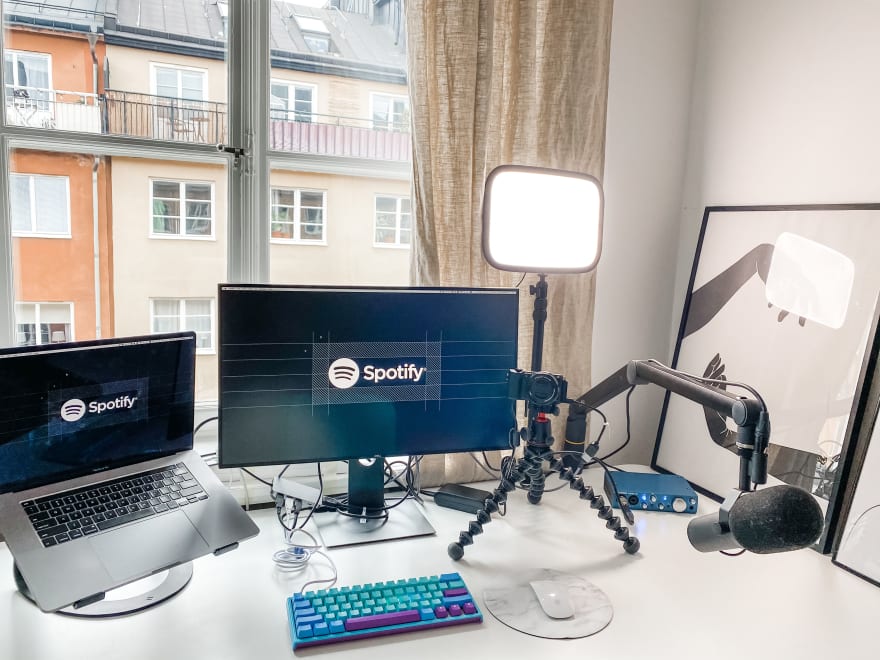
Lights, Camera, Action! My Tech Setup For Recording Courses && Podcasts
Earlier this week I posted a couple of tweets regarding my new camera and lighting setup! Many people were interested in what technologies I use to record online courses and podcasts so Im here today to share all of the details!
 Guess who got a new camera and is super excited about her recording setup
Would y'all be interested in my setup guide? (i.e. mic, mic arm, audio box, camera, tripod, camlink, lights, etc.?)11:32 AM - 01 Oct 2020
15
1671


 I listened to all of your feedback on my earlier tweet and decided to get some new decor for the background of my videos!
LMK if you like it!08:07 AM - 02 Oct 2020

As a quick note, I am NOT a tech equipment expert. In fact I was advised to buy this specific equipment by trained professionals who have created online content for years.
I also want to explicitly note that this equipment is EXPENSIVE. I understand that many of you are not able to afford most of this equipment and for that I apologize. Where possible I will recommend more affordable equipment but the reality of it is that if you want the best quality content you have to spend some money.
Some of this equipment was provided by work, but the camera, lights, adapters, tripod, camlink, and keyboard I purchased myself. It was painful for me to spend the money but I keep reminding myself that this is a business expense and it will pay off in the long-run.
Also remember that this is my setup and yours could look completely different! I havent tried a ton of equipment variants so I am a bit biased in my reviews. I advise you to do your own homework and research the best solutions that fit your budget. You dont have to purchase all of the equipment at once; you can accumulate it over time!
Please dont judge me for the cat hair and fingerprints on my equipment. I aint got time to clean that shit everyday. With that, lets jump right in!

Keyboard
Okay Ill admit, I have a keyboard problem. Ive tried a bunch of different keyboards in all different price ranges and every time I see a fun new keyboard I have an overwhelming desire to purchase it.
I recently backed the Keychron K3 Ultra Slim Compact Wireless Mechanical Keyboard and am very much looking forward to receiving that in the mail someday.

The keyboard Ive been using for a long time is the Mini Ducky Frozen Llama keyboard.
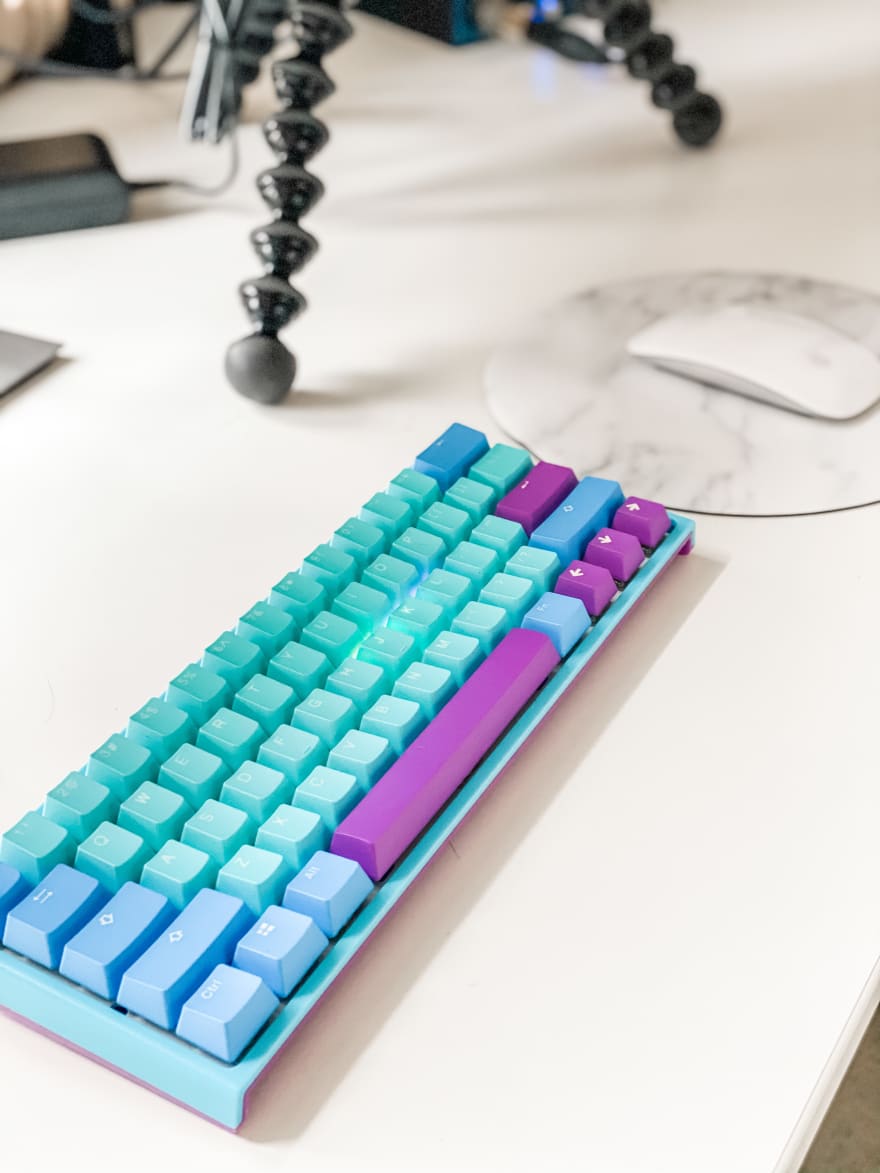
This keyboard uses the Cherry MX mechanical switches, which means its not as deafeningly loud as other mechanical keyboard switches (so your coworkers wont hate you as much).
While I love this mechanical keyboard and find it both aesthetically pleasing and easy to type on, I have some issues with it.
First, this is a Windows OS layout and while many of the keys map to Mac OS, I still find it a bit hard to use as the command and option keys are swapped from the Mac layout.
Youll also notice that I dont have an up-arrow key. This is because the Frozen Llama keyboard is a 60% layout, meaning it doesnt have all the keys.
When I received the keyboard it didnt have any arrow keys, but I re-mapped the keyboard and replaced the keycaps on the right-hand side to use the shift key as the up arrow. This poses issues when I try to use the right-side shift key and instead get an up-arrow.
This keyboard isnt wireless which means it adds to the spaghetti nightmare of cables on my desk. Not a huge fan, but not a dealbreaker.
Lastly there is no back tick (`) / tilde (~) key which makes coding a freaking nightmare. There are keys on the Ducky keyboard which map to these characters but in all honesty I have no idea what they are and end up using my Mac keyboard when I need to insert those characters.
I paid about $99 for this keyboard off of mechanicalkeyboards.com and it took a few weeks to arrive. I probably wouldnt re-purchase this. While its great its a bit impractical and Id opt for something with a wider layout.
Laptop Stand
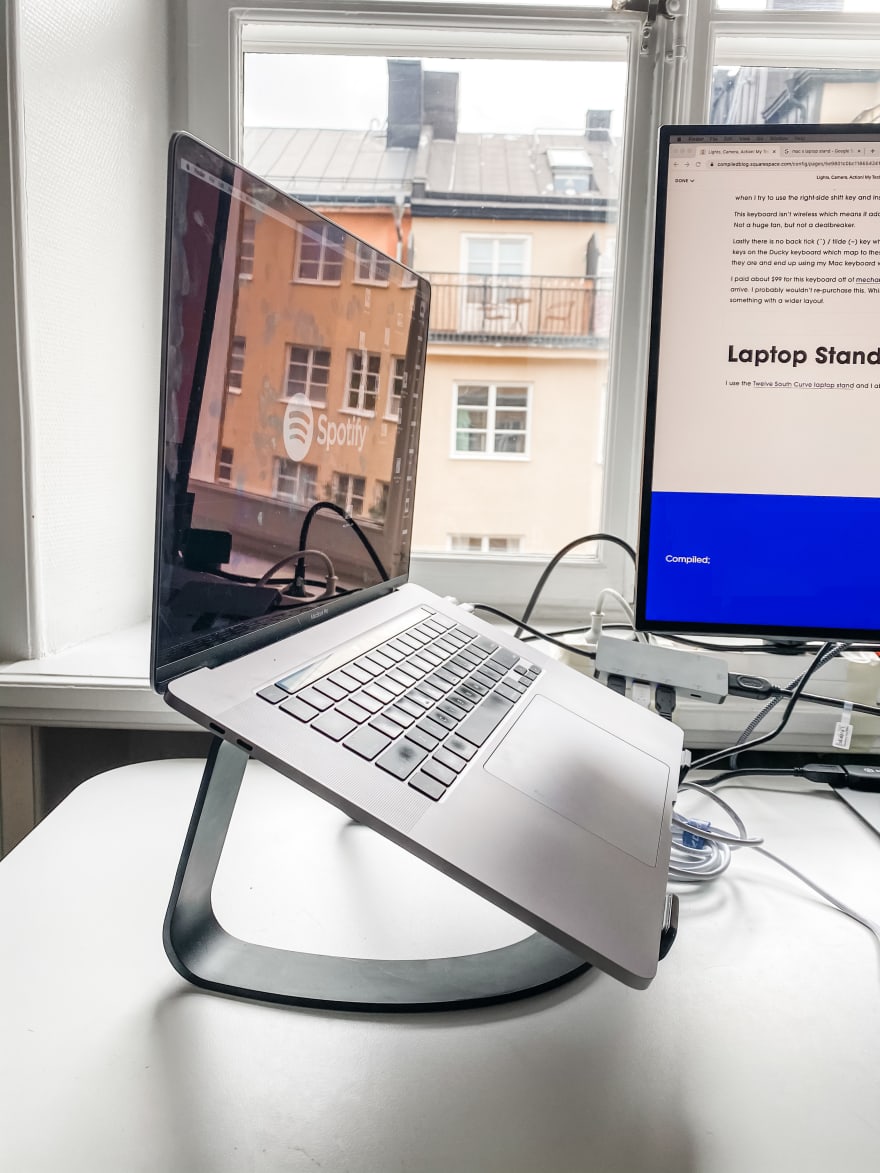
I use the Twelve South Curve laptop stand and I absolutely love it. I received this stand through work but it retails for about $50 give or take. I would 110% recommend this stand and purchase it for myself if something bad happened to it (but lets hope it doesnt).
Mac Adapter

If you have a MacBook then you understand the f*cking struggle of not having enough holes to plug your shit into (sorry for the profanity, I feel very strongly about this). And when youre expanding your tech equipment youre gonna have a lot of shit to plug in.
Ive used this Mac adapter for years and really love it. I dont know the exact brand but I did buy it off of Amazon. Heres a comparable model that runs about $24.99.
If youre going to be using a 4k monitor, be sure to have a 4k HDMI port (the one I linked above does). For all of the equipment I use, I need three USB ports and a 4K HDMI port but if you have a wireless keyboard you wont need the third USB port (so the link above should work, and no its not an affiliate link although maybe it should be).
Monitor

I use the Dell Ultrasharp 27 monitor. Ill just come out and say it: this shit is expensive retailing at over $400. I absolutely love this monitor but if it wasnt provided through work I wouldnt have purchased it (I am cheap ironically). The thought of spending more than $200 on a monitor seems absurd to me but then again I do appreciate the high-quality so really what do I know.
But to be fair it does move up and down, tilt forwards and backwards, rotate for landscape or portrait mode. Its wide AF so you can troll Twitter while on a Zoom call without anyone knowing youre not paying attention. And its a matte display so you wont see all the nasty fingerprints left when eating Doritos while coding.
Ill also admit that I know nothing about computer monitors, but the kind people of Twitter do know something about monitors so feel free to check out this thread on the best monitors for your workspace.
Microphone
When I began podcasting I started with the Shure SM58 LC microphone (I think). This microphone was provided through a podcast I frequent, JSParty and I used this with a pop filter (a noise protection filter for microphones that eliminate popping sounds). for quite a while. The quality was really good so Id recommend this mic to someone starting out in the podcast industry. It retails for about $99 and youll need a mic stand to hold it up (unless you want to pretend youre at a karaoke bar).
Youll also need an adapter for this microphone (its not a USB) and an audio box (which well discover in a subsequent section of this blog post). The adapter is an XLR male to XLR female and retails for about $8. All I could find is the German website so I apologize but you can likely find the same product in the U.S. if thats where youre shopping from.

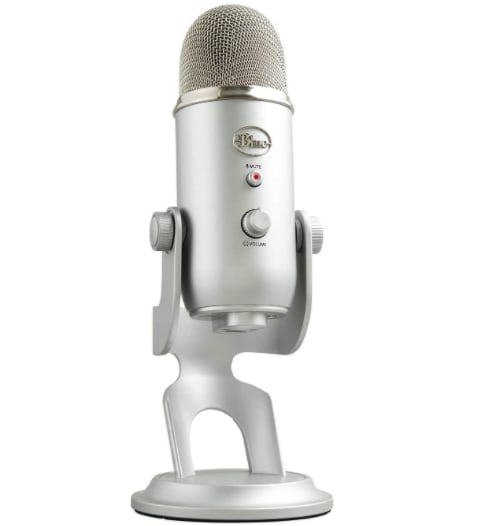
Next I migrated over to the Blue Yeti USB microphone which retails for about $115. This mic is great for anyone looking to create online content or sound way cooler than their coworkers on meetings. Its also free standing which is nice and allows you to plug your headphones directly into the microphone to hear yourself.
Now, if youre looking for the ultimate podcaster/content creator/influencer setup, I got you covered. Enter the Shure SM7B microphone. This is the ultimate badass podcaster microphone.

This microphone doesnt mess around, its super legitimate and as far as I know one of the best microphones on the market. It does cost about $400 but the quality is unparalleled. I recommend using the round pop filter the microphone comes with as Ive been told its the most effective and I blindly listen to other peoples advice without fact checking.
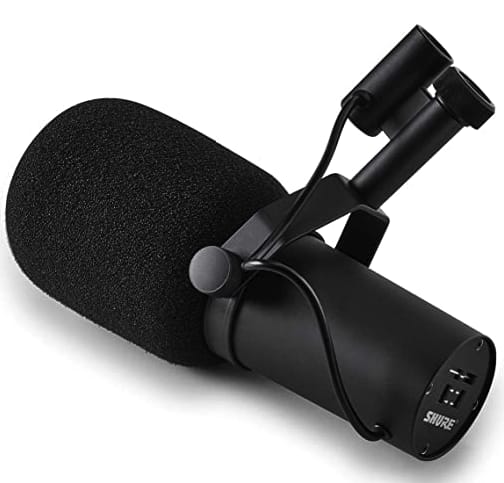
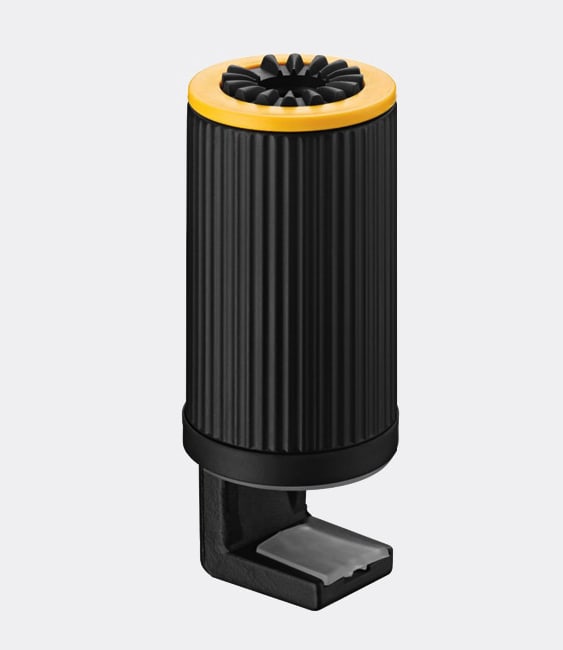
Similarly to the first Shure microphone, youll need a male-to-female adapter as well as an in-line microphone preamplifier. I use the TritonAudio FetHead Germanium which is also expensive at a retail price of 929 SEK (Swedish kronor) or about $104.

Again you will need an AudioBox (which Ill cover in the next section) and a microphone arm (which Ill also cover) so in total this microphone setup retails for about $520 depending upon where you purchase each product. Id recommend using a legitimate audio equipment website versus Amazon not only to support more local businesses but to ensure the quality of your products.
Audio Box
If youre going to use a microphone that requires an adapter (like the two Shure microphones mentioned above), youll need to buy an audio box. I use the PreSonus AudioBox iTwo.
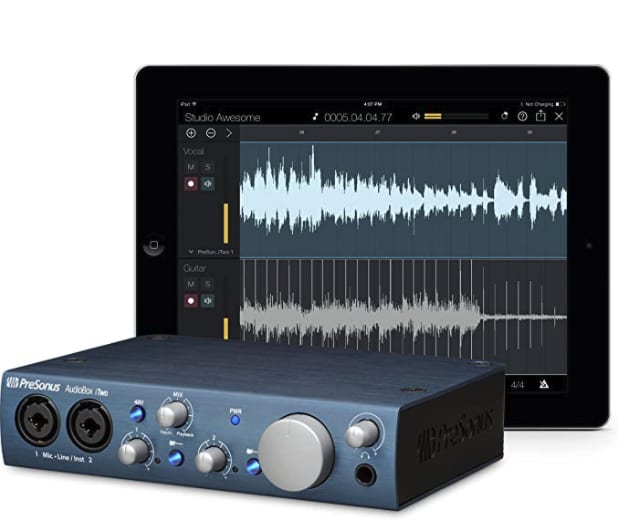
This audio box allows for two device hookups (i.e. two microphones) and retails for about $150. If you dont need two inputs you can opt for a one-input audio box like the Scarlet Solo which retails for about $100.
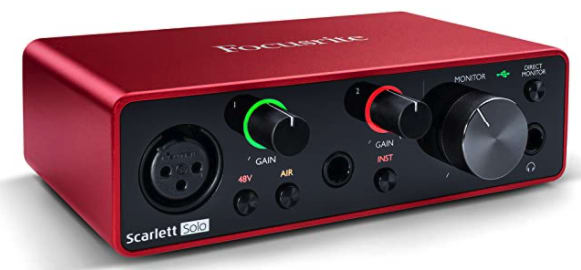
I havent used this audio box but I was sent it by LinkedIn Learning to record a course so Im sure their audio engineers have vetted the plethora of audio boxes available on the market. Im also pretty sure Ali and Kelly use the Scarlet Solo to record our Ladybug Podcast episode.
Remember youll need a preamp to connect your microphone adapter to your audio box (Ive listed mine above). Then you can connect your audio box to your computer via USB port. Here is what my setup looks like. (microphone => mic adapter => preamp => audio box => USB into computer).

When using an audio box youll want to learn about mic gain and how to set up your audio box. Heres a video that explains the whole process. Admittedly I have no idea how to use my audio box; I generally plug it in and hope it works so I should probably watch the video I just recommended lol.
Microphone Arm
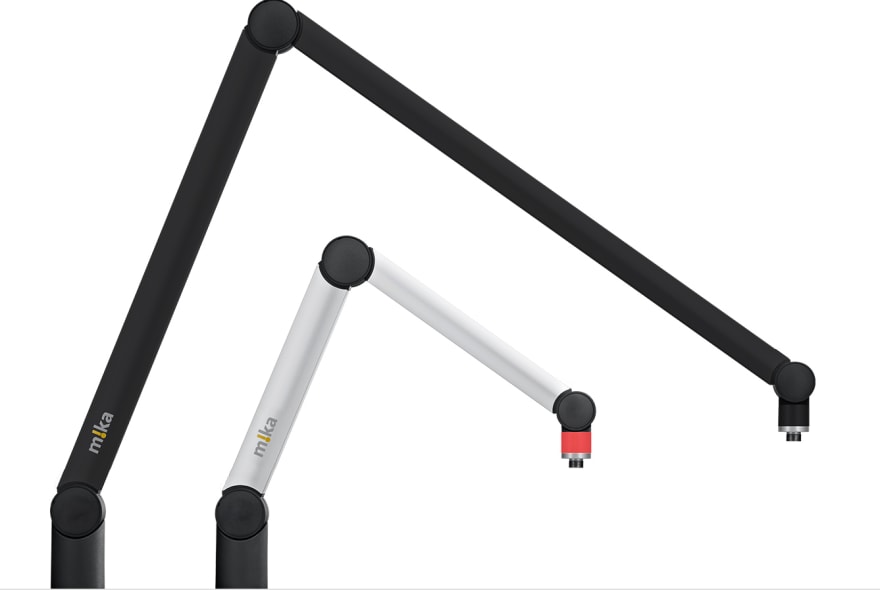
To hold up my Shure SM7B microphone I use the MIKA YellowTec mic arm. This mic arm is extremely expensive at about $400 depending upon where you purchase it. It comes preloaded with a mic adapter although if you move your mic arm in a specific way, the wires inside can snap and youre screwed. I did this. Dont be like me. Treat it gently.
Youll also need to buy a mic arm clamp. I use the YellowTec MIKA YT3210 Table Clamp which costs about $50. Its one of the best clamps Ive ever used and is easily adjusted. Your mic arm just sits inside of it!
Here is my desk with the mic arm, clamp, microphone, and adapter all hooked up! Please disregard the cat hair


Lighting
I dont understand much about lighting but I did purchase a light for my setup (as recommended). I havent used it yet because its still light out in Sweden but come the Swedish winter it will become my best friend!

I use the Elgato Key Light LED Panel With 2800 Lumens. Again, this shit is expensive, but it seems to be the best on the market. It retails for about $199 per light and since Im cheap I only bought one but I might invest in a second come winter-time. It comes with the desk clamp and is extremely easy to assemble!
Camera
Okay now on to the equipment everyone wants to know about: the camera. I bought the Sony a5100 for about $500 (yeah, it freaking hurt). I didnt purchase any additional lenses.

To be honest, I have no idea how to use this camera. I dont know what the specs mean or how to adjust aperture or whatever else anyone whos decently versed in cameras talks about. I just plugged it in and went on my merry way. Again, I was advised to purchase this. So far so good but yeah not cheap. Although, there are more expensive cameras out there so yeah I have no idea what Im talking about.
I also purchased the Joby JB01507 GorillaPod tripod for about $50. Its honestly super cool but its a table-top / I can cling to things tripod, not a standing tripod, so there are limitations.

Along with the camera I purchased some accessories. The first is an adapter. This functions as a battery and allows you to keep your camera charging while using it. I use the Sony AC Adapter. I want to say it was around $100 and if you plan to use your camera as your web meeting camera, I highly encourage you to purchase it.

I bought a remote control for camera recording. I havent used it yet but it will definitely come in handy when recording online courses. I bought the Sony Cybershot remote control. This cost about $70 and sadly I cant tell you my opinion as I havent used it.

Lastly I purchased the Elgato CamLink 4k. This allows me to use my camera as a web camera in meetings. It costs about $150 (so not cheap) but the quality is unparalleled.

Lastly I bought a micro-HDMI cable to connect my camera to the CamLink and a USB card (obviously). Both of these things can be purchased for relatively cheap at most home/electronics stores. My setup is: camera => mini HDMI cable => USB cable => CamLink => Mac adapter.

And thats my entire setup! I spent way too long on this blog post so I hope its useful for you! I know this is all completely overwhelming and very expensive but if youre looking to create a business out of digital content creation, unfortunately at some point youll need to spend a decent amount of money to achieve the quality youre looking for.
If you have any questions, feel free to leave a comment but I probably wont know the answers to most of them lol.
Have a lovely day!
Original Link: https://dev.to/emmabostian/lights-camera-action-my-tech-setup-for-recording-courses-podcasts-2p6j
Dev To
More About this Source Visit Dev To